Bintec-elmeg DECT80 Operating instructions
- Category
- Telephones
- Type
- Operating instructions
This manual is also suitable for

Operating Instructions
funkwerk DECT80
English

© 2007 Funkwerk Enterprise Communications GmbH - All rights reserved.
Reprinting of this document, even excerpts, is permitted only with the express consent of the publish-
er and with precise source information, regardless of the media used (mechanical or electronic).
Function descriptions included in this documentation which refer to software products of other manu-
facturers are based on the software used and valid at the date the documentation was prepared or
published. The product and company names used in this documentation may be protected by trade-
marks.

Safety notes .....................................................................................................................................5
Starting the telephone.....................................................................................................................7
Unpacking and placing the telephone ...............................................................................................7
Connecting the phone........................................................................................................................9
Functions with elmeg/funkwerk PABX systems...............................................................................10
Starting up the handset ...................................................................................................................12
Display indicators, keys, icons.........................................................................................................15
The Main Menu................................................................................................................................19
Switching the handset on/off ...........................................................................................................20
Switching KeyGuard on/off..............................................................................................................20
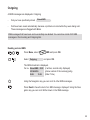
Paging: Search for a “misplaced” handset ......................................................................................21
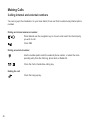
Making Calls...................................................................................................................................22
Calling internal and external numbers.............................................................................................22
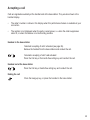
Accepting a call................................................................................................................................23
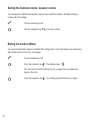
Setting the handset volume / speaker volume ................................................................................24
Muting the handset (Mute)...............................................................................................................24
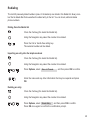
Redialing..........................................................................................................................................25
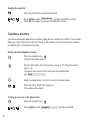
Telephone directory.........................................................................................................................26
The VIP Memory..............................................................................................................................29
“Info“ menu....................................................................................................................................30
General............................................................................................................................................30
Caller List.........................................................................................................................................31
SMS-Service (text messages) ........................................................................................................33
SMS alarm.......................................................................................................................................37
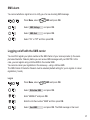
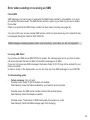
Logging on/off with the SMS center ................................................................................................37
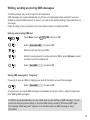
Writing, sending an storing SMS-messages....................................................................................39
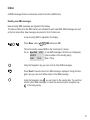
Inbox................................................................................................................................................41
Outgoing ..........................................................................................................................................43
Error when sending or receiving an SMS........................................................................................45
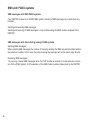
SMS with PABX-systems.................................................................................................................46
1
Table of contents

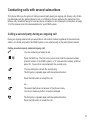
Conducting calls with several subscribers.................................................................................47
Calling a second party during an ongoing call ................................................................................47
Forwarding an external call to an internal party ..............................................................................49
Conducting two calls at once while switching between the calls (broker's call)..............................50
Talking with two parties simultaneously (three-party conference call)............................................51
Safety..............................................................................................................................................52
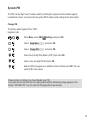
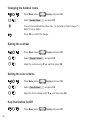
System-PIN .....................................................................................................................................53
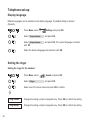
Telephone set-up...........................................................................................................................54
Display language ............................................................................................................................54
Setting the ringer .............................................................................................................................54
Saving emergency numbers............................................................................................................55
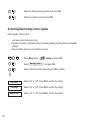
Activating/Deactivating notice signals..............................................................................................56
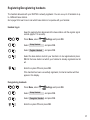
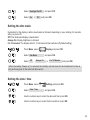
Registering/Deregistering handsets.................................................................................................57
Direct call ........................................................................................................................................58
Selecting a base station ..................................................................................................................59
Auto-answer.....................................................................................................................................59
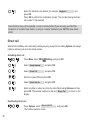
Setting the dialing method ..............................................................................................................60
Setting the flash interval ..................................................................................................................60
Enter exchange code.......................................................................................................................61
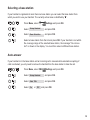
Setting the wallpaper.......................................................................................................................61
Setting the contrast .........................................................................................................................62
Setting the color scheme.................................................................................................................62
Key illumination On/Off....................................................................................................................62
Setting the dim mode ......................................................................................................................63
Setting the date / time......................................................................................................................63
Restoring factory default settings ....................................................................................................64
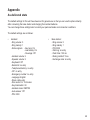
Appendix .......................................................................................................................................65
As-delivered state ...........................................................................................................................65
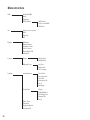
Menu structure.................................................................................................................................66
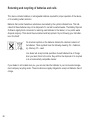
Notes regarding the use of batteries ..............................................................................................67
Returning and recycling of batteries and cells ..............................................................................68
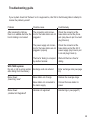
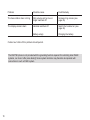
Troubleshooting guide .....................................................................................................................69
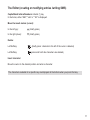
The Editor (creating or modifying entries /writing SMS)..................................................................71
2

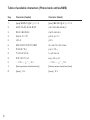
Table of available characters (Phone book entries/SMS)...............................................................72
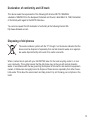
Declaration of conformity and CE mark...........................................................................................73
Disposing of old phones ..................................................................................................................73
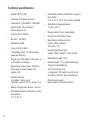
Technical specifications...................................................................................................................74
Index................................................................................................................................................75
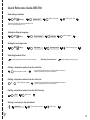
Quick Reference Guide DECT80 ....................................................................................................79
3

4

Safety notes
•Mind the storage and operation temperatures for the device listed in the technical specifica-
tions.
•Only connect the device when the permissible ambient operating temperature has been
reached.
•Please note that condensate may form on or in the device when it is transferred from a cold to
a warm location. Only remove the unit from the package when the permissible ambient operat-
ing temperature has been reached.
• You should not make calls or connect or disconnect any lines during thunderstorms.
• Only attach the connecting cords at the connections provided.
•Make sure phone cables are installed in a safe manner to prevent tripping.
• Avoid the following:
- Direct sunlight
- Heat sources (such as radiators)
- Nearby electronic devices (such as stereos, office equipment or microwave devices)
- Ingress of moisture or liquids
- Aggressive fluids or vapors
- Dusty environment
• Do not use the unit in excessively humid rooms or hazardous locations.
• Only open those sections of the device specified in the assembly / operating instructions.
•Do not touch plug connectors with pointed, metal, or moist objects.
• If you do not permanently mount the device or any accessories, be sure to place it/them on a
non-slip surface.
•When required, clean the unit with a slightly moistened cloth.
• Only use approved accessories.
• Only terminals with SELV and/or which comply with ETS 300047 may be connected to the
unit. This regulation is fulfilled when approved terminal devices are used as intended.
5

• Mains connection (230VAC)
- Ensure that the installation for electrical connection (grounding outlet) for the PABX system
(and any for additional devices where required) is installed installed by a qualified electrician
to prevent any risks of personal or material injury/damage!
- Connect any operational grounding provided for your device before connecting the device to
the mains power supply.
•Plug-in power supply
- Use only approved power plug-in units.
- Do not use power plug-in units with visible defects or damage (fissures, cracks, etc. )
•Working on an opened device (e.g. patch panel)
- Unplug the connector before removing the cover and working on the cable terminal bay.
Replace the cover before reconnecting the mains connector.
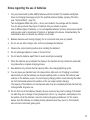
• Battery-operated devices
- Use only approved battery packs.
- Use the battery pack only as intended. Never use a damaged or exhausted battery pack.
- Do not let the charging and battery contacts come into contact with any conductive objects,
such as keys, paper clips, rings or bracelets.
- Dispose of the exhausted battery pack according to local rules and regulations. Recycle! Do
not expose battery cells to open fire.
• Radio equipment (such as DECT, Bluetooth)
- It is possible in some cases that medical devices are affected by powered-up radio devices.
Please comply with local rules and regulations concerning DECT devices.
- Do not operate radio devices in vehicles or hazardous locations.
6

7
Starting the telephone
Unpacking and placing the telephone
Unpacking
Included in package:
• Handset
• Base station
• Plug-in power pack, model SNG 11 ea
• Two phone connecting cords
- Western - Western / TAE - Western (EU-version)
- Western - Western / BT - Western (UK-version)
• Two batteries
• Belt clip
• Operating instructions
Installation location
We recommend installing the base station at a central location near the center of your radius of activi-
ties to achieve the best possible coverage range. Do not install the unit in nooks, small areas or
behind steel doors.
The maximum coverage range between the base station and the handset is around 300 meters. This
range may be less, depending on the surrounding conditions,, i.e. the room and building conditions.
Usually, coverage is less in buildings than in open spaces. Depending on the surroundings in build-
ings, and because of the frequency ranges used for digital transmission, dead spots may occur, even
when you are still within the specified coverage range for your phone. This may degrade the trans-
mission quality by the occurrence of multiple, brief gaps in transmission. You can restore your normal
transmission quality by just moving a bit until you are out of the dead spot. If you go outside your
range, the connection is terminated if you do not return within the coverage area within 10 seconds.
To prevent any radio interference with other electronic devices, we recommend installing the base
station at the greatest possible distance (min. 1 meter) from the handset and other devices.

8
Users with hearing aids should note that when using the handset radio signals may interfere with
the hearing aid and, if strong enough , may cause an unpleasant humming sound.
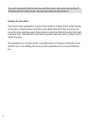
Installing the base station
Your phone has been produced for use under normal conditions. A myriad of paint, varnish and plas-
tics are used on modern furniture and all them require different products for their care. We can not
rule out that some substances used in these products may attack and deform the plastic bottom pads
of the base station. Pads deformed in this manner may leave unattractive marks or scratches on the
surface of furniture.
The manufacturer can, for logical reasons, not be held liable for such damage. We therefore recom-
mend that you use non-skidding pads under your phone, especially with new or re-varnished furni-
ture.

9
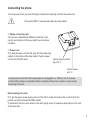
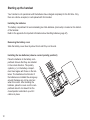
Connecting the phone
To start up your phone you must first plug in the phone connecting cord and the power cord.
Only use the SNG 11 ea power pack with your base station!
➀ Phone connecting cord
Your phone is delivered with different connecting cords.
Use the connecting cord that you need for your particular
conditions.
➁ Power cord
First, plug the power cord into the jack with the power plug
symbol on the bottom of the base station. Plug the power
unit into the 230VAC outlet.
Your phone will not function if the power pack is not plugged in, or if there is a loss of power.
Let the battery charge up completely before connecting to the phone network to ensure proper
functioning of the unit.
Disconnecting the cords
First, pull the plug-in power supply unit out of the 230 V socket and remove the connector from the
jack for your phone connection/PABX system.
To disconnect the cord, press down on the catch (using a pen, for example) while pulling on the cord
at the same time.
a
Jack for power
cord ➁
Jack for phone connect-
ing cord ➀

10
Functions with elmeg/funkwerk PABX systems
Note the following when connecting your DECT80 to an elmeg/funkwerk PABX system:
• Check whether “Automatic access to exchange line" or “Manual access to exchange line” is pro-
grammed in the PABX system. Depending on this setting, you will hear either the internal or exter-
nal dial tone when you press the Call key on the handset.
Also follow the instructions given in the operating instructions for your PABX system for “Automatic
access to exchange line”.
• The default setting for the flash time of the DECT80 is 100 ms. You can change the flash duration
under “Setting the flash time”, see page 60.
Instructions for operation with “Automatic access to exchange line”
•If you hear the external dial tone, you must press the asterisk (*) key to make internal calls (party
being called is connected to the same PABX system).
• Remember to take this into account when storing internal phone numbers in the phone book and
for other similar functions.
Instructions for operation without “Automatic access to exchange line”
• If you hear the internal dial tone you must first dial “0” to access an external line. You will hear the
external dial tone.
• When you save phone numbers in the phone book, and for other similar functions, you must also
save this “0” (exchange code) with the number.
• Note that to use the performance feature “SMS”, the “SMS Center” must also be saved with a “0”
(exchange code), see page 36.
• You must activate the setting “Transmit exchange code” in the configuration program for the
“PABX system” for the internal subscriber line connected with the DECT80 to enable the phone
numbers to be stored properly in the “Caller list”.

SMS with PABX-systems
Your DECT80 is connected to a PABX system. Sending of SMS messages is possible from any
handset.
Sending and receiving SMS-messages
Sending and receiving of SMS messages is only possible using the MSN number assigned to the
DECT80!
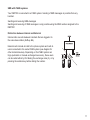
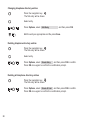
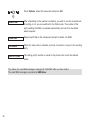
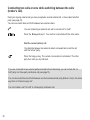
Distinction between Internal and External
Internal calls are calls between handsets that are logged in to
the same base station (Softkey Int).
External calls include all calls to the phone system and calls to
users connected to the same PABX system (see diagram for
other terminal devices). Depending on the PABX system set-
tings (automatic or manual exchange line access), these users
can be called either by first dialing the exchange code (0), or by
pressing the asterisk key before dialing the number.
11

12
Starting up the handset
Your handset is not operational until the batteries have charged completely for the first time. Only
then can calls be accepted, or calls placed with this handset.
Installing the batteries
The battery compartment for accommodating two AAA batteries (microcells) is located on the bottom
of the handset.
Refer to the appendix for important information about handling batteries (page 67).
Removing the battery cover
Slide the battery cover down by about 5 mm and lift up on the end.
Installing the two batteries (observe correct polarity position!)
Place the batteries in the battery com-
partment. Ensure that they are installed
in the correct direction. The polarity
symbols (+/-) in the battery compart-
ment must agree with those on the bat-
teries. The handset will not function if
the batteries are installed the wrong way
around. Damage can not be ruled out
when this occurs. After installing the
batteries, place the cover over the com-
partment about 5 mm down from the
closed position and slide it up until it
catches in place.

13
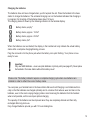
Charging the batteries
The batteries have not been charged when you first unpack the unit. Place the handset in the base
station to charge the batteries. The animated charging icon on the handset indicates that charging is
in progress. Full charging of the batteries takes about 14 hours.
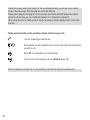
The charging status is shown by the following indicators in the handset display:
Battery status „empty"
Battery status „approx. 1/3 full"
Battery status „approx. 2/3 full"
Battery status „full".
When the batteries are re-installed, the display in the handset will only indicate the actual battery
status after a complete charging/draining process.
Plug the connector into the phone jack when the battery icon quits flashing. Your phone is now
ready for use.
Important
Only use NiMH batteries – never use plain batteries or primary cells (see page 67). Never place
the handset in the base station without the battery cover!
Please note: The battery indicator requires a complete charging cycle when new batteries are
installed in order to reflect the correct battery status.
You can place your handset back in the base station after each call.Charging is controlled electroni-
cally so that the batteries are charged optimally and in a manner that reduces wear and tear on the
batteries, even in the most varying charging states. Avoid removing the batteries from the handset
when at all possible, as this can impair optimal charging.
The capacity of the batteries can be improved when they are completely drained and then fully
recharged after long-term use.
Fully charged batteries provide you with 10 hours talking time.
!

14
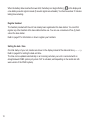
When the battery status reaches the lower limit, the battery icon begins flashing ( ) in the display and
a low battery acoustic signal is issued (if acoustic signals are activated). You then have about 10 minutes
talking time remaining.
Register handset
The handset provided with the unit has already been registered at the base station. You must first
register any other handset at the base station before use. You can use a maximum of five (5) hand-
sets at the base station.
Refer to page 57 for information on how to register your handsets.
Setting the date / time
On initial startup of your unit, dashes are shown in the display instead of the date and time (--.-- --:--).
Refer to page 63 for setting the date and time.
The time can be updated automatically on an incoming call when your unit is connected with an
elmeg/funkwerk PABX system (only when CLIP is activated, and depending on the model and soft-
ware version of the PABX system).

15
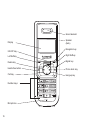
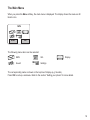
Display indicators, keys, icons
Display indicators
The display provides you with information about the current status of your phone and prompts you
through the use of your unit.
Significance of display icons:
This icon lights up permanently when there is a connection with the base station.
A flashing icon indicates that the handset is at the limit of the range for the select-
ed base station.
You have pressed the Call button.
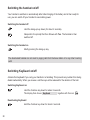
Listening/Hands-free calling activated.
Indicates a new, incoming SMS (text message).
Indicates new entries in the calls log.
You have activated the KeyGuard.
You have deactivated the ringer. (see also page 54).
You have “muted” your handset; the microphone is off.
Shows the battery status. Three bars indicate a full or nearly full battery; if only
one bar is displayed, or if the empty rectangle is flashing, you should place your
handset in the base station to charge it up.

16
Display
Info/VIP key
Left Softkey
Delete key
Hands-free button
Call key
Number keys
Microphone
Sound element
Speaker
(back)
Navigation key
Right Softkey
Signal key
Phone book key
Hang-up key

17
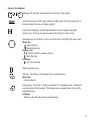
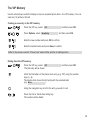
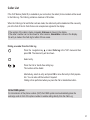
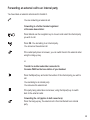
Keys on the Handset
Softkeys, left and right, whose functions are shown in the display.
Info: direct access to "Info" menu (Calls log, SMS, extra VIP phone book with 10
phone numbers that you can freely program.
Hands-free calling key, activates/deactivates the phone speaker (key lights
up/goes out). This key can also be used as the Call key to make a call.
Navigation key for scrolling in menus and lists and for controlling the input cursor.
When idle
- Open Calls log
- Open phone book
During a call
- Set the handset / speaker volume
- Mute the mike
In Menus
- Go back one level.
Signal key/Inquiry key
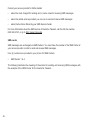
Call key. The same as “Lift handset” for a standard phone.
When idle
- Open Redial list.
Hang-up key. The same as “Hang up handset” for a standard phone. Holding this
key down turns off the handset. The handset can be switched back on by briefly
pressing this key.
In Menus
- Return to idle state (discontinue programming).

18
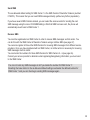
Number keys for manually entering phone numbers and names.
0 key: Holding this key creates a pause in dialing.
Rhombus key for entering the “Number” character. Holding this key when the
phone is idle activates/deactivates the key guard function.
Asterisk key for inputting the “Asterisk” symbol. Holding this key down when the
unit is idle switches the ringer on/off. You can switch between capital and small
letters and digits by briefly pressing this key when entering text (Editor).
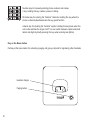
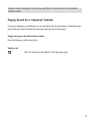
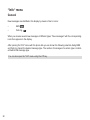
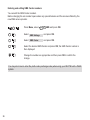
Key on the Base station
Call key at the base station for activating a paging call (group call) and for registering other handsets.
Handset charger
Paging button
Page is loading ...
Page is loading ...
Page is loading ...
Page is loading ...
Page is loading ...
Page is loading ...
Page is loading ...
Page is loading ...
Page is loading ...
Page is loading ...
Page is loading ...
Page is loading ...
Page is loading ...
Page is loading ...
Page is loading ...
Page is loading ...
Page is loading ...
Page is loading ...
Page is loading ...
Page is loading ...
Page is loading ...
Page is loading ...
Page is loading ...
Page is loading ...
Page is loading ...
Page is loading ...
Page is loading ...
Page is loading ...
Page is loading ...
Page is loading ...
Page is loading ...
Page is loading ...
Page is loading ...
Page is loading ...
Page is loading ...
Page is loading ...
Page is loading ...
Page is loading ...
Page is loading ...
Page is loading ...
Page is loading ...
Page is loading ...
Page is loading ...
Page is loading ...
Page is loading ...
Page is loading ...
Page is loading ...
Page is loading ...
Page is loading ...
Page is loading ...
Page is loading ...
Page is loading ...
Page is loading ...
Page is loading ...
Page is loading ...
Page is loading ...
Page is loading ...
Page is loading ...
Page is loading ...
Page is loading ...
Page is loading ...
Page is loading ...
Page is loading ...
Page is loading ...
-
 1
1
-
 2
2
-
 3
3
-
 4
4
-
 5
5
-
 6
6
-
 7
7
-
 8
8
-
 9
9
-
 10
10
-
 11
11
-
 12
12
-
 13
13
-
 14
14
-
 15
15
-
 16
16
-
 17
17
-
 18
18
-
 19
19
-
 20
20
-
 21
21
-
 22
22
-
 23
23
-
 24
24
-
 25
25
-
 26
26
-
 27
27
-
 28
28
-
 29
29
-
 30
30
-
 31
31
-
 32
32
-
 33
33
-
 34
34
-
 35
35
-
 36
36
-
 37
37
-
 38
38
-
 39
39
-
 40
40
-
 41
41
-
 42
42
-
 43
43
-
 44
44
-
 45
45
-
 46
46
-
 47
47
-
 48
48
-
 49
49
-
 50
50
-
 51
51
-
 52
52
-
 53
53
-
 54
54
-
 55
55
-
 56
56
-
 57
57
-
 58
58
-
 59
59
-
 60
60
-
 61
61
-
 62
62
-
 63
63
-
 64
64
-
 65
65
-
 66
66
-
 67
67
-
 68
68
-
 69
69
-
 70
70
-
 71
71
-
 72
72
-
 73
73
-
 74
74
-
 75
75
-
 76
76
-
 77
77
-
 78
78
-
 79
79
-
 80
80
-
 81
81
-
 82
82
-
 83
83
-
 84
84


Bintec-elmeg DECT80 Operating instructions
- Category
- Telephones
- Type
- Operating instructions
- This manual is also suitable for
Ask a question and I''ll find the answer in the document
Finding information in a document is now easier with AI
