BrightSign ClareVision Plus User manual
- Category
- Digital Video Recorders (DVR)
- Type
- User manual
This manual is also suitable for

ClareVision Plus
Network Video Recorder
User Guide
Last Modified: 03/22/18
DOC ID - 1431 • Rev 03

Copyright
© 22MAR18
Clare Controls, LLC. All rights reserved.
This document may not be copied in whole or in part or otherwise
reproduced without prior written consent from Clare Controls, LLC.,
except where specifically permitted under US and international
copyright law.
Trademarks and
patents
The ClareVision Plus Network Video Recorder User Manual name
and logo are trademarks of Clare Controls, LLC.
Other trade names used in this document may be trademarks or
registered trademarks of the manufacturers or vendors of the
respective products.
Manufacturer
Clare Controls, LLC.
7519 Pennsylvania Ave., Suite 104, Sarasota, FL 34243, USA
Contact information
Clare Controls, LLC.
7519 Pennsylvania Ave, Suite 104
Sarasota, FL 34243
Support: 941.404.1072
Fax: 941.870.9646
http://support.clarecontrols.com
www.clarecontrols.com


Network Video Recorder User Manual i
Content
Important information...vi
Limitation of liability...vi
Advisory messages...vi
Warranty information...vi
Introduction...1
Front panel...1
Rear panel...8
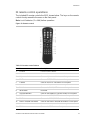
IR remote control operations...13
Troubleshooting the remote control...14
USB mouse operation...15
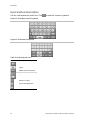
Input method description...16
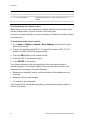
Getting Started...17
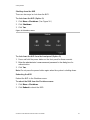
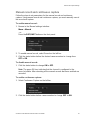
Starting up and shutting down the NVR...17
Shutting down the NVR...19
Rebooting the NVR...19
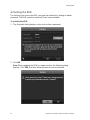
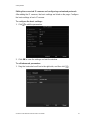
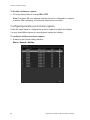
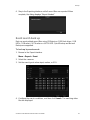
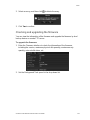
Activating the NVR...20
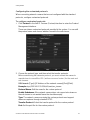
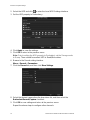
Using the wizard for basic configuration...21
Logging in and out...26
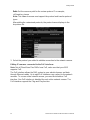
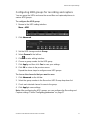
Adding and connecting the IP cameras...27
Activating the IP cameras...27
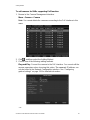
Adding the online IP cameras...28
Editing the connected IP cameras and configuring customized
protocols...31
Configuring the customized protocols...33
Editing IP cameras connected to the PoE interfaces...34
Live View...37
Live View icons...37
Operations in Live View mode...37
Front panel operation in Live View...38
Using the mouse in Live View...39
Using an auxiliary monitor...40
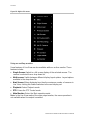
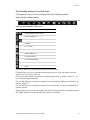
Quick Setting toolbar in Live View mode...41
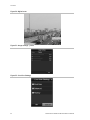
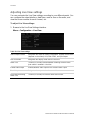
Adjusting Live View settings...44
Setting cameras order...45
Channel-zero encoding...45
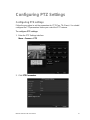
Configuring PTZ Settings...47
Configuring PTZ settings...47
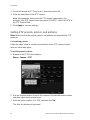
Setting PTZ presets, patrols, and patterns...48
Customizing presets...48

ii ClareVision Plus Network Video Recorder User Manual
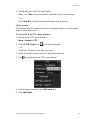
Calling presets...49
Customizing patrols...50
Calling patrols...51
Customizing patterns...52
Calling patterns...52
Customizing the linear scan limit...53
Calling linear scan...54
Customizing one-touch park...54
PTZ control panel...55
Configuring parameters...57
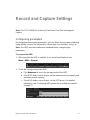
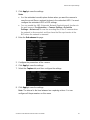
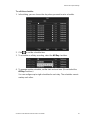
Configuring record/capture schedule...60
Configuring motion detection record and capture...63
Configuring alarm triggered record and capture...65
Manual record and continuous capture...67
Configuring holiday record and capture...68
Configuring redundant recording and capture...69
Configuring HDD groups for recording and capture...71
File protection...72
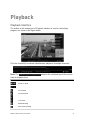
Playback interface...74
Play recorded files...75
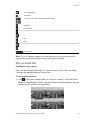
Playing back by channel...75
Playing back by event search...76
Playing back by tag...77
Playing back with Smart Playback...79
Playing back by system logs...81
Playing back external file...83
Playing back by sub-periods...83
Playing back pictures...84
Auxiliary functions of playback...85
Playing back frame by frame...85
Digital zoom...86
Managing files...86
Reverse playback of multi-channel...87
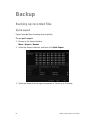
Backing up recorded files...89
Quick export...89
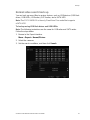
Normal video search back up...91
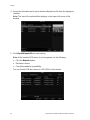
Event search back up...93
Video clip back up...94
Back up device management...95
Hot Spare device back up...95
Setting motion detection alarms...99
Setting sensor alarms...101
Detecting video loss alarm...104
Detecting video tampering alarm...105
Handling alarm exceptions...106
Setting alarm response actions...106

ClareVision Plus Network Video Recorder User Manual iii
Event hint display...106
Full screen monitoring...107
Audible warning...107
Notify surveillance center...108
Email linkage...108
Trigger alarm output...108
Triggering or clearing alarm output manually...109
Face recognition...110
Face detection...110
Vehicle detection...111
Line crossing detection...113
Intrusion detection...114
Region entrance detection...116
People gathering detection...117
Parking detection...117
Unattended Baggage detection...117
Object removal detection...117
Audio exception detection...118
Sudden scene change detection...119
Defocus detection...119
PIR alarm...119
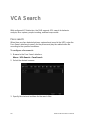
Face search...120
Behavior search...122
Plate search...123
People counting...124
Heat map...124
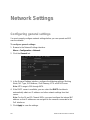
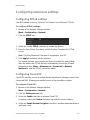
Configuring general settings...126
Configuring advanced settings...127
Configuring PPPoE settings...127
Configuring Cloud P2P...127
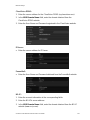
Configuring DDNS...128
ClareVision DDNS:...129
IPServer:...129
PeanutHull:...129
NO-IP:...129
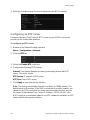
Configuring an NTP server...130
Configuring SNMP...131
Configuring the More Settings tab...131
Configuring a remote alarm host...131
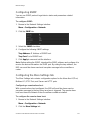
Configuring multicast...132
Configuring RTSP...132
Configuring server and HTTP ports...133
Configuring the HTTPS port...133
Configuring email...135
Configuring NAT...137
UPnP...137

iv ClareVision Plus Network Video Recorder User Manual
Manual mapping...139
Configuring high-speed downloads...140
Configuring Virtual Host...140
Checking network traffic...141
Configuring network detection...142
Exporting network packets...142
Checking the network status...143
Checking network statistics...144
RAID...145
Configuring array...145
Introduction...145
Enable RAID...146
One-touch configuration...147
Manually creating array...148
Rebuilding array...150
Automatically rebuilding the array...150
Manually rebuilding array...151
Deleting array...152
Checking and upgrading the firmware...153
Initializing HDDs...154
Managing Network HDD...155
Managing eSATA...157
Managing the HDD group...158
Setting HDD groups...158
Setting the HDD property...159
Configuring Quota mode...160
Configuring disk clone...161
Checking HDD status...163
HDD detection...164
Configuring HDD error alarms...165
Configuring OSD settings...166
Configuring privacy mask...167
Configuring video parameters...168
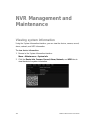
Viewing system information...169
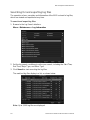
Searching for and exporting log files...170
Importing and exporting IP camera info...172
Importing and exporting configuration files...172
Upgrading the system...173
Restoring default settings...174
Understanding camera capacity in an NVR...175
Streaming video types...175
Adjusting settings...176
Configuring RS-232 serial ports...176
Configuring general settings...177

ClareVision Plus Network Video Recorder User Manual v
Configuring DST settings...178
Configuring more settings...179
Managing user accounts...180
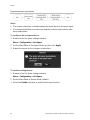
Adding a user...180
Deleting a user...183
Editing a user...184

vi ClareVision Plus Network Video Recorder User Manual
Important information
Limitation of liability
To the maximum extent permitted by applicable law, in no event will Clare
Controls, LLC. be liable for any lost profits or business opportunities, loss of use,
business interruption, loss of data, or any other indirect, special, incidental, or
consequential damages under any theory of liability, whether based in contract,
tort, negligence, product liability, or otherwise. Because some jurisdictions do not
allow the exclusion or limitation of liability for consequential or incidental
damages the preceding limitation may not apply to you. In any event the total
liability of Clare Controls, LLC. shall not exceed the purchase price of the
product. The foregoing limitation will apply to the maximum extent permitted by
applicable law, regardless of whether Clare Controls, LLC. has been advised of
the possibility of such damages and regardless of whether any remedy fails of its
essential purpose.
Installation in accordance with this manual, applicable codes, and the instructions
of the authority having jurisdiction is mandatory.
While every precaution has been taken during the preparation of this manual to
ensure the accuracy of its contents, Clare Controls, LLC. assumes no
responsibility for errors or omissions.
Advisory messages
Advisory messages alert you to conditions or practices that can cause unwanted
results. The advisory message used in this document is shown and described
below.
Note: Note messages advise you of the possible loss of time or effort. They
describe how to avoid the loss. Notes are also used to point out important
information that you should read.
Warranty information
Clare Controls offers a three (3) year limited warranty on original Clare Controls
components, from the date of shipment from Clare Controls. To view complete
limited warranty details, including limitations and exclusions,
www.clarecontrols.com/warranty.
Scan the code
to view product
warranty details.

ClareVision Plus Network Video Recorder User Manual vii


Network Video Recorder User Manual 1
Introduction
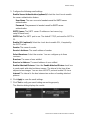
Front panel
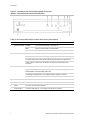
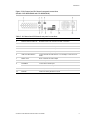
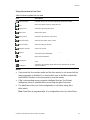
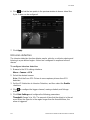
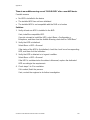
Figure 1: 64-Channel NVR front panel
(Model: CVP-64050-10)
Table 1: 64-Channel NVR control panel buttons
No.
Name
Description
1
Status Indicators
ALARM
Turns red when a sensor alarm is detected
READY
Blue when the device functions properly
STATUS
Turns blue when an IR remote controls the device
Turns red when controlled by a keyboard and purple when the IR
remote and keyboard are used at the same time
HDD
Blinks red when data is being read from or written to HDD
MODEM
Reserved for future use
TX/RX
Blinks blue when the network connection is functioning properly
GUARD
Guard indicator turns blue when the device is in armed status
The indicator turns off when the device is unarmed. Pressing and
holding the ESC button for more than three seconds in Live View
mode can change the arm/disarm status.
2
IR Receiver
Receiver for the IR remote
3
Front Panel Lock
Lock or unlock the panel with the key
4
DVD-R/W
Slot for DVD-R/W
5
Alphanumeric Buttons
Switch to the corresponding channel in Live view or PTZ Control
mode
Switch between different channels in Playback mode
The button is blue when the corresponding channel is recording;
red when the channel is in network transmission status; and pink
when the channel is recording and transmitting

Introduction
2 ClareVision Plus Network Video Recorder User Manual
6
USB Interfaces
Universal Serial Bus (USB) ports for additional devices such as
USB mouse and USB Hard Disk Drive (HDD)
7
Composite Keys
ESC
Return to the previous menu
Press for arming or disarming the device in Live View mode
REC/SHOT
Enter the Manual Record setting menu
In the PTZ control settings, press REC/SHOT and then press a
Numeric button to call a PTZ preset
Turn audio on and off in Playback mod
PLAY/AUTO
Use to enter Playback mode
Use to auto-scan in the PTZ Control menu
ZOOM Plus
Zoom in the PTZ camera in the PTZ Control setting
A/FOCUS
Plus
Adjust focus in the PTZ Control menu
Use to switch between input methods (upper and lowercase
alphabet, symbols and numeric input)
EDIT/IRIS
Plus
Edit text fields. When editing text fields, it functions as a
Backspace button
On check box fields, pressing the button will check the box
In PTZ Control mode, the button adjusts the iris of the camera
Use in Playback mode to generate video clips for backup
Enter or exit the folder of USB device and eSATA HDD
MAIN/SPOT/
ZOOM
Switch between main and spot output
Use in PTZ Control mode to zoom out of the image
F1/LIGHT
Select all items on the list when used in a list field.
In PTZ Control mode, it will turn on/off PTZ light (if applicable).
Use in Playback mode to switch between play and reverse play.
F2/AUX
Cycle through tab pages.
In synchronous playback mode, it is used to switch between
channels.
MENU/
WIPER
Press the button to return to the Main menu (after successful
login).
Press and hold the button for 5 seconds will turn off audible key
beep.
In PTZ Control mode, the MENU/WIPER button will start wiper (if
applicable).
In Playback mode, it is used to show/hide the control interface.
PREV/
FOCUS
Switch between single screen and multi-screen mode.
In PTZ Control mode, it is used to adjust the focus in conjunction
with the A/FOCUS Plus button.

Introduction
ClareVision Plus Network Video Recorder User Manual 3
PTZ/IRIS-
Enter the PTZ Control mode.
In the PTZ Control mode, it is used to adjust the iris of the PTZ
camera.
8
Control Buttons
DIRECTION
The DIRECTION buttons are used to navigate between different
fields and items in menus.
In the Playback mode, use the Up and Down button to speed up
and slow down recorded video. The Left and Right button select
the next and previous record files.
In Live View mode, use these buttons to cycle through channels.
In PTZ control mode, control the movement of the PTZ camera.
ENTER
The ENTER button is used to confirm selection in any of the menu
modes.
Use to check the check box fields.
In Playback mode, it is used to play or pause the video.
In single-frame Playback mode, pressing the button will advance
the video by a single frame.
In Auto-switch mode, use to stop /start auto switch.
9
JOG SHUTTLE controls
Move the active selection in a menu. It will move the selection up
and down.
In Live View mode, use to cycle through different channels.
In Live View mode, use to cycle through different channels.
In the Playback mode: For 64-Channel NVRs, the ring is used to
jump 30s forward/backward in video files.
In PTZ control mode, it controls the movement of the PTZ camera.
10
POWER ON/OFF
Power on/off switch

Introduction
4 ClareVision Plus Network Video Recorder User Manual
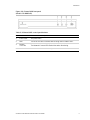
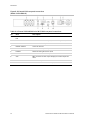
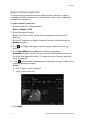
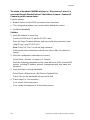
Figure 2: 16-Channel NVR and 32-Channel NVR front panel
(Models: CVP-M321650-08 and CVP-M161650-04)
Table 2: 16-Channel NVR and 32-Channel NVR control panel buttons
No.
Name
Description
1
Status Indicators
POWER
Turns green when NVR is powered up.
HDD
Blinks red when HDD is reading/writing.
Tr/Tx
Blinks green when network connection is functioning normally.
2
Enter
The enter button confirms meu selection in menu mode.
In playback mode, enter is used to play/pause the video.
In a single-frame play mode, pressing Enter plays the video by single frames.
In auto sequence vide mode, the buttons are used to pause/resume auto
sequence.
3
Direction
In menu mode, the direction buttons navigate between different fields and items.
In playback mode, the up/down buttons speed/slow the record playing. The
left/right buttons skip forward/backward 30s.
In the image setting interface, the up/down buttons adjust the level bar.
In live view mode, the buttons switch channels.
4
Back
Returns to the previous menu.
5
Power on/off
The power switch.
6
Menu
Accesses the main menu interface.
7
USB interface
Connects USB devices – for example, a USB mouse or writer. .

Introduction
ClareVision Plus Network Video Recorder User Manual 5
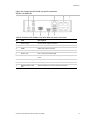
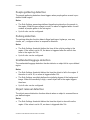
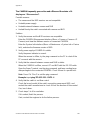
Figure 3: 8-Channel NVR front panel
(Model: CVP-B8860-02)
Table 3: 8-Channel NVR control panel buttons
No.
Name
Description
1
Power on/off
The power switch.
2
HDD
The HDD LED turns red when data is being read or written. HDD.
3
Network
connection
The Network Connect LED flashes blue when functioning.
4
USB interface
Connects USB devices – for example, a USB mouse or writer. .

Introduction
6 ClareVision Plus Network Video Recorder User Manual
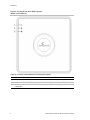
Figure 4: 4-Channel mini Wi-Fi NVR top panel
(Model: CVP-B4450-01)
Table 4: 4-Channel CVP-B4450-01 mini NVR panel buttons
No.
Name
Description
1
Power
The POWER LED turns red when NVR is powered up.
2
HDD
The HDD LED turns red when data is being read or written. HDD.
3
Network
Connection
The Network Connect LED flashes blue when functioning.

Introduction
ClareVision Plus Network Video Recorder User Manual 7
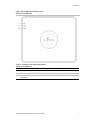
Figure 5: 8-Channel mini NVR top panel
(Model: CVP-B8850-02)
Table 5: 4-Channel mini NVR panel buttons
(Model: CVP-B4450-01)
No.
Name
Description
1
Power
The POWER LED turns red when NVR is powered up.
2
HDD
The HDD LED turns red when data is being read or written. HDD.
3
Network
Connection
The Network Connect LED flashes blue when functioning.

Introduction
8 ClareVision Plus Network Video Recorder User Manual
Rear panel
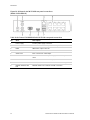
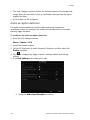
Figure 6: 64-Channel NVR rear panel
(Model: CVP-P64050-10)
Table 6: 64-Channel NVR rear panel connections
No.
Name
Description
1
LAN Interface
2 network interfaces.
2
LINE IN
RCA connector for the audio input.
3
AUDIO OUT
2 RCA connectors for audio output.
4
HDMI1/HDMI2
HDMI video output connector.
5
VGA1/VGA2
DB9 connector for VGA output. Display local video output
and menu.
6
USB interface
Connects USB devices – for example, a USB mouse or writer.
7
RS-232 interface
Connector for RS-232 devices.
8
eSATA (optional)
Connects external SATA HDD, CD/DVD-RM.
2 eSATA interfaces.
9
Controller Port
D Plus/D- pin connects to Ta, Tb pin of controller. For
cascading devices, the first NVR’s D Plus/D- pin connects
with the D Plus/D- pin of the next NVR.
ALARM IN
Connector for alarm input.
ALARM OUT
Connector for alarm output.
10
POWER
Switch for turning on/off the device.
11
AC 100 to 240 V
AC 100 to 240 V power supply.
12
GROUND
Ground (connect before starting the NVR).

Introduction
ClareVision Plus Network Video Recorder User Manual 9
Figure 7: 16-Channel and 32-Channel rear panel connections
(Models: CVP-M321650-08 and CVP-M161650-04)
Table 7: 16-Channel and 32 Channel rear panel connections
No.
Item
Description
1
Network interface with PoE
Network interface for cameras and PoE connection.
2
RS-232 interface
Connector for the RS-232 devices
3
AUDIO IN
RCA connector for audio input.
4
VGA
DB9 connector for VGA output.
5
AC 100 V to 240 V
AC 100 V to 240 V power input.
6
USB and LAN interface
Connects USB and LAN devices – for example, a USB mouse or
writer.
7
AUDIO OUT
RCA connector for audio output.
8
HDMI
HDMI output connector.
9
ALARM IN
Connector for alarm input
ALARM OUT
Connector for alarm output.
10
GROUND
Ground (must be connected when the NVR starts.)
11
POWER
Switch for turning the device on/off.
Page is loading ...
Page is loading ...
Page is loading ...
Page is loading ...
Page is loading ...
Page is loading ...
Page is loading ...
Page is loading ...
Page is loading ...
Page is loading ...
Page is loading ...
Page is loading ...
Page is loading ...
Page is loading ...
Page is loading ...
Page is loading ...
Page is loading ...
Page is loading ...
Page is loading ...
Page is loading ...
Page is loading ...
Page is loading ...
Page is loading ...
Page is loading ...
Page is loading ...
Page is loading ...
Page is loading ...
Page is loading ...
Page is loading ...
Page is loading ...
Page is loading ...
Page is loading ...
Page is loading ...
Page is loading ...
Page is loading ...
Page is loading ...
Page is loading ...
Page is loading ...
Page is loading ...
Page is loading ...
Page is loading ...
Page is loading ...
Page is loading ...
Page is loading ...
Page is loading ...
Page is loading ...
Page is loading ...
Page is loading ...
Page is loading ...
Page is loading ...
Page is loading ...
Page is loading ...
Page is loading ...
Page is loading ...
Page is loading ...
Page is loading ...
Page is loading ...
Page is loading ...
Page is loading ...
Page is loading ...
Page is loading ...
Page is loading ...
Page is loading ...
Page is loading ...
Page is loading ...
Page is loading ...
Page is loading ...
Page is loading ...
Page is loading ...
Page is loading ...
Page is loading ...
Page is loading ...
Page is loading ...
Page is loading ...
Page is loading ...
Page is loading ...
Page is loading ...
Page is loading ...
Page is loading ...
Page is loading ...
Page is loading ...
Page is loading ...
Page is loading ...
Page is loading ...
Page is loading ...
Page is loading ...
Page is loading ...
Page is loading ...
Page is loading ...
Page is loading ...
Page is loading ...
Page is loading ...
Page is loading ...
Page is loading ...
Page is loading ...
Page is loading ...
Page is loading ...
Page is loading ...
Page is loading ...
Page is loading ...
Page is loading ...
Page is loading ...
Page is loading ...
Page is loading ...
Page is loading ...
Page is loading ...
Page is loading ...
Page is loading ...
Page is loading ...
Page is loading ...
Page is loading ...
Page is loading ...
Page is loading ...
Page is loading ...
Page is loading ...
Page is loading ...
Page is loading ...
Page is loading ...
Page is loading ...
Page is loading ...
Page is loading ...
Page is loading ...
Page is loading ...
Page is loading ...
Page is loading ...
Page is loading ...
Page is loading ...
Page is loading ...
Page is loading ...
Page is loading ...
Page is loading ...
Page is loading ...
Page is loading ...
Page is loading ...
Page is loading ...
Page is loading ...
Page is loading ...
Page is loading ...
Page is loading ...
Page is loading ...
Page is loading ...
Page is loading ...
Page is loading ...
Page is loading ...
Page is loading ...
Page is loading ...
Page is loading ...
Page is loading ...
Page is loading ...
Page is loading ...
Page is loading ...
Page is loading ...
Page is loading ...
Page is loading ...
Page is loading ...
Page is loading ...
Page is loading ...
Page is loading ...
Page is loading ...
Page is loading ...
Page is loading ...
Page is loading ...
Page is loading ...
Page is loading ...
Page is loading ...
Page is loading ...
Page is loading ...
Page is loading ...
Page is loading ...
Page is loading ...
Page is loading ...
Page is loading ...
Page is loading ...
Page is loading ...
Page is loading ...
Page is loading ...
Page is loading ...
Page is loading ...
Page is loading ...
Page is loading ...
Page is loading ...
Page is loading ...
Page is loading ...
Page is loading ...
Page is loading ...
Page is loading ...
Page is loading ...
Page is loading ...
Page is loading ...
Page is loading ...
-
 1
1
-
 2
2
-
 3
3
-
 4
4
-
 5
5
-
 6
6
-
 7
7
-
 8
8
-
 9
9
-
 10
10
-
 11
11
-
 12
12
-
 13
13
-
 14
14
-
 15
15
-
 16
16
-
 17
17
-
 18
18
-
 19
19
-
 20
20
-
 21
21
-
 22
22
-
 23
23
-
 24
24
-
 25
25
-
 26
26
-
 27
27
-
 28
28
-
 29
29
-
 30
30
-
 31
31
-
 32
32
-
 33
33
-
 34
34
-
 35
35
-
 36
36
-
 37
37
-
 38
38
-
 39
39
-
 40
40
-
 41
41
-
 42
42
-
 43
43
-
 44
44
-
 45
45
-
 46
46
-
 47
47
-
 48
48
-
 49
49
-
 50
50
-
 51
51
-
 52
52
-
 53
53
-
 54
54
-
 55
55
-
 56
56
-
 57
57
-
 58
58
-
 59
59
-
 60
60
-
 61
61
-
 62
62
-
 63
63
-
 64
64
-
 65
65
-
 66
66
-
 67
67
-
 68
68
-
 69
69
-
 70
70
-
 71
71
-
 72
72
-
 73
73
-
 74
74
-
 75
75
-
 76
76
-
 77
77
-
 78
78
-
 79
79
-
 80
80
-
 81
81
-
 82
82
-
 83
83
-
 84
84
-
 85
85
-
 86
86
-
 87
87
-
 88
88
-
 89
89
-
 90
90
-
 91
91
-
 92
92
-
 93
93
-
 94
94
-
 95
95
-
 96
96
-
 97
97
-
 98
98
-
 99
99
-
 100
100
-
 101
101
-
 102
102
-
 103
103
-
 104
104
-
 105
105
-
 106
106
-
 107
107
-
 108
108
-
 109
109
-
 110
110
-
 111
111
-
 112
112
-
 113
113
-
 114
114
-
 115
115
-
 116
116
-
 117
117
-
 118
118
-
 119
119
-
 120
120
-
 121
121
-
 122
122
-
 123
123
-
 124
124
-
 125
125
-
 126
126
-
 127
127
-
 128
128
-
 129
129
-
 130
130
-
 131
131
-
 132
132
-
 133
133
-
 134
134
-
 135
135
-
 136
136
-
 137
137
-
 138
138
-
 139
139
-
 140
140
-
 141
141
-
 142
142
-
 143
143
-
 144
144
-
 145
145
-
 146
146
-
 147
147
-
 148
148
-
 149
149
-
 150
150
-
 151
151
-
 152
152
-
 153
153
-
 154
154
-
 155
155
-
 156
156
-
 157
157
-
 158
158
-
 159
159
-
 160
160
-
 161
161
-
 162
162
-
 163
163
-
 164
164
-
 165
165
-
 166
166
-
 167
167
-
 168
168
-
 169
169
-
 170
170
-
 171
171
-
 172
172
-
 173
173
-
 174
174
-
 175
175
-
 176
176
-
 177
177
-
 178
178
-
 179
179
-
 180
180
-
 181
181
-
 182
182
-
 183
183
-
 184
184
-
 185
185
-
 186
186
-
 187
187
-
 188
188
-
 189
189
-
 190
190
-
 191
191
-
 192
192
-
 193
193
-
 194
194
-
 195
195
-
 196
196
-
 197
197
-
 198
198
-
 199
199
-
 200
200
-
 201
201
-
 202
202
-
 203
203
-
 204
204
-
 205
205
-
 206
206
-
 207
207
-
 208
208
-
 209
209
-
 210
210


BrightSign ClareVision Plus User manual
- Category
- Digital Video Recorders (DVR)
- Type
- User manual
- This manual is also suitable for
Ask a question and I''ll find the answer in the document
Finding information in a document is now easier with AI
Related papers
-
clare CLR-VACC-WBKT1B Installation guide
-
clare CLR-CVP-B2B50-ODI Quick start guide
-
clare CLR-V200-4PNVR1 Quick start guide
-
clare CLR-V200-4B28W Installation guide
-
clare CLR-CVP-B2D50-ODIW User manual
-
-
clare CLR-V100-2T36B Installation guide
-
clare CLR-V200-4DVFW Installation guide
-
clare CLR-V200-4BVFB Installation guide
-
Other documents
-
Xvision X2RN User manual
-
 xmartO WP1324 User manual
-
ESP NVR User manual
-
Clare Controls 32-Channel NVR with PoE User manual
-
-
-
Clare Controls ClareVision CV-P64010 Installation guide
-
HKC Quantum70 User manual
-
-
