Hunter Fan 25178 Owner's manual

Type
Owner's manual
For Your Records and Warranty
Assistance
Model Name: _____________________
Catalog/Model No.: ________________
Serial No.: ________________________
Date Purchased: ___________________
Where Purchased: _________________
For reference also attach your receipt or a
copy of your receipt to the manual.
43113-01•05/04/12
TYPE E Models
2
Welcome
Table of Contents
1•GettingReady ...................................................4
2•InstallingtheCeilingPlate .......................... 5
3•AssemblingandHangingtheFan ..........6
4•WiringtheFan ..................................................7
5•InstallingtheCanopy ....................................8
6•AssemblingtheBlades .................................9
7•OptionalLightKit ........................................ 10
8•OperatingandCleaning
Your Ceiling Fan.............................................11
9•Troubleshooting ........................................... 12
© 2012 Hunter Fan Company
Hunter®FanCompany 43113-01•05/04/12
YournewHunter
®
ceiling fan is an addition to your home or office that
will provide comfort and performance for many years. is installation
and operation manual gives you complete instructions for installing
and operating your fan.
We are proud of our work. We appreciate the opportunity to supply
youwiththebestceilingfanavailableanywhereintheworld.
Beforeinstallingyourfan,foryourrecordsandwarrantyassistance,
recordinformationfromthecartonandHunternameplatelabel
(located on the top of the fan motor housing).
Cautions and Warnings
READ THIS ENTIRE MANUAL CAREFULLY BEFORE
BEGINNING INSTALLATION. SAVE THESE INSTRUCTIONS.
•UseonlyHunterreplacementparts.
•Toreducetheriskofpersonalinjury,attachthefandirectlytothe
supportstructureofthebuildingaccordingtotheseinstructions,
and use only the hardware supplied.
•Toavoidpossibleelectricalshock,beforeinstallingyourfan,
disconnectthepowerbyturningothecircuitbreakerstothe
outletboxandassociatedwallswitchlocation.Ifyoucannotlock
thecircuitbreakersintheoposition,securelyfastenaprominent
warningdevice,suchasatag,totheservicepanel.
•Allwiringmustbeinaccordancewithnationalandlocalelectrical
codesandANSI/NFPA70.Ifyouareunfamiliarwithwiring,usea
qualified electrician.
•Toreducetheriskofpersonalinjury,donotbendtheblade
attachmentsystemwheninstalling,balancing,orcleaningthefan.
Neverinsertforeignobjectsbetweenrotatingfanblades.
•Toreducetheriskofre,electricalshock,ormotordamage,donot
useasolid-statespeedcontrolwiththisfan.UseonlyHunterspeed
controls.
3
Installer’s Choice and Optional Accessories
Understanding Mounting and Installer’s Choice®
Hunterspatented3-positionmountingsystemprovidesyoumaximum
installationexibilityandease.YoucaninstallyourHunterfaninone
ofthreeways,dependingonceilingheightandyourpreference:Low
Prole,Standard,orAnglemounting.estepsinthismanualinclude
instructionsforallthreeInstallersChoicemountingmethods.
Considering Optional Accessories
ConsiderusingHunter’soptionalaccessories,includingawall-mounted
orremotespeedcontrol.Toinstallandusetheaccessories,follow
the instructions included with each product. For quiet and optimum
performanceofyourHunterfan,useonlyHunterspeedcontrols.
Forceilingshigherthan8feet,youcanpurchase
Hunterextensiondownrods.AllHunterfansuse
sturdy3/4”diameterpipetoassurestabilityand
wobble-freeperformance.
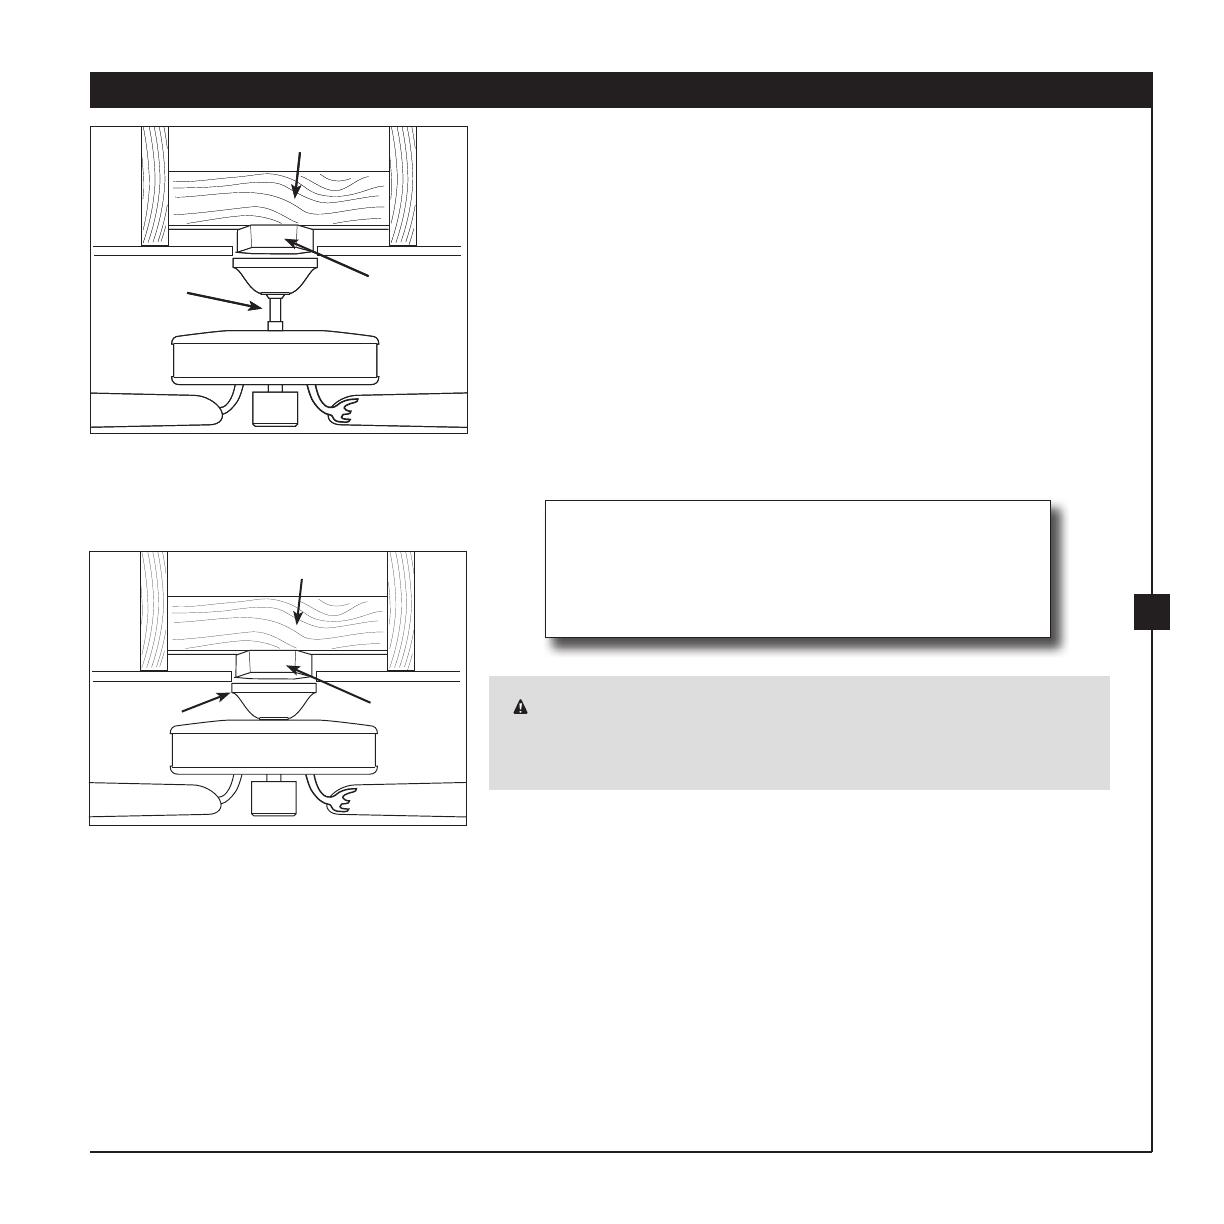
Standard Mounting hangs from the
ceilingbyadownrod(included).
SupportBrace
Standard
Mounting
Style
Ceiling
OutletBox
Installer’s Choice and Optional Accessories
Understanding Mounting and Installer’s Choice®
Hunterspatented2-positionmountingsystemprovidesyoumaximum
installationexibilityandease.YoucaninstallyourHunterfaninone
ofthreeways,dependingonceilingheightandyourpreference:Low
Prole,Standard,orAnglemounting.estepsinthismanualinclude
instructionsforallthreeInstallersChoicemountingmethods.
Considering Optional Accessories
ConsiderusingHunter’soptionalaccessories,includingawall-mounted
orremotespeedcontrol.Toinstallandusetheaccessories,follow
the instructions included with each product. For quiet and optimum
performanceofyourHunterfan,useonlyHunterspeedcontrols.
Forceilingshigherthan8feet,youcanpurchase
Hunterextensiondownrods.AllHunterfansuse
sturdy3/4”diameterpipetoassurestabilityand
wobble-freeperformance.
SupportBrace
Standard
Mounting
Style
Ceiling
OutletBox
43113-01•05/04/12 Hunter®FanCompany
CAUTION: Toreducetheriskofpersonalinjury,attachthefan
directlytothesupportstructureofthebuildingaccordingto
theseinstructions,anduseonlythehardwaresupplied.
Low Profile Mounting fits close to the
ceiling,recommendedforceilingsless
than 9 feet high
LowProle
Mounting
Style
Ceiling
OutletBox
SupportBrace
4
1 Getting Ready
Toinstallaceilingfan,besureyoucandothefollowing:
•Locatetheceilingjoistorothersuitablesupportinceiling.
•Drillholesforandinstallwoodscrews.
•Identifyandconnectelectricalwires.
•Lift40pounds.
Ifyouneedhelpinstallingthefan,yourHunterfandealercandirect
you to a licensed installer or electrician.
Gathering the Tools
You will need the following tools for installing the fan:
•Electricdrillwith9/64”bit
•Standardscrewdriver(magnetictiprecommended)
•Phillips-headscrewdriver(magnetictiprecommended)
•Wrenchorpliers
•Ladder(heightdependentuponinstallationsite)
Checking Your Fan Parts
Carefullyunpackyourfantoavoiddamagetothefanparts.Referto
theincludedPartsGuide.Checkforanyshippingdamagetothemotor
orfanblades.Ifanypartsaremissingordamaged,contactyourHunter
dealerorcallHunterTechnicalSupportDepartmentat888-830-1326.
Preparing the Fan Site
Beforeyoubegininstallingthefan,followalltheinstructionsin
the pullout sheet called “Preparing the Fan Site.” Proper ceiling fan
locationandattachmenttothebuildingstructureareessentialfor
safety,reliableoperation,maximumeciency,andenergysavings.
Installing Multiple Fans?
Ifyouareinstallingmorethan
onefan,keepthefanbladesand
bladeirons(ifapplicable)insets,
as they were shipped.
Hunter®FanCompany 43113-01•05/04/12
5
2 Installing the Ceiling Plate
CAUTION: Toavoidpossibleelectricalshock,beforeinstallingyourfan,
disconnectthepowerbyturningothecircuitbreakerstotheoutletbox
andassociatedwallswitchlocation.Ifyoucannotlockthecircuitbreakers
intheoposition,securelyfastenaprominentwarningdevice,suchasa
tag,totheservicepanel.
2-1. Drilloneholeoneachsideofthesupplymainsusingtheholes
intheu-bracketasaguide.epilotholesshouldbe9/64”in
diameter.
2-2. Placethebushingpinassemblyintotheu-bracket.
2-3.Screwtheu-bracketscrewsthroughtheu-bracketandintothe
pilot holes.
Step 2-1
Step 2-2
Step 2-3
43113-01•05/04/12 Hunter®FanCompany
6
Step 3-1
Step 3-2 - 3-3
Rubber
Gasket
Rubber
Gasket
Upper
Canopy
Lower
Canopy
Pipe
Decorative
Sleeve
Metal
Gasket
3 Assembling and Hanging the Fan
Hunter®FanCompany 43113-01•05/04/12
Adaptor
WARNING:Fanmayfallifnotassembledasdirectedinthese
installation instructions.
Standard Mounting - 9’ ceilings or higher:
• readingthewiresthroughtheadapter,screwtheadapteronto
the shaft on the top of the fan and securely tighten the upper
setscrew with the included allen wrench.
• Loosenthelowersetscrewintheadapter.readingthewires
throughthe7”pipe,screwthepipeintotheadapterontopofthe
fan and securely tighten the upper setscrew.
CAUTION: e adapter has a special coating on the threads. Do
not remove this coating; the coating prevents the downrod from
unscrewing.Onceassembled,donotremovethedownrod.
•Slidethelowercanopyontothepipewiththelargeopening
facing the fan.
• Slidethemetalgasketanddecorativesleeveontothepipe(inthat
order).Orientthegasketssothatthesleevewilloverlapthelipof
each gasket.
• Slidetheuppercanopyontothepipewiththelargeopening
facingawayfromthefan.enslidetherubbergasketontothe
pipe,orientedsothatthelipslidesintothesleeve.Continueto
step 3-1.
Low Profile Mounting - 8’-9’ceilings:
Note: For Low Profile Mounting,Adapterisnotused.
• readingthewiresthroughthe2.75”pipe,screwthepipeinto
the top of the fan and securely tighten the setscrew.
• Slidethelowercanopyontothepipewiththelargeopening
facingtheceiling,theuppercanopyisnotusedforlowprole
mounting.
3-1. Screwthehangerbracketontothetopofthepipeatleastthree
fullturns.Securelytightenthesetscrewonthehangerbracket.
3-2.Centerthepinintherubberbushing.
3-3.Holdingthefanbyboththemotorhousingandthepipe,liftthe
fanassemblyandhookbothsidesofthehangerbracketontothe
bushingpinassembly.
7
fsdfsdf
4 Wiring the Fan
Wire Nut
Single Switch Wiring
Dual Switch Wiring
43113-01•05/04/12 Hunter®FanCompany
All wiring must be in accordance with national and local electrical
codes and ANSI/NFPA 70. If you are unfamiliar with wiring, use a
qualified electrician.
Wallswitchesarenotincluded.Selectanacceptablegeneral-useswitch
in accordance with national and local electrical codes.
4-1. Beforeattemptinginstallation,makesurethepowerisstillo.
4-2. Toconnectthewires,holdthebaremetalleadstogetherandplace
awirenutoverthem,thentwistclockwiseuntiltight.Forallthese
connections use the wire nuts provided.
4-3. Connectthebareorgreengroundwire(grounded)fromthe
ceiling to the green ground wire (grounded) from the ceiling plate
and the green ground wire from the fan.
4-4. Connect the white wire (ungrounded) from the ceiling to the
white wire (ungrounded) from the fan.
4-5. Connecttheremainingwiresasfollows:
Dual Switch Wiring:
•eblackwire(ungrounded)fromtheceilingtotheblackwire
(ungrounded) from the fan
•eblack/whitewire(ungrounded)fromthefantothewire
(ungrounded) for the wall switch
Single Switch Wiring:
•eblackwire(ungrounded)fromtheceilingtotheblack
(ungrounded)andtheblack/whitewire(ungrounded)from
the fan
CAUTION:Besurenobarewireorwirestrandsarevisibleafter
making connections.
4-6. Turnthesplicesupwardandpushthemcarefullybackthroughthe
ceilingplateintotheoutletbox.
4-7. Spreadthewiresapart,withthegroundedwiresononesideof
theoutletboxandtheungroundedwiresontheothersideofthe
outletbox.
8
5 Installing the Canopy
WARNING:Fanmayfallifnotassembledasdirectedinthese
installation instructions.
Standard Mounting
Note: e lower canopy, along with the sleeve & gaskets, must
be raised first so that the upper canopy can secure to the
sleeve.
5-1.Raisethelowercanopy,alongwiththedecorativesleeveandtwo
gaskets,sothattheloweredgeisevenwiththeupperedgeofthe
motor housing. Securely install the setscrews in the lower canopy
and metal gasket.
5-2.Raisetheuppercanopy,leaving1-2mmofspacebetweentherim
ofthecanopyandtheceiling,andsecurelyinstallthesetscrew.
Low Profile Mounting
5-3.Raisethecanopy,leaving1-2mmofspacebetweentherimofthe
canopyandtheceiling,andsecurelyinstallthesetscrew.
Step 5-2
Step 5-1
Hunter®FanCompany 43113-01•05/04/12
Step 5-3
9
6 Assembling the Blades
Step 6-1 (Detail)
BladeAssembly
Screws
Usewithgrommet
Usewithoutgrommet
Grommet
Blade
Mounting
Screw
Steps 6-1 – 6-2
Hunterfansuseseveralstylesoffanbladeirons(bracketsthatholdthe
bladetothefan).
6-1. Yourfanmayincludebladegrommets.Ifyourfanhasgrommets,
insertthembyhandintotheholesontheblades.
6-2. Attacheachbladetoabladeironusingthreebladeassembly
screws(thecarvedsideshouldfacedownward).Ifyouused
grommets,thebladesmayappearslightlylooseafterscrewsare
tightened. is is normal.
6-3. Foreachblade,insertoneblademountingscrewthroughthe
bladeiron,andattachlightlytothefan.Insertthesecondblade
mountingscrew,thensecurelytightenbothmountingscrews.
6-4. Attachthefandangles(included)tothefanpullchainsusingthe
plasticbreakawayconnector.(Youmayndtheplasticbreakaway
connectorontheendoftheextrachain.)
Step 6-3
43113-01•05/04/12 Hunter®FanCompany
10
isfanwasdesignedtoacceptanyHunterlistedlightkit.Ifyou
decidetoinstallalightkit,followthesestepstoinstalltheincluded
light kit adapter then follow the instructions supplied with the light kit.
7-1.Removethetwoscrewsfromthereversingswitch.
7-2.Unscrewthenutontheswitchhousingcover.Youmayneedto
use pliers to loosen the nut.
7-3.Removethetwoscrewsintheswitchhousingcoverandremove
the cover.
7-4.Installthereversingswitchintothelightkitadapterwiththetwo
screws removed in step 7-1.
7-5.readthefanpullchainthroughthesideofthelightkitadapter
andsecurewiththenutremovedinstep7-2.
7-6.Attachthelightkitadaptertotheupperswitchhousingwiththe
two screws removed in step 7-3.
7-7. Follow the instructions supplied with the accessory light kit to
complete installation of the light kit.
7 Accessory Light Option
Step 7-1
Step 7-2
Step 7-6
Hunter®FanCompany 43113-01•05/04/12
11
8 Operating and Cleaning Your Ceiling Fan
In warm weather,use
downward air flow pattern
In cold weather,useupward
air flow pattern
8-1. Turn on electrical power to the fan.
8-2. efanpullchaincontrolspowertothefan.epullchainhas
foursettingsinsequence:High,Medium,LowandO.
• Pullthechainslowlytochangesettings.
• Releaseslowlytopreventthechainfromrecoilingintothe
blades.
• echainusesabreakawayconnectorthatseparatesifthe
chainisjerked.Ifthishappens,simplyreinsertthechaininto
the connector.
8-3. Ceilingfansworkbestbyblowingairdownward(counterclockwise
bladerotation)inwarmweathertocooltheroomwithadirect
breeze.Inwinter,havingthefandrawairupward(clockwiseblade
rotation)willdistributethewarmerairtrappedattheceiling
around the room without causing a draft.
8-4. Forcleaningnishes,useasoftbrushorlint-freeclothtoprevent
scratching.Avacuumcleanerbrushnozzlecanremoveheavier
dust.Removesurfacesmudgesoraccumulateddirtanddustusing
a mild detergent and a slightly dampened cloth. You may use
anartisticagent,butneverabrasivecleaningagentsastheywill
damage the finish.
8-5. Cleanwoodnishbladeswithafurniturepolishingcloth.
Occasionally,applyalightcoatoffurniturepolishforadded
protectionandbeauty.Cleanpaintedandhigh-glossbladesinthe
same manner as the fan finish.
To Change Airow Direction
Turnthefanoandletitcometoacomplete
stop. Slide the reversing switch on the fan to the
oppositeposition.Restartfan.
Reversing
Switch
43113-01•05/04/12 Hunter®FanCompany
12
Problem: Nothing happens; fan does not move.
1.Turnpoweron,replacefuse,orresetbreaker.
2.Loosencanopy,checkallconnectionsaccordingtothewiringthe
fan section.
3. Check the plug connection in the switch housing.
4. Push motor reversing switch firmly left or right to ensure that the
switch is engaged.
5.Pullthepullchaintoensureitison.
6.Removetheshippingbumpers.
Problem: Noisy operation.
1.Tightenthebladebracketscrewsuntilsnug.
2.Checktoseeifthebladeiscracked.Ifso,replacealltheblades.
Problem: Excessive wobbling.
1.Ifyourfanwobbleswhenoperating,usetheenclosedbalancingkit
andinstructionstobalancethefan.
2.Tightenallbladeironscrews.
3.Turnpowero,supportfanverycarefully,andcheckthatthe
hangerballisproperlyseated.
9 Troubleshooting
Ifyouneedpartsorserviceassistance,pleasecall
888-830-1326orvisitusatourwebsiteat
http://www.HunterFan.com.
HunterFanCompany
2500FriscoAvenue
Memphis,Tennessee38114
Hunter®FanCompany 43113-01•05/04/12
  • Page 1 1
  • Page 2 2
  • Page 3 3
  • Page 4 4
  • Page 5 5
  • Page 6 6
  • Page 7 7
  • Page 8 8
  • Page 9 9
  • Page 10 10
  • Page 11 11
  • Page 12 12

Hunter Fan 25178 Owner's manual

Type
Owner's manual

Ask a question and I''ll find the answer in the document

Finding information in a document is now easier with AI