
© 2011
VR516301
Printed in China
Electronic Flash
FL
-
300R
JP
7
EN
Instructions
17
FR
Mode d’emploi
29
ES
Instrucciones
41
KR
53
CHS
使⽤说明书
63
CHT
使⽤說明書
75

© 2011
VR516301
Printed in China
Electronic Flash
FL
-
300R
JP
7
EN
Instructions
17
FR
Mode d’emploi
29
ES
Instrucciones
41
KR
53
CHS
使⽤说明书
63
CHT
使⽤說明書
75

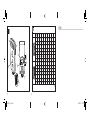
1
7
9
5
6
8
2
3
4
1.4 2 2.8 4 5.6 8 11 16 22
100
1.3~14 0.9~10 0.6~7 0.6~5 0.6~3.5 0.6~2.5 0.6~1.7 0.6~1.3 0.6~0.9
200
1.8~20 1.3~14 0.9~10 0.6~7 0.6~5 0.6~3.5 0.6~2.5 0.6~1.7 0.6~1.3
400
2.5~28 1.8~20 1.3~14 0.9~10 0.6~7 0.6~5 0.6~3.5 0.6~2.5 0.6~1.7
800
3.6~40 2.5~28 1.8~20 1.3~14 0.9~10 0.6~7 0.6~5 0.6~3.5 0.6~2.5
1600
5.1~56 3.6~40 2.5~28 1.8~20 1.3~14 0.9~10 0.6~7 0.6~5 0.6~3.5
3200
7.1~80 5.1~56 3.6~40 2.5~28 1.8~20 1.3~14 0.9~10 0.6~7 0.6~5
6400
9.9~112
7.1~80 5.1~56 3.6~40 2.5~28 1.8~20 1.3~14 0.9~10 0.6~7
100
0.8~8.5 0.5~6 0.5~4.3 0.5~3 0.5~2.1 0.5~1.5 0.5~1.1 0.5~0.8 0.5
200
1.1~10 0.8~8.5 0.5~6 0.5~4.3 0.5~3 0.5~2.1 0.5~1.5 0.5~1.1 0.5~0.8
400
1.6~17 1.1~10 0.8~8.5 0.5~6 0.5~4.3 0.5~3 0.5~2.1 0.5~1.5 0.5~1.1
800
2.1~24 1.6~17 1.1~10 0.8~8.5 0.5~6 0.5~4.3 0.5~3 0.5~2.1 0.5~1.5
1600
3~34 2.1~24 1.6~17 1.1~10 0.8~8.5 0.5~6 0.5~4.3 0.5~3 0.5~2.1
3200
4.3~48 3~34 2.1~24 1.6~17 1.1~10 0.8~8.5 0.5~6 0.5~4.3 0.5~3
6400
6~69
4.3~48 3~34 2.1~24 1.6~17 1.1~10 0.8~8.5 0.5~6 0.5~4.3
(m)
3 4
ISO
F
no.
MEMO

5
Information for Your Safety
IMPORTANT SAFETY
INSTRUCTIONS
When using your photographic equipment, basic safety precautions
should always be followed, including the following:
Read and understand all instructions before using.
Close supervision is necessary when any fl ash is used by or near
children. Do not leave fl ash unattended while in use.
Care must be taken as burns can occur from touching hot parts.
y
y
y

6
Do not operate if the fl ash has been dropped or damaged - until it has
been examined by qualifi ed service personnel.
Let fl ash cool completely before putting away.
To reduce the risk of electric shock, do not immerse this fl ash in
water or other liquids.
To reduce the risk of electric shock, do not disassemble this fl ash,
but take it to qualifi ed service personnel when service or repair
work is required. Incorrect reassembly can cause electric shock
when the fl ash is used subsequently.
The use of an accessory attachment not recommended by the
manufacturer may cause a risk of fi re, electric shock, or injury to
persons.
SAVE THESE INSTRUCTIONS
y
y
y
y
y
Page is loading ...
Page is loading ...
Page is loading ...
Page is loading ...
Page is loading ...
Page is loading ...
Page is loading ...
Page is loading ...
Page is loading ...
Page is loading ...

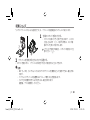
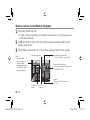
EN 17
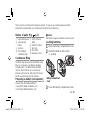
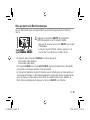
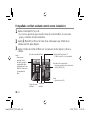
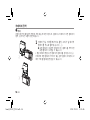
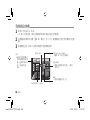
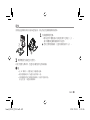
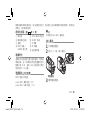
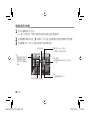
Names of parts (Fig. Names of parts (Fig. p. 3) p. 3)
1
Light-emitting area
2 Lock release
button
3 Lock pin
4 TEST button/
CHARGE lamp
5 AUTO CHECK
lamp
6 ON/OFF button
7 W knob
8 RC switch
9 Remote sensor
Continuous fi ringContinuous fi ring
The fl ash may become hot when fi red many
times in succession, resulting in damage
or malfunction. The fl ash should be fi red
no more than 10 times in succession at
intervals of 6 seconds, after which it should
be left unused for at least 10 minutes.
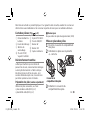
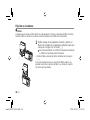
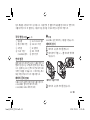
Preparing a battery Preparing a battery
(sold separately)(sold separately)
Choose from the below batteries:
AAA (R03) alkaline batteries (x 2)
AAA (R03) NiMH batteries (x 2)
•
•
x
Notes
AAA (R03) manganese batteries cannot be used.
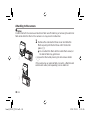
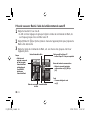
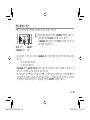
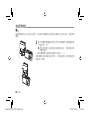
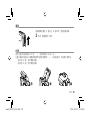
Loading batteriesLoading batteries
1
Open the battery compartment cover.
2
Insert the batteries with correct
+/– polarity.
3
Close the battery compartment cover.
Battery compartment
cover
Battery compartment
cover
Thank you for purchasing this Olympus product. To ensure your safety, please read this
instruction manual before use, and keep it handy for future reference.

18 EN
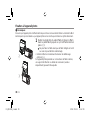
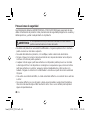
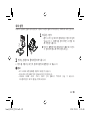
Attaching to the cameraAttaching to the camera
x
Notes
Confi rm that both the camera and electronic fl ash are off. Attaching or removing the electronic
fl ash while either the fl ash or the camera is on may result in malfunction.
1
2
1
Remove the camera hot shoe cover and slide the
fl ash securely into the hot shoe until it clicks into
place (
1
).
Do not attach this fl ash with the built-in fl ash raised, or
the built-in fl ash may get broken.
Remove the fl ash while pressing the lock release button
(
2
).
If the camera has an external fl ash connector, a fl ash bracket
and bracket cable (sold separately) can be attached.
•

EN 19
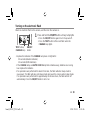
Turning on the electronic fl ashTurning on the electronic fl ash
Attach an electronic fl ash to the camera, and then turn the camera on.
TEST button/
CHARGE lamp
ON/OFF
button
1
Press and hold the ON/OFF button until any lamp lights.
Press the ON/OFF button again to turn the power off.
Press the TEST button to fi re a test fl ash when the
CHARGE lamp lights.
•
•
Replace the batteries if the CHARGE lamp does not light after:
30 seconds (Alkaline batteries)
10 seconds (NiMH batteries)
If the CHARGE lamp and AUTO CHECK lamp blink simultaneously, batteries are running
low. Replace the batteries.
If no operations are performed for about 15 minutes, the fl ash will enter sleep mode to
save power. The fl ash will also enter sleep mode whenever the camera enters sleep mode.
If no operations are performed for approximately 60 minutes more, the fl ash will turn off
automatically. Press the ON/OFF button to turn it on.
•
•
•

20 EN
ShootingShooting
According to the fl ash mode setting of the camera, shooting in TTL-AUTO mode or MANUAL
mode is available with this fl ash.
RC switch
1
Set the RC switch to “OFF”.
2
In accordance with the intended use, set the fl ash mode
of the camera.
For details, refer to the instruction manual of the camera.
MANUAL mode is not available for some cameras.
In TTL-AUTO mode: When fl ash activation has been performed correctly, the AUTO
CHECK lamp blinks for about 5 seconds after the shooting.
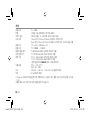
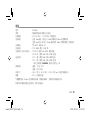
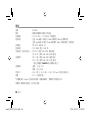
In MANUAL mode: Adjust camera settings (ISO sensitivity and aperture value) based on the
distance to subject and then shoot.
Shooting distance (m) = Guide No. (ISO100) x ISO sensitivity coeffi cient ÷ Aperture value
Available shooting range (Table P.4)
ISO sensitivity coeffi cient
ISO
sensitivity
25 50 100 200 400 800 1600 3200 6400
Coeffi cient
0.5 0.71 1.0 1.4 2.0 2.8 4.0 5.6 8.0
When using a fl ash, fl ash light may be blocked by the lens body, lens hood, etc.
When the shooting distance is closer to 1m, using the wide panel is recommended not to control the fl ash volume too much.
•
•
•
•

EN 21
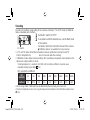
Wide angleWide angle
Use the wide panel for shooting when the lens focal length is
wider than 9 mm to 14 mm.
1
Slide the W knob to the W side.
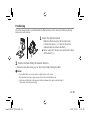
FoldingFolding
This fl ash can be bent approx. 30 degrees in front (
1
) and 60 degrees in rear (
2
).
It also can be folded in front to make it easier to carry the camera with the fl ash attached (
3
).
The fl ash does not fi re when folded in front.
Approx. 30 degrees in front: Used for macro shooting.
Approx. 60 degrees in rear: Used for bounce shooting.

22 EN
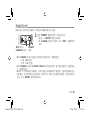
Wireless remote control fl ash photographyWireless remote control fl ash photography
1
Set the RC switch to A or B.
A and B are the group settings. Set the fl ash control mode, etc. to each groups and
control them wirelessly.
2
Set [# RC Mode] to [On] in the menu of the camera to make the fl ash on the
camera ready to fi re.
3
Set the fl ash control mode, etc. in each of the groups A and B on the camera.
Flash intensity value
250250 F5.6
0.0
0.0
P
3838
A Mode
TTL
M
Off
+5.0
TTL +3.0
1/8
–
LO
1
Ch
Group
Select the fl ash
control mode and
adjust the fl ash
intensity individually.
For MANUAL, select
the fl ash intensity.
•
Normal fl ash/Super FP fl ash
Super FP fl ash is not compliant.•
Communication light level
Set the communication light level to
[HI], [MID], or [LO].
•
Channel
Be sure to set the channel
to [1].
•
Flash
intensity
Flash control
mode
•

EN 23
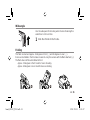
PositioningPositioning
Since the communication is performed with the fl ash emission of the camera, the fl ash positioning
range varies with camera.
1
Attach the stand provided.
Slide the fl ash securely into the stand until
it clicks into place (
1
). Press the shoe lock
release button to remove the fl ash.
When using it for bounce, be careful not to drop
off the stand (
2
).
•
2
Position the fl ash facing the desired direction.
Instead of using the stand, you can also shoot simply holding the fl ash.
x
Notes
The built-in fl ash can not be used as a light source in RC mode.
We recommend using a single group of up to three remote fl ash units.
Flash may not fi re due to the angle or distance between the camera and the object.
Take a test shot after positioning.
•
•
•
•
1
2
1
2

24 EN
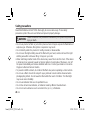
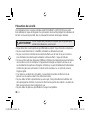
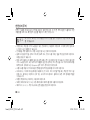
Safety precautionsSafety precautions
Read WARNINGS and CAUTIONS thoroughly to ensure safe usage. These safety
precautions protect the users and others and prevent property damage.
WARNING
Failure to observe the precautions indicated by this symbol may result in
injury or death.
Do not use product or fl ash or just omit in places where it may be exposed to fl ammable or
explosive gas. Otherwise, fi re ignition or explosion may result.
Do not directly solder the product or modify, remodel, or disassemble.
Do not cover the light emitting area of the fl ash with your hand, and do not touch the light
emitting area after continuous fi ring. It may burn your skin.
Water and foreign matter inside of the device may cause fi re or electric shock. If the device
is immersed in or exposed to water or foreign matter is found inside of the device, turn off
the power immediately and remove batteries with care. Contact your dealer or consult an
Olympus Authorized Service Station.
To prevent a traffi c accident, do not direct the fl ash at a person operating a motor vehicle.
Do not use a fl ash close to the subject's eyes; particular care should be observed when
photographing infants. Do not leave the fl ash within the reach of children. The fl ash light
may cause vision disability.
Do not use batteries that are not specifi ed for use.
Do not mix old and new batteries, or batteries made by different manufacturers.
Do not connect substances such as metal to the (+) or (–) of batteries.
•
•
•
•
•
•
•
•
•

EN 25
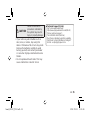
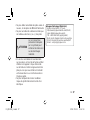
CAUTION
Failure to observe the
precautions indicated by
this symbol may result in
injury or property damage.
If you notice any abnormalities such as
odor, noise, or smoke, stop using this
device. Otherwise a fi re or burn may result.
Remove the batteries carefully to avoid
burning yourself, and contact your dealer
or consult an Olympus Authorized Service
Station.
Do not operate with wet hands. This may
cause malfunction or electric shock.
•
•
Technical Support (U.S.A.)
24/7 online automated help :
http://www.olympusamerica.com/DSLR/
Phone customer support :
Tel.1-800-260-1625 (Toll-free)
Our phone customer support is available
from 9 am to 9 pm (Monday to Friday) ET
E-Mail : [email protected]

26 EN
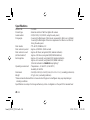
Specifi cationsSpecifi cations
MODEL NO. : FL-300R
Product type : External electronic fl ash for digital still camera
Guide number : 20 (ISO 100), 12 (ISO100, using the wide panel)
Firing angle : Covering the fi eld angle of 14mm lens (equivalent to 28mm on a 135mm)
Covering the fi eld angle of 9mm lens (equivalent to 18mm on a 135mm) :
Using the wide panel
Flash modes : TTL-AUTO, MANUAL, RC
Flash emission period : Approx. 1/20000 to 1/500 seconds
Flash emission count
(at full activation)*
: Approx. 80 times (using AAA (R03) alkaline batteries)
Approx. 130 times (using AAA (R03) NiMH batteries)
Recharge time : Approx. 5.5 seconds (using AAA (R03) alkaline batteries)
Approx. 4.5 seconds (using AAA (R03) NiMH batteries)
(from full activation to CHARGE lamp lighting)*
Operating environment : Temperature: –10 to 42°C (14 to 108°F)
Humidity: 20 to 90%
Dimensions :
56.4 (W) × 89.2 (H) × 26.9 (D) mm (2.2 × 3.5 × 1.1 in.) (excluding protrusions)
Weight : 97 g (3.4 oz.) (excluding batteries)
* Measurements obtained from in-house tests at Olympus. Actual fi gures may vary depending on
shooting conditions.
Specifi cations are subject to change without any notice or obligation on the part of the manufacturer.

EN 27
For customers in USAFor customers in USA
FCC Notice
This device complies with part 15 of the FCC rules. Operation is subject to the following
two conditions: (1) This device may not cause harmful interference, and (2) this device
must accept any interference received, including interference that may cause undesired
operation.
Any unauthorized changes or modifi cations to this equipment would void the user’s
authority to operate.
For customers in CANADAFor customers in CANADA
This Class B digital apparatus complies with Canadian ICES-003.
Page is loading ...
Page is loading ...
Page is loading ...
Page is loading ...
Page is loading ...
Page is loading ...
Page is loading ...
Page is loading ...
Page is loading ...
Page is loading ...
Page is loading ...
Page is loading ...
Page is loading ...
Page is loading ...
Page is loading ...
Page is loading ...
Page is loading ...
Page is loading ...
Page is loading ...
Page is loading ...
Page is loading ...
Page is loading ...
Page is loading ...
Page is loading ...
Page is loading ...
Page is loading ...
Page is loading ...
Page is loading ...
Page is loading ...
Page is loading ...
Page is loading ...
Page is loading ...
Page is loading ...
Page is loading ...
Page is loading ...
Page is loading ...
Page is loading ...
Page is loading ...
Page is loading ...
Page is loading ...
Page is loading ...
Page is loading ...
Page is loading ...
Page is loading ...
Page is loading ...
Page is loading ...
Page is loading ...
Page is loading ...
Page is loading ...
Page is loading ...
Page is loading ...
Page is loading ...
Page is loading ...
Page is loading ...
Page is loading ...
Page is loading ...
Page is loading ...

1
7
9
5
6
8
2
3
4
1.4 2 2.8 4 5.6 8 11 16 22
100
1.3~14 0.9~10 0.6~7 0.6~5 0.6~3.5 0.6~2.5 0.6~1.7 0.6~1.3 0.6~0.9
200
1.8~20 1.3~14 0.9~10 0.6~7 0.6~5 0.6~3.5 0.6~2.5 0.6~1.7 0.6~1.3
400
2.5~28 1.8~20 1.3~14 0.9~10 0.6~7 0.6~5 0.6~3.5 0.6~2.5 0.6~1.7
800
3.6~40 2.5~28 1.8~20 1.3~14 0.9~10 0.6~7 0.6~5 0.6~3.5 0.6~2.5
1600
5.1~56 3.6~40 2.5~28 1.8~20 1.3~14 0.9~10 0.6~7 0.6~5 0.6~3.5
3200
7.1~80 5.1~56 3.6~40 2.5~28 1.8~20 1.3~14 0.9~10 0.6~7 0.6~5
6400
9.9~112
7.1~80 5.1~56 3.6~40 2.5~28 1.8~20 1.3~14 0.9~10 0.6~7
100
0.8~8.5 0.5~6 0.5~4.3 0.5~3 0.5~2.1 0.5~1.5 0.5~1.1 0.5~0.8 0.5
200
1.1~10 0.8~8.5 0.5~6 0.5~4.3 0.5~3 0.5~2.1 0.5~1.5 0.5~1.1 0.5~0.8
400
1.6~17 1.1~10 0.8~8.5 0.5~6 0.5~4.3 0.5~3 0.5~2.1 0.5~1.5 0.5~1.1
800
2.1~24 1.6~17 1.1~10 0.8~8.5 0.5~6 0.5~4.3 0.5~3 0.5~2.1 0.5~1.5
1600
3~34 2.1~24 1.6~17 1.1~10 0.8~8.5 0.5~6 0.5~4.3 0.5~3 0.5~2.1
3200
4.3~48 3~34 2.1~24 1.6~17 1.1~10 0.8~8.5 0.5~6 0.5~4.3 0.5~3
6400
6~69
4.3~48 3~34 2.1~24 1.6~17 1.1~10 0.8~8.5 0.5~6 0.5~4.3
(m)
3 4
ISO
F
no.
MEMO

© 2011
VR516301
Printed in China
Electronic Flash
FL
-
300R
JP
7
EN
Instructions
17
FR
Mode d’emploi
29
ES
Instrucciones
41
KR
53
CHS
使⽤说明书
63
CHT
使⽤說明書
75
-
 1
1
-
 2
2
-
 3
3
-
 4
4
-
 5
5
-
 6
6
-
 7
7
-
 8
8
-
 9
9
-
 10
10
-
 11
11
-
 12
12
-
 13
13
-
 14
14
-
 15
15
-
 16
16
-
 17
17
-
 18
18
-
 19
19
-
 20
20
-
 21
21
-
 22
22
-
 23
23
-
 24
24
-
 25
25
-
 26
26
-
 27
27
-
 28
28
-
 29
29
-
 30
30
-
 31
31
-
 32
32
-
 33
33
-
 34
34
-
 35
35
-
 36
36
-
 37
37
-
 38
38
-
 39
39
-
 40
40
-
 41
41
-
 42
42
-
 43
43
-
 44
44
-
 45
45
-
 46
46
-
 47
47
-
 48
48
-
 49
49
-
 50
50
-
 51
51
-
 52
52
-
 53
53
-
 54
54
-
 55
55
-
 56
56
-
 57
57
-
 58
58
-
 59
59
-
 60
60
-
 61
61
-
 62
62
-
 63
63
-
 64
64
-
 65
65
-
 66
66
-
 67
67
-
 68
68
-
 69
69
-
 70
70
-
 71
71
-
 72
72
-
 73
73
-
 74
74
-
 75
75
-
 76
76
-
 77
77
-
 78
78
-
 79
79
-
 80
80
-
 81
81
-
 82
82
-
 83
83
-
 84
84
-
 85
85
-
 86
86


Olympus FL-300R User manual
- Type
- User manual
- This manual is also suitable for
Ask a question and I''ll find the answer in the document
Finding information in a document is now easier with AI
in other languages
- français: Olympus FL-300R Manuel utilisateur
- español: Olympus FL-300R Manual de usuario
- 日本語: Olympus FL-300R ユーザーマニュアル
Related papers
-
Olympus FL-14 User manual
-
Olympus FL-300R Extra-Compact Wireless Flash User manual
-
Olympus FL-300R Electronic Flash User manual
-
Olympus FL-600R User manual
-
Olympus FC-WR User manual
-
Olympus FL-700WR User manual
-
-
-
-
Other documents
-
Pentax AF360FGZII/AF540FGZII Owner's manual
-
Sony HVL-F42AM Owner's manual
-
-
Fujifilm EF-42 Owner's manual
-
Sigma EF-630 Instructions Manual
-
-
-
Panasonic DMW-FL580LPP Owner's manual
-
-