
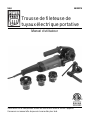
V 4.0 8639379
User Manual
Portable Electric
Pipe Threader Kit
Please read and understand all instructions before use. Retain this manual for
future reference.

8639379 Portable Electric Pipe Threader Kit V 4.0
SPECIFICATIONS
Size Range Threads pipe from 1/2 to 1-1/4 in.
Dies 1/2, 3/4, 1, 1-1/4 in.
Power 120V/60Hz, 12A
SAFETY
WARNING! Read and understand all instructions before using this tool. The
operator must follow basic precautions to reduce the risk of personal injury
and/or damage to the equipment.
SAVE THESE INSTRUCTIONS
Keep this manual for safety warnings, precautions, operating or inspection and
maintenance instructions.
HAZARD DEFINITIONS
Please familiarize yourself with the hazard notices found in this manual. A notice
is an alert that there is a possibility of property damage, injury or death if certain
instructions are not followed.
DANGER! This notice indicates an immediate and specific hazard that will
result in severe personal injury or death if the proper precautions
are not taken.
WARNING! This notice indicates a specific hazard or unsafe practice that
could result in severe personal injury or death if the proper
precautions are not taken.
CAUTION! This notice indicates a potentially hazardous situation that may result
in minor or moderate injury if proper practices are not taken.
Portable Electric
Pipe Threader Kit
2 For technical questions call 1-800-665-8685

V 4.0 Portable Electric Pipe Threader Kit 8639379
NOTICE! This notice indicates that a specific hazard or unsafe practice will
result in equipment or property damage, but not personal injury.
WORK AREA
1. Operate in a safe work environment. Keep your work area clean, well lit and
free of distractions.
2. Keep anyone not wearing the appropriate safety equipment away from the
work area.
3. Store unused tools properly in a safe and dry location to prevent rust or
damage. Lock tools away and keep out of the reach of children.
4. Do not install or use in the presence of flammable gases, dust or liquids.
PERSONAL SAFETY
WARNING! Wear personal protective equipment approved by the
Canadian Standards Association (CSA) or American National Standards
Institute (ANSI).
PERSONAL PROTECTIVE EQUIPMENT
1. Always wear impact safety goggles that provide front and side protection
for the eyes. Eye protection equipment should comply with CSA Z94.3-07
or ANSI Z87.1 standards based on the type of work performed.
2. Wear the appropriate type of full-face shield in addition to safety googles,
as the work can create chips, abrasive or particulate matter.
3. Wear gloves that provide protection based on the work materials or to
reduce the effects of tool vibration.
a. Avoid wearing clothes or jewelry that can become entangled with the
moving parts of a tool. Keep long hair covered or bound.
4. Wear protective clothing designed for the work environment and tool.
5. Non-skid footwear is recommended to maintain footing and balance in the
work environment.
6. Wear steel toe footwear or steel toe caps to prevent a foot injury from
falling objects.
Visit www.princessauto.com for more information 3

8639379 Portable Electric Pipe Threader Kit V 4.0
7. Wear a NIOSH approved respirator when working on materials that
produce hazardous fumes, dust or particulate matter.
8. This tool can cause hearing damage. Wear hearing protection gear with an
appropriate Noise Reduction Rating to withstand the decibel levels.
PERSONAL PRECAUTIONS
Control the tool, personal movement and the work environment to avoid
personal injury or damage to tool.
1. Do not operate any tool when tired or under the influence of drugs, alcohol
or medications.
2. Avoid wearing clothes or jewelry that can become entangled with the
moving parts of a tool. Keep long hair covered or bound.
3. Do not overreach when operating a tool. Proper footing and balance
enables better control in unexpected situations.
4. Support the workpiece or clamp it to a stable platform. Holding the
workpiece by hand or against your body may lead to personal injury.
5. Securely hold this tool using both hands. Using a tool with only one hand
can result in loss of control.
SPECIFIC SAFETY PRECAUTIONS
WARNING! DO NOT let comfort or familiarity with product (gained from
repeated use) replace strict adherence to the tool safety rules. If you use
this tool unsafely or incorrectly, you can suffer serious personal injury.
1. Use the correct tool for the job. This tool was designed for a
specific function. Do not modify or alter this tool or use it for
an unintended purpose.
2. Keep hands away from threading area and the blade.
3. Always cut the threads slowly and never apply excessive force.
4. Never hold a work piece being threaded in your hands or across your leg.
Secure the work piece to a stable platform. It is important to support the
work properly to minimize body exposure, or loss of control.
5. Always handle the dies with care when mounting or removing the dies.
4 For technical questions call 1-800-665-8685

V 4.0 Portable Electric Pipe Threader Kit 8639379
6. Never use damaged or incorrect dies. The dies were specially designed for
your tool, for optimum performance and safety of operation.
ELECTRICAL SAFETY
1. Disconnect power supply. Disconnect the tool from the power supply when
not in use, before cleaning, servicing or changing any parts.
2. Protect yourself against electric shocks when working on electrical
equipment. Avoid body contact with grounded surfaces such as pipes,
radiators, cooking stoves and refrigerators. There is an increased chance
of electrical shock if your body is grounded.
3. Double insulated tools are equipped with a polarized plug (one blade is
wider than the other.) This plug will fit in a polarized outlet only one way. If
the plug does not fit fully in the outlet, reverse the plug. If it still does not
fit, contact a qualified electrician to install a polarized outlet. Do not change
the plug in any way. Double insulation eliminates the need for a three wire
grounded power cord and grounded power supply system.
4. Grounded tools must be plugged into an outlet that is properly installed
and grounded in accordance with all codes and ordinances. Never remove
the grounding prong or modify the plug in any way. Do not use any adapter
plugs. Check with a qualified electrician if you are in doubt as to whether
the outlet is properly grounded. If the tool should electronically
malfunction or break down, grounding provides a low resistance path to
carry electricity away from the user.
5. Do not abuse the cord. Never use the cord to carry tools or pull the plug
from an outlet. Keep the cord away from heat, oil, sharp edges or moving
parts. Do not operate this tool if the power cord is frayed or damaged.
Replace damaged cords immediately. Damaged cords increase the risk of
electric shock. Do not modify the plug in any way.
Visit www.princessauto.com for more information 5

8639379 Portable Electric Pipe Threader Kit V 4.0
6. When operating a power tool outside, use an outdoor extension cord
marked “W-A” or “W”. These cords are rated for outdoor use and reduce
the risk of electric shock. Use in conjunction with a Ground Fault Circuit
Interrupter (GFCI). If operating a power tool in a damp location is
unavoidable, the use of a GFCI reduces the risk of electric shock. It is
recommended that the GFCI should have a rated residual current of 30 mA
or less.
7. Avoid using an unnecessarily long extension cord. Choose a cord that is
appropriate for the situation, as a cord that is too long and running across
the floor can be more dangerous than helpful. Using a cord that is too long
or too thin could damage the tool. Unroll the cord completely to prevent it
from overheating.
8. Place the electrical cord in a position that prevents it from coming into
contact with the tool and from getting caught by the work piece. The cord
should always stay behind the tool.
9. Keep all connections dry and off the ground to reduce the risk of electric
shock. Do not touch the plug with wet hands.
WARNING! People with pacemakers should consult their physician(s) before
using this product. Operations of electrical equipment in close proximity to
a heart pacemaker could cause interference or failure of the pacemaker.
LOW VOLTAGE
Low voltage may cause overheating due to higher power current being drawn to
the tool that will shorten the motor life.
An extension cord may cause a drop in power to the tool if it is too long or the
amperage rating is not correct. This may result in the following:
1. The tool will not activate when switched on.
2. The tool may switch on, but fails to maintain power when applied to
a workpiece.
3. The tool may overheat, possibly starting a fire.
Test the tool by plugging it directly to the power supply. If it powers on, change
the extension cord with the correct rating and as short as needed. The
workpiece may also need to be relocated closer to the power supply.
6 For technical questions call 1-800-665-8685

V 4.0 Portable Electric Pipe Threader Kit 8639379
VIBRATION PRECAUTIONS
This tool vibrates during use. Repeated or long-term exposure to vibration may
cause temporary or permanent physical injury, particularly to the hands, arms
and shoulders.
1. Anyone using vibrating tools regularly or for an extended period should first
be examined by a doctor and then have regular medical check-ups to ensure
medical problems are not being caused by or worsened from tool use.
Pregnant women or people who have impaired blood circulation to the hands,
past hand injuries, nervous system disorders, diabetes, or Raynaud’s Disease
should not use this tool. If you feel any medical symptoms related to
vibrations (such as tingling, numbness, and white or blue fingers), seek
medical attention as soon as possible.
2. Do not smoke during use. Nicotine reduces the blood flow to the hands and
fingers, increasing the risk of vibration-related injury.
3. Wear suitable gloves to reduce the vibration effects on the user.
4. Use tools with the lowest amount of vibration when there is a choice between
different processes.
5. Do not use for extended periods. Take frequent breaks when using this tool.
6. Let the tool do the work. Grip the tool as lightly as possible (while still keeping
safe control of it).
WARNING! If abnormal vibrations occur, stop using this tool immediately.
UNPACKING
WARNING! Do not operate the tool if any part is missing. Replace the
missing part before operating. Failure to do so could result in a malfunction
and personal injury.
Remove the parts and accessories from the packaging and inspect for damage.
Make sure that all items in the parts list are included.
Contents:
• Electric threader
• Pipe support clamp
• 4 pc Dies: 1/2, 3/4, 1, 1-1/4 in.
Visit www.princessauto.com for more information 7

8639379 Portable Electric Pipe Threader Kit V 4.0
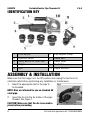
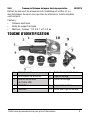
IDENTIFICATION KEY
1
Front Handle
6
Pipe Support Clamp
2
Direction Switch
7
Clamp Rod
3
Safety Button On Other Side
8
Clamp Lever
4
Trigger
9
Die Holder
5
Dies
10
Clamp Rod Slot
ASSEMBLY & INSTALLATION
Make sure that the trigger is in the Off position and unplug the tool from its
electrical outlet before performing any installation or maintenance.
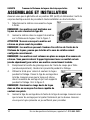
1. Select the appropriate die for the pipe to
be threaded.
NOTE: Dies are intended for use on standard 40
steel pipe.
2. Insert the die into the die holder of the pipe
threader. See figure 1.
CAUTION! Make sure that the die is secured in
place before proceeding.
8 For technical questions call 1-800-665-8685

V 4.0 Portable Electric Pipe Threader Kit 8639379
NOTE: Dies can be inserted from either side of the pipe threader, provided
the clamp and rotation direction are properly configured.
NOTE: The dies are held in place with a retaining ring. Removing a
properly inserted die may require light tapping with a wooden mallet
(sold separately).
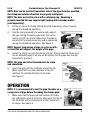
3. Fill the oil can with thread cutting oil (sold separately). Keep it nearby
during the threading operation.
4. Use the clamp assembly to secure and support
the pipe during threading operation. Screw the
clamp rod into the clamp. Make sure the pipe is
secured to the clamp assembly and is supported
during the threading operation. See figure 2.
NOTE: Support long pieces of pipe in a vice or with
a stand that will support the weight of the pipe.
5. Install the clamp rod into the clamp rod slot. Ensure that the clamp lever
can be adjusted easily from above. Be certain that the pipe has enough
clearance to proceed.
NOTE: The pipe end to be threaded must be clean
and chamfered.
6. Insert the pipe into the toothless end of the die.
Make sure that the inside diameter of the die
matches the outside diameter of the pipe.
See figure 3.
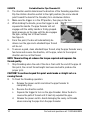
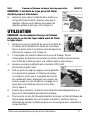
OPERATION
NOTE: It is recommended to test the pipe threader on a
scrap piece of pipe before threading the chosen pipe.
1. Make sure that the pipe end and threads of the die
are sufficiently oiled at all times, otherwise, the life of
the die blade will be shortened and the threads will
be rough. See figure 4.
Visit www.princessauto.com for more information 9

8639379 Portable Electric Pipe Threader Kit V 4.0
2. The direction switch determines the direction of the threading operation.
Flip the rotation direction switch to the right position (the arrow should
point toward the head of the threader) for a clockwise rotation.
3. Make sure the trigger is in the Off position, then plug in the tool.
4. While holding the handle, press the trigger in and
squeeze the handle. The pipe threader will not
engage until the safety handle is firmly grasped.
Apply pressure on the pipe until the die engages
the pipe, cutting two to three threads.
See figure 5.
5. From this point, the die will automatically be
drawn over the pipe and a standard taper thread
will be cut.
6. To ensure a good, clean standard taper thread, stop the pipe threader every
few turns and reverse the direction, oil the pipe, return to the original
direction and re-cut the thread.
NOTE: Thread cutting oil reduces the torque required and improves the
thread quality.
7. Stop threading when the end of the die is flush with the end of the pipe. At
this point, the correct thread length has been reached to produce the
proper joint.
CAUTION! To continue beyond this point would make a straight cut or a
running thread.
8. To finish the threading operation:
a. Release the power switch and allow the pipe threader to
completely stop.
b. Reverse the direction switch.
c. Squeeze the trigger to turn on the pipe threader. Allow the die to
reverse the path of thread until it has fully expelled the pipe.
d. Release the power switch. Avoid damaging the newly cut threads
when removing the pipe from the pipe threader.
10 For technical questions call 1-800-665-8685

V 4.0 Portable Electric Pipe Threader Kit 8639379
NOTE: Hold the pipe threader firmly when backing the pipe out of
the pipe threader.
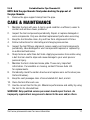
9. Remove the pipe support clamp from the pipe.
CARE & MAINTENANCE
1. Maintain the tool with care. A tool in good condition is efficient, easier to
control and will have fewer problems.
2. Inspect the tool components periodically. Repair or replace damaged or
worn components. Only use identical replacement parts when servicing.
3. Keep the tool handles clean, dry and free from oil/grease at all times.
4. Follow instructions for lubricating and changing accessories.
5. Inspect the tool fittings, alignment, power supply cord and components
periodically. Have damaged or worn components repaired or replaced by
an authorized technician.
6. Sharp tools are safer than dull tools. Applying excessive force while using
a dull tool can lead to slips and cause damage to your work piece or
personal injury.
7. Maintain the tool's label and name plate. These carry important
information. If unreadable or missing, contact Princess Auto Ltd.
for replacements.
8. Periodically check the carbon brushes and replace worn out brushes (see
Carbon Brushes).
9. Keep the vent passages clear of accumulated dirt, dust, and oil.
10. Clean the tool after each use.
11. Use the correct tool for the job. Maximize performance and safety by using
the tool for its intended task.
WARNING! Only qualified service personnel should repair the tool. An
improperly repaired tool may present a hazard to the user and/or others.
Visit www.princessauto.com for more information 11

8639379 Portable Electric Pipe Threader Kit V 4.0
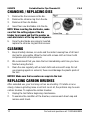
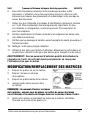
CHANGING / REPLACING DIES
1. Remove the four screws on the die.
2. Remove the chrome ring from the die.
3. Remove all four die blades.
4. Insert four new die blades into the die.
NOTE: When inserting the die blades, make
sure that the cutting edges of the die
blades face inward and that the number on
each die blade is at the top and in sequence.
5. Once the die blades are properly inserted,
replace the chrome ring and four screws.
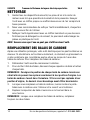
CLEANING
1. Keep all safety devices, air vents and the motor housing free of dirt and
dust as far as possible. Wipe the tool with a clean cloth or blow it with
compressed air at low pressure.
2. We recommend that you clean the tool immediately each time you have
finished using the tool.
3. Clean the saw regularly with a moist cloth and some soft soap. Do not
use cleaning agents or solvents; these could damage the plastic parts of
the tool.
NOTICE! Make sure that no water can seep into the tool.
REPLACING CARBON BRUSHES
After extended use, your tool may not run as smoothly. If it starts or runs
slowly, makes a grinding noise or will not run at all, the problem may be worn
carbon brushes. To replace the carbon brushes:
1. Unplug the tool before beginning maintenance.
2. To examine the condition of the brushes, unscrew each brush cap and
remove each brush.
12 For technical questions call 1-800-665-8685

V 4.0 Portable Electric Pipe Threader Kit 8639379
NOTE: Record the position of each carbon brush as you remove it, so you
can replace them in exactly the same way. Carbon brushes wear into the
armature. If they are replaced in a different orientation, they will have to
undergo additional wear before they will fit properly again.
3. When replacing a carbon brush, insert it into the brush holder carbon end
first, with the spring end to the outside.
4. Replace the brush cap and tighten it by turning it clockwise.
NOTE: When replacing carbon brushes, always replace both brushes at the
same time.
5. After replacing the carbon brushes, let the tool run for 2 minutes before
use. This will allow the carbon brushes to wear into the armature.
LUBRICATION
All bearings in this tool are lubricated with a sufficient amount of high grade
lubricant for the life of the tool under normal conditions. Therefore, no further
lubrication is required.
NOTICE! NEVER use a penetrating oil to lubricate the tool. Penetrating oil
may act as a solvent that can break down the grease and cause the tool to
seize up.
STORAGE
Store the tool in a cool dry place, out of the reach of children.
DISPOSAL
Recycle a tool damaged beyond repair at the appropriate facility.
Contact your local municipality for a list of disposal facilities or by-laws for
electronic devices, batteries, oil or other toxic liquids.
Visit www.princessauto.com for more information 13

8639379 Portable Electric Pipe Threader Kit V 4.0
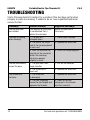
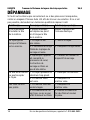
TROUBLESHOOTING
Visit a Princess Auto Ltd. location for a solution if the tool does not function
properly or parts are missing. If unable to do so, have a qualified technician
service the tool.
Problem(s) Possible Cause(s) Suggested Solution(s)
The die head can’t
be installed.
The position of the circlip
is so defelcted that it
blocks the die head.
Adjust the position of
the circlip.
The pipe is slipping
when working.
1. The pipe isn’t
clamped down.
1. Clamp down the pipe.
2. The end of the screw
rod of the clamping board
is worn out.
2. Replace the screw rod.
3. After the machine has
carried out the recession
order, the clamping
structure releases
slightly by itself.
3. Install the clamping again.
The die head cannot
accept the pipe.
1. The pipe has a tool
large chamfer.
1. Cut out the chamfer.
2. The screw die is
worn out.
2. Replace the screw die.
The threads are
not clear.
1. The screw die
is damaged.
1. Replace the screw die.
2. The iron chippings
cannot be discharged and
squeeze the threads.
2. Clean up the iron
chippings in the threads
and then recede it.
14 For technical questions call 1-800-665-8685

V 4.0 Portable Electric Pipe Threader Kit 8639379
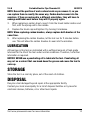
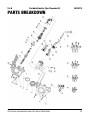
PARTS BREAKDOWN
Visit www.princessauto.com for more information 15

8639379 Portable Electric Pipe Threader Kit V 4.0
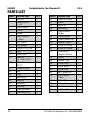
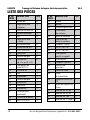
PARTS LIST
PART# DESCRIPTION QTY
1 M5 Nut 6
2 Head Capsule
– Left
1
3 Worm Wheel 1
4 Circlip 1
5 Screw 6
6 Head Capsule
– Right
1
7 Flat Spacer 4
8 Play Spacer 4
9 Screw ST4.9 x 35 2
10 Cap 1
11 Blind Ring 2
12 Bearing
(ɸ 17xȹ 12x12)
2
13 Plane Bearing
51101
2
14 Endless Screw 1
15 Key 1
16 Gear 1
17 Blind Ring 1
18 Bearing 1
19 Armature 1
20 Bearing 1
21 Bearing Sheath 1
22 Armature Ring 1
PART# DESCRIPTION QTY
23 Screw ST3.9x75 2
24 Stator 1
25 Housing 1
26 Nameplate 1
27 Carbon Brush
Holder
2
28 Carbon Brush 2
29 Carbon Brush Cap 2
30 Handle - Right 1
31 Screw ST3.9x16 3
32 Screw ST3.9x45 4
33 Positive and
Negative Switch
1
34 Switch 1
35 Handle - Left 1
36 Press Plank 1
37 Cable Jacket 1
38 Power Plug 1
39 5x12 Brake Pin 1
40 Pipe Support
Clamp
1
41 1/2 in. Die 1
42 3/4 in. Die 1
43 1 in. Die 1
44 1-1/4 in. Die 1
16 For technical questions call 1-800-665-8685
Page is loading ...
Page is loading ...
Page is loading ...
Page is loading ...
Page is loading ...
Page is loading ...
Page is loading ...
Page is loading ...
Page is loading ...
Page is loading ...
Page is loading ...
Page is loading ...
Page is loading ...
Page is loading ...
Page is loading ...
Page is loading ...
Page is loading ...
Page is loading ...
Page is loading ...
Page is loading ...
-
 1
1
-
 2
2
-
 3
3
-
 4
4
-
 5
5
-
 6
6
-
 7
7
-
 8
8
-
 9
9
-
 10
10
-
 11
11
-
 12
12
-
 13
13
-
 14
14
-
 15
15
-
 16
16
-
 17
17
-
 18
18
-
 19
19
-
 20
20
-
 21
21
-
 22
22
-
 23
23
-
 24
24
-
 25
25
-
 26
26
-
 27
27
-
 28
28
-
 29
29
-
 30
30
-
 31
31
-
 32
32
-
 33
33
-
 34
34
-
 35
35
-
 36
36


Ask a question and I''ll find the answer in the document
Finding information in a document is now easier with AI
in other languages
Related papers
-
Power Fist 9046095 User manual
-
Power Fist 8871584 Owner's manual
-
-
-
-
-
-
-
-
Other documents
-
Powerfist 9033358 Owner's manual
-
-
-
-
-
-
-
Gardner Bender B1000PT-RTL Operating instructions
-
-