Page is loading ...

1
UCEC USB 2.0 UVC
Video Capture All in One
Quick Start Guide
Thanks for your support, UCEC USB2.0 UVC Video Capture product. The following steps will guides you how to
set it up. Hope this device will bring you nice digital experience.
IMPORTANT: The included software is for windows. If you use Macbook, you can directly use the QuickTime
Player to capture your video, But if you use Windows Computer, here provide you with 2 types of video capture
and edit software ( VHS to DVD 3.0 SE and OBS Studio) , you can install any one of them depending on your
needs.
BOX CONTENTS
● UCEC USB2.0 UVC Video Capture
● Software CD and Quick Start Guide
● Composite (RCA) Cable
NOTE:
UCEC provides 24-hour technical support. Please feel free to contact us if you have any questions. If you are not
satisfied with our products, UCEC offers 30-day money-back guarantee.
CONTACT US:
♦ Send the message to us by your order detail page. (Reply within 24 hours)
Our goal is to bring you the best shopping experience on Amazon. We’d really appreciate it if
you can share your experience with our product on Amazon.

2
Contents
Part 1. Connections............................................................................................................................... 2
♦ OVERVIEW...................................................................................................................................2
♦ The function of each port of UCEC All-in-One Video Capture..............................................3
♦ Connection Types........................................................................................................................ 3
Part 2. How to use UCEC All-in-One Video Capture on MacBook................................................ 4
►Steps:............................................................................................................................................ 4
Part 3. How to capture video on Windows Computer?.................................................................... 9
♦ How to use Honestech VHS to DVD 3.0 on Windows Computer?...................................... 9
1. Install the drivers.....................................................................................................................9
2. Install VHS to DVD 3.0SE..................................................................................................... 9
3. Starting honestech VHS to DVD 3.0....................................................................................9
♦ How to use OBS Studio on Windows Computer?.................................................................14
1. Install the drivers..................................................................................................................14
2. Install OBS Studio................................................................................................................14
3. Starting OBS Studio............................................................................................................ 14
4. Some Personalized Settings..............................................................................................20
Part 4. Troubleshooting.......................................................................................................................21
1. Installation Problems...............................................................................................................21
2. Video Problems........................................................................................................................21
2.1 No video......................................................................................................................................20
2.2 Black & White video................................................................................................................... 20
2.3 Choppy video or Choppy audio...................................................................................................20
2.4 Can't recognize this video capture when is plugged into any of the USB
Port?................................................................................................................................................ 21
3. Converting PAL / NTSC (and other video standards)...................................................22

3
Part 1. Connections
♦
OVERVIEW
♦ The function of each port of UCEC All-in-One Video Capture
1. USB PORT – Connect the USB port of device to an available USB 2.0 port on your computer (preferably a port
on the real panel).
2. AUDIO INPUTS (red and white) – Use standard RCA cables to connect these left and right audio inputs to
the left and right audio outputs of your playback device. Be sure to match the colors properly – red to red (right
channel), white to white (left channel).

4
3. COMPOSITE VIDEO INPUT (yellow) – Use a standard composite video cable to connect this input to the
composite video output of your playback device.
4. S-VIDEO INPUT (black) – Use a standard S-Video cable to connect this input to the S-Video output of your
playback device.
♦ Connection Types
There are two kinds of video connection types: RCA(Composite) or S-Video. You only can choose one of
them.
● RCA(Composite) Connection:
● S-Video Connection:
If your camcorder has a standard S-Video output connection, use the appropriate S-video and
composite audio connection(White & Red Port). An extra S-video cable is necessary for it.
S-Video cables can transmit a higher quality video signal than regular RCA (Composite) cables,
but they do not carry an audio signal. RCA (Composite) audio cables are still required when
You are making an S-Video connection.
NOTES:
● To capture a video’s sound, connect the left and right AUDIO INPUTS to the left and right audio outputs of your
playback device.
● To capture video with scart output, you should buy one scart-composite converter.
● Please don’t connect composite video and S-Video at the same time.

5
Part 2. How to use UCEC All-in-One Video Capture On
MacBook
The software that we provided is for Windows computer. So if you use Macbook or iMac, you can directly use
QuickTime Player to capture your video.
►Steps:
1. Connect the RCA cable to the video capture card and your VCR, Digital Camcorder, DVD player, TV. Insert the
USB port of the Video capture card to your MacBook. Wait a minute and the system will automatically install the
hardware drivers.
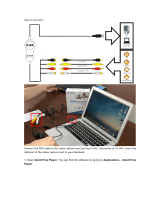
2. Open QuickTime Player. You can find the software by going to Applications – QuickTime Player. (Next
Page)

6
3. After the software opens, click the File menu and select New Movie Recording.
4. Click the Drop Box next to Red Record icon, and select AV TO USB2.0 under Camera and Microphone
option. (Next Page)

7
5. To start recording. Play your video source (connected to Video Capture device), click Red Record icon to start
recording. The Red Record icon will turn grey. You can adjust the volume by drag the volume bar. (Next Page)
Drop Box

8
6. When you are done capturing your video, click Grey Stop Recording icon in the screen to stop recording.
QuickTime Player automatically saves your captured videos as .mov file.
For more information on using QuickTime Player, please click Help on panel.

9
Part 3. How to capture video on Windows Computer?
You can install VHS to DVD 3.0 SE or OBS Studio to capture your videos. We recommend you to install VHS
to DVD 3.0 SE which is easy to use, supports burning to DVD, and can be shared on social media. Or you can
choose OBS Studio, Because can provide you more output settings.
♦ How to use Honestech VHS to DVD 3.0 on Windows Computer?
1. Install the drivers
Connect the RCA cable to the video capture card and your VCR, Digital Camcorder, DVD player, TV. Insert the USB
port of the Video capture card to your Computer. Wait a minute and the system will automatically detect and install
the hardware drivers.
2. Install VHS to DVD 3.0SE
2.1 Disable any Anti-Virus or Anti-Spyware. Insert the CD into your computer’s CD drive. Double click MY
Computer then double click the CD. Once the CD’s contents are show up, Open the folder “Honestech VHS to
DVD 3.0 SE”, double click Setup.exe.
2.2 Click “Next” to continue to install the software. Read the License Agreement. Click [Next >] after accepting the
License Agreement to continue with the installation. Choose the setup language and click “Next” to continue. The
setup status screen will display the installation progress. Please wait until is complete.
2.3 After the installation is finished, click Exit and eject the CD. We recommend restarting your computer once
more before using the software.
3. Starting honestech VHS to DVD 3.0
3.1 Double-click the “honestech VHS to DVD 3.0 SE” icon on your desktop. You need to enter the Product Key
when you use this software for the first time. The Product Key is printed on the sticker on the CD sleeve.

10
3.2 Click on the (1.Capture tab) in the upper left-hand comer of the screen. Click the Option tab in the bottom
right of the screen.
3.3 Click the drop-down box next to Video menu, and select AV TO USB2.0 from the list and Click the
drop-down box next to Audio menu and select AV TO USB2.0 from the list. (Next Page)

11
3.4 Click the drop-down box next to Format, and select what video format you want. And click Setting menu that
is next to the drop-down box to choose capture resolution. Click OK when is done.
3.5 Click the drop-down box next to Video Type, and choose video standard - PAL or NTSC. In the US, Mexico
and Japan, Select NTSC. For Europe, Please select PAL.

12
3.6 At the bottom of Option window, (click … ) menu next to Output Folder tab to select where you want to
save your captured video. Click OK when you are done all the options.
3.7 Play your video source (with your Video Capture device connected), and click Record button to start
recording. When you finish, click the Stop button.
3.8 The captured videos will be shown in the right panel of main window. Click the 3. Burn tab, and select the
captured video to burn DVD or other type disc format. You can learn more by clicking "?" icon in the upper right
corner and selecting Help to open the user manual, VHStoDVD3UserGuide.pdf
3.9 Click the second tab – You Tube in the bottom right corner to upload the video to your YouTube account
(you will need to enter your accounts username and password, etc.).

13
3.10 To edit your video, click the 2. Edit tab. This allows you to create transitions, apply effects, and more. You
can learn more by clicking "?" icon in the upper right corner and selecting Help to open the user manual,
VHStoDVD3UserGuide.pdf.
3.11 To learn more about the software’s features, double click the Honestech VHS to DVD 3.0 SE User Guide
shortcut icon on your computer’s desktop. Or click ? menu in the upper right corner and select Help to open the
user manual, VHStoDVD3UserGuide.pdf
Click this icon

14
♦ How to use OBS Studio on Windows Computer?
1. Install the drivers
1.1 Connect UCEC USB2.0 UVC Video Capture to a free USB 2.0 port on your computer. The system will install
automatically the hardware drivers.
1.2 Click on the “Sound, video and game controllers” on the Device Manager, you should see the “AV TO
USB2.0”, that means driver installed rightly.
1.3 Insert the installation CD into the CD/DVD drive on your computer.
2. Install OBS Studio
2.1 Insert the installation CD into the CD/DVD drive on your computer.
2.2 Double click MY Computer then double click the CD. Once the CD’s contents are shown, Open the folder
“OBS Studio”.
2.3 If your Windows system is 64-bit, please double click OBS-Studio-23.0.2-Full-Installer-x64.exe. If your
Windows system is 32-bit, please double click OBS-Studio-23.0.2-Full-Installer-x86.exe
2.4 After the installation is finished, click Exit and eject the CD.
3. Starting OBS Studio
3.1 To open the software, double click the shortcut icon on your computer’s Desktop.
3.2 Connect the RCA cable to your DVD, VCR, VHS audio and video connectors.
3.3 Open OBS Studio and point "+" at the source.
3.4 Select to add "Video Capture Device" and click "OK" in the sources box. (Next Page)

15
3.5 In the Device box, the default is your camera lens. Here we need to select "AV to USB2.0".
3.6 You click “Configure Video” to adjust Brightness, Contrast, Hue and Saturation Control for a good picture
quality. (Next Page)

16
3.7 In the Device box, you need to drag the scroll bar to the bottom and choose “Capture audio only” in the
Audio Output Mode. Then you need to check the “Use custom audio device” and select “Microphone (2-AV
TO USB2.0)”. Click ”OK”.
3.8 Mute all audio sources (except the video capture device) in the audio section. (Next Page)
Microphone (2-AV
TO USB2.0)

17
3.9 Under Settings > Video, set the Base Resolution to 480x333 (standard VHS resolution), or you can select
other resolution according to your device. Hit “Apply”.
Mute all audio sources (except the video
capture device) in the audio section. Just
click the speaker icon

18
3.10 When you start playing VHS videos, you can adjust the image size and position to fit and be centered in the
black "canvas." If you want to crop some of the original image, Hold down the "ALT" key while grabbing and
moving one the 'bubbles' on the frame. Otherwise, grabbing them retains original aspect ratio and won't crop.
Hold down the "ALT" key while
grabbing and moving one the
'bubbles' on the frame

19
3.11 Hit Start Recording and play the VHS, DVD or camcorder. Click Stop Recording to stop recording the
video.
P.S. Please note that it is not possible to hear the video sound during recording, but when you saved the
video it will be heard
3.12 Click "File" in the upper left corner and select "Show Recordings" from the drop-down menu to view your
recorded video.
Recording Time
Adjust Volume
Stop Recording
File
Start Recording

20
4. Some Personalized Settings
4.1 You can set a variety of video formats: click on the upper left corner of the "File", appear drop-down menu,
select "Settings"
4.2 In the "Settings" interface, select "Output", you can select the recording video save path, set the output
format of the recorded video. Select OK to finish.
Setting
/