Page is loading ...

www.GEAppfiances.com
©
©
Safety Instruaions ......... 2, s
Operating Instructions
Control Knob Models ....... 6, 7
Touch Pad Models .......... 4, 5
Care and Cleaning
Air Fiher . .................. 8
Grille and Case .............. 8
Outdoor Coils ............... 8
Installation Instruc_tions
Preparing to Install tile
Air Conditioner . ............. 9
Window Installation ....... ] 0-14
Troubleshooting Tips .... 15, 16
Normal Operating Sounds .... 16
Consumer Support
Consumer Support .......... 20
Product Registration ...... 17, 18
_A'arranty .................. 19
A GFI 8 A GL24
A GL l 8 A CN24
A CM l 8 A GQ24
AGNI8 AGV24
AGQI8 AGW24
AGVI8
©
Write the model and serial numbers here:
Model #
Serial #
Find these numbers on a label on the
side of the air conditione_:
3828.42029614 49-7448 11-02JR

IMPORTANTSAFETYINFORMATION.
READALLINSTRUCTIONSBEFOREUSING.
WARNING!
For your safe_ the information in this manual must be followed to minimize the risk of fire, electric shock
or personal injury.
SAFETYPRECAUTIONS
Use this appliance only %r its intended
pni])ose as described in this Owner's
Manual.
This air conditioner must be properly
installed in accordance with dxe Installation
h_structions before it is used.
q?{:_Turn the mode control to 0FFand unplug
your air conditioner before making any
repairs or cleaning.
NOTE.'X_estrongly recommend that any
servicing be performed by a qualified
individual.
Never unplug your air conditioner by
pulling on the power cord. Alwws grip
plug firefly and pull straiOit out fiom the
receptacle.
Repair or replace immediately all elecu_ic
service cords that hme become fiwed or
otherwise damaged. Do not use a cord that
shows cracks or abrasion damage along its
lengflx or at either the ping or connector
end.
;_;Fox your safety...do not store or use
combustible mamrials, gasoline or oflxer
flammable vapors or liquids in the vicinity
of this or any other appliance.
;fi:,:All air conditioners contain refligerants,
which under federal law must be remoxed
plJor to product disposal. If you are getting
rid of an old product with refl_igerants, check
with the company handling disposal about
what to do.
HOWTOCONNECTELECTRICITY
Do not, under any circumstances, cut or remove
the third (ground) prong from the power cord. For
personal safety, this appliance must be properly
grounded.
The power cord of dfis appliance is equipped
with a 3-prong (grounding) plug which mates
with a standard 3-prong (grounding) wall
outlet m minimize the possibility of electric
shock hazard fiom this appliance.
Hme the wall outlet and circuit checked by a
qualified electrician to make sure the outlet is
properly grounded.
Where a 2-prong wall outlet is encountered
it is your personal responsibility and obliganon
to hme it replaced with a properly grounded
3-prong wall outlet.
The air conditioner should always be
plugged into its own individual electrical
outlet which has a xoltage rating that matches
the rating plate.
This provides the best performance and also
prments oxerloading house wiring circuits
which could cause a fire hazard flom
oxerheated wires.
See the Installation Instructions, Electrical
Requirements section fox specific electdca]
connection requirements.
2

GEAppliances.com
A WARNING!
USEOFEXTENSIONCORDS--115-Voltmodelson/)/
Because of potential safety hazards under certain
conditions, we strongly recommend against the
use of an extension cord.
Howex>_; if you must use all exmnsion cord,
it is absolumly necessm y flint it be a UL-lismd,
14 gauge, 3-wi_e grounding type appliance
extension cord having a grounding type plug
and outlet and that file electrical radng of the
cord be 15 amperes (minimum) and 195 volts.
-&CAUTION:
DO NOT use an extension cord with any of
the 230/208 volt models.
USEOFADAPTERPLUGS--115-Voltmodelsonly
Because of potential safety hazards under certain
conditions, we strongly recommend against the use
of an adapter plug.
Howe_l; if you must use all adapmi; where
local codes permit, a temporaryconnectionmay
be made to a properly grounded 9-prong wall
outlet by use of a UL-lismd adaptor available at
most local hardware stores.
The larger slot in the adapter must be aligned
with tile larger slot in the wall outlet to proxqde
proper polarity in the connection of the power
cord.
V_'l:,endisconnecting the power cord flora the
adapmi, alwws hold the adaptor in place with
one hand while pulling the power cord plug
with tile other hand. If this is not done, the
adaptor ground mrminal is x>iT likely' to break
with repeamd use.
If the adapter ground terminal breaks, DO NOT
USEthe air conditioner until a proper ground
has been established.
Attachingtheadaptergreundterminalto a waftoutlet
coverscrewdoesnot groundtheapplianceunlessthe
coverscrewis metal,andnot bsulated, andthe wall
outlet isgroundedthroughthe housewiring. Youshould
havethecircuitcheckedby a qualifiedelectricianto
makesuretheoutlet is properlygrounded.
READANDFOLLOWTHISSAFETYINFORMATIONCAREFULLY.
SAVETHESEINSTRUCTIONS

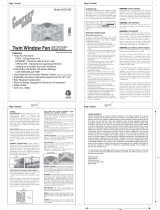
Aboutthe controlsontheair conditionermmodels with touchpads.
Features and appearance will vary.
(;eel on
Fanon
Energy
Saveror
Air ConditionerControls RemoteControl
Controls
o ON/OFFPad
TtlFns aiI" (-onditionei" on and of].
Oisplav
Shows the set temperature or time remaining
on timer.
O MODE
Use to set the air conditioner to COOL or
FANmode.
O Increase •/Decrease • Pads
Use to set temperature when in COOL mode.
O AN Pad
Use to setthe tm_speedto LOW(FI),MED(F2)
or HIGH(1:3).
O NERGYSAVER--Conm_ls the tim.
(on some models)
O/_-The tim and compressor cycle on and
oil This results in wider \m'iations of room
temperature and humidity. Nommlly used
when the room is unoccupied. Note:Thefan
will continueto runfor a short timeafter the
compressorcycles off
OFF The tim runs all the time, while the
COI/II)I'eSSOI"cycles on and ott_
This teattli'e must be set at OFFinorder to use
the tan settings (on the mode control).
Note:Onsomemodels,theENERGYSAVER
feature cannot be set on the air conditioner.
It must be set usingthe remote control
O CIRCUUIIRE(onsomemodels)
FoI" con[intiotis side-to-side air ciI'('tIlation
(cool settings only), set the Circulaire switch
to ON.
For fixed side-to-side air direction, turn ON
until the desired air direction is obtained,
then turn it OFF.
O TIMER Pad
ON--_._qmn the air conditioner is off, it can be
set to automatically come on in 1 to 12 horus
at its i)revious setting. Each touch will set the
timer in hotu_.
OFF "X._q_en the air conditioner is on, it can be
set to autoinaficallv turn off in 1 to 12 houI_.
Each touch will set the timer in horns.
Tocancel the timer, press the TIMERpad until
the displa) time disappeai_.
O Remote Control Signal Receiver
4
Remote Control
iJi::To ensure proper operation, aim the
remote control at the signal receixer
on the air condifionei:
iJi::The remote control signal, has a range, of uI)
to 21 teet.
::Ji::Make sure nothing is between the air
conditioner and the i'eil/ote control
that could block the signal.
::Ji::Make sure batteries are ti'esh and installed
correctly as indicated on the remote control.

Lights next to the touch pads on the air conditioner
control panel indicate the selected settings.
GEAppliances.com
COOLMode
Use tile COOLInode with HIGH(F3),MED(F2)or
LOW(F1)tim for cooling. Use the INCREASEA/
DECREASEVpads to set the desired temperature
between 60°F and 86°F in l°F increments.
An electronic them/ostat is used to maintain the
room temperature. The compressor will (-)'de on and
off to keep the room at the set level ot comfi)rt. Set
the them(ostat at a lower number and the indoor air
will become (()()let: Set the them/ostat at a higher
number and the indoor air will become warn(eL:
NOTE."ff theak conditioneris off and isthenturnedon
whileset to COOL,it will take approximately3 minutes
for the compressorto startand coolingtobegin.
CoolingDescriptions
ForNormalCooling---Select the COOLm(>de and
HIGH(F3)or MED(F2)lim with amiddle set
temperature.
ForMaximumCooling---Select the COOLmode
and HIGH(F3)tilt( with a lower set temperatm'e.
ForQuieter& NighttimeCooling---Select the
COOLm(>de and LOW(FI)tilt( with a middle set
temperamre,
NOTE:If youswitch from a COOLsettingto OFForto
a fan setting,wait at least3 minutesbeforeswitching
back to a COOLsetting.
FAN Mode
Llsethe FANat HIGH(F3),MEO(F2)or LOW(FI)t(>
provide air circulation and filtering without cooling.
Since tim only settings do not provide cooling,
a temperature setting will not lye displayed.
Vent Control
The vent control is located on the inside ot the air
lou\'et_ on the lower right side.
When set at CLOSE,only the air inside the room will
lye circulated and conditioned. V_q(en set at OPEN,
some inside air is exhausted outside.
To open the vent, pull the lever toward you.
To close it, push it ix(.
Air Direction--Up and Down
Fingertip pressm'e on the bank of horizontal lou\'et_
a()iusts the air direction up or down.
5

Aboutthecontrolsontheair conditionermmodelswith controlknobs.
Features and appearance will vary.
OFF
HIGHQHIGH
FAN COOL
LOW MED
FAN COOL
LOW
COOL
OFF
HI OIHI
FAN OOL
LOW .OW
FAN COOL
MODECONTROLS
Yourmodel will have one of the above type controls.
TEMPCONTROLS
Yourmodel will have one of the above type controls.
Controls
o ode Controls
HIGH COOL,MED COOLand LOW COOLpro'dde
cooling with different tim speeds.
FAN settings provide air circulation and
filtering without cooling.
NOTE."If youmove themode control froma coolsettlbg to
OFFor to a fansetting, wait at least3 minutesbefore
switchlbg back toa coolsettlbg.
Cooling Descriptions
For Normal Cooling--Select HIGH COOLor MED
COOLwith the temp control at midpoint.
For Maximum Coolin#---Select HIGH COOL with the
temp control at the highest number available on
VOIIY knob.
TempControls
The temp control is used to maintain the
room temperature. The compressor will cycle
on and off to kee I) the room at the same
level of comfort. When you turn the knob to
a higher number the indoor air will become
coole_: Turn the knob to a lower number and
the indoor air will become wmme_:
ForQuieter& NighttimeCooling--Select LOW COOL
with the temp control at midpoint.

GEAppliances.com
Additional controls and important information.
Energy Saver (on some models)
The energy' saver switch controls the Imp.
0/_-The tim and compressor cycle on and off
together: This results in wider \_riations _ffroom
temperature and lmmiditv. Nommllv used when
the room is tmoccupied.
OFF The tim rtms all the dine, while the
compressor cycles on and off.
This switch must be set at OFFin order to use
the tm_ settings (on the mode control).
Vent Control
The vent control is located above the control
knobs.
_]_en set at CLOSE,only the air inside the room will
be circtflated and conditioned. _4_en set at OPEN,
some inside air is exhausted outside.
To open the vent, ptfll the lever toward you.
To close it, push it in.
Air Direction--Side-to-Side
CIRCULAIRE(on some models)
For fixed side-to-side air direction, set the
Circtflaire switch to ON tmtil the desired air
direction is obtained, then move it to OFF.
For contintloUS side-to-side air circulation (cool
settings only), set the Circtflaire switch to O/V.
OFF
CIRCULAIRE
ON
Air Direction--Up and Down
Fingertip pressm'e on the bank oI horizontal
louve_ a(!justs the air direction up or down.
7

Careand cleaningoftheair conditioner.
Grille and Case
Turn the air conditioner off and remo;e the To clean, use water and a mild deteroent Do not
plug, fl'om the wall outlet before cleaning, use bleach or abrasives.
OutdoorCoils
The coils on the outdoor side (ff the air conditioner
should be checked regularly. If they are clogged
with dirt or soot they may be proti_ssionally steam
cleaned, a service available through pmr GE
service outlet.
Air Filter
The air filter behind the ti'ont grille should be
checked and cleaned at least evec_' 30 dm_s or more
ol_teil i[ necessai_i.
Toremove:
] Open the inlet grille up_ard b) _ullin,, out the
bottom of the inlet grille.
] Using the rob, pull up slightly on the filter to
release it and pull it down.
Clean the filter with warn/, SOalU water; Rinse and
let the filter (h T beiore replacing it.
CAUTION:DONOToperetethe ak conditioner without a
filter becausedlTtand/ibt will dog it and reduceperformance.
8

Preparingto installtheair conditioner.
Read these instructions completely and carefully.
BeforeYouBegin
NOTE TOINSTALLER:Leave these instructions with
the air conditioner after installation is completed.
NOTE TOCONSUMER:Keep this Owner's Manual
and Installation Instructions for future use.
IMPORTANT NOTES:
For personal safety, this air conditioner must be
properly grounded.
It is important to have the wall outlet and circuit
checked by a qualified electrician if there is any
doubt as to whether a proper ground exists.
CAUTION:
Do not, under any circumstances, cut or
remove the third (ground) prong from the
power cord.
Do not change the plug on the power cord
of this air conditioner.
Aluminum house wiring may present
special problems--consult a quafified
electrician.
Follow National Electric Codes (NEC)and/or local
codes and ordinances.
ElectricalRequirements
@
Some models require l 15/120-volt a.c.,
60 Hz gromMed outlet protected with
a ] 5-amp time delay fllse or drcuit
breaker:
The ?,prong grotmding plug minimizes the
possibili_' of electric shock haa_rd. If the wall outlet
you plan to use is only a 2-prong outlet, it is w)ur
responsibility to have it replaced with a properly
grotmded 3-prong wall outlet.
(_ ome models require 230/208-volt a.c.,
protected with a time dela_ filse or circuit
breaker. These models should be installed
on their own sin,de branch circuit fin"bestperlom/ance and to prexent oxerloading
house or apartment wiring circuits, which
could cause a possible fire hazard fl'om
oxerheafing wires.
ToolsYouWillNeed
::Ji::Phillips-head screwdi{ver
::Ji::Hat-blade screwdriver
Ruler or tape measm'e
_: Scissm_ or knife
iJi::Pencil
iJi::i,evel
!i_:Hammer

Window InstallationInstructions.
Parts Included
Top mounting rail Window
accLe_ion _oam top _ eal
Pan__ting rai_ind°w__
IIIT sea
Frame guide(2__ _I,__ '______--____ : JJ / acRiogrh_on
_ Sill _acket (2)_ /% panel
"_ S b k 2
Windowl_@_cking _ r_ upport rac et( ) <,, Illll
bracket _
Type A (14) Type B (7) Type C (5) Type D (2)
Y
Carriage Bolt (2)
Lock Nut (4)
10

Read completely, then follow step-by-step.
Window Requirements
_):':These instructions are for a stnn(lard double-
hung window, You will need to moditk' them fin.
other types of windrows.
_):':Tile air conditioner can be installed without tile
accordion panels if needed to fit in a narrow
window. See tile window opening dimensions to
tile right.
_ M1 supporting parts must be secured to finn
WOO(I_ Ill[IsonI_' OI" inetnl,
_:i Tile electrical outlet must be within reach of tile
power cord.
18"rain.
29" to41"
(Withaccordionpanels)
I I
26¼"rain.
(Withoutaccordionpanels)
Storm Window Requirements
A store/window fl'ame Mll not allow tile air
conditioner to tilt towards tile outside and will keep
it fl'om draining properly: To at!just for this, attach
a piece of wood to tile stool.
/ Wood
1/2" higher
titanframe
t Stool
frame
WOODPIECES--
WIDTH: 2"
LENGTH: I,ong enough to fit inside tile window
tI}l Ill e,
THICKNESS: To detei_nline tile thickness, place a
piece of wood on tile stool to make it ]/9" higher
than tile top of tile strum window fl'ame.
Attach secm'elv with nails or screws provided by
tile insmlle_:
11

Window InstallationInstructions.
Remove the Air Conditioner From the Case
_] Remoxe the 2 shipping screws fl'om the back oI
the case.
_] Remove the 2 screws on each side of the case.
Keep these fin" later use.
Shippingscrews
[_] Slide the air conditioner from the case b}
,griII) )ing, the base I)an handle and I)ullin°-,
fin'ward while bracing the case.
Prepare the Window and the Case
_]Cut thewindow sash seal to the proper length.
( ) o" "
Peel fl the backm_ and attach the seal to the
tmderside of the window sash.
12
_] Careflfily insert the plastic fl'ame guides into
the bottom of the case on each side.
BottoIllof CaSe
tuide
] Remoxe the backing fl'om the top mounting
rail seal stxip and attach the seal to the bottom
of the top mounting rail.
] Install the top mom_fing rail _fith 3 t}pe A
screws on the inside of the case. Insert the
fl'ames fin" the accordion panels into the top
mounting rail and the ti'ame guides. Attach
the accordion panels to the side of the case
using 5 t},l)e A screws.
Topmountingrail
d%
c_
G_
Frarneguides

Prepare the Window
] I,oosely attach the sill brackets to the
suplxn't brackets using the 2 carriage bolts
and 2 lock nuts.
Supportbracket
Carriage ]
belt
Sillbracket
_] Open the window and mark the centerline of
the window stool. Measure and mark 11" to the
left and right of the centerline.
Centerline
,, *,*," I
Install the Case in the Window
[]Mign the inside edge of the sill brackets with
the 11" marks fl'om the centerline and attach
them to the window sill using, 2 tx,'l_e g screws
on each side.
_] Careflfll) place the case on the window stool
aligning the center front on the bottom with
the centerline marked on the window stool.
(;lose the window making sure the window sash
is behind the top mounting rail.
[_] Using the laroer diameter hole in the case,
attach the brackets to the case, usiw,,_ two t)ipe D
screws and 2 lock nuts on each side.
_] Secure the case to the window stool by
usiw,,_ 3 t)l_e g screws.
i
FD] A(!just the carriage bolts and the lock nuts in
each sui)port so that the case is installed with a
slight tilt to the outside. Lrse a level; about 1/3
bubble will be the correct case slant to the
outside. Tighten the bolts.
CAUTION:DONOTdrilla hole in thebase pan. Theunit Is
designedto operatewith approximately 1/2" of water in the
basepan.
_] Pull the accordion panels to each window
sash track. Attach them on each side to the
window sash and the window stool using
4 _])e C screx_s.
<
13

Window InstallationInstructions.
Install the Window Locking Bracket and the Foam TopWindow Gasket
Cut tile toam top window gasket to tile window[_ Attach tile window locking bracket with a [_
_'pe (_ screw.
width.
I [] Sttlff tile fi)_lIIl between tile glass and tile
window to prexent air and insects from getting
into tile i'OOlil,
Install the Air Conditioner in the Case
_] Slide tile air conditioner into tile case.
• S cRem,_tall the 2 screws remoxed earlier on each
side of the case.
] gefiwe installing the fl'ont grille, pull out the
xent control lexer located aboxe tile unit
control knobs, as shown.
[] Am_ch tile fl'ont grille to tile case b) inserting
tile tabs on tile grille into tile slots on tile front
of the case. Pttsh the grille in until it snaps into
place.
• .%
Guide the lever carefully
through the grille as you
push it in.
] I,itt tile inlet grille and secure tile fl'ont fl'ame
xdth a g])e A screw. I,ower the inlet grille into
place.
14

Beforeyoucall forservice...
Troubleshooting -tips
Save time and money/. Review the chart below first
and you may not need to call for service.
GEAppliances.com
Possible Causes What ToDo
Air conditioner The air conditioner • Make sure tile air conditioner plug is pushed completely
does not start is unplugged, int_) the outlet.
The fuse is blown/circuit • Check the house fllse/circuit breaker box and replace
breaker is tripped, the fl/se or reset the breaker:
Power failure. •/f power thilm'e occurs, turn the air conditioner OFF.
_'hen power is restored, wait 3 minutes to restart the
air conditioner to prevent tripping of the compressor
overload.
Air conditioner does not Airflow is restricted. • Make sure there are no curtains, blinds or fiu'nimre
cool as # should blocking th e fl'ont (ff th e air conditi()ne_:
The temp control may • On models with touch pads: In COOL mode, press the
not be set correctly. DECREASE Vl)ad.
• On models with control knobs, turn the temperatm'e
knob to a higher nmnbe_:
The air Filter is dirty. • Clean the filter :It least eve_y 30 days.
See the OperatingInstructionssecti_)n.
The room may have been hot. • \4]wn the air conditioner is filSt tUlaled on you need to
allow tJi/le _'or the l'oolll to COO1 dowll.
Cold air is escaping. " Check fi)r open flu'nace floor registers and cold air
I'etl/l]lS.
• Set the air conditioner's vent to the closed position.
Cooling coils have iced up. • See "Air conditioner freezing up" below.
Air conditioner Ice blocks the air flow • On models with (ontrol knobs, set the mode control at
freezing up mad stops the air conditioner HIGH FAN or HIGH COOL with the temp ;It I or 2.
from cooling the room.
• On models with touch pads, set the controls at
HIGH (F3) FAN or HIGH (F3) COOL and set the them/osmt
to a higher temperatm'e.
The remote control The batteries are inserted • Check the position of the batteries. They, should be
is not working incorrectly, inserted in the opposite (+) and (-) direction.
The batteries may be dead. • Replace the batteries.
Water drips outside Excessively hot and • This ix nom_al.
hmnid weather.
Water drips indoors The air conditioner is not • For l)r()per water disp_)sal, make sure the air c_m(lifi_ mer
tilted to the outside, slants slightly t]'om the case fl'ont to the re:u:
Water collectsin
basepan
Moisture is removed from
indoor air mad drains into
rear of a cabinet where a fan
blows it against the outdoor
condenser coil.
• This is nomml fi)r a short period in areas Mth lithe
lmmidity; nomml tor a longer period in ve_y hmnid
_lI'e_ls.
15

Beforeyoucall forservice...
Normal Operating Sounds
::Ji::Ym may hear a pinging noise caused by water being
picked up and thrown against tile condenser on rainy
days or when tile lmmidiW is high. This design teature
helps remove moistm'e and improve efficiency.
::Ji::Y_m may hear tile them/ostat click when tile compressor
cycles on and off'.
iJi::Water will collect in tile base pan during high humidi D
or on raim daxs. The water ma_ oxerllow and drip from
tile outdoor side of tile trait.
iJi::Tile t_lll I//}l_ I'11n exen when tile coi//l)ressor does not.
/6

GE Service Protection Plus 'M
GE, a name recognized worldwide fbr quality and dependability, ofi_ers you
Service Protection Plus "--comprehensive protection on all your appliances--
No Matter What Brand!
Benefits Include:
• Backed by GE
• All brands covered
• Unlimited service calls
• All parts and labor costs included
• No out-of-pocket expenses
• No bidden deductibles
• One 800 number to call
We71CoverAnyAppliance.
Anywhere. Anytime.*
You will be COlnpletely satisfied with our service protection or )ou Ina) request )our molae) back
on the remaining value of your contract. No questions asked. It's that simple.
Protect your refl'igeratoi; dishwashei; washer and dlyei; range, TV, V(:R and much more--may brand!
Plus there's no extra charge fiw emelgency selMce and low monthly financing is awfilable. Even icemaker
coverage and fi_od spoilage protection is offered. You can rest easy; knowing that all your valuable
household products are protected against expensive repairs.
g't Jot lot f* _ f* g_ K'IL _ At
Place your confidence in GE and call us in the U.S. toll-free at I'_(IU.DZD.ZZZ°,x
for UlOi'e ilatorlnatiola.
"*Allbl_mds o_xered, up m 20 }<ms _dd. in the _mtin< ntal [.S.
_(MI liar<
Please place in envelope and mail to:
General Electric Company
Warranty Registration Department
EO. Box 32150
Louisville, KY 40232-2150
17

Consumer Product Ownership Registration
Dear Customer:
Thank you for purchasing our product and thank you for placing your confidence in us.
We are proud to ha_e you as a customer!
Follow these three steps to protect your new appliance investment:
Complete mid mail
your Consumer
Product Ownership
Registration today.
t law' the peace of
mind of knowing we
can contact you in
the unlikely (writ o/
a sa/_'w modilication.
Atter mailing tl]e
reg6st ration below,
store ttlis (tocIllIlent
in a sa/b place. It
COlltains inl()rlilation
you will need should
you require service.
Our service nmnber is
800.GE.CARES
(800.432.2737).
[)_('ad VO/IF OwnelT'S
Manual carefully.
It will help you
operate your new
at_pliance properly.
Model Number Serial Number
I I I I I
Important: If you did not get a registration card with your
product, detach and return the form below to
ensure that your product is registered, or register
online at www.GEAppliances.com.
Consumer Product Ownership Registration
Model Number Serial Number
MI: Ms. M_s. Mi_s
Firsl I I Lasll
Naln( I I I I I I I I I Name I I I I I I
I I I I I I
Sl F(!(!I I
Address I I I I I I I I I I I I I I I I I I I I I I I I
, I
I
I
Apt. #, [ I I I I I I I [ E-lllail Address:
Zip ]
tIalePlaced
Month
': Please provide your (-mail address Io r¢ ceiv¢, via e-mail, discounts, spe(ial off( rs and ofll¢r impormnl
communications h-ore (;E Appliances ((;EA).
(_heck h(?l-(?if you do nol want to receive colnlnlltlic_ltiollS froln (;gz\'s careftflly selected partners.
GEAppliances
GEConsomor Prodocts
General Electric Company
tooisville, KenttJcky
/ _ www, GEAppliances,com

Air ConditionerWarranty.
All warranty service provided by our Factory Service Centers,
or an authorized Customer Care®technician. Toschedule service,
on-line, 24 hours a day, visit us at GEAppliances.com, or carl
800.GE.CARES(800.432.2737).
Staple your receipt here.
Proof of the original purchase
date is needed to obtain service
under the warranty.
Fromthedateof the
origina!purchase
FiveYears
Fromthedateofthe
originalpurchase
We Will Replace:
Any partof the air conditioner which tidls due to a defect in matei_ials or workmanship,
Dm_ing this full one-year warranty, we will also proxide, free of charge, all labor and in-home
sei_ice to replace the deiecti_e part,
Any part of the sealed refrigerating system (the compressoi; condensei; exaporator and
all ('ouue('tiug ttlbiug) which thils (hie to a (lefb('t iu ulateYJals oI" woi'kt/laushi[). DtlYJug this
four-yearadditionalwarranty,we will also provide, free of charge, all labor and in-home service
to replace the (lefecti\'e part,
_: Service trips to your home to teach you how to
use the product.
iJi::Improper installation. If you have an installation problem,
or if the air conditioner is of improper cooling capacity
for the intended use, contact your dealer or hlstaJler.
You axe responsible for providing adequate electrical
comlecthlg facilities.
_: Failure of the product resulting from modifications to
the product or due to unreasonable use including failure
to provide reasonable and necessary maintenance.
::Ji::In commercial locations labor necessary to move the
refit to a location where it is accessible for service
by an individual techlticiml.
!i_:Replacement of house fuses or resetting of circuit
breakers.
::Ji::Failure due to corrosion on models not corrosion-
protected.
_: Dmuage to the product caused by improper power supply
voltage, accident, fire, floods or acts of God.
::Ji::h_cidentaJ or consequentiaJ dmuage caused by possible
defects with this air conditioner.
This warranty is extended to the original purchaser and any succeeding owner for products purchased for home
use within the USA. In Alaska, the warranty excludes the cost of shipping or service calls to your home.
Some states do not allow the exclusion or limitation of incidental or consequential damages. This warranty gives
you specific legal rights, and you may also have other rights which vary from state to state. Toknow what your
legal rights are, consult your local or state consumer affairs office or your state's Attorney General.
Warranter: General Electric Company. Louisville, KY 40225
19

ConsumerSupport.
f
k
l GEAppliancesWebsite GEAppliances.com
Hme a question or need assistance with your appliance? Try the GE Al)pliances _,_ebsite 24 hom_ a (la_;
any cla_ of the _ear! For greater comenience and faster service _ou can now download Owner's Manuals,
order parts, catalogs, or exert schedule serxice on-line. You can also "Ask Om Team of Experts ....
VO//I" questions and so I/ltlch i/loi'e...
ScheduleService GEAppliances.com
Expert (;E repair sertice is onl,_ one step awa) fi'om your doo_: Get on-line and schedule your serxice at
your comenience 24 hou_ am dm of the '_ear! Or call 800.GE.(_ARES 800.432.2737) during n(mnal
business h(_u_.
RealLifeDesignStudio GEAppliances.com
GE SUl_ports the Universal Design concept--products, services and environments that can be used b)'
people of all ages, sizes and capabilities. _'e recognize the need to design fi)r a wide range of i)hysical and
mental abilities and impaim_ents. For details of GE's Universal Design applications, including kitchen
design ideas for people with disabilities, check out otlr _'ebsite today. For the hea_ing impaired, please call
800.TDD.GEAC (800.833.4322).
ExtendedWarranties GEAppliances.com
Purchase a (;E extended warrant_ and learn about special discounts that are ax filable while )our warrant}
is still in effect. You can i)urchase it on-line anytime, or call 800.626.2224 during nomml business hou_.
(;E (_onsumer Home Serxices will still be there alter }our warrant} expires.
PartsandAccessories GEAppliances.com
]ndi\'iduals qualified to service their own appliances can have parts or accessories sent directly to their
homes (VISA, MasterCard and Discover cards are accepted). Order on-line today, 24 hom_ every day or
by phone at 800.626.2002 during nomml business hou_.
Instructions contained in this manual cover procedures tobe performed by any user. Otherservicing generally
should be referred to qualified service personnel. Cautionmust be exercised, since improper servicing may cause
unsafe operation.
_1ContactUs GEAppliances.com
If _ou are not satisfied with the set\ice _ou receixe ti'om (;E, contact us on our _ ebsite with all the details
including ,,our phone numbe_; or w_ite to: Ceneral Manage_; (alstomer Relations
GE Appliances, Appliance Park
i,ouisxille, KY 40225
l RegisterYourAppliance GEAppliances.com
Register your new applim_ce on-lhm_at your convenience! Timely product registration will allow for
enhanced communication and prompt serx'ice under the terms of )our warranty, should the need arise.
You may also mail in the pre-p_inted registration card included in the I)acking, material.
20 Printed in Korea
/