Frigidaire FRS23LH5DBN Owner's manual

Category
Fridges
Type
Owner's manual
2
:lng E_
..4=5
Espa5ol ........... 25
Controls ....... 7
Looking inside .......... 8 - 9
Automatic ice and Water
Dispenser ................ 10 =15
Food Storage
& Ener Savin Ti s ....... 16
Normal O_ Sounds.. 17
Care & Cleaning ......... 18 =19
Warranty ...................... 20
Before You Call
Solutions to
commo.Prob=ems.............. 21 - 24
I
READ AND SAVE THESE INSTRUCTIONS p_N241_15oo_o5o_
CongratuIations on your purchase of a new refrigerator! We
here at Electrolux Home Products, inc. are very proud of our
product and we are completely committed to providing you
with the best service possible. Your satisfaction is our #1
priority.
Please read this Use & Care Manual very carefully. It contains
valuable information on how to properly maintain your new
refrigerator.
We know you'll enjoy your new refrigerator and Thank You for
choosing our product. We hope you consider us for future
purchases.
PLEASE READ AND SAVETHESE INSTRUCTIONS
This Use & Care Manual provides specific operating
instructions for your model Use your refrigerator only as
instructed in this manual These instructions are not meant to
cover every possible condition and situation that may occur.
Common sense and caution must be practiced when installing,
operating and maintaining any appliance.
Pmeaserecord your modem and seriam numbers below for
future reference.This information is found on the serial
plate tocated inside the refrigerator compartment.
Model Number:
Serial Number:
Purchase Date:
Questions?
1-800-944-9044
(United States)
1-800-265-8352
(Canada)
or visit our web site at ww_',frigidaire, com
Extend Your Warranty Protection
With An
Extended Service Contract
OALL 1-800-944-9044
To Enjoy These Benefits:
Total freedom from repair bills so
unexpected repairs won't upset your budget,
Fast, convenient toll-free service isjust a
phone call away,
Top-quaJity repairs by factory-trained
experts,
Quick access to genuine repJacement
parts so you can rest assured your
refrigerator is repaired with the proper
components,
PLEASE COMPLETE AND MAIL IN THE PRODUCT
REGISTRATION CARD INCLUDED WITH YOUR
REFRIGERATOR.
Please attach sales receipt here for future reference.
FORYOURSAFETY
,, Donotstoreorusegasoline,orotherflammableHquidsin
thevicinityofthisoranyotherappliance.Readproduct
labelsforwarningsregardingflammabilityandother
hazards.
,, Donotoperatetherefrigeratorinthepresenceof
explosivefumes.
,, Avoidcontactwithanymovingpartsofautomaticice
maker.
,, RemovealIstaplesfromthecarton.Staplescancause
severecuts,andalsodestroyfinishesiftheycomein
contactwithotherappliancesorfurniture.
CHILDSAFETY
Destroyorrecyclethecarton,plasticbags,andanyexterior
wrappingmateriatimmediatelyaftertherefrigeratoris
unpacked.ChildrenshouldNEVERusetheseitemstoplay.
Cartonscoveredwithrugs,bedspreads,plasticsheetsor
stretchwrapmaybecomeairtightchambers,andcanquickly
causesuffocation.
PROPERDISPOSALOFYOURREFRIGERATOROR
FREEZER
Risk of child entrapment
Child entrapment and suffocation
are not problems of the past.
Junked or abandoned
refrigerators or freezers are still
dangerous - even if they wilI sit for
"just a few days." If you are getting
rid of your old refrigerator or
freezer, please follow the
instructions below to help prevent
accidents.
Before you throw away your old refrigerator/freezer:
o Remove doors.
_, Leave shelves in place so children may not easily climb
inside.
,, Have refrigerant removed by a qualified service
technician.
ELECTRICAL INFORMATION
,, The refrigerator must be plugged into its own dedicated
115 Volt, 60 Nz,, AC onmyelectric outlet. The power cord
of the appliance is equipped with a three-prong grounding
plug for your protection against electrical shock hazards. It
must be plugged directly into a properly grounded three-
prong receptacle. The receptacle must be installed in
accordance with local codes and ordinances. Consult a
qualified electrician. Do not use an extension cord or
adapter p_ug.
,, If the power cord is damaged, it should be replaced by the
manufacturer, service technician or a qualified person to
prevent any risk.
,, Never unplug the refrigerator by pulling on the power
cord. Always grip the plug firmly, and pulI straight out
from the receptacle to prevent damaging the power cord.
,, Unplug the refrigerator before cleaning and before
replacing a light bulb to avoid electrical shock.
,, Performance may be affected if the voltage varies by'
10% or more. Operating the refrigerator with insufficient
power can damage the compressor. Such damage is
not covered under your warranty.
Do not plug the unit into an outlet controlled by a walI
switch or pull cord to prevent the refrigerator from being
turned off accidentally.
Avoid connecting refrigerator to a Ground Fault Interruptor
(GFI) circuit.
3=prorlg g_suaded P!ug
This Owner's Guide provides specific operating instructions for
your model. Use the refrigerator onIy as instructed in this Use &
Care Manuai. Before starting the refrigerator, follow these
important first steps.
LOCATION
o Choose a ptace that is near a grounded electrical outleL
Do Not use an extension cord or an adapter plug.
o If possible, place the refrigerator out of direct sunlight
and away from the range, dishwasher or other heat
SOUrCeS,
. The refrigerator must be instaIIed on a floor that is level
and strong enough to support a fully loaded refrigerator.
. Consider water supply availability for models equipped
with an automatic ice maker.
INSTALLATION
Installation Clearances
. Allow the following clearances for ease of installation,
proper air circulation, and plumbing and electrical
connections:
Sides & Top .................. 3/8"
Back ........................... 1"
DOOR OPENING
To Remove Toe Grille:
2.
Open freezer and fresh food compartment doors.
Working from left side of toe grille, slip your fingers
between top of toe grille and cabinet. Gently pull
forward until first set of
tabs are free. Slide
your hand down past Cabinet
the free tabs and pulI
forward again until the
second set of tabs are
free. Continue this Grille / _-_.,
"i
process until all tabs . j_;
-<<.
are free and the toe __ _
grille can be removed.
I1
(See graphic at top of
page in right column.)
LEVELING
Ali four corners of your refrigerator must rest firmly on asolid floor_
Your refrigerator is equipped with adiustabie front rollers to help level
your unit. Toensure proper door seal and assist door closing, the
refrigerator should be tilted 1/4" (6 ram), front to back.
ToLevel Your Refrigerator:
1. Remove toe grille, (See "To Remove ToeGri//e',)
2. Use flat-blade screwdriver or 3/8" socket wrench to adjust
front rollers.
Your refrigerator should be positioned to allow easy access to a
counter when removing food. For best use of drawers and
freezer baskets, the refrigerator should be in a position where
both the refrigerator and freezer doors can be fully opened.
TOE GRILLE INSTALLATION/REMOVAL
Toinstall Toe Grille:
1. Open freezer and fresh food compartment doors.
2. Line up toe grille at base of refrigerator, making sure the
four bottom tabs are resting through holes at base of
cabinet.
3. Starting from Ieft side of toe grille, press in on first top tab
using your thumb and push toe grille forward until it snaps
in place. Continue this process until al! tabs are snapped
in place and toe grille is secured to refrigerator.
3,
I Raise
i_iiiii
© s
Check both doors to be sure seals touch cabinet on atl four
sides.
Before lnstafling The Water Supply Line, You Will Need:
,, Basic Tools: adjustable wrench, flat-blade screwdriver,
and Phillips TM screwdriver
,, Access to a household cold water Iine with water pressure
between 30 and 100 psi.
,, A water supply line made of ¼ inch (6.4 ram) OD, copper
tubing. To determine the length of copper tubing needed,
you wilI need to measure the distance from the ice maker
inlet valve at the back of the refrigerator to your cold water
pipe. Then add approximately 7 feet (2.1 meters), so the
refrigerator can be moved out for cleaning (as shown).
,, A shutoff valve to connect the water supply Iine to your
household water system. DO NOT use a self-piercing type
shutoff valve.
,, A compression nut and ferrule (sleeve) for connecting the
water supply line to the ice maker inlet valve.
To Connect Water Supply Line To lee Maker Inlet Valve
1. Disconnect refrigerator from electric power source.
2. Place end of water supply line into sink or bucket. Turn ON
water supply and flush supply Iine until water is clear. Turn
OFF water supply at shutoff valve.
3. Unscrew plastic cap from water valve inlet and discard
cap.
4. Slide brass compression nut, then ferrule (sleeve) onto
water supply line, as shown.
5. Push water supply line into water valve inlet as far as it will
go inch). Slide ferrule (sleeve) into valve inlet and
finger tighten compression nut onto valve. Tighten another
half turn with a wrench; DO NOT over tighten.
6. With steel clamp and screw, secure water suppiy line to
rear panel of refrigerator as shown.
7. Coil excess water supply line (about 2_/2turns) behind
refrigerator as shown and arrange coils so they do not
vibrate or wear against any other surface.
8. Turn ON water suppiy at shutoff valve and tighten any
connections that leak.
9. Reconnect refrigerator to electrical power source.
10. To turn ice maker on, lower wire signal arm (side
mounted) or set the ice maker's On/Off power switch to the
"t" position. (rear mounted)
Plastic Water Tubieg
to Ice Maker
I_ Fill Tube
water he
Water Valve
Valve Inbt
valve
-ousehold water suppl_
(Include enough tubing _nIoos to allow
rnowng retngerator out fox cleaning.,
Hinge
--....
_
TO DmSOONNEOT
I. Press outer r qg agaF_st face
remove IUDe
TO OO_t ....
insert t
push until matk touches face of fitthg
ToolsNecessor.
Ph _s neuu Wrench
DOOR REMOVAL INSTRUCTIONS:
if it is necessary to move the refrigerator through narrow doorways, follow
these steps to remove the doors.
NOTE
1. Disconnect electrical supply.
2. Open botf aoors, then remove _oe grille.
3, Close doors.
To Remove Refrigerator Door:
1 Remove _op hinge cover screw on refrigerator door _nd remove cover.
2. Trace around hinge with soft lead oenciI. This wilI make it easier to realign doors
wnen they are reelaced.
3. Remove ICe hinge ana ift refrigerator door off bottom singe pin. Set door aside.
4. Remove eonom hinge, if necessary.
5. Reverse this :roceaure to reinstall refrigerator door.
To Remove Freezer Door:
1. Disconnect water Iine coming from ower hinge of freezer aoor at connection
located under trent of freezer: Press ouler nng against face of fitting, then pull to
remove tube.
2. Remove top hinge cover screw on lreezer door and remove cover.
3. Disconnect wrong harness conneclor plug at ton htnge: D_aceyour thumbs on flat
sides of each connector ane Dena both Earts eacK and forth, then with firm grasp,
pull both Dleces apart.
4. Trace around hinge wlth soft earl pencil. This wiI make _teas_er to realign doors
wnen they are reDIaced.
5. Remove _cs hinge allowing wrong harness _o Dull through hinge and lift freezer
door off st bottom hinge Din Lay door dowr flat to avoid k_nkIng water line.
6. Remove eo_-comhinge, if necessary.
7. Reverse this procedure to reinstall freezer door.
When DOra doors save seen reinstalled, connect water line by inserting tube and
push until mark loucnes face of fitting, replace _oe gnlle and ptug in electrical power
cord. Turn both _empera_ure comro_s to center position. Adjust settings as necessary.
Door Bin
RceContainer
Pica Shelf
Wire Bhelf
Small items
Door Bin
Wire Shelf
Door Bin
Small Basket
LB_e Basket
Door Bin
Large Basket
Door Bin
Dai_ Door
Door Bin
Witte Rack
Door Bin
Meat Keeper
and Cover
8pi((Safe"_
Fixed She(f
Door Din
EggTray
Speciam Item
•Rack
fa(mBottle
Retainer
Snugger
Crisper Pan
and Cover
Fixed
Door Bin
COOL DOWN PERIOD
To ensure safe food storage, aliow the refrigerator to operate
with the doors closed for at least 8 to 12 hours before loading
it with food=
REFRIGERATOR & FREEZER CONTROLS
TEMPERATURE ADJUSTMENT
, After 24 hours, adjust the controls as needed= Adjust
temperatures gradually; move the knob insmall
increments, allowing the temperature to stabilize,
, For cotder temperatures, turn the knob towards Colder=
, For warmer temperatures, turn the knob towards Co_d=
To maintain temperatures, a fan circulates air in the
refrigerator and freezer compartments= For good circulation,
do not block cold air vents with food items=
Factory Setting fa¢tof7 Settlng
Freezer co.T.o_ Fresh food
Refrigerator & Freezer Controls
(Features may vary according to modeL)
TEMPERATURE ADJUSTMENT GUIDE
if Fresh Food Compartment (s Too Warm Turn Fresh Food Control Slightly Towards Colder.
ff Fresh Food Compartment EsToo Cold Turn Fresh Food Control Slightly Towards Cold.
ff Freezer Compartment EsToo Warm Turn Freezer Control Slightly Towards Colder.
ff Freezer Compartment EsToo Cold Turn Freezer Control Slightly Towards Cold,
* To Turn Refrigerator Off Turn Freezer and Fresh Food Controls To O,
MODELS)
This shelf is attached to the
freezer wall beside the ice
dispenser container. This
convenient area allows for
storage of pizza and other tall
items placed vertically between
the ice dispenser container and
the freezer wall.
ICE CREAM SHELF (SOME
Pizza Shelf
[_ODELS)
This shelf attaches to the top of
the ice dispenser container. It
allows storage of both round and
rectangular cartons of your
favorite ice cream.
TmP-UP SHELF (SOME
MODELS)
A Tip-Up shelf in the freezer
section atlows tall items to be
easily stored.
Ice Cream Shelf
ADJUSTABLE DOOR BINS
Some models have adjustable door bins that can be moved to
suit individual needs_
To move door bins
1. Lift bin straight up.
2. Remove bin.
3. Place bin in desired position.
4. Lower bin onto supports until locked in place.
AdjustabJeDoor Bin
*WhiteWestinghouse - SpHUFreeTM
CANTILEVER SHELF ADJUSTMENT
Refrigerator shelves are easily adjusted to suit individual
needs. Before adjusting the shelves, remove all foe&
Cantilever shelves are supported at the back of the refrigeraton
To adjust cantilever shelves:
Lift front edge up.
Pull shelf out.
Replace the shelf by inserting the hooks at rear of the shelf into
the wail bracket. Lower the shelf into the desired slots and lock
into position.
* Spih'Safe7;_glass shelves (some models) catch and hold
accidental spills. In some models, the * SpiflSafe TM shelves slide
out for easy access to food and for fast cleaning. The shelves
slide out independently of their mounting brackets. Just pull the
front of the shelf forward. Shelves can be extended as far as the
stopper will allow but are not removable from their mountinc
brackets.
i
Cantilever Sliding Glass Shelf
Cantilever Glass Shelf
DOOR STORAGE
Door bins and shelves are provided for convenient storage of
jars, bottles, and cans. Frequently used items can be quickly
selected.
Some models have door bins that can accommodate gallon-
sized plastic drink containers and economy-sized jars and
containers. Some bins are adiustable for maximum storage
capacity.
The dairy compartment, which is warmer than the general food
storage section, is intended for short term storage of cheese,
spreads, or butter.
Tilt Out
Fixed Door Bin
TALLBOTTLERETAINER(SOME[VIODELB)
The Tail Bottle Retainer keeos _a containers in the bin frorr
falling forward when opening or closing the retngerator aoor.
To install, hold the retainer at the top, and slide it }ver [ne
outside wall of the bin. as ShOWnin the diagram. The Tal!
Bottle Retainer works best with a Bin Snugger.
SPECIAL ITEM RACK
(SOME MODELS)
The innovative design of
the Special Item Rack
allows you to store a six-
pack of 12 ounce drink
cans, a bottle of wine, a
two-Iiter soft drink bottle,
or a carton of eggs. The
Special Item Rack mounts
on the left side of your
refrigerator. To install, just
slide the Special Item
Rack onto any shelf as
shown in the drawing.
Special ItemRack
Tall Bottle Retainer (Ieft) and Bin Snugger (right)
CRISPERS (SOME
MODELS)
The crispers, located under
the bottom refrigerator shelf,
are designed for storing
fruits, vegetables, and other
fresh produce. Wash items in
clear water and remove
excess water before placing
them in the crispers. Items
with strong odors or high
moisture content should be
wrapped before storing.
Crisper Drawer
HUMIDITY CONTROL (SOME MODELS}
The Humidity Control, present on some models with crisper
drawers, allows you to adjust the humidity within the crisper.
This can extend the life of fresh vegetables that keep best in
high humidity.
f
Crisper Humidity Control
DELl DRAWER (SOME MODELS}
Some models are equipped with a Deli Drawer for storage of
luncheon meats, spreads, cheeses, and other deli items.
MEAT KEEPER (SOME MODELS}
Some models are equipped with a Meat Keeper. Meat Keeper
temperatures can be adjusted by sliding the Meat Keeper
Temperature Control in either direction. Use this pan for short
term storage of bulk meat items, if meats are to be kept Ionger
than one or two days, they should be frozen. The Meat Keeper
is fixed and cannot be moved up or down. if fruits or vegetables
are to be stored in the Meat Keeper, set the Meat Keeper
Temperature Control to a warmer setting to prevent freezing.
WiNE RACK (SO[VIE
MODELS)
The wine rack stores bottles of
wine, or single two-liter plastic
bottles of juice or soda pop. To
install, slide the Wine Rack
onto the shelf with the curve
facing in. To remove, slide the
Wine Rack out. Install on
side of shelf.
Meat Keeper with
Temperature Control
Wine Rack
AUTOMATIC iCE &WATER DJSPENSEFt OPERATING iNSTRUCTiONS
!_om_f.... F_,ol_o Cube Crush Ligh} fil}_lRe,e} I_ck
EXTREME
FREEZE
EXTRA
tOE
CUBE
CRUSH
LIGHT
F_LTER
STATUS
LOCK
WATER
i! iii ill
i ,/ ii i!' i ii i
i i
J i
Tofreeze food at a faster rate to preserve freshness, push the Touch Pad _ for 3-5 seconds to
activate this feature. A green light will appear above the Touch Pad. Push _theTouch Pad _again
for 3-5 seconds to deactivate.
To increase ice production for special occasions, such as parties, push the Touch Pad @for
3-5 seconds to activate this feature. A green light wilI appear above the Touch Pad. Push the
Touch Pad O again for 3-5 seconds to deactivate.
Press the CUBE Touch Pad @. to get cubed,_Lice.A green light will appear above the Touch Pad.
Press glass against ICE dispensing paddle _ as far up as possible to catch alI ice.
Press the CRUSH Touch Pad @ to get crushed ice. A green light wilI appear above the Touch Pad.
Press glass against ICE dispensing paddle@ as far up as possible to catch alI ice.
Press the LIGHT Touch Pad _ to turn on dispenser light. Press_again to turn the light off.
The light also turns on automatically when ice and/or water is dispensed. Replace light bulb with
an appliance bulb of the same wattage.
The FILTER STATUS indicator light above the Touch Pad @ will light up each time the dispenser
is used. The following filter light indications are:
Green The filter is still operating within its specified Iife cycle.
Amber The filter has reached approximately 80% of its useful life. This is the recommended time
to purchase a replacement filter.
Red The filter is 100% used up. Change the filter as soon as possible.
After the filter cartridge has been changed, press and hotd the FILTER RESET Touch Pad @ for
10-15 seconds.
NOTE: The Green, Red and Amber lights will flash when reset is completed.
The Ice & Water Dispenser can be mocked out to prevent unwanted use.
To Lock Out Press the LOCK Touch Pad @ for 3-5 seconds. A Red light will appear above
the Touch Pad.
To Unlock Press the LOCK Touch Pad _ for 3-5 seconds until the Red light above the
Touch Pad goes out.
To operate the water dispenser, press a glass against the WATER dispensing paddle@. To
stop dispensing water, pull the glass away from the dispensing paddle @. Dispensed
water is not
cold. For colder water, add crushed ice or cubes before dispensing water. A drip tray located at
the base of the dispenser catches small spills and allows them to evaporate. This drip tray is
removable and dishwasher safe. Do not pour water and excess ice in this area because there
is no drain.
10
AUTOMATICiCE&WATERDISPENSEROPERATINGiNSTRUCTiONS
_ % :J_ _ y-_L ,_!i j_ ,_! _
O@@@
I_e L_ht-
Features may vary according to modem.
Crushed Press the Crushed Touch Pad A to get crushed ice, A red indicator will appear above the Touch Pad, Press glass against
ICE dispensing paddle@ as fa_up as possible to catch all ice,
Cubed Press the Cubed Touch Pad _ to get cubed ice. A red indicator will appear above the Touch Pad. Press glass against ICE
dispensing paddle as far up as possible to catch all ice.
Light On Press the Light On Touch Pad @ to turn on dispenser light. A red indicator will appear above the Touch Pad.
Off Press the Light Off Touch Pad @ to turn off dispenser light. A red indicator will appear above the Touch Pad.Light
WATER To operate the water dispenser, press a g_ against the WATER dispensing paddle@. To stop dispensing water, pull
the glass away from the dispensing paddle _ . Dispensed water is not cold. For colder water, add crushed ice or cubes
before dispensing water. A drip tray located at the base of the dispenser catches small spills and allows them to evaporate.
This drip tray is removable and dishwasher safe. Do not pour water and excess ice in this area because there is no drain.
11
HOWTHEWATERDmSPENSERWORKS
Thewatertank,locatedbehindthedrawersintherefrigerator
compartment,automaticallyfillsaswaterisdispensed.For
properdispenseroperation,therecommendedsupplywater
pressureshouidfallbetween30psiand100psi.
Aftertherefrigeratorisconnectedtothewatersupply,filIthe
watertankbydrawingoneglassofwater._tmaytakeabout
11/2minutesafteractivatingthedispenserpaddlebeforewater
beginstofillthisfirstglass.Continueflushingthesystemfor3
minutestoridthetankandplumbingconnectionsofany
impurities.Thewaterdispenserhasabuiltinshutoffdevice
thatwiIIstopthewaterflowafter3minutesofcontinuoususe.
Simplyreleasethedispenserpaddletoresettheshutoff
mechanism.
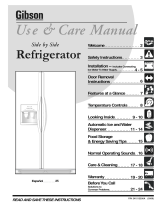
HOWTHEICEDISPENSERWORKS-SIDEMOUNTED
Theicemakerandcontainerarelocatedinthetopofthe
freezercompartment.Aftertherefrigeratorisinstalledproperly
andhascooledforseveral
hours,theicemakercan _o,
beginmakingicewithin24
hours.Airinnewplumbing
linesmaycausetheice
makertocycletwoorthree
timesbeforemakingafulI , _
tray of ice. To begin ice _/__.. /./.
production, lower the wire
signal arm to the "down" or
ON position. With no usage it
wilI take approximately 2
days to fill the ice container.
The ice maker turns off automatically when the ice container
becomes full. To stop the ice maker, lift the wire signal arm until
it clicks, and locks in the "up" or OFF position.
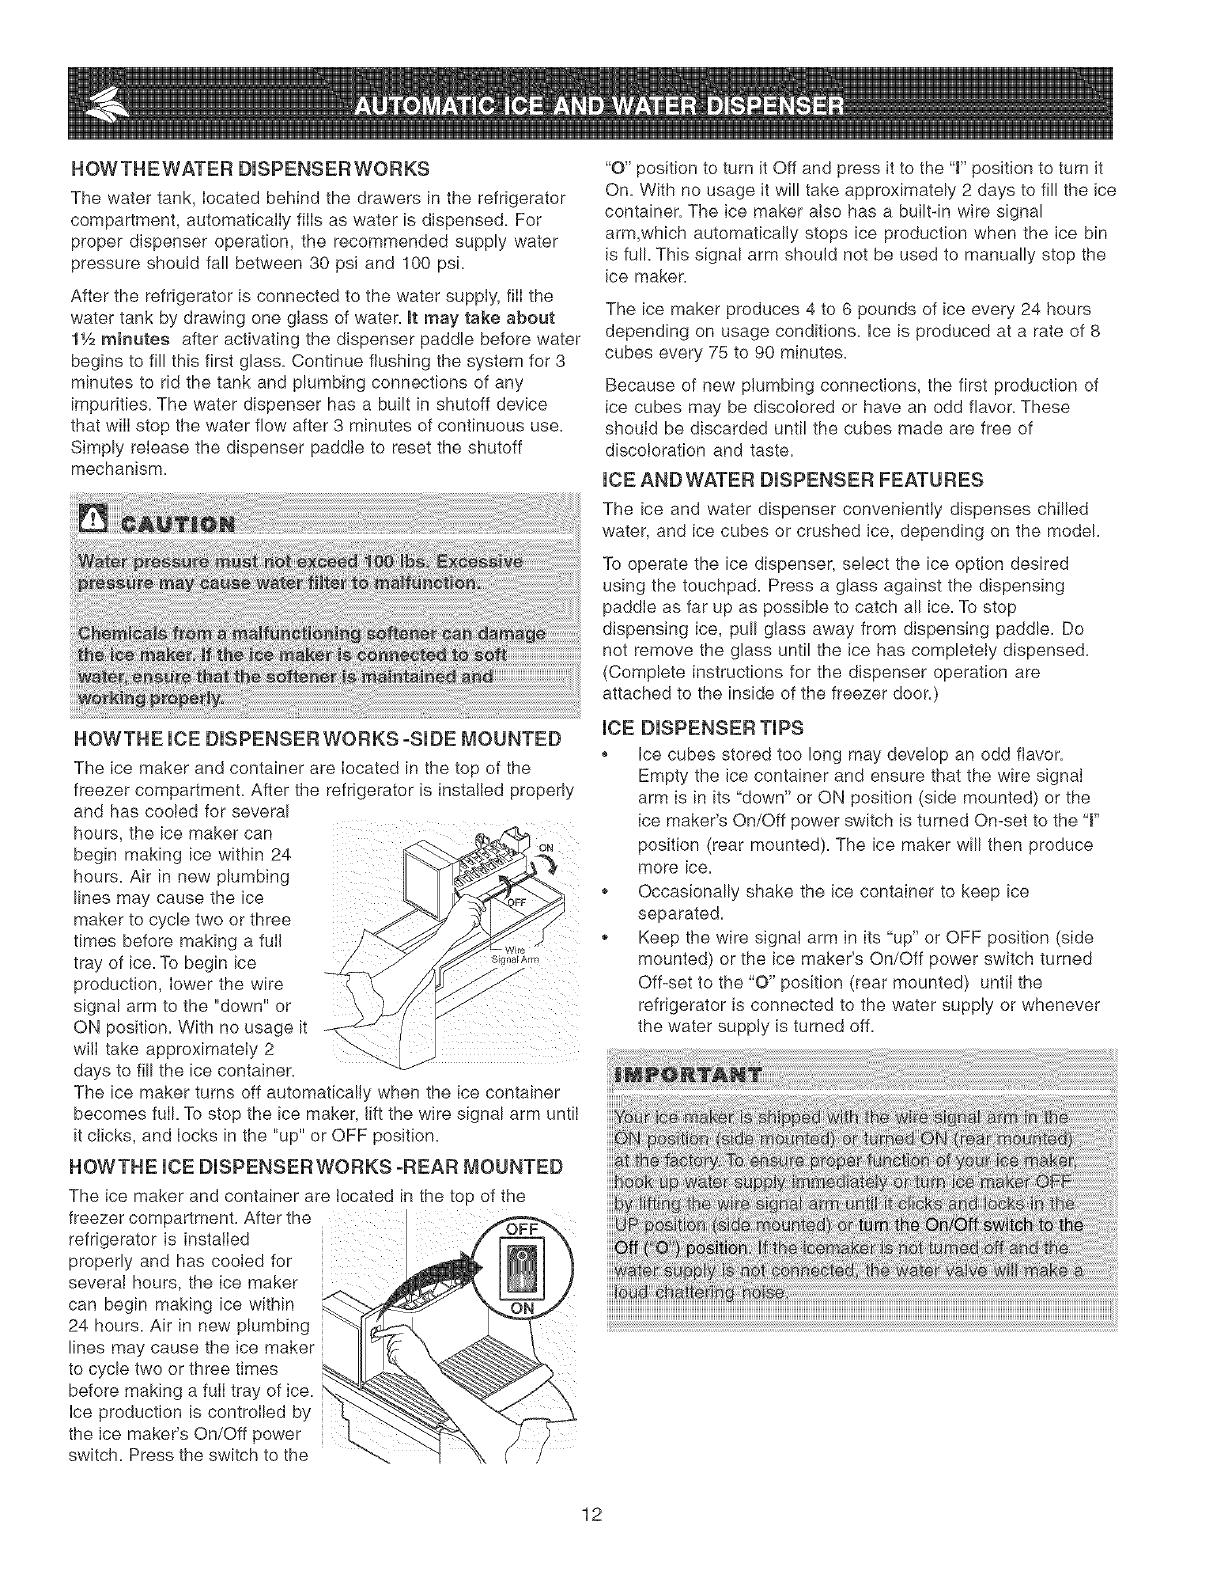
HOWTHE lOB DISPENSER WORKS -REAR MOUNTED
The ice maker and container are located in the top of the
freezer compartment. After the
refrigerator is installed
properly and has cooled for
severa! hours, the ice maker
can begin making ice within
24 hours. Air in new plumbing
lines may cause the ice maker
to cycle two or three times
before making a fulI tray of ice.
Ice production is controlled by
the ice maker's On/Off power
switch. Press the switch to the
"O" position to turn it Off and press it to the "J"position to turn it
On. With no usage it will take approximately 2 days to fill the ice
container. The ice maker also has a built-in wire signal
arm,which automatically stops ice production when the ice bin
is full. This signal arm should not be used to manually stop the
ice maker.
The ice maker produces 4 to 6 pounds of ice every 24 hours
depending on usage conditions. Ice is produced at a rate of 8
cubes every 75 to 90 minutes.
Because of new plumbing connections, the first production of
ice cubes may be discolored or have an odd flavor. These
should be discarded until the cubes made are free of
discoloration and taste.
ICE ANDWATER DISPENSER FEATURES
The ice and water dispenser conveniently dispenses chilled
water, and ice cubes or crushed ice, depending on the model.
To operate the ice dispenser, select the ice option desired
using the touchpad. Press a glass against the dispensing
paddle as far up as possible to catch all ice. To stop
dispensing ice, pull glass away from dispensing paddle. Do
not remove the glass until the ice has completely dispensed.
(Complete instructions for the dispenser operation are
attached to the inside of the freezer door.)
ICE DISPENSER TIPS
,, Ice cubes stored too long may deve!op an odd flavor.
Empty the ice container and ensure that the wire signal
arm is in its "down" or ON position (side mounted) or the
ice maker's On/Off power switch is turned On-set to the '!"
position (rear mounted). The ice maker will then produce
more ice,
,, Occasionally shake the ice container to keep ice
separated.
,, Keep the wire signal arm in its "up" or OFF position (side
mounted) or the ice maker's On/Off power switch turned
Off-set to the "O" position (rear mounted) until the
refrigerator is connected to the water supply or whenever
the water supply is turned off.
12
,, If a large quantity of ice is needed at one time, it ls best to
remove cubes directly from the ice container.
,, The following sounds are normal when the ice maker ls
operating:
,, Motor running
,, Ice dropping into ice container
+ Water valve opening or closing
+ Ice loosening from tray
, Running water
+ Stop the ice maker when cleaning the freezer and during
vacations.
, If the ice maker wilI be turned off for a Iong period of time,
turn the water supply valve to the closed position.
CLEANINGTHE ICE DISPENSER
CIean the dispenser and ice container at reguIar intervals,
particularly before you take a vacation or move, or if the ice
dispenser sticks.
1. Stop ice production by lifting the wire signal arm to the
"up" or OFF position (side mounted) or the ice maker's On/
Off power switch turned Off-set to the "O" position (rear
mounted) .
2. Remove ice container by lifting up and out. Empty and
carefully clean the container with mild detergent. Rinse
with clear water. Do not use harsh or abrasive cleaners.
Allow ice container to dry completely before replacing in
the freezer.
3. Remove ice chips and clean the shelf and chute that
supports the ice container.
4. Replace the ice container. Lower the wire signal arm on
the ice maker to the "down" or ON position (side
mounted) or the ice maker's On/Off power switch is turned
On-set to the "l" position. (rear mounted)and the ice
maker wil! resume production.
Remove and empty the ice storage bin if:
1. An extended power failure (one hour or longer) causes ice
cubes in the ice storage bin to melt and freeze together
and jam the dispenser mechanism.
2. The ice dispenser is not used frequently. Ice cubes will
freeze together in the bin and jam the dispenser
mechanism. Remove the ice storage bin and shake to
loosen the cubes.
Auger +--+
13
PURESOURCETM*iCE AND WATER FILTER (SOME
MODELS)
System Startup:
Water supply does not need to be turned off, however, do not
use ice and water dispenser while installing filter=The filter
cartridge has aIready been installed in the filter housing at the
factory. Refer to the How The Water Dispenser Works section to
properly fill the system with water.
Order new filter
cartridges through the
dealer where you bought
the refrigerator, contact
the Consumer
Ass_gtance Center at 1-
800-944-9044, or go to
our web site at
_idaire=com. It
might be good to order
some filter cartridges
when you first install your
refrigerator. Be sure to
ask for the RG-100
mureSource TM*
replacement cartridge.
The PureSource TM * NGRG-2000 Ice and Water
Filter System with the RG-100 cartridge is tested
and certified by NSF International, the nationally
recognized and respected, not for profit,
certification organization for public health safety.
The PureSource TM*system is tested and certified to ANSl/NSF
Standard 42=See performance data sheet for specifications=
This system should not be used on water that is
microbiologically unsafe or with water of unknown quality
unless the water has been adequately disinfected before or
after traveling through the filtration system.
,,Rated Capacity - 400 gallons
,,Rated service flow - .5 GPM
,,Maximum Rated Pressure - 100 PSI
,,Maximum Operating Temp= - 100° F
Changing the Filter:
Water conditions vary throughout the world, but changing the
water filter every 6 - 9 months normally will ensure the highest
possible water quality=The Filter Status light wiII turn red after
400 gallons of water has flowed through the ice and water
dispenser (some models). Also, if the filter has been in a
refrigerator that has not been in use for awhiIe (during moving
for example), change the filter before reinstalling the refrigerator=
The dispenser system wilI also operate without filtration (with
filter cartridge removed)=
To change fitter:
It is not necessary to turn the water suppiy off to change the filter.
1= Open freezer door and leave open until filter change is
complete=
2= Set ice maker wire signal arm to the OFF (up) position (side
mounted) or the ice maker's On/Off power switch turned Off-set
to the "O" position (rear mounted)=
3. Hold filter cup firmty, and unscrew towards Ieft (Some water
could leak out as you remove cup. This is normaL)=Filter
cartridge should come down with cup=If cartridge remains in
housing, pull down gently, while b.,vistingfilter back and forth=
4= Rinse out cup under running water=
5. The large o-ring that seals the filter system sets in the o-ring
groove down inside the cup=Should the o-ring fail out during
filter cartridge replacement, simply place it back in the groove
prior to screwing the cup back in place. Ifthe o-ring becomes
damaged, you wilI need to order one from the Consumer
Assistance Center=
6= Discard old filter cartridge=
7. Remove new filter cartridge from packaging=Place in cup=The
end with the small o-ring should be up, out of the cup=
8= Screw cup, with fiIter, back onto housing=Do Not Use Wrench
To ReinetalBCup= Filtercartridge will self-align as cup is
tightened. Be sure cup is completely tightened with
PureSource TM logo facing outward=Do Not Tighten Past Stop.
9. Set ice maker wire signal arm to the ON (down) position (side
mounted) or the ice maker's On/Off power switch is turned
On-set to the "t" position=(rear mounted).
10= Check for leaks=Open refrigerator door=Wipe any water droplets
from the filter cup. Filla glass with water.If there is a leak,
unscrew filter cup, and reinsert the filter cartridge=Check
placement of large O-ring= Reinstall filter cup, making certain it is
tightened completely=
11= To condition filter system and purge air from water line, filI a
glass with water. Continue flushing the system for approximately
3 minutes to assure that the purestwater possible isstored in
the water tank.
* White Westinghouseuses the nameCrystalClear insteadof PureSource,butthey are the same filter.
14
PURESOURCE2TM*iCE ANDWATER FRONT FILTER
(SOME MODELS)
filter before reinstalling the refrigerator. The dispenser system
will also operate without filtration (with filter cartridge removed
and bypass installed).
System Startup:
Water supply does not need to be turned off, however, do not
use ice and water dispenser while installing filter.
The filter cartridge has already been installed in the filter
housing at the factory. Refer to the How T,_e Water Dispenser
Works section to properly fill the system with water.
Order new filter
cartridges through the
dealer where you
bought the refrigerator,
contact the Consumer
Assistance Center at 1-
800-944-9044, or go to
our web site at
_idaire.com. it
might be good to order
some filter cartridges
when you first install
your refrigerator. Be
sure to ask for the FC-
100 PureSource TM*
replacement cartridge.
Fiuter
and CUick
To _nstaU TO Release
The PureSoume2 rM"Ice and Water Filter
System NGFC 2000 with the PureSoume2 rM"
cartridge FC 100 is tested and certified by
NSF international, the nationally recognized
and respected, not for profit, certification
organization for public health safety. The PureSource2 rM*
Filter system is tested and certified to ANSI/NSF Standards
42 and 53. See performance data sheet for specifications.
This system should not be used on water that is
microbiologicaIIy unsafe or with water of unknown quality
unless the water has been adequately disinfected before or
after traveling through the filtration system.
. Rated Capacity - 400 gallons
,, Rated service flow - .5 GPM
,, Maximum Rated Pressure - 100 PSI
. Maximum Operating Temp. - 100° F
To change filter:
It is not necessary to turn the water supply off to change the
filter.
1. Set ice maker wire signal arm to the OFF (up) position (side
mounted) or the ice maker's On/Off power switch turned Off-set
to the "O" position (rear mounted).
2. Push the Filter Release Button, located to the right of the
filter cartridge, to release the filter from the housing. To
minimize the possibility of the filter falling out of the
housing during removal, it would be best to hold the
filter as it moves out toward you.
3. Pull the old filter cartridge straight out of the housing.
4. Discard the old filter.
5. Remove the new filter cartridge from the packaging and
insert into the filter housing the same way the old one
came out.
6. When the cartridge is almost in, you will feel it stop against
the clip assembly in the back of the housing. The clip
assembly holds the filter cartridge firmly in piace. At this
point, you wilI need to push firmly until the cartridge
snaps fully in place. When completely in place, the front of
the filter cartridge will be flush with the front of the housing.
7. Set ice maker wire signal arm to the ON (down) position (side
mounted) or the ice maker's On/Off power switch is turned On-
set to the 'T'position. (rear mounted).
8. Fill a glass with water. As you are doing this, check for
leaks at the filter housing. There will be noticable spurts
and sputters as the system pushes the air out through the
system and out the dispenser nozzle. This is normal
9. After you have run one glass of water, continue to flush the
system for approximately 3 minutes to assure that the
purest water possible is stored in the water storage tank.
Changing the Filter:
Water conditions vary throughout the world, but changing the
water filter every
6 - 9 months normally will ensure the highest possible water
quality. The Fiiter Status light wiil turn red after approximately
400 gallons of water has flowed through the ice and water
dispenser. Also, if the filter has been in a refrigerator that has not
been in use for awhiie (during moving for example), change the
* White Westinghouse uses the name CrystaIClear instead of PureSource, but they are the same filter.
15
FOODSTORAGEmDEAS
Fresh Food Storage
,, The fresh food compartment should be kept between 34 °
F and 40° F with an optimum temperature of 37° R
,, Avoid overcrowding the refrigerator shelves. This reduces
the circulation of air around the food and results in uneven
cooling.
Fruits and Vegetables
,, Storage in the crisper drawers traps moisture to help
preserve the fruit and vegetable quality for longer time
periods.
Meat
,, Raw meat and poultry should be wrapped securely so
leakage and contamination of other foods or surfaces
does not occur.
Frozen Food Storage
,, The freezer compartment should be kept at 0° F or lower.
,, A freezer operates most efficiently when it is at least 2/3
full.
Packaging Foods for Freezing
_, To minimize dehydration and quality deterioration, use
aluminum foil, freezer wrap, freezer bags or airtight
containers. Force as much air out of the packages as
possible and seal them tightly. Trapped air can cause food
to dry out, change color, and develop an off-flavor (freezer
burn).
,, Wrap fresh meats and poultry with suitable freezer wrap
prior to freezing.
,, Do not refreeze meat that has completely thawed.
Loading the Freezer
,, Avoid adding too much warm food to the freezer at one
time. This overloads the freezer, slows the rate of freezing,
and can raise the temperature of frozen foods.
,, Leave a space between the packages, so cold air can
circulate freely, allowing food to freeze as quickly as
possible.
_, Avoid storing hard-to-freeze foods such as ice cream and
orange iuice on the freezer door shelves. These foods are
best stored in the freezer interior where the temperature
varies less.
ENERGY SAVING IDEAS
'_$ -MOS"-", " Locate the refrigerator in the cooIest
i&_ _°_"_ part of the room, out of direct
sunlight,
,_'-° _'__ _! and away from heating ducts or
_; ,'_ registers. Do not place the refrigerator
next to heat-producing appliances such
as a range, oven, or dishwasher. If this
is not possible, a section of cabinetry or an added layer of
insulation between the two appliances will help the refrigerator
operate more efficiently.
,, Level the refrigerator so that the doors close tightly.
_, Refer to this Use & Care Manual for the suggested
temperature control settings.
_, Periodic cleaning of the condenser will help the
refrigerator run more efficiently. See the Care and
C/eaning Chart on page 18.
,, Do not overcrowd the refrigerator or block cold air vents.
Doing so causes the refrigerator to run longer and use
more energy.
_, Cover foods and wipe containers dry before placing them
in the refrigerator. This cuts down on moisture build-up
inside the unit.
_, Organize the refrigerator to reduce door openings.
Remove as many items as needed at one time and close
the door as soon as possible.
16
UNDERSTANDmNGTHE SOUNDSYOU MAY HEAR
Your new high-efficiency refrigerator may make unfamiliar
sounds. These are alI normal sounds and soon wilI become
familiar to you. They also indicate your refrigerator is operating
as designed. Hard surfaces, such as vinyl or wood floors,
walls, and kitchen cabinets may make sounds more
noticeable. Listed below are descriptions of some of the most
common sounds you may hear, and what is causing them.
A. Evaporator
The flow of refrigerant through the evaporator may
create a boiling or gurgling sound.
B. Evaporator Fan
You may hear air being forced through the refrigerator
by the evaporator fan.
C. Defrost Heater
During defrost cycles, water dripping onto the defrost
heater may cause a hissing or sizzling sound. After
defrosting, a popping sound may occur.
D. Automatic ice Maker
If your refrigerator is equipped with an automatic ice
maker, you will hear ice cubes falling into the ice bin.
E. Cold Control & Automatic Defrost Control
These parts can produce a snapping or clicking sound
when turning the refrigerator on and off.
F. Condenser Fan
You may hear air being forced through the condenser
by the condenser fan.
G. Compressor
Modern, high-efficiency compressors operate much
faster than older models. The compressor may have a
high-pitched hum or puisating sound.
H. WaterValve
If your refrigerator is equipped with an automatic ice
maker, you will hear a buzzing sound as the water
valve opens to fill the ice maker during each cycle.
L Drain Pan (not removable)
You may' hear water running into the drain pan during
the defrost cycle.
d. Condenser
May create minimal sounds from forced air.
17
Keepyourrefrigeratorandfreezercleantopreventodorbuild-up.Wipeupanyspillsimmediatelyandcleanbothsectionsat
leasttwiceayear.Neverusemetallicscouringpads,brushes,abrasivecleanersorstrongalkalinesolutionsonanysurface.Do
notwashanyremovablepartsinadishwasher.Always unplug the electrical power cord from the wall oudet before cleaning.
Care & Cleaning Chart
Part Cleaning Agents Tips and Precautions
Interior/Door Use 2 tablespoons of baking soda in 1 quart of warm water. Be sure to
Liner Soap and water
wring excess water out of sponge or cloth before cleaning around
Baking soda and water controls, light bulb or any electrical part.
Door Gaskets Soap and water Wipe gaskets with a clean soft cloth.
Drawers/Bins Soap and water
Do not wash any removable items (bins, drawers, etc.) in dishwasher.
Glass Shelves
Soap and water Allow glass to warm to room temperature before immersing in warm
Glass cleaner water.
Mild liquid sprays
Toe Grille Soap and water Vacuum dust from front of toe grille. Remove toe grille (See illustration on
Mild liquid sprays page 4). Vacuum backside and wipe with sudsy cloth or sponge. Rinse
Vacuum attachment and dry.
Exterior and Do not use commercial household cleaners, ammonia, or alcohol to clean
Handles handles. Use a soft cloth to clean smooth handles. Do Not use a dry
cloth to clean smooth doors.
Exterior and
Handles
(Stainless
Steel Models
Only)
Soap and water
Non Abrasive Glass
Cleaner
Soap and water
Ammonia
Stainless Steel
Cleaners
Condenser Vacuum attachment
Coils
Never use CHLORIDE to clean stainless steel.
Clean stainless steel front and handles with non-abrasive soapy water
and a dishcloth. Rinse with clean water and a soft cloth. Wipe stubborn
spots with an ammonia-soaked paper towel, and rinse. Use a non-
abrasive stainless steel cleaner. These cleaners can be purchased at
most home improvement or major department stores. Always follow
manufacturer's instruction. NOTE: Always, clean, wipe and dry with the
grain to prevent cross-grain scratching. Wash the rest of the cabinet
with warm water and mild liquid detergent. Rinse well, and wipe dry with a
clean soft cloth.
Use the dusting tool attachment on your vacuum to remove dust build-up
on the condenser coils (see item "J" in illustration on page 17 for location).
18
REPLACING UGHT BULBS
1. Unplug refrigerator.
2. Wear gloves as protection against possible broken glass.
3. Remove light cover, if necessary.
4. Unscrew and replace oId bulb with an appliance bulb of
the same wattage.
5. Replace light cover, if necessary.
6. Remember to plug the refrigerator back in.
Light Sockets
Located Behind
or
Refrigerator Light Replacement
/
LightBulb
Located Behind Right
Rear of Ice Container
Crisper Light Replacement (Models may vary)
Vacation and Moving Tips
Short
Vacations
Long
Vacations
Freezer Light Replacement
. Leave refrigerator operating during vacations of 3 weeks or less.
. Use all perishable items from refrigerator compartment.
. Turn automatic ice maker off, even if you will only be gone for a few days.
. Remove all food and ice if you will be gone one month or more.
. Turn controls to "O" ( the OFF position) and disconnect power.
. Turn off automatic ice maker and turn water supply valve to closed position.
. Clean interior thoroughly.
. Leave both doors open to prevent odors and mold build-up. Block doors open if
necessary.
Remove all food and ice.
If using handcart, load from side.
Moving
° Adjust rollers all the way up to protect them during sliding or moving.
Pad cabinet to avoid scratching surface.
19
REFRIGERATOR WARRANTY Yourrefrigeratoris protectedby this warranty
WARRANTY THROUGH OUR AUTHORIZED SERVICERS, THE CONSUMER WILL BE
PERIOD WE WILL: RESPONSIBLE FOR:
FULL ONE-YEAR One year from Pay all costs for repairing or replacing any parts of this Costs of service calls that are listed under
WARRANTY odginal purchase appliance which prove to be defective in materials or NORMAL RESPONSIBILITIES OF THE
date workmanship Excludes original and replacement Ice & Water CONSUMER.*
filter cartridges (if equipped) Odginal and replacement
cartridges are warranted for 30 days (parts only)
LIMITED 2"d- 5TM Second through fifth Repair or replace any parts in the cabinet liner or sealed Costs for pickup and delivery of the appliance
YEAR WARRANTY years from original refrigeration system (compressor, condenser, evaporator, required because of service Costs for _abor, parts
(Cabinet Liner and purchase date dryer or tubing) which prove to be ddecfive in materials or and transportation other than with respect to the
Sealed System) workmanship cabinet liner or Sea_ed Refrigeration System
LIMITED Time periods listed All of the provisions of the full warranties above and the Costs of the technician's travel to the home and any
WARRANTY above exclusions listed below apply costs for pick up and delivery of the appliance
(Applicable to the required because of service
StateofAlaska)
in theU.S.A..andPuerto Rico,your applianceiswarrantedby ElectroluxMajor AppliancesNorfbAmerica,a divisionof ElectroluxHomeProducts,
inc.InCanada,yourapplianceiswarrantedby ElectroluxMajorAppliancesNorthAmerica,adivisionof ElectroluxCanadaCorp.ElectroluxHome
Products,Inc.and ElectroluxCanadaCorp.are referredto in thiswarrantyas "Electrolux".We authorizenopersontochangeor addtoany ofour
obligationsunderthiswarranty.Our obligationsfor serviceandpartsunderthiswarrantymustbeperformedby usor anauthorizedElectrolux
servicer.
*NORMAL
RESPONSIBILITIES
OFTHECUSTOMER
EXCLUSIONS
This warrantyappliesonly to products in ordinaryhousehold use, and the consumeris responsible for the items
listed below:
1. Properuseoftbeappliancein accordancewith instructionsprovidedwith theproduct.
2. Proper installationby an authorizedservicer in accordancewith instructionsprovided with the appliance and in
accordancewithall localplumbing,electricaland/orgas codes.
3. Proper connectionto a groundedpower supply of sufficientvoltage, replacementof blown fuses, repair of loose
connectionsordefects in housewiring.
4. Expensesfor makingthe applianceaccessiblefor servicing,such as removalof trim, cupboards,shelves, etc.,which
are nota partoftheappliancewhenit wasshippedfromthefactory.
5. Damagestofinish afterinstallation.
6. Replacementoflightbulbsand/orfluorescenttubes (onmodetswiththesefeatures).
This warranty does not cover the following:
1. CONSEQUENTIALOR INCIDENTALDAMAGESSUCHAS PROPERTYDAMAGEAND INCIDENTALEXPENSES
RESULTINGFROMANYBREACHOFTHISWRITTENORANY IMPLIEDWARRANTY.
Note: Somestatesdonotallowthe exclusionor limitationofincidentalor consequentialdamages,so thislimitationor
exclusionmaynotapplytoyou.
2. Servicecalls whichdonot involvemalfunctionor defectsin workmanshipor material,orfor appliancesnot inordinary
householduse.Theconsumershall payforsuchservicecalls.
3. Damagescausedby servicesperformedby servicers otherthan Electrolux,or its authorizedservicers;use of parts
other than genuine Electroluxparts; obtainedfrom personsother thansuch servicers;or external causes suchas
abuse,misuse,inadequatepowersupplyoractsof God.
4. Productswithoriginalserialnumbersthathavebeenremovedoralteredandcannotbereadilydetermined.
iFYOU NEED
SERVICE
Keep your bill of sale, delivery slip, or some other appropriatepaymentrecord. The date on the bill establishesthe
warranty period shouldservice be required. If service is performed,it is in your best interestto obtain and keep all
receipts. Thiswrittenwarrantygivesyou specificlegalrights.You mayalsohaveother rightsthatvaryfrom stateto state.
Serviceunderthiswarrantymustbeobtainedby contactingElectrolux.
This warrantyonlyappliesinthe50Statesof theU.S.A.and PuertoRico,andCanada.Productfeaturesor specificationsas describedorillustrated
aresubjectto changewithoutnotice.
USA
800-944-9044
EIectroluxMajorAppliancesNorthAmerica,
adivisionof ElectroluxHomeProducts,Inc.
P.O.Box212378
Augusta,GA 30917
Canada
800-265-8352
Electrotux Major Appliances North America,
a division of Etectrolux Home Products, Inc.
5855 Terry Fox Way
Mississauga, Ontario
L5V 3E4
2O
1 / 1

Frigidaire FRS23LH5DBN Owner's manual

Category
Fridges
Type
Owner's manual

Ask a question and I''ll find the answer in the document

Finding information in a document is now easier with AI

Ask the document