Page is loading ...

40L-1802B
400137

Bartscher GmbH
Franz-Kleine-Str. 28
D-33154 Salzkotten
Germany
Phone: +49 5258 971-0
Fax: +49 5258 971-120
Service hotline: +49 5258 971-197
www.bartscher.com
Version: 2.0
Date of preparation: 2019-12-04
Original assembly instructions
EN

400137 3 / 7
EN
Technical Specifications
Name:
Two handle mixer 40L-1802B
Item No.:
400137
Material:
Brass, steel
Handles material:
Metal (EUR)
Flow at 3 bar:
Outlet quantity: 16 l/min., jet regulator:
40 l/min.
Jet regulator mouthpiece, in mm:
55
Swivelling tap, in °:
180
Diameter of table borehole, in mm:
21 - 25
AG connection:
1/2"
Attachment with threaded coupling:
1/2"
Water connection:
1/2"
Dimensions (W x D x H), in mm:
515 x 415 x 1.220
Weight in kg:
7,2
We reserve the right to implement technical modifications!
Version / Characteristics
• Fitting type: two-handle mixer
• Mixer with dish-washing rinser shower arm
• Valve type: stainless steel valve-seat
• Assembly type: double-hole borehole
• Jolt-free
• Setting ring for permanent operation
• Highly resistant to impact, abrasion, wear and tear
• Chemical resistance in broad temperature range
• Excellent corrosion-resistance
• Low friction coefficient

4 / 7 400137
EN
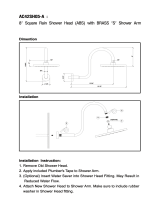
List of Parts
1. Stainless steel pipe
2. Wall retainer
3. Rinser shower arm hook
4. Spring holder
5. Flexible hose
6. Seal
7. Spiral spring
8. Rinser shower arm head
9. Seal
10. Tap
11. Outlet valve pipe screw
Fig. 1
Assembly
1. Mount the supplied mixer to the drainboard sink table.
2. Undo the screw (11) (detail B) and insert the tap (10) onto the mixer. Pay
attention not to damage the seals. Tighten firmly the screw (11) and check if the
tap may rotate freely.
3. Screw the stainless steel pipe (1) into the threaded socket of the mixer.
4. Mount the wall holder (2) on the wall at the right height. Fit the wall holder (2)
over the stainless steel pipe (1). In case the wall holder (2) is too long, undo the
hexagon socket head screw on the round flange and shorten the wall holder (2)
with a metal cutting saw. Refit the holder in the round flange and tighten firmly
the hexagon socket head screw. Mount the wall holder (2) with 2 included bolts
to the wall (detail A). Use chrome-plated pliers to tighten the nuts.
5. Fit the rinser shower arm hook (3) over the stainless steel pipe (1), but do not fix it
yet.
6. Fit the spring holder (4) with the nut facing the bottom on the stainless steel pipe
(1). Fix the spring holder (4) with the distance of 15–20 cm from the upper end
of the stainless steel pipe (1), tightening the grub screw with the right hexagon
key supplied with the mixer. Make sure that the spring holder (4) is properly
fitted and does not slide along the stainless steel pipe (1).

400137 5 / 7
EN
7. Fit the flexible hose (5) and the seal (6) at the upper end of the stainless steel
pipe (1).
8. Insert the flexible hose (5) in the spiral spring (7). Fit the spiral spring (7) onto
the spring holder (4) and check it for stability.
9. Tighten the rinser shower arm head (8) by hand (not using the adjustable
wrench) and the other end of the flexible hose (5). Place the supplied seal (9)
between the rinser shower arm head (8) and flexible hose (5).
10. Undo the pipe outlet valve screw (11) that is fitted on the stainless steel pipe (1).
Fit the outlet (10) and re-tighten the screw (11). Pay attention not to damage the
outlet seal and that the outlet (10) swivels freely.
11. Then, adjust the height and position of the rinser shower arm hook (3). Tighten
the grub screw with the hexagon key. Verify that the rinser shower arm hook (3)
does not slide along the stainless steel pipe (1) and does not move sidewards.
12. Connect the supplied hot and cold water hoses to the water supply and drainage
system.
13. When the installation is completed check if the rinser shower arm works
correctly. Close the rinser shower arm head (fit the ring upwards and release the
lever). Open the water supply to the fitting and check for any possible water
loss. Then, verify if the rinser shower arm works well during opening and
closing.
ATTENTION!
The plumber performing the installation is responsible for installation
according the EN1717.

6 / 7 400137
EN
Operation Instructions
• Unless the water softening device or anti-scaling filter has been already fitted,
we recommend to install them as limescale and water impurities might damage
the fitting.
• When not in use, close the fitting handles.
• Avoid sudden and abrupt movements of the tap cock.
• Never hang any objects on the tap cock.
Cleaning
ATTENTION!
Do not use any aggressive or coarse cleaning agents, nor containing
acids.
Do not use scouring sponges or synthetic cloths, etc.
1. Keep the rinser shower arm surface clean and dry to avoid limescale deposits
and corrosion.
2. Before cleaning, make sure the fitting is cold.
3. To remove limescale stains from the fitting, use water with neutral cleaning
agent.
4. To remove soiling and the remains of the cleaning agent, wipe the surfaces with
a cloth soaked in clean water.
5. Then dry it thoroughly using a soft cloth.
6. Do not let the seals have contact with cleaning agents.

400137 7 / 7
EN
Dimensions
Fig. 2
/