Page is loading ...

WARRANTY
DO NOT RETURN YOUR PRODUCT TO THE
STORE. PLEASE CONTACT BABY TREND FOR
REPLACEMENT PARTS, SERVICE AND REPAIR.
The Baby Trend
®
warranty covers workmanship defects
within the rst 180 days of purchase. Any product which
has been subjected to misuse, abuse, abnormal use,
excessive wear and tear, improper assembly, negligence,
environmental exposure, alteration or accident, or has
had its serial number altered or removed invalidates
all claims against the manufacturer. Any damage to
property during installation is the sole responsibility of
the end user. The Customer Service Department can
be contacted at 1 (800) 328-7363 Monday through
Friday between 8:00am and 4:30pm (PST). Return
Authorizations are required prior to returning product(s)
to Baby Trend
®
. Warranty only valid in North America.
PT03D58A_040920
Jammin’ Gym with Play Mat
Instruction Manual
Manual de Instrucciones
Manuel d’instruction
Read all instructions BEFORE assembly and USE
of product.
KEEP INSTRUCTIONS FOR FUTURE USE.
Lea todas las instrucciones ANTES de armar y
USAR el producto.
CONSERVE LAS INSTRUCCIONES
PARA USO FUTURO.
Lisez toutes les instructions du manuel AVANT
l’assemblage ou L’UTILISATION de ce produit.
CONSERVEZ CES INSTRUCTIONS POUR
Baby Trend, Inc. 13048 Valley Blvd. Fontana CA 92335
1-800-328-7363 (8:00am ~ 4:30pm PST) www.babytrend.com
PT03D58A
3 - 36m

WARNING WARNING
Copyright © 2020, Baby Trend Inc., All Rights Reserved. Todos los derechos reservados. Tous droits réservés. Copyright © 2020, Baby Trend Inc., All Rights Reserved. Todos los derechos reservados. Tous droits réservés.
21
The Play Gym is designed to be used only by
infants at least 3 months of age. Discontinue
to use the Play Gym when the child reaches 36
months of age.
Discontinue use should any part become
damaged. Please contact our customer service
at 1-800-328-7363 to order replacement parts or
arrange for repairs.
Read all instructions before assembly and use of
the Play Gym.
IMPORTANT! To ensure safe operation
of your product, please follow these instructions
carefully. Please keep these instructions for future
reference.
IMPORTANT! Before assembly and each
use, inspect this product for damaged hardware,
loose joints, missing parts or sharp edges. NEVER
use if any parts are missing or broken.
IMPORTANT! Adult assembly is required.
STRANGULATION HAZARD
Strings can cause STRANGULATION!
• DO NOT place items with a string around child’s
neck, such as hood strings or pacier cords.
• DO NOT suspend strings over product or attach
strings to toys. To prevent entanglement injury,
never place the Play Gym in a crib or playpen.
Never add strings, ties or other products to the
Play Gym.
FALL HAZARD!
Babies can FALL from unit resulting in head
injuries.
• NEVER leave child unattended. Always keep child
in view while in product.
• NEVER use near stairs, stoves or ovens, heaters,
replaces, swimming pools, or other dangerous
areas. To avoid tip over, place product on a at,
level surface.
• NEVER lift this product with your child in it.
• NEVER place product on counter tops, tables, or
any other elevated surface.
• ALWAYS Ensure that all frame parts are
completely locked, refer to page 5 for
instructions. Check that all pin connections on
the Play Gym are secured properly.
• ALWAYS make sure the fasteners
(ropes, straps, clips, etc.) are securely fastened
on the Play Gym.
• ALWAYS use parts provided by the manufacturer,
never substitute any parts with items not
provided by the manufacturer.
• Keep ALL packaging out of reach from children.
Do not use the Play Gym if it is damaged
or broken.
Care / Maintenance
• MACHINE WASHABLE MAT. Wash the mat
separately in cold water on the gentle cycle. Do not
use bleach. Tumble dry on low heat.
• The arched bars, hard toys, mirror, bases and
frames can be wiped with a clean, damp cloth.
• DO NOT MACHINE WASH. The arched bars, toys
and plastic parts, use only lukewarm water and mild
soap.
MAINTENANCE

PARTS
4
Copyright © 2020, Baby Trend Inc., All Rights Reserved. Todos los derechos reservados. Tous droits réservés.
3
Copyright © 2020, Baby Trend Inc., All Rights Reserved. Todos los derechos reservados. Tous droits réservés.
BABY TREND
®
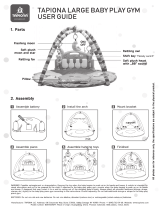
Check that you have all the parts for this model
before assembling the Play Gym.
Assembled Parts Diagram Step 6
Play Gym Legs (x4)
Padded Mat
Central Frame
BABY TREND
CUSTOMER SERVICE
The Customer Service Department can be
contacted at 1 (800) 328-7363 Monday through
Friday between 8:00am and 4:30pm (PST). Return
Authorizations are required prior to returning
product(s) to Baby Trend®. Warranty only valid
in North America.
* Rattle and strap #2* Rattle and strap #1 * Rattle and strap #3
* Assembled
4pc toy and bar #1
* Not - Assembled
4pc toy and bar #2
Side frames (x2)(T) Shape connectors (x4)
* Toys may vary

ASSEMBLYASSEMBLY
65
Copyright © 2020, Baby Trend Inc., All Rights Reserved. Todos los derechos reservados. Tous droits réservés. Copyright © 2020, Baby Trend Inc., All Rights Reserved. Todos los derechos reservados. Tous droits réservés.
TOP FRAME CONNECTION
1
• Insert each side frame into the central frame (Fig. 1a).
NOTE: Ensure that they click into position. Slide the lock
outward on both sides to secure the side frames (Fig. 1b).
• Not - Assembled Toy Bar:
Pressing the pins, insert the
toys into the bar as seen in
(Fig. 2c).
• Assembled Toy Bars:
Pressing the pins, insert the
toy bar to the rst pair of
legs. Repeat for the second
toy bar (Fig. 2d).
• Pressing the top pins insert
each pair of legs to the side
frames attached to each
side of the central frame
(Fig. 2e).
NOTE: Face the toys
outward or inward when
completing the frame
assembly. All pins must
click into position.
Fig. 1a
Fig. 1b
Fig. 2a
Fig. 2b
Fig. 2d
Fig. 2c
4 legs connectors in
Small tube
pointed up
• After locking the frames,
check that both side
frames are secure by
gently pulling away from
central frame (Fig. 1b).
NOTE: These parts do
not separate when lock is
correctly engaged.
BAR AND LEGS
2
• Position the (T) shape
connectors over the top
leg angled as shown
in (Fig. 2a). Slide a
connector to the second
locking pins and secure
in place. Continue
steps for all other legs
until complete. Ensure
the small tubes on the
connestors point up and
all pins click into position.
• Complete each (T)
shape connectors
attachment onto each
leg and set them as
shown in (Fig. 2b).
Follow the diagram
on (Fig. 2c - Fig.2d) to
insert each side toy bar.
Pins in
Lock both
latches
Insert toy bar
Assembled Bar
Fig. 2e
Pins in
Side 2
Pins in
Side 1

ASSEMBLYASSEMBLY
87
Copyright © 2020, Baby Trend Inc., All Rights Reserved. Todos los derechos reservados. Tous droits réservés. Copyright © 2020, Baby Trend Inc., All Rights Reserved. Todos los derechos reservados. Tous droits réservés.
Fig. 3b
Fig. 3a
Fig. 3d
Fig. 3c
Fig. 3e
ATTACHING THE TOYS
3
• Use the straps attached
to the toys to thread
them through the open
slots of the central frame
(Fig. 3a).
• Undo the strap hook and
loop for toy threading
(Fig. 3b).
• Face the toys to front
of the central frame
assembly, thread strap
and toy through the slot
as desired (Fig. 3c).
NOTE: Always use
the hook and loop to
secure the toy onto the
central frame.
• To adjust the rattle toys:
undo the hook and loop on
the strap (Fig. 3d). Remove
the strap with toy rattle from
the central frame. Rethread
the strap through the slots to
recongure the toys. (Fig. 3e).
NOTE: Always use the hook
and loop to secure the toy onto
the central frame.

ASSEMBLYASSEMBLY
109
Copyright © 2020, Baby Trend Inc., All Rights Reserved. Todos los derechos reservados. Tous droits réservés. Copyright © 2020, Baby Trend Inc., All Rights Reserved. Todos los derechos reservados. Tous droits réservés.
PLACE THE PADDED MAT
WARNING: Never leave child
unattended. Always keep child in view
while in product. NEVER put child under
the mat.
TO DISASSEMBLE FRAME
5
• Unlatch the left latch to
the right and the right
latch to the left. Listen for
the latch to disengage.
Pull the 2 side frames
away from the central
frame (Fig. 5a).
• Press in the pins on the
side frames to release
the each leg with
attached toy bar from the
framing. Press the pins
on each side of the toy
bars to release them from
the legs.
TO DISASSEMBLE ATTACH / REMOVE TOYS
A
B
C
F
D
G
E
4
• Center the padded mat
between the frame legs
and under the frame
assembly (Fig. 4).
NOTE: Padded mat
may be used without the
frame and toy assembly.
Fig. 5a
Fig. 5c
Fig. 5b
Fig. 4
Fig. 7
Unlock both
latches
Pins in
Optional
ASSEMBLED VIEW AND PARTS
• (T) shape Connector
removal is optional: Press
the pins and remove each
connector from each leg.
6
• Use the diagram
to see parts and
locations. Use the
list to identify parts
for set up and
disassembly.
A. Central Frame
B. Side Frame
C. Leg
D. Connector
E. Toy Rattle / Strap
F. Toy Bar
G. Padded mat
• For assembly or
to disassemble
assistance see
(Page 3) to contact
customer service.
TOY ATTACHMENT STRAP
7
• Use hook and loop to attach or remove toys (Fig. 7).
/