Page is loading ...

The specifications of this product may vary from this photo and are subject to change without notice.
IRONMAN, IRONMAN TRIATHLON and M-DOT are registered trademarks of World Triathlon Corporation.
This product is licensed by the World Triathlon Corporation.
OWNER’S MANUAL
Leg Develop Attachment
6839.2‐050516


SERVICE-------------------------------------------------------------------- 2
LABEL PLACEMENT----------------------------------------------------- 3
PRODUCT SAFETY------------------------------------------------------ 4
ASSEMBLY PREPARATION-------------------------------------------- 5
OVERVIEW------------------------------------------------------------------ 6
HARDWARE PACK-------------------------------------------------------- 7
PART LIST------------------------------------------------------------------- 8
STEP 1----------------------------------------------------------------------- 10
STEP 2----------------------------------------------------------------------- 12
STEP 3----------------------------------------------------------------------- 14
STEP 4----------------------------------------------------------------------- 16
ADJUSTMENTS------------------------------------------------------------ 19
WARRANTY----------------------------------------------------------------- 20
PARTS REQUEST FORM----------------------------------------------- 21
TABLEOFCONTENT
1

IMPORTANT: FOR NORTH AMERICA ONLY
For damage or defective product, questions, replacement parts or any other service
support, please contact our customer service department (8:00 AM - 5:00 PM Pacific
Standard Time, Open Daily) by below methods:
For Best Service Email:
Service@paradigmhw.com
Website:
www.paradigmhw.com
Toll-Free:
1-844-641-7922
Please have the following information ready when requesting for service:
Your name
Phone number
Model number
Serial number
Part number
Proof of Purchase
For damaged or defective product please contact our customer service
before returning to the store.
* Emailing us with the information above will be the best method to
receive a response during peak business hours.
**Response time may vary.
Paradigm Health & Wellness, Inc.
1189 Jellick Ave.
City of Industry, CA 91748, USA
SERVICE
2

UNDER PENALTY OF LAW THIS TAG
NOT TO BE REMOVED EXCEPT BY THE
CONSUMER
NOTICE
This article does not meet
requirements of California
Bureau of Home Furnish-
ings technical bulletin 117.
Care should be exercised
burning cigaretts.
ALL NEW MATERIALCONSISTING
OF POLYURETHANE
FOAM PAD_100%
REGISTRY NO. VA25302 (CN)
manufacturer that the materials
in this article are described in
accordance with law.
Paradigm Health and Wellness, Inc.
1189 Jellick Ave. City of Industry
CA 91748, USA
Paradigm Health and Wellness, Inc.
1189 Jellick Ave. City of Industry, CA
91748 USA
SE SANCIONARÁ LEGALMENTE A
QUIENES QUITEN ESTA ETIQUETA.
SOLO EL CONSUMIDOR PODRÁ
QUITARLA.
MATERIAL COMPLETAMENTE NUEVO
COMPUESTO DE 100% RELLENO DE
ESPUMA DE POLIURETANO.
NOTIFICACIÓN
Este artículo no se ajusta a
Mobiliario boletín técnico
117. Cuidado de California
deben ejercerse cerca de
una llama abierta o con
cigaretts ardientes.
NO. DE REG VA25302 (CN)
materiales de este artículo se
describen según las leyes.
Paradigm Health and Wellness, Inc.
1189 Jellick Ave. City of Industry
CA 91748, USA
SOUS PEINE DE SANCTION LÉGALE,
CETTE ÉTIQUETTE NE PEUT ÊTRE
ENLEVÉE PAR UNE PERSONNE AUTRE
QUE LE CONSOMMATEUR
AVIS
Ce produit ne satisfait pas
-
du devis technique du
California Bureau of Home
Furnishings. Ne pas utiliser
près d’une source de
nue (cigarettes, etc.)
ENTIÈREMENT FABRIQUÉ DE
MATÉRIAUX NEUFS REMBOURRAGE
DE MOUSSE DE
POLYURÉTHANE 100 %
NO D’ENREGISTREMENT
VA25302 (CN)
Cette étiquette est apposée
conformément aux lois Cana-
diennes.
LABELPLACEMENT
3

WARNING: Before using this equipment you should consult with your personal physician to
see if Ironman Leg Development Attachment is appropriate for you. Do not use this
equipment without your physician’s approval. Do not use this equipment if you have any
of the following conditions or ailments:
Extreme obesity
Glaucoma, retinal detachment or conjunctivitis
Pregnancy
Spinal injury, Cerebral Sclerosis, or acutely swollen joints
Middle ear infection
High blood pressure, Hypertension, Recent stroke or Transient ischemic attack
Heart or circulatory disorders for which you are being treated
Hiatus hernia or Ventral hernia
Bone weaknesses including Osteoporosis, Unhealed fractures, Modularly pins, or Surgically
implanted orthopedic supports
Use of anti-coagulants including Aspirin in high doses
The Maximum Weight Capacity for this product is 180lbs/82kgs.
Read all instructions carefully before assembling or operating this product. Retain this
owner’s manual, do not remove any safety labels from the machine and keep the original
purchase receipt for future reference.
This Leg Development Attachment was designed and built for optimum safety. However, certain
precautions apply whenever you use the exercise equipment. Be sure to read the entire manual
before assembling and operating this equipment. Also, please note the following safety
instructions:
1. Consult your physician or other health care professionals before using the piece of equipment.
2. Always wear proper exercise apparel when using the equipment. Use care when getting on or
off the unit.
3. If any time you feel faint, light-headed or dizziness while operating the equipment, stop
exercising immediately and contact your physician. You should also discontinue use if you
are experiencing pain or any discomfort.
4. Keep children and pets away from the equipment at all times.
5. Only one person should use the equipment at a time.
6. Make sure your equipment is correctly assembled before you use it. Be sure all screws, nuts,
and bolts are tightened prior to use. Check screws, nuts, and bolts are tight on a weekly basis.
7. Do not operate this or any exercise equipment if it is damaged.
8. Wait 2 hours after eating before using the exercise equipment. If you get nauseous, stop
exercising as soon as you feel queasy.
9. This product should be placed on a flat surface when using. A mat or other covering material
on the ground is recommended. For indoor use only, do not use outdoors.
10. Keep hands and feet away from any moving parts. Do not insert any object into any
openings on the equipment.
11. Keep loose clothes, jewelry, limbs and long hair away from moving parts.
12. Children under the age of 12 should not use this fitness equipment.
4
PRODUCTSAFETY

Warning: It is highly recommend that you have assistance during the assembly of this
IRONMAN strength equipment.
1. Tools for assembly:
General tools you may need for the assembling this IRONMAN strength equipment:
Metric Allen Key Set
Metric Wrench Set and Adjustable Wrench
Flat Screwdrivers
Phillips Screwdrivers
Rubber Mallet
Silicone Spray Oil
2. Insert the bolts into the frame as illustrated in the drawing of each of the steps.
3. Hand-tighten the bolts, nuts, and screw during assembly. Hand-tightening will allow for easily
aligning the parts during assembly. Tighten all the hardware once the entire unit has been
completely assembled.
4. It is highly recommended that a professional installer assembles the IRONMAN strength
equipment. But, with the proper assistance, the right tools, and strictly following the assembly
steps, and given enough time; the assembly of the unit can be achieved without professional
help.
5. Thoroughly read each step before proceeding to assemble the items of that step.
6. To aid in assembly of the equipment, the hardware (bolts, nuts, washer…etc.) has been
presorted according to their corresponding steps. Each bag of hardware is labeled with its
corresponding step number.
7. When the equipment is fully assembled check all the functions for correct operation. Consult the
manual if you experience any issues, or for further help please contact our service department.
See page 2.
5
ASSEMBLYPREPARATION

OVERVIEWDRAWING
6

HARDWAREPACK
7

Part# Description Q’ty.
Part# Description Q’ty.
A Main Frame Post 1
101 Push Pin D8x55L 1
B
Leg Development
Tube
1
120
Round Cap
D25.4xD65x31.5
5
C Handlebar 1
125
Round Cap
D50.8x15
2
D Preacher Curl Post 1
126 Round Cap D1"x17 4
E Preacher Curl Pad 1
153
Square Cap
50x50x20L
1
F
Foam Roller Tube
D25.4x2.0Tx450L
2
155
Square Cap
30x70x17L
2
G
Rotating Axle
D12x58.5L
1
185
Buffer
D35xD25.5x24
1
2
Hex Bolt
M8x1.25x20L
2
186 Buffer R23x35x35 1
3 Hex Bolt M8x1.25x25L 4
200
Hand Grip
D24x3Tx300L
2
11
Allen Screw
M6x1x10L
1
222
Foam Roller
D23xD100x200L
6
50
Flat Washer
D18xD8.5x1.2T
4
223 Foam Roller Sleeve 6
53
Flat Washer
D25xD8.5x2T
3
250 Bearing 2
54
Spring Washer
D15.4xD8.2x2T
6
272 Bushing D20x26.4L 1
100 Push Pin D9.4x70 1
295 Standard Clip 1
PARTLIST
8
PARTLIST

9

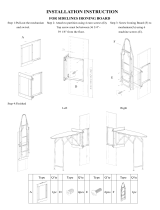
Appearance upon completion of Step 1.
1A. Attach Leg Development Tube (B) onto the Main Frame Post (A) by using:
2 - (2) Hex Bolt M8x1.25x20L
2 - (54) Spring Washer D15.4xD8.2x2T
2 - (53) Flat Washer D25xD8.5x2T
1 - (G) Rotating Axle D12x58.5L
Thoroughly tighten the hardware once complete
STEP1
10

8
NO.2 Hex Bolt
M8x1.25x20L
2PCS
NO.53 Flat Washer
D25xD8.5x2T
2PCS
NO.54 Spring Washer
D15.4xD8.2x2T
2PCS
NO.G Rotating Axle
D12x58.5L
1PC
STEP1
11
13
,
15 mm Wrench 2PCS

Appearance upon completion of Step 2.
2A. Attach 2 Foam Rollers and Foam Roller Sleeve (222, 223) onto the circular
tubes on Main Frame Post (A) and secure them into place with 2 Round Cap (120)
using:
2 - (222) Foam Roller D23xD100x200L
2 - (223) Foam Roller Sleeve
2 - (120) Round Cap D25.4xD65x31.5
2B. Insert a Foam Roller Tube (F) into the hole at the bottom of Leg Development
Tube (B). Attach a Foam Roller and Foam Roller Sleeve (222, 223) to each side of
the Foam Roller Tube (F). Secure each Foam Roller and Foam Roller Sleeve (222,
223) into place with a Round Cap (120) at each end of Foam Roller Tube (F). Using:
2 - (222) Foam Roller D23xD100x200L
2 - (223) Foam Roller Sleeve
2 - (120) Round Cap D25.4xD65x31.5
2C. Insert a Foam Roller Tube (F) mid-way along its length into one of the holes at
the upper portion of Leg Development Tube (B). Attach a Foam Roller and Foam
Roller Sleeve (222, 223) to each side of the Foam Roller Tube (F). At one end of
Foam Roller Tube (F) use a Round Cap (120), and at the other end use a Round
Cap (126). Using:
2 - (222) Foam Roller D23xD100x200L
1 - (120) Round Cap D25.4xD65x31.5
1 – (126) Round Cap Round Cap D1"x17
Note: The Foam Roller Tube (F) of step 2C is meant to have two different types of
end caps. This will allow for the easy removal of this set of foam rollers when
performing preacher curls.
Warning: The foam rollers in step 2C must be removed in order to perform
preacher curl exercises or leg extensions.
STEP2
12

STEP2
13
NO.126 Round Cap
D1’’X17 1 PC
NO.120 Round Cap
D25.4xD65x31.5
5 PCS

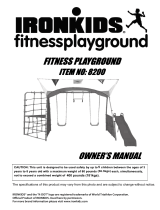
Appearance upon completion of Step 3.
3A. Slide Preacher Curl Post (D) into the Square tube of the Main Frame Post (A).
Secure Preacher Curl Post (D) to Main Frame Post (A) with Push Pin (101). Using:
1 - (101) Push Pin D8x55L
3B. Attach Handlebar (C) to Leg Development Tube (B) with Push Pin (100). Using:
1 - (100) Push Pin D9.4x70
STEP3
14

15
STEP3
D.101 Push Pin
D8x55 1PC
NO.100 Push Pin
D9.4x70 1PC

Appearance upon completion of Step 4.
4A. Attach the Preacher Curl Pad (E) to the Preacher Curl Post (D) as shown in
diagrams AA-1 and AA-2 using:
4 - (3) Hex Bolt M8x1.25x25L
4 - (50) Flat Washer D18xD8.5x1.2T
4 - (54) Spring Washer D15.4xD8.2x2T
Note: Loosely insert all the hardware by hand first. This will allow for all the holes to
be aligned prior to fastening.
4B. When all the Hex Bolt (2) have been inserted, proceed to tightening the bolts to
completely secure the Preacher Curl Pad (E) to the Preacher Curl Post (D).
STEP4
16

STEP4
NO.50 Flat Washer
D18xD8.5x1.2T
4PCS
NO.54 Spring Washer
D15.4xD8.2x2T
4PCS
NO.3 Hex Bolt
M8x1.25x25L
4PCS
17
13,15 mm Wrench 1PC

Install the Standard Clip (295), please follow the steps below:
A. To secure your weight plates, pinch the rubber grips of Standard Clip (295).
B. Slide the Standard Clip (295) on to the post of the Leg Development Tube (B).
C. Standard Clip (295) should be pushed all the way down until it makes contact with
the weight plates, securing the weight plates to the backside of the weight post of
the Leg Development Tube (B).
Warning: DO NOT use weight plates on the post of Leg Development Tube (B)
without first securing them in place with the Standard Clip (295).
ClipInstallation
18
/