SMARTCORE 50SLV509 User manual

Type
User manual

This manual is also suitable for

SMARTCORE™
Premium Engineered Vinyl Flooring
Installation Instructions
SMARTCORE™ INSTALLATION INSTRUCTIONS (V.1.1)
1
ATTENTION! READ BEFORE INSTALLING!
FOR BEST VISUAL REPRESENTATION OF YOUR FLOOR
This flooring replicates the look of a natural product which has natural variations in color, texture, and sheen/gloss. For best
visual effect, shuffle planks from several cartons and do not install similar planks next to one another.
SUBFLOOR PREPARATION
Subfloor should be dry and level to 3/16” per 10 ft. radius for best installation results.
SMARTCORE™ Premium Engineered Vinyl Flooring Installation Instructions
READ THESE INSTRUCTIONS THOROUGHLY BEFORE BEGINNING INSTALLATION. If the following instructions leave any
unanswered questions or if additional information is required, please call Natural Floors toll free at 800-404-2675 (706-733-6120).
FLOORING MATERIAL SHOULD BE INSPECTED PRIOR TO INSTALLATION
Responsibility for the suitability of Natural Floors flooring and accompanying products for each individual installation cannot
be assumed by Natural Floors, since Natural Floors has no control over the installer's proper application. Should an
individual plank be doubtful as to appearance or dimension the installer should not use this piece. Natural Floors will send
replacement in a timely fashion.
NOTE: Natural Floors SMARTCORE Premium Engineered Vinyl Floors may be installed with a direct glue-down method on
approved wooden (or) concrete substrates that are on, above, or below grade. Use only Natural Floors recommended flooring
adhesive. Please consult with adhesive manufacturer to determine if suitable for use with this material.
READ BEFORE INSTALLING:
While SMARTCORE is waterproof, it’s not a moisture barrier. It’s still a good idea to make sure your concrete is cured and a
covered with a minimum 6 mil polyfilm moisture barrier, and, when installing over a raised subfloor, that a moisture barrier is
installed in the crawl space. Moisture won’t damage SMARTCORE, but it can get in the walls and structure of the home. A
couple of extra dollars and a few extra minutes is a small investment for the added protection and peace of mind.
Use good common sense installation practices, and you’ll have a successful installation that results in a beautiful floor.
PRE-INSTALLATION JOBSITE REQUIREMENTS
NATURAL FLOORS cannot be held responsible for site conditions.
Carefully examine the flooring prior to installation for color, finish and quality. Ensure adequate lighting for proper inspection. If
flooring is not acceptable, contact your supplier immediately and arrange for replacement. NATURAL FLOORS cannot accept
responsibility for flooring installed with visible defects. Prior to installation of any flooring, the installer must ensure that the jobsite and
subfloor meet the requirements of these instructions. NATURAL FLOORS is not responsible for flooring failure resulting from
unsatisfactory jobsite and/or subfloor conditions.
Flooring should be one of the last items installed in any new construction or remodel project.
Crawl spaces must be a minimum of 18′′ (46 cm) from the ground to the underside of the joists. A ground cover of 620 mil black
polyethylene film is essential as a vapor barrier with joints lapped 6′′ (15 cm) and sealed with moisture resistant tape. The crawl space
should have perimeter venting equal to a minimum of 1.5% of the crawl space square footage. These vents should be properly located
to foster cross ventilation. Where necessary, local regulations prevail.
Room temperature and humidity of installation area should be consistent with normal, year-round living conditions for at least one week
before installation of flooring. Maintaining an optimum room temperature of 70
o
F and a humidity range of 30-50% is recommended.
2
SMARTCORE™ INSTALLATION INSTRUCTIONS (V.1.1)
PRE-INSTALLATION SUBFLOOR REQUIREMENTS
All Subfloors must be:
Dry
Structurally sound
Clean: Thoroughly swept and free of all debris
Level: Flat to 3/16” per 10-foot radius
Wood subfloors must be dry and well secured. Nail or screw every 6” along joists to avoid squeaking. If not level, sand down high
spots and fill low spots with a Portland Based leveling patch.
Concrete subfloors must be fully cured, at least 60 days old, and should have minimum 6-mil polyfilm between concrete and ground.
Subfloor should be flat and level within 3/16” per 10’ radius. If necessary grind high spots down and level low spots with a Portland
leveling compound.
Ceramic Tile, resilient tile and sheet vinyl must be well-bonded to subfloor, in good condition, clean and level. Do not sand existing
vinyl floors, as they may contain asbestos.
INSTALLATION TOOLS
For all installation methods:
Tape measure
Pencil
Chalk line
Circular saw
3M
Scotch-Blue™ 2080 tape
Rubber mallet
¼” spacers
Acceptable subfloor types:
CDX Underlayment Grade Plywood (at least ½” thick)
Underlayment grade particleboard
OSB (at least ¾” thick)
Concrete slab
Existing wood or laminate floor
Ceramic tile
Resilient tile & sheet vinyl
STARTING YOUR INSTALLATION
Because houses and buildings expand and contract, and are constantly settling, so it is recommended to leave ¼ between the
perimeter walls and any adjacent hardwood floor.
Work from several open boxes of flooring and “dry lay” the floor before permanently laying the floor. This will allow you to select the
varying textures, colors, and sheens, and to arrange them in a harmonious pattern. Remember, it is the installers’ responsibility to
determine the expectations of what the finished floor will look like with the end user first and then to cull out pieces.
Begin installation next to an outside wall. This is usually the straightest and best reference for establishing a straight working line.
Establish this line by measuring an equal distance from the wall at both ends and snapping a chalk line. The distance you measure
from the wall should be the width of a plank. You may need to scribe cut the first row of planks to match the wall in order to make a
straight working line if the wall is out of straight.
You may want to position a few rows before starting installation to confirm your layout decision and working line. When laying planks,
stagger end joints from row to row by at least 8” (20 cm). When cutting the last plank in a row to fit, you can use the cut-off end to begin
the next row. If cut-off end is less than 8”, discard it and instead cut a new plank at a random length and use it to start the next row.
Always begin each row from the same side of the room.
SMARTCORE™ INSTALLATION INSTRUCTIONS (V.1.1)
3
INSTALLATION INSTRUCTIONS
Inspection: Prior to installation, inspect material in daylight for visible faults/damage. Check if subfloor/site
conditions comply with the specifications described in these instructions. If you are not satisfied, do not install, and
contact your supplier.
Before laying: Measure the room at right angle to the direction of the flooring. For best visual effect, planks in the
final row should be at least 1/3 of the width of the plank. For this purpose, planks in the first row can be cut to
smaller size. Shuffle planks from different boxes in order to obtain a pleasant blend of shades. Lay planks,
preferably following the direction of the main source of light. We recommend laying on wooden floors crossways to
the existing floorboard.
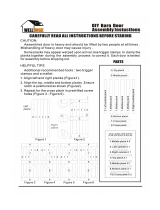
INSTALLING THE FIRST ROW:
1. Starting from the left with the tongue facing the wall, carefully place the first plank in place using spacers
to leave ¼ gap between wall and edges of the plank. (Figure 1)
2. Align the next piece by overlapping the end of the first board. Tap the joint with the rubber mallet using a
downward angle striking motion towards the adjoining tile (Figure 5) until the tongue and groove lock
together to secure the joint on the ends. Continue in this manner until reaching the final plank in the first
row.
3. Cut the final plank piece to length.
CONTINUING THE INSTALLATION:
1. Begin the second row with the cut piece left over from the first row if it is at least 8” in length. If the cut
plank is shorter than 8” do not use it. Instead, begin with a new board that is at least 8” in length and
allow 8” between the end joints on the adjacent planks.
2. Position the first board in place by angling it up slightly, pushing forward and interlocking the side tongue.
(Figure 2) The long side of the plank MUST BE SNUG against the adjoining plank with NO GAPPING.
There will be a slight click when the long side is fully engaged and lowered into place.
3. Lower the plank (Figure 3) and slide the plank to the left to within approximately 1 mm of the end joint of
the adjoining plank. (Figure 4)
4. Tap the joint with the rubber mallet using a downward angle striking motion towards the adjoining end joint
(Figure 5) until the tongue and groove lock together on the side and ends.
5. Carefully inspect the long edge and short ends of the plank for any gapping before moving on to
the next plank. If you notice a gap, STOP, and reinstall the plank to ensure a snug fit.
6. Install the remaining planks and rows in the same manner. (Figures 2-5)
7. Cut the last plank to size.
8. Whenever practical, use cut pieces from previous rows as the starter board to reduce waste.
9. Maintain proper spacing of at least 8” between end joints for best appearance.
INSTALLING FINAL ROW:
1. The last row may need to be cut lengthwise (ripped).
2. Place the last row of planks to be fit on top of the last row of installed planks. Use a piece of plank as a
scribe to trace the contour of the wall.
3. Mark where the plank will be cut. If the fit of the wall is simple and straight, simply measure for the correct fit and cut.
4. After planks are cut, position planks and tap all joints (long and short ends) with the rubber mallet.
INSTALLING UNDER A DOOR JAMB:
1. Installation under moldings (such as door jambs) may require that the top lip of the groove
on the end be reduced in size.
2. Using a small plane or knife plane, carefully shave off the ledge of the groove. (Figure 6)
3. After the groove ledge has been trimmed, place the plank in place and tighten with a pull
bar. The installer must be sure that the required expansion gap has been maintained and
the flooring is not pinched.
4. If fit is not correct, re-trim as necessary.
5. Place a bead of wood glue on the bottom lip of the groove.
6. Insert the tongue into the groove and engage with a pull bar. Hold the plank in place with painters tape (3M Scotch-Blue™
2080 Tape) until the glue is dry. Do not use masking tape or duct tape as they may damage the floors finish.
Figure 3
Figure 2
Figure 6
Figure 1
(1mm)
Figure 4
4
SMARTCORE™ INSTALLATION INSTRUCTIONS (V.1.1)
In-floor Radiant Heat:
SMARTCORE can be installed using the floating or glue down method. When gluing floor, use only recommended flooring adhesive.
Turn the heat off for 24 hours before, during and 24 hours after installation when installing over radiant heated subfloors
Floor temperature must not exceed 85°F (30°C).
Failure to strictly follow adhesive manufacturer’s guidelines may result in failure and void warranty.
Warning: Electric heating mats that are not embedded into the subfloor are not recommended for use underneath
SMARTCORE floors. Using electric heating mats that are not embedded and applied directly underneath SMARTCORE floors
could void the warranty for your floor in case of failure. It is best to install SMARTCORE flooring over embedded radiant floor
heating systems that use water and adhere to the guidelines listed above.
AFTER INSTALLATION
Flooring should be one of the last items installed in a project. In order to protect the floors while other trades are finishing their
work prior to final cleanup and turnover to the owner, use rosin paper and only use 3M Scotch-Blue™ 2080 Tape to hold the
rosin paper to the floor (other blue tapes may damage the finish). Clean the floor thoroughly before laying the rosin paper to
ensure that no debris is trapped underneath. DO NOT USE plastic film or other non-breathing coverings as this can cause the
floor to become damaged from humidity buildups.
Dust mop or vacuum your floor to remove any dirt or debris.
It is suggested that you clean the floor using a ph neutral cleaner.
Install any transition pieces that may be needed (reducers, T-moldings, nosing. etc.).
Protection and Maintenance of Your Floor
Lasting beauty can be achieved through purchasing a quality floor covering and providing proper on-going maintenance.
Furniture should be moved onto the newly installed floor using an appliance hand truck over hardboard runways.
Avoid exposure to long periods of direct sunlight. Close blinds or drapes during peak sunlight hours. Floor covering subjected
to excessive heat and light is subject to thermal degradation. Use appropriate precautions to minimize potential affects on the
floor covering.
Oil or petroleum-based products can result in surface staining. Do not track asphalt-driveway sealer or automobile-oil drips
onto the vinyl floor covering.
Use non-staining mats. Rubber may discolor the floor.
Frequently moved furniture should be equipped with felt pads to avoid scratching the floor. Heavy furniture and appliances
should be equipped with non-staining large surface floor protectors. Furniture with castors or wheels must be easy swiveling,
large surface non-staining and suitable for resilient floors. Do NOT use ball type castors as they can damage the floor.
Use floor protectors under furniture.
Use walk off mats at entrances to prevent dirt and grit from being tracked on to the floor.
Sweep or vacuum the floor regularly to remove loose dirt. Do NOT use vacuums that use a beater bar or turn beater bar off.
Do NOT use electric brooms with hard plastic bottoms with no padding.
Clean up spills immediately.
Damp mop as needed using clean water and a ph neutral cleaner. DO NOT use harsh cleaners or chemicals on the floor. DO
NOT use abrasive scrubbing tools. DO NOT use detergents, abrasive cleaners or “mop and shine” products.
Vinyl Flooring, like other types of smooth floors, may become slippery when wet. Allow time for floor to dry after washing.
Immediately wipe up wet areas from spills, foreign substances or wet feet
For complete maintenance guidelines for your floor visit smartcorefloors.com.
  • Page 1 1
  • Page 2 2
  • Page 3 3
  • Page 4 4

SMARTCORE 50SLV509 User manual

Type
User manual
This manual is also suitable for

Ask a question and I''ll find the answer in the document

Finding information in a document is now easier with AI