
P/N 07.04.921.00 © 2019 Hatco Corporation
hatcocorp.com
Register Online!
(see page 2)
S’inscrire en ligne!
(voir page 14)
Do not operate this equipment unless you
have read and understood the contents
of this manual! Failure to follow the
instructions contained in this manual
may result in serious injury or death.
This manual contains important safety
information concerning the maintenance,
use, and operation of this product. If
you’re unable to understand the contents
of this manual, please bring it to the
attention of your supervisor. Keep this
manual in a safe location for future
reference.
English = p 2
WARNING
No opere este equipo al menos que haya
leído y comprendido el contenido de este
manual! Cualquier falla en el seguimiento
de las instrucciones contenidas en
este manual puede resultar en un serio
lesión o muerte. Este manual contiene
importante información sobre seguridad
concerniente al mantenimiento, uso y
operación de este producto. Si usted
no puede entender el contenido de
este manual por favor pregunte a su
supervisor. Almacenar este manual en
una localización segura para la referencia
futura.
ADVERTENCIA
Ne pas utiliser cet équipement sans avoir
lu et compris le contenu de ce manuel ! Le
non-respect des instructions contenues
dans ce manuel peut entraîner de
graves blessures ou la mort. Ce manuel
contient des informations importantes
concernant l’entretien, l’utilisation et le
fonctionnement de ce produit. Si vous ne
comprenez pas le contenu de ce manuel,
veuillez le signaler à votre supérieur.
Conservez ce manuel dans un endroit
sûr pour pouvoir vous y référer plus tard.
Français = p 14
AVERTISSEMENT
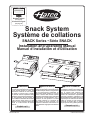
Snack System
Système de collations
SNACK Series • Série SNACK
Installation and Operating Manual
Manuel d’installation et d’utilisation

2
Form No. SNACKM-0519
English
INTRODUCTION
Hatco Snack Systems cook a variety of excellent-quality
baked and grilled food product for commercial kitchens,
display cooking locations, and buffets. The interchangeable
cooking plates and adjustable time/temperature controls
enable operators to cook continuous, consistent quality
product. Exclusive heating elements provide exceptional heat
distribution throughout the entire cooking plate, ensuring the
even cooking of each product.
Hatco Snack Systems are products of extensive research and
field testing. The materials used were selected for maximum
durability, attractive appearance, and optimum performance.
Every unit is inspected and tested thoroughly prior to shipment.
This manual provides installation, safety, and operating
instructions for the Snack System. Hatco recommends all
installation, operating, and safety instructions appearing in this
manual be read prior to installation or operation of a unit.
Safety information that appears in this manual is identified by
the following signal word panels:
WARNING
WARNING indicates a hazardous situation which, if not
avoided, could result in death or serious injury.
CAUTION
CAUTION indicates a hazardous situation which, if not
avoided, could result in minor or moderate injury.
NOTICE
NOTICE is used to address practices not related to
personal injury.
Important Owner Information ..............................................2
Introduction ...........................................................................2
Important Safety Information ..............................................3
Model Description ................................................................4
Model Designation ...............................................................4
Specifications .......................................................................5
Plug Configurations .............................................................5
Electrical Rating Charts ....................................................... 5
Dimensions .......................................................................... 5
Installation .............................................................................6
General ................................................................................ 6
Changing Cooking Plates .................................................... 6
Operation ...............................................................................7
General ................................................................................ 7
Operator Controls ................................................................ 7
Operating the Unit ...............................................................7
Cooking Tips ........................................................................9
Changing Between Fahrenheit and Celsius ........................ 9
Programming the Snack System .........................................9
Maintenance ........................................................................10
General .............................................................................. 10
Daily Cleaning ...................................................................10
Troubleshooting Guide ...................................................... 11
Options and Accessories ..................................................12
Limited Warranty ................................................................13
Authorized Parts Distributors ...........................Back Cover
IMPORTANT OWNER INFORMATION
Record the model number, serial number, voltage, and purchase
date of the unit in the spaces below (specification label located
on the back of the unit). Please have this information available
when calling Hatco for service assistance.
Model No. ________________________________________
Serial No. _________________________________________
Voltage ___________________________________________
Date of Purchase ___________________________________
Register your unit!
Completing online warranty registration will prevent delay in
obtaining warranty coverage. Access the Hatco website at
www.hatcocorp.com, select the Support pull-down menu,
and click on “Warranty”.
Business
Hours: 7:00 am to 5:00 pm Monday–Friday,
Central Time (CT)
(Summer Hours: June to September—
7:00 am to 5:00 pm Monday–Thursday
7:00 am to 4:00 pm Friday)
Telephone: 800-558-0607; 414-671-6350
E-mail: [email protected]
24 Hour 7 Day Parts and Service
Assistance available in the United States
and Canada by calling 800-558-0607.
Additional information can be found by visiting our web site at
www.hatcocorp.com.
CONTENTS

Form No. SNACKM-0519
3
English
IMPORTANT SAFETY INFORMATION
WARNING
ELECTRIC SHOCK HAZARD:
• Plug unit into a properly grounded electrical receptacle
of the correct voltage, size, and plug configuration. If
plug and receptacle do not match, contact a qualified
electrician to determine and install proper voltage and
size electrical receptacle.
• Turn OFF power switch, unplug power cord, and
allow unit to cool before performing any cleaning,
adjustments, or maintenance.
• Unit is not weatherproof. Locate unit indoors where
ambient air temperature is a minimum of 70°F (21°C).
• DO NOT submerge or saturate with water. Unit is not
waterproof. Do not operate if unit has been submerged
or saturated with water.
• Do not steam clean or use excessive water on unit.
• This unit is not “jet-proof” construction. Do not use jet-
clean spray to clean this unit.
• Do not clean unit when it is energized or hot.
• Do not allow liquids to spill into unit.
• Do not pull unit by power cord.
• Do not allow power cord to hang over edge of counter.
• Discontinue use if power cord is frayed or worn.
• Do not attempt to repair or replace a damaged power
cord. Cord must be replaced by Hatco, an Authorized
Hatco Service Agent, or a person with similar
qualifications.
• This unit must be serviced by qualified personnel only.
Service by unqualified personnel may lead to electric
shock or burn.
• Use only Genuine Hatco Replacement Parts when
service is required. Failure to use Genuine Hatco
Replacement Parts will void all warranties and may
subject operators of the equipment to hazardous
electrical voltage, resulting in electrical shock or burn.
Genuine Hatco Replacement Parts are specified to
operate safely in the environments in which they are
used. Some aftermarket or generic replacement parts
do not have the characteristics that will allow them to
operate safely in Hatco equipment.
EXPLOSION HAZARD: Do not store or use gasoline or
other flammable vapors or liquids in the vicinity of this or
any other appliance.
Make sure all operators have been instructed on the safe
and proper use of the unit.
This unit is not intended for use by children or persons
with reduced physical, sensory, or mental capabilities.
Ensure proper supervision of children and keep them away
from the unit.
Never leave unit unattended during use.
Do not use unit for any purpose other than for which it is
designed.
WARNING
FIRE HAZARD:
• Locateunitaminimumof2″(51mm)fromcombustible
walls and materials. If safe distances are not maintained,
discoloration or combustion could occur.
• Do not obstruct air ventilation openings on outer
housing of unit. Unit combustion or malfunction may
occur.
This unit has no “user-serviceable” parts. If service
is required on this unit, contact an Authorized Hatco
Service Agent or contact the Hatco Service Department at
800-558-0607 or 414-671-6350.
CAUTION
BURN HAZARD:
• Some exterior surfaces on unit will get hot. Avoid
unnecessary contact with unit.
• Do not come in contact with cooking plates during
operation. Both plates are very hot.
• Allow unit to cool before performing any cleaning,
adjustments, or maintenance.
Locate unit at proper counter height in an area that is
convenient for use. Location should be level and strong
enough to support weight of unit and contents.
NOTICE
Do not locate unit in an area subject to excessive
temperatures or grease from grills, fryers, etc. Excessive
temperatures and grease could cause damage to unit.
Damage to any countertop material caused by heat
generated from Hatco equipment is not covered under
the Hatco warranty. Contact manufacturer of countertop
material for application information.
For steel surfaces, use non-abrasive cleaners and cloths
only. Abrasive cleaners and cloths could scratch finish of
unit, marring its appearance and making it susceptible to
soil accumulation.
Do not use harsh chemicals such as bleach, cleaners
containing bleach, or oven cleaners to clean this unit.
This unit is intended for commercial use only—NOT for
household use.
Clean unit daily to avoid malfunctions and maintain
sanitary operation.
Read the following important safety information before using this equipment to avoid serious
injury or death and to avoid damage to equipment or property.

4
Form No. SNACKM-0519
English
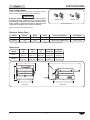
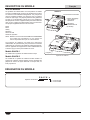
MODEL DESCRIPTION
MODEL DESIGNATION
All Models
Hatco Snack Systems consist of an easy-to-clean stainless
steel frame and removable/interchangeable aluminum cooking
plates. The standard, installed cooking plates are for round,
Belgian-style waffles. These plates produce waffles that are 7″
(178 mm) in diameter and 1″ (25 mm) thick. Additional cooking
plates for a variety of different baked and grilled food product
are available as accessories. These additional plates include:
Panini
Donut
Chelky
Sandwich
Coffee Bean
Freestyle Waffle
NOTE: Refer to the OPTIONS AND ACCESSORIES section
for information regarding available cooking plates as
well as other items.
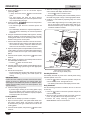
Snack Systems feature a Power I/O (on/off) switch on the back,
a multi-function control panel, and a top plate adjustment knob.
All units are equipped with a factory attached 6′ (1829 mm)
power cord and plug.
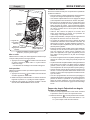
SNACK-1 Model
This model is a single head Snack System.
SNACK-2 Model
This model is a dual head Snack System. The dual head Snack
System allows the versatility of having different style cooking
plates installed on each head.
S N A C K - x
Snack System
1 = Single Head
2 = Dual Head
SNACK-1
SNACK-2
Handle
Control Panel
Power I/O Switch
(on back)
Top Plate
Adjusment
Knob
Snack Systems

Form No. SNACKM-0519
5
English
Model
Width
(A)
Depth
(B)
Height
(C)
Footprint
Width (D)
Footprint
Depth (E)
SNACK-1
10-7/16″
(265 mm)
17-9/16″
(446 mm)
8-1/16″
(204 mm)
8-1/4″
(209 mm)
11-3/16″
(284 mm)
SNACK-2
21-1/8″
(537 mm)
17-9/16″
(446 mm)
8-1/16″
(204 mm)
18-1/4″
(463 mm)
11-3/16″
(284 mm)
Model Voltage Watts Amps Plug Configuration Unit Weight
SNACK-1 120 900 7.5 NEMA 5-15P 16 lbs. (7 kg)
SNACK-2 120* 1800 15 NEMA 5-15P, NEMA 5-20P 33 lbs. (15 kg)
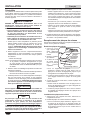
SPECIFICATIONS
Electrical Rating Chart
Plug Configurations
Units are supplied from the factory with an electrical cord and
plug. Plugs are supplied according to the application.
WARNING
ELECTRIC SHOCK HAZARD: Plug unit into a properly
grounded electrical receptacle of the correct voltage,
size, and plug configuration. If plug and receptacle do not
match, contact a qualified electrician to determine and
install proper voltage and size electrical receptacle.
NOTE: Receptacle not supplied by Hatco.
1(0$31(0$3
Plug Configurations
Dimensions
Front View Side View
C
BA
ED
* 120 V Canadian units operate at 1800 W and 15 A with a NEMA 5-20P plug configuration.

6
Form No. SNACKM-0519
English
INSTALLATION
General
Hatco Snack Systems are shipped pre-assembled and ready
to use. Care should be taken when unpacking the shipping
carton to avoid damage to the unit. The following installation
procedure must be performed before connecting electricity and
operating the unit.
WARNING
ELECTRIC SHOCK HAZARD: Unit is not weatherproof.
Locate unit indoors where ambient air temperature is a
minimum of 70°F (21°C).
FIRE HAZARD:
• Locateunitaminimumof2″(51mm)fromcombustible
walls and materials. If safe distances are not maintained,
discoloration or combustion could occur.
• Do not obstruct air ventilation openings on outer
housing of unit. Unit combustion or malfunction may
occur.
1. Inspect the shipping carton for obvious signs of transit
damage. If damaged, inform the freight company
immediately. CAUTION! Stop! Do not attempt to use
unit if damaged. Contact Hatco for assistance.
2. Remove the unit and any loose components/accessories
from the shipping carton. The following loose components
are included with every Snack System:
• Cleaning Brush
NOTE: To prevent delay in obtaining warranty coverage,
complete online warranty registration. See the
IMPORTANT OWNER INFORMATION section for
details.
3. Remove tape and protective packaging from all surfaces
of the unit.
• Make sure to remove all protective film from the stainless
steel surfaces.
4. Inspect the unit for freight damage such as dents in
housing or broken handles. If damaged, inform the freight
company immediately. CAUTION! Stop! Do not attempt
to use unit if damaged. Contact Hatco for assistance
CAUTION
Locate unit at proper counter height in an area that is
convenient for use. Location should be level and strong
enough to support weight of unit and contents.
NOTICE
Do not locate unit in an area subject to excessive
temperatures or grease from grills, fryers, etc. Excessive
temperatures and grease could cause damage to unit.
Damage to any countertop material caused by heat
generated from Hatco equipment is not covered under
the Hatco warranty. Contact manufacturer of countertop
material for application information.
5. Place the unit in the desired location.
• Locate the unit in an area where the ambient air
temperature is constant and a minimum of 70°F
(21°C). Avoid areas that may be subject to active air
movements or currents (i.e., near exhaust fans/hoods
and air conditioning ducts).
• Make sure the unit is at the proper counter height in an
area convenient for use.
• Make sure the countertop is level and strong enough to
support the weight of the unit and food product.
• Make sure all the feet on the bottom of the unit are
positioned securely on the countertop.
6. Install the desired cooking plates, if necessary. Refer to
the “Changing Cooking Plates” procedure in this section, if
necessary.
Changing Cooking Plates
Use the following procedures to change the cooking plates on
the Snack System.
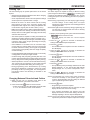
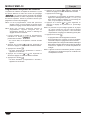
Removing Cooking Plates
Top Release
Button
Top Locking
Tab
Bottom Locking
Tab
Bottom Release
Button
1. Make sure the unit
is off, unplugged,
and completely
cool.
2. Open the Snack
System.
3. Using the included
removal tool,
remove the top
cooking plate.
a. While supporting
the top plate,
insert the removal tool into the hole, and push in the
release button until the locking tab releases the plate.
b. Angle the top plate out and down to release the back of
the plate from the rear tab.
4. Using the included removal tool, remove the bottom
cooking plate.
a. Insert the removal tool into the hole, and push in the
release button until the locking tab releases the plate.
b. Angle the top plate up and toward the back of the unit to
release the back of the plate from the rear tab.
Installing Cooking Plates
1. Make sure the unit is off, unplugged, and completely cool.
2. Install the desired bottom cooking plate.
a. While holding the bottom plate at an angle, align the
hole in the back of the plate with the rear tab on the unit.
Move the back of the plate slightly side-to-side until the
hole seats in the rear tab.
b. Carefully lower the front of the bottom plate down onto
the locking tab, and push down until the tab locks into
the hole on the plate. A slight side-to-side motion may
be necessary to engage the locking tab.
3. Install the corresponding top cooking plate.
a. While holding the top plate at an angle, align the hole in
the back of the plate with the rear tab on the unit. Move
the back of the plate slightly side-to-side until the hole
seats in the rear tab.
b. Carefully move the front of the top plate toward the unit
onto the locking tab, and push in until the tab locks into
the hole on the plate. A slight side-to-side motion may
be necessary to engage the locking tab.

Form No. SNACKM-0519
7
English
OPERATION
General
Hatco Snack Systems are designed for ease of operation and
versatility. Use the following information and procedures to
operate a Snack System.
WARNING
Read all safety messages in the IMPORTANT SAFETY
INFORMATION section before operating this equipment.
Operator Controls
The following are descriptions of the controls used to operate
the Snack System. Controls are located on the control panel as
well as on the back and side of the unit.
Power I/O Switch
The Power I/O (on/off) switch controls power to the unit. It is
located on the back of the unit. Use the Power I/O switch for
daily or long-term shutdown of the unit.
LED Display
The LED display shows time, temperature, and error information
for the unit. Time is shown as “minutes:seconds”.
Standby Button
The lighted Standby button ( ) toggles the unit between
operating mode and standby mode. Use standby mode for short-
term shutdown of the unit.
• In standby mode, the light will be red.
• In operating mode, the light will be green.
Preset Buttons
Four separate Preset buttons enable the storage of four different
cooking cycles. A cooking cycle is made up of temperature,
time, and top element power percentage. Press the desired
Preset button to select a programmed cooking cycle. The
indicator light above the selected preset will illuminate. The
Preset buttons are set at the factory to the following setpoints:
= 375°F (190°C) / 03:30 / 100% (Waffles, Panini)
= 340°F (170°C) / 04:00 / 80% (Donut, Coffee Bean)
= 310°F (155°C) / 06:00 / 100% (Chelky, other pastries)
= 340°F (170°C) / 04:00 / 70% (other cake batter product)
NOTE: The temperature range of the unit is 220°–425°F
(104°–218°C). The timer setting range of the unit is
0:10–10:00. Refer to “Programming the Snack System”
in this section for more information and to make
adjustments to these settings.
Arrow Buttons
The Arrow buttons ( ) are used to change time and
temperature settings.
• Press the button to increase a time or temperature
setting.
• Press the button to decrease a time or temperature
setting.
Enter Button
The Enter button ( ) starts a cooking cycle and resets the
timer at the end of a cycle.
Top Plate Adjustment Knob
The top plate adjustment know allows the rear height of the
top cooking plate to be adjusted. Adjustment to the height may
be required by the style of cooking plates installed on the unit.
Setting the plate too low may result in compression of the food
product.
• After changing cooking plates, use the top plate adjustment
knob to set the rear height of the top cooking plate so that
it just makes contact with the bottom plate.
Operating the Unit
Startup
1. Make sure the correct cooking plates are installed on the
Snack System. Refer to the INSTALLATION section for
details on changing cooking plates, if necessary.
• Clean the cooking plates thoroughly with warm water
and mild soap before their first use.
2. Plug the unit into a properly grounded electrical receptacle
of the correct voltage, size, and plug configuration. See the
SPECIFICATIONS section for details.
CAUTION
BURN HAZARD:
• Some exterior surfaces on unit will get hot. Avoid
unnecessary contact with unit.
• Do not come in contact with cooking plates during
operation. Both plates are very hot.
Power I/O
Switch
3. Move the Power I/O switch located
on the back of the unit to the “I” (on)
position to turn on power to the unit.
• A beep will sound and the light on
the button will illuminate red
(standby mode).
LED Display
Preset Buttons
Arrow Buttons
Standby Button
Enter Button
Control Panel

8
Form No. SNACKM-0519
English
OPERATION
4. Press the button to turn on the Snack System
(operating mode).
• A beep will sound and the button will illuminate
green.
• The LED display will flash the active setpoint
temperature followed by the current temperature of the
unit, and preheating will begin.
5. Press the desired button that corresponds to
the installed cooking plates.
• The indicator light above the selected preset will
illuminate.
• The LED display will flash the setpoint temperature of
the Preset button, followed by the current temperature
of the unit.
6. Using the included heat-resistant cleaning brush, carefully
apply an oil-based, non-stick shortening evenly onto each
cooking plate. Make sure the shortening makes it to the
bottoms of the grooves in each plate.
7. Close the Snack System and allow to heat for 30 minutes.
• When beeps will sound and the LED display will show
the current timer setting. Continue to allow the unit to
heat for the full 30 minutes to season the plates.
8. Open the Snack System and spread batter onto the bottom
cooking plate. The amount of batter will be determined by
the type of batter and the style of the installed cooking
plates.
9. Close the Snack System, and press the button to start
the timer.
10. When cooking is complete, several beeps will sound and
the LED display will flash zeros.
• Touch the button to reset the timer.
11. Carefully open the Snack System and immediately remove
the food product using a pair of tongs or other appropriate
utensil.
12. Discard the food product.
• The first baked food product after startup will soak up
excess shortening, preparing the Snack System for
cooking.
IMPORTANT NOTE
Perform the entire “Startup” procedure each time the Snack
System is turned on. Seasoning the cooking plates and
discarding the first baked food product are important steps
toward ensuring quality product, non-stick operation, and
ease of cleanup.
13. Continue cooking food product.
• If product begins sticking to the cooking plates, spray
the top and bottom cooking plates lightly with an oil-
based food release spray. Continue to spray the plates
in between product as needed.
Cooking Waffles
1. Make sure the “Startup” procedure is complete.
2. Open the Snack System, and spread waffle batter onto
the bottom cooking plate. The amount of batter will
be determined by the type of batter and the size of the
cooking plates.
3. Close the Snack System, and press the button to start
the timer.
4. When the cooking cycle is complete, several beeps will
sound and the LED display will flash zeros.
• Touch the
button to reset the timer.
5. Carefully open the Snack System, and immediately remove
the waffle using a pair of tongs or other appropriate utensil.
6. Continue to cook waffles by repeating steps 2–5 of this
procedure.
• If the waffles begin sticking to the cooking plates, spray
the top and bottom cooking plates lightly with an oil-
based food release spray. Continue to spray the plates
in between waffles as needed.
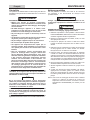
Bottom
Cooking
Plate
Top Plate
Adjustment
Knob
Bottom
Locking Tab
Top
Cooking
Plate
Handle
Bottom
Release Button
Snack System in open position
(shown with Belgian Waffle plates).
Standby Shutdown
Use standby shutdown to put the unit in standby mode during
extended periods of non-use.
1. Press the
button to shut down operation and put the
unit into standby mode. The light will be red.
• The heating elements and LED display will shut down.
Daily Shutdown
Use the following procedure to shutdown the unit at the end
of each day.
1. Press the
button to shut down operation and put the
unit into standby mode.
2. Move the Power I/O switch located on the back of the unit
to the “O” (off) position to turn off power to the unit.
3. Perform the “Daily Cleaning” procedure in the
MAINTENANCE section of this manual.

Form No. SNACKM-0519
9
English
OPERATION
Cooking Tips
Use the following tips for optimal performance of the Snack
System.
• Always allow temperature adjustment time when changing
between setpoint temperatures.
• Some experimentation with time and temperature settings
will be required for a specific batter or dough.
• Because the food is in direct contact with the cooking
plate surfaces for most of the cook time, slightly lower
temperatures than regular oven cooking temperatures are
recommended. A good place to start is 340°F (170°C).
• Make sure to season the non-Teflon cooking plates properly
before use (refer to the “Startup” procedure in this section).
• Always clean the cooking plates thoroughly with mild soap
and water after each use.
• The Snack System is capable of cooking most batters and
doughs that normally would be cooked in a regular oven—
this includes: bread and pizza doughs; laminated doughs
(croissant); many pastry doughs (excluding Filo dough);
and various cake batters.
• Avoid additions to wet batter such as chocolate chips.
Contact with the cooking plates when they sink through
the batter will lead to burning. These types of ingredients
can be used as a dough filling when the dough completely
encases the filling.
• Cooking breadsticks with bread/pizza dough on the Chelky
cooking plates can take up to eight minutes.
• Croissant dough and puff pastry generally take four to six
minutes. High fat doughs (like croissant dough) may benefit
from by using a lower cooking temperature (320°F [160°C]).
• Allow all products to cool for a few minutes before serving.
The contents may be extremely hot and under pressure
from steam generated inside during the cooking cycle.
• During programming of the Preset buttons, top cooking
plate power adjustment is allowed to reduce the power
percentage of the top cooking plate. This is designed for
food product where more browning is desirable on the
bottom side.
Changing Between Fahrenheit and Celsius
1. Make sure the unit is in standby mode. Refer to the
“Standby Shutdown” procedure in this section.
2. Press and hold the button for three seconds.
• A beep will sound, and the LED display will show either
“F” or “C” to indicate the active unit of measure.
Programming the Snack System
The Snack System is capable of storing 4 different cooking
cycles using the Preset buttons ( ). A cooking cycle
consists of three different settings: temperature, time, and top
cooking plate power. Use the following procedure to program a
Preset button.
NOTE: During programming, the LED display toggles through
all three settings. If each setting does not require
adjustment, toggle through the correct setting(s) without
changing the value.
NOTE: After eight seconds of inactivity during programming, the
unit will save all changes made and revert to showing
the current timer setting.
1. With the unit in operating mode, press and hold the desired
button for three seconds.
• The LED display will flash the current setpoint
temperature.
2. Press the or button to increase or decrease the
setting to the desired setpoint temperature.
3. Press the button.
• The two characters that represent “minutes” will flash on
the LED display.
4. Press the or button to increase or decrease the
setting to the desired number of minutes.
5. Press the button.
• The two characters that represent “seconds” will flash on
the LED display.
6. Press the or button to increase or decrease the
setting to the desired number of seconds.
7. Press the button.
• The top element power percentage will flash on the LED
display (example = “P :10”). The last two digits indicate
the percentage as 1–10, which corresponds to 10%–
100%.
8. Press the or button to increase or decrease the
setting to the desired power percentage.
NOTE: The adjustable top cooking plate power percentage
allows the versatility to cook specific types of food
product. Experimentation with this setting for different
types of batter/dough will be required.
9. Press the button.
• Programming is saved and complete.
• If the setpoint temperature was not changed, the LED
display will show the current timer setting.
• If the setpoint temperature was changed, the LED
display will show the current timer setting, and the unit
will begin adjusting to the new setpoint temperature.
NOTE: The unit will operate normally during the temperature
adjustment period after a setpoint temperature change.

10
Form No. SNACKM-0519
English
General
Hatco Snack Systems are designed for maximum durability
and performance with minimum maintenance.
WARNING
ELECTRIC SHOCK HAZARD:
• Turn OFF power switch, unplug power cord, and
allow unit to cool before performing any cleaning,
adjustments, or maintenance.
• DO NOT submerge or saturate with water. Unit is not
waterproof. Do not operate if unit has been submerged
or saturated with water.
• Do not steam clean or use excessive water on unit.
• This unit is not “jet-proof” construction. Do not use
jet-clean spray to clean this unit.
• Do not clean unit when it is energized or hot.
• Do not allow liquids to spill into unit.
• This unit must be serviced by qualified personnel only.
Service by unqualified personnel may lead to electric
shock or burn.
• Use only Genuine Hatco Replacement Parts when
service is required. Failure to use Genuine Hatco
Replacement Parts will void all warranties and may
subject operators of the equipment to hazardous
electrical voltage, resulting in electrical shock or burn.
Genuine Hatco Replacement Parts are specified to
operate safely in the environments in which they are
used. Some aftermarket or generic replacement parts
do not have the characteristics that will allow them to
operate safely in Hatco equipment.
This unit has no “user-serviceable” parts. If service
is required on this unit, contact an Authorized Hatco
Service Agent or contact the Hatco Service Department at
800-558-0607 or 414-671-6350.
NOTICE
For steel surfaces, use non-abrasive cleaners and cloths
only. Abrasive cleaners and cloths could scratch finish of
unit, marring its appearance and making it susceptible to
soil accumulation.
Do not use harsh chemicals such as bleach, cleaners
containing bleach, or oven cleaners to clean this unit.
Clean unit daily to avoid malfunctions and maintain
sanitary operation.
Daily Cleaning
To preserve the finish of the unit as well as maintain
performance, it is recommended that the unit be cleaned daily.
WARNING
Submerging or saturating unit with water may cause
serious injury, will damage the unit, and void unit warranty.
CAUTION
BURN HAZARD: Allow unit to cool before performing any
cleaning, adjustments, or maintenance.
1. Perform the “Daily Shutdown” procedure in the
OPERATION section, unplug the power cord, and allow
the unit to cool completely.
2. Brush or wipe all crumbs, oil, etc. from both cooking plates.
3. Wipe clean the cooking plates with a non-abrasive, damp
cloth. Wipe dry with a non-abrasive, dry cloth.
4. Wipe clean all components of the hinge area and the
handle with a non-abrasive, damp cloth. Wipe dry with a
non-abrasive, dry cloth.
5. Wipe all exterior surfaces of the unit with a non-abrasive
cloth dampened in warm water and a mild soap. Stubborn
stains may be removed with a good stainless steel cleaner.
Hard to reach areas should be cleaned with a small brush
and mild soap.
6. Wipe the unit thoroughly using a non-abrasive cloth
dampened in warm water only.
7. Dry the unit using a clean, dry, non-abrasive cloth.
8. Using a heat-resistant cooking brush, apply an oil-based,
non-stick shortening evenly onto each cooking plate. Make
sure the shortening makes it to the bottoms of the grooves
in each plate.
NOTE: A cleaning brush for spreading shortening and cleaning
the cooking plates is available as an accessory. See
OPTIONS AND ACCESSORIES for details.
MAINTENANCE

Form No. SNACKM-0519
11
English
Symptom Probable Cause Corrective Action
Unit turned “On”, but no heat. Unit in standby mode.
Press the button to turn on the unit. The light on the
button will be green.
Heating element(s) defective.
Contact Authorized Service Agent or Hatco for assistance.
Temperature controller defective.
Unit not hot enough. Setpoint temperature too low. Increase the setpoint temperature.
Heating element(s) defective. Contact Authorized Service Agent or Hatco for assistance.
Unit not working at all. Unit not turned on. Review “Operating the Unit” in the OPERATION section of
this manual.
Unit not plugged in. Plug unit into proper power supply.
Circuit breaker tripped. Reset circuit breaker. If circuit breaker continues to trip,
contact an Authorized Service Agent or Hatco for assistance.
Temperature controller defective. Contact Authorized Service Agent or Hatco for assistance.
TROUBLESHOOTING GUIDE
WARNING
This unit must be serviced by qualified personnel only.
Service by unqualified personnel may lead to electric
shock or burn.
WARNING
ELECTRIC SHOCK HAZARD: Turn OFF power switch,
unplug power cord, and allow unit to cool before
performing any cleaning, adjustments, or maintenance.
Troubleshooting Questions?
If you continue to have problems resolving an issue, please contact the nearest Authorized Hatco Service Agency or Hatco for
assistance. To locate the nearest Service Agency, log onto the Hatco website at www.hatcocorp.com, select the Support pull-
down menu, and click on “Find A Service Agent”; or contact the Hatco Parts and Service Team at:
Telephone: 800-558-0607 or 414-671-6350
e-mail: [email protected]
E1 = Control board temperature sensor is over temperature.
Turn off unit and allow to cool. Make sure ventilation
openings on unit are not blocked. Restart unit. If error
happens again, contact Authorized Service Agent or
Hatco for assistance.
E2 = Cooking plate temperature sensor is out of operating
range. If the plate sensing circuit measures a temperature
either below 50°F (10°C) or above 500°F (260°C), the
unit will shut down. Turn off unit and allow to cool. Restart
unit. If error happens again, contact Authorized Service
Agent or Hatco for assistance.
E3 = Heat sink temperature sensor is over temperature. Turn off
unit and allow to cool. Make sure ventilation openings on
unit are not blocked. Restart unit. If error happens again,
contact Authorized Service Agent or Hatco for assistance.
Error Codes
The following error codes may appear on the digital display to indicate an error in the operating condition of the unit.

12
Form No. SNACKM-0519
English
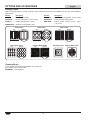
OPTIONS AND ACCESSORIES
Cleaning Brush
A heat-resistant cleaning brush is available as an accessory for
easy cleaning of the cooking plates.
WM-BRUSH ....Cleaning Brush
Item No. Description
PANINI ............... Panini Cooking Plates
4DONUTTF ........ Donut Cooking Plates, 4 donut, Teflon
5CHELKY ........... Chelky Cooking Plates, 5 chelky
SANDWICHTF ... Sandwich Cooking Plates, Teflon
Item No. Description
12BEANTF ......... Coffee Bean Cooking Plates, 12 bean, Teflon
FREESTYLE ...... Freestyle Waffle Cooking Plates
RBELGIAN ......... Belgian Waffle Cooking Plates, round,
7″ (178 mm)
Sandwich Plates Belgian Waffle Plates
Freestyle Waffle Plates
Top Bottom
Chelky Plates
Top Bottom
Donut Plates
Top Bottom
Panini Plates
Top Bottom
Coffee Bean Plates
Top Bottom
Cooking Plates
Additional cooking plates for a variety of different baked and grilled food product are available as accessories. These additional
plates include:

Form No. SNACKM-0519
13
English
LIMITED WARRANTY
1. PRODUCT WARRANTY
Hatco warrants the products that it manufactures (the “Products”)
to be free from defects in materials and workmanship, under
normal use and service, for a period of one (1) year from the
date of purchase when installed and maintained in accordance
with Hatco’s written instructions or 18 months from the date
of shipment from Hatco. Buyer must establish the Product’s
purchase date by registering the Product with Hatco or by other
means satisfactory to Hatco in its sole discretion.
Hatco warrants the following Product components to be free
from defects in materials and workmanship from the date of
purchase (subject to the foregoing conditions) for the period(s)
of time and on the conditions listed below:
a) One (1) Year Parts and Labor PLUS One (1) Additional
Year Parts-Only Warranty:
Conveyor Toaster Elements (metal sheathed)
Drawer Warmer Elements (metal sheathed)
Drawer Warmer Drawer Rollers and Slides
Strip Heater Elements (metal sheathed)
Display Warmer Elements (metal sheathed air heating)
Holding Cabinet Elements (metal sheathed air heating)
Heated Well Elements — HW and HWB Series
(metal sheathed)
b) Two (2) Year Parts and Labor Warranty:
Induction Ranges
Induction Warmers
c) One (1) Year Parts and Labor PLUS Four (4) Years
Parts-Only Warranty:
3CS and FR Tanks
d) One (1) Year Parts and Labor PLUS Nine (9) Years
Parts-Only Warranty on:
Electric Booster Heater Tanks
Gas Booster Heater Tanks
e) Ninety (90) Day Parts-Only Warranty:
Replacement Parts
THE FOREGOING WARRANTIES ARE EXCLUSIVE AND
IN LIEU OF ANY OTHER WARRANTY, EXPRESSED OR
IMPLIED, INCLUDING BUT NOT LIMITED TO ANY IMPLIED
WARRANTY OF MERCHANTABILITY OR FITNESS FOR
A PARTICULAR PURPOSE OR PATENT OR OTHER
INTELLECTUAL PROPERTY RIGHT INFRINGEMENT.
Without limiting the generality of the foregoing, SUCH
WARRANTIES DO NOT COVER: Coated incandescent light
bulbs, fluorescent lights, heat lamp bulbs, coated halogen light
bulbs, halogen heat lamp bulbs, xenon light bulbs, LED light
tubes, glass components, and fuses; Product failure in booster
tank, fin tube heat exchanger, or other water heating equipment
caused by liming, sediment buildup, chemical attack, or
freezing; or Product misuse, tampering or misapplication,
improper installation, or application of improper voltage.
2. LIMITATION OF REMEDIES AND DAMAGES
Hatco’s liability and Buyer’s exclusive remedy hereunder will
be limited solely, at Hatco’s option, to repair or replacement
using new or refurbished parts or Product by Hatco or a Hatco-
authorized service agency (other than where Buyer is located
outside of the United States, Canada, United Kingdom, or
Australia, in which case Hatco’s liability and Buyer’s exclusive
remedy hereunder will be limited solely to replacement of part
under warranty) with respect to any claim made within the
applicable warranty period referred to above. Hatco reserves
the right to accept or reject any such claim in whole or in part. In
the context of this Limited Warranty, “refurbished” means a part
or Product that has been returned to its original specifications
by Hatco or a Hatco-authorized service agency. Hatco will not
accept the return of any Product without prior written approval
from Hatco, and all such approved returns shall be made
at Buyer’s sole expense. HATCO WILL NOT BE LIABLE,
UNDER ANY CIRCUMSTANCES, FOR CONSEQUENTIAL
OR INCIDENTAL DAMAGES, INCLUDING BUT NOT LIMITED
TO LABOR COSTS OR LOST PROFITS RESULTING FROM
THE USE OF OR INABILITY TO USE THE PRODUCTS OR
FROM THE PRODUCTS BEING INCORPORATED IN OR
BECOMING A COMPONENT OF ANY OTHER PRODUCT
OR GOODS.

14
Formulaire n° SNACKM-0519
Français
SOMMAIRE
INTRODUCTION
Les systèmes de collations Hatco permettent la préparation de
divers aliments cuits au four et grillés d’excellente qualité pour
les cuisines commerciales, les cuisines ouvertes et les buffets.
Les plaques de cuisson interchangeables et les commandes de
temps/thermostat réglables permettent aux utilisateurs de cuire
des produits de qualité constante en continu. Les éléments
chauffants exclusifs assurent une répartition exceptionnelle de
la chaleur sur l’ensemble des plaques de cuisson, garantissant
ainsi une cuisson uniforme de chaque aliment.
Les systèmes de collations Hatco sont issus de recherches
avancées et de tests intensifs sur le terrain. Les matériaux
utilisés ont été sélectionnés afin de garantir une durée de vie
maximale, un design attractif et des performances optimales.
Chaque appareil est inspecté et testé minutieusement avant
d’être expédié.
Ce manuel fournit les instructions concernant l’installation,
la sécurité et le fonctionnement du système de collations.
Hatco vous recommande de lire l’ensemble des instructions
d’installation, de sécurité et d’utilisation fournies dans ce
manuel avant d’installer et d’utiliser l’appareil.
Les consignes de sécurité qui apparaissent dans ce manuel
sont identifiées par les mots indicateurs suivants :
AVERTISSEMENT
AVERTISSEMENT indique une situation dangereuse qui,
si elle n’est pas évitée, peut provoquer la mort ou des
blessures graves.
ATTENTION
ATTENTION indique une situation dangereuse qui, si elle
n’est pas évitée, peut provoquer des blessures légères ou
moyennes.
AVIS
AVIS est utilisé pour des questions sans rapport avec des
blessures corporelles.
Informations Importantes pour le Propriétaire ................14
Introduction .........................................................................14
Consignes de Sécurité Importantes ................................. 15
Description du Modèle .......................................................16
Désignation du Modèle ...................................................... 16
Caractéristiques Techniques ............................................17
Configuration des fiches .................................................... 17
Tableau des valeurs nominales électriques ......................17
Dimensions ........................................................................ 17
Installation ...........................................................................18
Généralités ........................................................................18
Remplacement des plaques de cuisson ...........................18
Mode d’emploi ....................................................................19
Généralités ........................................................................19
Panneau de commande ....................................................19
Fonctionnement de l’appareil ............................................20
Conseils de cuisine ...........................................................21
Passer des degrés Fahrenheit aux degrés Celsius et
inversement ..................................................................... 21
Programmation du système de collations .........................22
Maintenance ........................................................................23
Généralités ........................................................................23
Nettoyage quotidien ...........................................................23
Guide de Dépannage ..........................................................24
Options et accessoires ...................................................... 25
Garantie Limitée .................................................................26
Autorisés Distributeurs de Pièces ........Couverture Arrière
INFORMATIONS IMPORTANTES POUR LE PROPRIÉTAIRE
Notez le numéro de modèle, le numéro de série, la tension
et la date d’achat de l’appareil dans les espaces ci-dessous
(Étiquette des caractéristiques techniques située au dos de
l’appareil). Veuillez avoir cette information à portée de la main
si vous appelez Hatco pour assistance.
Modèle No. ______________________________________
Numéro de série __________________________________
Voltage _________________________________________
Date d’achat _____________________________________
Enregistrez votre appareil!
Remplissez la garantie en ligne pour éviter les retards
pour faire jouer la garantie. Accédez au site Web Hatco
www.hatcocorp.com, sélectionnez le menu déroulant
Support (Assistance), puis cliquez sur « Warranty » (Garantie).
Horaires
ouvrables : 7h00 à 17h00 du lundi au vendredi
Heure du Centre (CT)
(Horaires d’été : juin à septembre—
7h00 à 17h00 du lundi au jeudi
7h00 à 16h00 le vendredi)
Téléphone: 800-558-0607; 414-671-6350
Courriel: [email protected]
Service d'assistance et de pièces de
rechange disponible 7j/7, 24h/24 aux
États-Unis et au Canada en composant
le 800-558-0607.
Des renseignements supplémentaires sont disponibles sur
notre site Web à www.hatcocorp.com.

Formulaire n° SNACKM-0519
15
Français
CONSIGNES DE SÉCURITÉ IMPORTANTES
Lisez l’information de securite importante suivante avant d’utiliser cet équipement pour éviter
des dommages ou la mort sérieux et pour éviter d’endommager l’équipement ou la propriété.
AVERTISSEMENT
DANGER DE DÉCHARGE ÉLECTRIQUE :
• Brancher l’appareil sur une prise de courant avec terre
de tension, de format et de configuration des broches
corrects. Si la fiche et la prise ne se correspondent pas,
s’adresser à un électricien qualifié pour déterminer et
installer une prise de courant de format et de tension
corrects.
• Mettez hors tension en utilisant l’interrupteur,
débranchez le cordon d’alimentation et laissez l’unité
refroidir avant d’effectuer tout nettoyage, tout réglage
ou tout entretien.
• L’appareil n’est pas résistant aux intempéries.
Placez l’appareil à l’intérieur, dans une zone dont la
température ambiante est de 21 °C (70 °F) minimum.
• NE PAS immerger l’appareil ni le saturer d’eau.
L’appareil n’est pas étanche à l’eau. Ne pas le faire
fonctionner s’il a été immergé ou saturé d’eau.
• Ne pas nettoyer à la vapeur ni utiliser trop d’eau sur
l’appareil.
• Cet appareil n’est pas étanche aux jets. Ne pas utiliser
de jet sous pression pour nettoyer l’appareil.
• Ne pas nettoyer l’appareil lorsqu’il est sous tension.
• Ne renversez pas de liquides dans l’appareil.
• Ne tirez pas l’unité par le cordon d’alimentation.
• Ne laissez pas le cordon pendre le long du comptoir.
• Interrompez l’utilisation de l’unité si le cordon
d’alimentation est effiloché ou usé.
• N’essayez jamais de réparer ou de remplacer un cordon
d’alimentation. Celui-ci devra être remplacé par Hatco,
un agent de service agréé par Hatco ou une personne
possédant des qualifications similaires.
• Cet appareil doit uniquement être réparé par un
personnel qualifié. Toute réparation par un personnel
non qualifié peut entraîner une électrocution et des
brûlures.
• Pour les réparations, utiliser exclusivement des pièces
de rechange Hatco d’origine. Utilisez des pièces
détachées Hatco authentiques sous peine d’annuler
toutes les garanties et d’exposer l’utilisateur à des
tensions électriques dangereuses pouvant entraîner
une électrocution ou des brûlures. Les pièces
de rechange Hatco d’origine sont conçues pour
fonctionner sans danger dans les environnements
dans lesquels elles sont utilisées. Certaines pièces
de rechange génériques ou de second marché ne
présentent pas les caractéristiques leur permettant de
fonctionner sans danger dans la matériel Hatco.
RISQUE D’EXPLOSION : Ne conservez pas ou n’utilisez pas
d’essence ou d’autres vapeurs ou liquides inflammables à
proximité de ces plaques ou de tout autre appareil.
Assurez-vous que tous les opérateurs ont été formés à
l’utilisation sûre et correcte de l’appareil.
Cet appareil ne doit pas être utilisé par des enfants ou des
personnes avec des capacités physiques, sensorielles ou
mentales diminuées. Assurez-vous que les enfants sont
bien surveillés et tenez-les à l’écart de l’appareil.
AVERTISSEMENT
DANGER D’INCENDIE :
• Placezl’appareilà aumoins51mm(2″)desmurset
matières inflammables. Si ces distances de sécurité
ne sont pas respectées, une décoloration ou une
combustion peut se produire.
• N’obstruez pas les ouvertures de ventilation d’air sur le
boîtier extérieur de l’appareil. Cela pourrait provoquer
une combustion ou une défaillance de l’unité.
Ne laissez jamais l’appareil sans surveillance pendant son
utilisation.
N’utilisez pas l’appareil pour des fins autres que celles qui
ont été prévues.
Cet appareil ne contient aucune pièce réparable par
l’utilisateur. Si cet appareil doit être réparé, contacter un
réparateur Hatco agréé ou le Service après-vente Hatco au
800-558-0607 ou 414-671-6350.
ATTENTION
DANGER DE BRÛLURE :
• Certaines surfaces extérieures de l’appareil deviennent
chaudes. Toucher ces zones de l’appareil avec
précaution.
• N’entrez pas en contact avec les plaques de cuisson
pendant le fonctionnement de l’appareil. Les deux
plaques sont très chaudes.
• Laissez l’appareil refroidir avant d’effectuer tout
nettoyage, réglage ou entretien.
Placez l’appareil sur un plan de travail dont la hauteur est
adaptée, à un emplacement pratique pour son utilisation.
L’emplacement choisi doit être de niveau et solide afin de
supporter le poids de l’appareil et de son contenu.
AVIS
Ne placez pas l’appareil dans une zone soumise à des
températures excessives ou exposée à de la graisse
provenant de grils, poêles, etc. Des températures
excessives et la graisse risquent d’endommager l’appareil.
Les dommages à toute partie du comptoir pouvant être
causés par la chaleur générée par l’équipement de Hatco
ne sont pas couverts par la garantie de Hatco. Contactez le
fabricant du comptoir pour plus de renseignements.
En ce qui concerne les surfaces en acier, utilisez des
chiffons et produits nettoyants non abrasifs uniquement.
Les chiffons et nettoyant abrasifs pourraient rayer la
finition de l’unité, altérant son apparence et la rendant
vulnérable à l’accumulation de saleté.
L’utilisation de produits chimiques agressifs tels que l’eau
de javel, les produits nettoyants contenant de la javel, ou
les produits de nettoyage pour les fours sont proscrits
pour nettoyer l’appareil.
Cet appareil est réservé à un usage professionnel
uniquement — il ne convient PAS à un usage personnel.
Nettoyez l’unité quotidiennement pour éviter les
dysfonctionnements et assurer un fonctionnement sain.

16
Formulaire n° SNACKM-0519
Français
DESCRIPTION DU MODÈLE
DÉSIGNATION DU MODÈLE
Tous les Modèles
Les systèmes de collation Hatco sont composés d’un châssis
en acier inoxydable facile à nettoyer et de plaques de cuisson
en aluminium amovibles/interchangeables. Les plaques de
cuisson standard installées sont prévues pour les gaufres
rondes de style belge. Ces plaques produisent des gaufres de
178 mm) (7 po) de diamètre et de 25 mm) (1 po) d’épaisseur.
Des plaques de cuisson supplémentaires pour divers aliments
cuits au four et grillés sont disponibles comme accessoires.
Ces plaques supplémentaires sont les suivantes :
Panini
Donut
Chelky
Sandwich
Grains de café
Gaufre de style libre
NOTA: Référez-vous à la section OPTIONS ET ACCESSOIRES
pour obtenir des informations sur les plaques de
cuisson disponibles ainsi que sur d’autres articles.
Les systèmes de collations sont dotés d’un interrupteur
d’alimentation I/O (marche/arrêt), d’un panneau de commande
multifonction et d’un bouton de réglage de la plaque supérieure.
Tous les appareils sont équipés d’un cordon d’alimentation de
1 829 mm (6 po) et d’une prise installés en usine.
Modèle SNACK-1
Ce modèle est un système de collations à tête unique.
Modèle SNACK-2
Ce modèle est un système de collations à têtes doubles. Le
système de collations à têtes doubles permet d’installer des
plaques de cuisson de styles différents sur chaque tête, en
toute polyvalence.
S N A C K - x
Système de collations
1 = Fonte simple
2 = Fonte double
SNACK-1
SNACK-2
Poignée
Panneau de commande
Interrupteur
d’alimentation I/O
(à l’arrière)
Bouton de réglage
de la plaque
supérieure
Systèmes de collations

Formulaire n° SNACKM-0519
17
Français
Modéle
Largeur
(A)
Profondeur
(B)
Hauteur
(C)
Empattement
Largeur (D)
Empattement
Profondeur (E)
SNACK-1
265 mm
10-7/16″)
446 mm
(17-9/16″)
204 mm
(8-1/16″)
209 mm
(8-1/4″)
284 mm
(11-3/16″)
SNACK-2
537 mm
21-1/8″)
446 mm
(17-9/16″)
204 mm
(8-1/16″)
463 mm
(18-1/4″)
284 mm
(11-3/16″)
CARACTÉRISTIQUES TECHNIQUES
Modéle Tension Intensité Amps Configuration de Fiches Poids de l’appareil
SNACK-1 120 900 7.5 NEMA 5-15P 7 kg (16 lbs.)
SNACK-2 120* 1800 15 NEMA 5-15P, NEMA 5-20P 15 kg (33 lbs.)
Tableau des valeurs nominales électriques
Configuration des fiches
Les appareils sont fournis par l’usine avec un cordon et une
prise électriques. Les fiches fournies correspondent à leur
application.
AVERTISSEMENT
DANGER DE DÉCHARGE ÉLECTIQUE: Brancher l’appareil
sur une prise de courant avec terre de tension, de format
et de configuration des broches corrects. Si la fiche et la
prise ne se correspondent pas, s’adresser à un électricien
qualifié pour déterminer et installer une prise de courant
de format et de tension corrects.
1(0$31(0$3
Configuration des fiche
NOTA: Prise non fournie par Hatco.
Dimensions
C
BA
ED
Vue de face Vue de côté
* Les unités canadiennes de 120 V fonctionnent à 1 800 W et 15 A avec une configuration de prise NEMA 5-20P.

18
Formulaire n° SNACKM-0519
Français
INSTALLATION
Généralités
Les systèmes de collations Hatco sont livrés prémontés et prêts
à être utilisés. Veillez à ne pas endommager l’appareil lors du
déballage du carton d’expédition. La procédure d’installation
suivante doit être suivie avant de brancher l’électricité et
d’utiliser l’appareil.
AVERTISSEMENT
DANGER DE DÉCHARGE ÉLECTRIQUE: Unit is not
weatherproof. Locate unit indoors where ambient air
temperature is a minimum of 70°F (21°C).
DANGER D’INCENDIE:
• Placezl’appareilà aumoins51mm(2″)desmurset
matières inflammables. Si ces distances de sécurité
ne sont pas respectées, une décoloration ou une
combustion peut se produire.
• N’obstruez pas les ouvertures de ventilation d’air sur le
boîtier extérieur de l’appareil. Cela pourrait provoquer
une combustion ou une défaillance de l’unité.
1. Vérifiez que le carton d’expédition ne présente pas de
défauts visibles à l’œil nu dus au transport. En cas de
dommages, prévenez immédiatement la société de
transport. ATTENTION! Arrêter! N’essayez pas d’utiliser
l’appareil s’il est endommagé. Contactez Hatco pour
obtenir une assistance.
2. Retirez l’appareil et tous les composants/accessoires
indépendants du carton d’expédition. Les composants
indépendants suivants sont inclus dans chaque système
de collations :
• Brosse de nettoyage
NOTA: Pour éviter des retards dans l’obtention de la couverture
de la garantie, complétez l’enregistrement en ligne
de votre garantie. Lisez la section INFORMATIONS
IMPORTANTES POUR LE PROPRIETAIRE pour plus
de détails.
3. Retirez le ruban et l’emballage de protection de toutes les
surfaces de l’appareil.
• Assurez-vous de retirer l’ensemble des films protecteurs
recouvrant les surfaces en acier inoxydable.
4. Vérifiez la présence ou non de dommages dus au transport,
tels que des bosses sur le boîtier ou des poignées
cassées. En cas de dommages, prévenez immédiatement
la société de transport. ATTENTION! Arrêter! N’essayez
pas d’utiliser l’appareil s’il est endommagé. Contactez
Hatco pour obtenir une assistance.
ATTENTION
Placez l’appareil sur un plan de travail dont la hauteur est
appropriée, à un emplacement pratique pour son utilisation.
L’emplacement choisi doit être de niveau et solide afin de
supporter le poids de l’appareil et de son contenu.
AVIS
Ne placez pas l’appareil dans une zone soumise à des
températures excessives ou exposée à de la graisse
provenant de grils, poêles, etc. Des températures
excessives et la graisse risquent d’endommager l’appareil.
Les dommages à toute partie du comptoir pouvant être
causés par la chaleur générée par l’équipement de Hatco
ne sont pas couverts par la garantie de Hatco. Contactez le
fabricant du comptoir pour plus de renseignements.
5. Placez l’appareil à l’emplacement souhaité.
• Placez l’appareil dans une zone dont la température
ambiante est constante (21 °C [70 °F] minimum). Évitez
les zones pouvant être soumises à des mouvements
d’air ou à des courants d’air actifs (c.-à-d. à proximité
des ventilateurs/capots d’échappement et des conduites
de climatisation).
• Assurez-vous que l’unité est placée à une hauteur
appropriée dans une zone facilitant son utilisation.
• Veillez à ce que le comptoir soit plat et assez résistant
pour supporter le poids de l’unité et des produits
alimentaires.
• Veuillez vous assurer que tous les pieds en dessous de
l’appareil sont fermement positionnés sur le comptoir.
6. Installez les plaques de cuisson désirées, le cas échéant.
Référez-vous à la procédure « Remplacement des plaques
de cuisson » de la présente section.
Remplacement des plaques de cuisson
Suivez les procédures suivantes pour remplacer les plaques de
cuisson sur le système de collations.
Retrait des plaques de cuisson
Bouton de
dégagement
supérieur
Languette de
verrouillage\
supérieure
Languette de
verrouillage
inférieure
Bouton de
déverrouillage inférieur
1. Assurez-vous
que l’appareil est
éteint, débranché
et complètement
refroidi.
2. Ouvrez le système
de collations.
3. À l’aide de l’outil
de retrait fourni,
retirez la plaque
de cuisson
supérieure.
a. Tout en supportant la plaque
supérieure, insérez l’outil de retrait dans le trou et
appuyez sur le bouton de dégagement jusqu’à ce que
la languette de verrouillage libère la plaque.
b. Inclinez la plaque supérieure vers l’extérieur et le bas
pour dégager l’arrière de la plaque de la languette
arrière.
4. À l’aide de l’outil de retrait fourni, retirez la plaque de
cuisson inférieure.
a. Insérez l’outil de retrait dans le trou et appuyez sur le
bouton de dégagement jusqu’à ce que la languette de
verrouillage libère la plaque.
b. Inclinez la plaque supérieure vers le haut et l’arrière
de l’appareil pour dégager l’arrière de la plaque de la
languette arrière.
Installation des plaques de cuisson
1. Assurez-vous que l’appareil est éteint, débranché et
complètement refroidi.
2. Installez la plaque de cuisson inférieure souhaitée.
a. Tout en inclinant la plaque inférieure, alignez le trou
à l’arrière de la plaque sur la languette arrière de
l’appareil. Déplacez légèrement et latéralement l’arrière
de la plaque jusqu’à ce que le trou s’insère dans la
languette arrière.

Formulaire n° SNACKM-0519
19
Français
INSTALLATION
Généralités
Les systèmes de collations Hatco sont conçus pour une
utilisation facile et polyvalente. Suivez les informations et les
procédures suivantes pour faire fonctionner le système de
collations.
AVERTISSEMENT
Lire tous les messages de sécurité de la section Consignes
de sécurité importantes avant d’utiliser ce matériel.
Panneau de commande
Voici la description des commandes utilisées pour faire
fonctionner le système de collations. Les commandes se tr
ouvent sur le panneau de commande ainsi qu’à l’arrière de
l’appareil.
Interrupteur d’alimentation I/O (marche/arrêt)
L’interrupteur d’alimentation I/O (marche/arrêt) permet
d’allumer ou d’éteindre l’appareil. Il est situé à l’arrière de
l’appareil. Utilisez l’interrupteur d’alimentation I/O pour l’arrêt
quotidien et sur le long terme de l’appareil.
Écran DEL
L’écran DEL indique l’heure, la température et des
informations d’erreur sur l’appareil. Le temps est affiché en
« minutes:secondes ».
Bouton de veille
Le bouton de veille éclairé ( ) permet de passer l’appareil du
mode de fonctionnement au mode veille. Utilisez le mode veille
pour l’arrêt à court terme de l’appareil.
• En mode veille, le voyant lumineux est rouge.
• En mode de fonctionnement, le voyant lumineux est vert.
Boutons de préréglage
Quatre boutons de préréglage distincts permettent de
mémoriser quatre cycles de cuisson différents. Un cycle de
cuisson inclut la température, le temps et la puissance en
pourcentage de l’élément chauffant supérieur. Appuyez sur le
bouton de préréglage souhaité pour sélectionner un cycle de
cuisson programmé. Le témoin de chauffage se trouvant au-
dessus du préréglage sélectionné s’allume. Les boutons de
préréglage sont réglés en usine avec les valeurs suivantes :
= 190 °C (375 °F) / 03:30 / 100 % (gaufres, panini)
= 170 °C (340 °F) / 04:00 / 80 % (donut, grains de café)
= 155 °C (310 °F) / 06:00 / 100 % (chelky, autres
pâtisseries)
= 170 °C (340 °F) / 04:00 / 70 % (autre produit de pâte à
gâteau)
NOTA: La plage de températures de l’appareil est de 104°–
218°C (220°–425°F). La plage de minuteur de l’appareil
est de 0:10à10:00. Reportez-vous à « Programmation
du système de collations » dans la présente section
pour plus d’informations et pour effectuer des réglages
sur ces paramètres.
Flèches
Les flèches ( ) sont utilisées pour modifier les réglages du
temps et de la température.
• Appuyez sur le bouton pour augmenter un réglage
de temps ou de température.
• Appuyez sur le bouton pour diminuer un réglage de
temps ou de température.
continué...
Écran DEL
Boutons de préréglage
Flèches
Bouton de veille
Bouton Entrée
Panneau de commande
MODE D’EMPLOI
b. Abaissez délicatement l’avant de la plaque inférieure
sur la languette de verrouillage, puis poussez-la vers le
bas jusqu’à ce que la languette soit enclenchée dans le
trou de la plaque. Un léger mouvement latéral peut être
nécessaire pour enfoncer la languette de verrouillage.
3. Installez la plaque de cuisson supérieure adaptée.
a. Tout en inclinant la plaque supérieure, alignez le trou à
l’arrière de la plaque sur la languette arrière de l’appareil.
Déplacez légèrement et latéralement l’arrière de la
plaque jusqu’à ce que le trou s’insère dans la languette
arrière.
b. Déplacez avec précaution l’avant de la plaque supérieure
vers l’appareil sur la languette de verrouillage, et
poussez jusqu’à ce que la languette s’enclenche dans le
trou de la plaque. Un léger mouvement latéral peut être
nécessaire pour enfoncer la languette de verrouillage.

20
Formulaire n° SNACKM-0519
Français
MODE D’EMPLOI
Bouton Entrée
Le bouton Entrée ( ) commence un cycle de cuisson et
réinitialise le minuteur à la fin d’un cycle.
Bouton de réglage de la plaque supérieure
Le réglage de la plaque supérieure permet de régler la hauteur
arrière de la plaque de cuisson supérieure. L’ajustement de
la hauteur peut être requis en fonction des types de plaques
de cuisson installées sur l’appareil. Un réglage trop bas de la
plaque peut provoquer l’écrasement de l’aliment.
• Après avoir changé les plaques de cuisson, utilisez le
bouton de réglage de la plaque supérieure pour régler la
hauteur arrière de la plaque de cuisson supérieure de façon
à ce qu’elle entre en contact avec la plaque inférieure.
Fonctionnement de l’appareil
Allumage
1. Assurez-vous que les bonnes plaques de cuisson sont
installées sur le système de collations. Reportez-vous à
la section INSTALLATION pour plus d’informations sur le
remplacement des plaques de cuisson, le cas échéant.
• Nettoyez soigneusement les plaques de cuisson à l’eau
tiède et au savon doux avant leur première utilisation.
2. Branchez l’appareil sur une prise de courant reliée à
la terre de tension, de taille et de configuration de fiche
correctes. Consultez la section CARACTÉRISTIQUES
TECHNIQUES pour obtenir plus de détails.
ATTENTION
DANGER DE BRÛLURE :
• Certaines surfaces extérieures de l’appareil deviennent
chaudes. Toucher ces zones de l’appareil avec précaution.
• N’entrez pas en contact avec les plaques de cuisson
pendant le fonctionnement de l’appareil. Les deux
plaques sont très chaudes.
Interrupteur
d’alimentation I/O
(marche/arrêt)
3. Mettez l’interrupteur d’alimentation
I/O situé à l’arrière de l’appareil en
position « I » (marche) pour mettre
l’appareil en marche.
• Un signal sonore retentit et la
lumière du bouton s’allume
en rouge. (mode veille).
4. Appuyez sur le bouton pour mettre le système de
collations en marche (mode de fonctionnement).
• Un signal sonore retentit et le bouton s’allume en vert.
• Sur l’écran DEL, la température de consigne active
clignote, suivie de la température actuelle de l’appareil.
Le préchauffage commence alors.
5. Appuyez sur le bouton correspondant aux
plaques de cuisson installées.
• Le témoin de chauffage se trouvant au-dessus du
préréglage sélectionné s’allume.
• Sur l’écran DEL, la température de consigne du bouton
de préréglage apparaît, suivie de la température actuelle
de l’appareil.
6. À l’aide de la brosse de nettoyage résistante à la chaleur
fournie, appliquez soigneusement de la matière grasse
non collante à base d’huile sur chaque plaque de cuisson.
Assurez-vous que la matière grasse pénètre dans les
rainures de chaque plaque.
7. Fermez le système de collations et laissez-le chauffer
pendant 30 minutes.
• Des signaux sonores retentissent et l’écran DEL indique
le réglage actuel du minuteur. Laissez encore l’appareil
chauffer pendant 30 minutes pour culotter les plaques.
8. Ouvrez le système de collations et étalez la pâte sur la
plaque de cuisson inférieure. La quantité de pâte sera
déterminée par le type de pâte et le type des plaques de
cuisson installées.
9. Fermez le système de collations et appuyez sur le bouton
pour démarrer le minuteur.
10. À la fin de la cuisson, plusieurs signaux sonores retentissent
et l’écran DEL indique zéro.
• Touchez le bouton pour réinitialiser le minuteur.
11. Ouvrez soigneusement le système de collations et retirez
immédiatement l’aliment à l’aide d’une pince ou d’un autre
ustensile adapté.
12. Jetez l’aliment.
• Le premier aliment cuit après le démarrage absorbe
l’excès de matière grasse afin de préparer le système
de collations pour la cuisson.
REMARQUE IMPORTANTE
Effectuez l’ensemble de la procédure de « Démarrage »
chaque fois que le système de collations est mis en marche.
Il est important de culotter les plaques de cuisson et de jeter
le premier aliment cuit afin de garantir des aliments de qualité
qui ne collent pas et un nettoyage facile.
13. Poursuivez la cuisson des aliments.
• Si l’aliment commence à coller sur les plaques de
cuisson, vaporisez les plaques inférieures et supérieures
de matière grasse à base d’huile. Continuez à vaporiser
les plaques entre les aliments au besoin.
Cuisson des gaufres
1. Assurez-vous que la procédure de « Démarrage » est
terminée.
2. Ouvrez le système de collations et étalez la pâte à gaufres
sur la plaque de cuisson inférieure. La quantité de pâte
sera déterminée par le type de pâte et la taille des plaques
de cuisson.
3. Fermez le système de collations et appuyez sur le bouton
pour démarrer le minuteur.
4. À la fin du cycle de cuisson, plusieurs signaux sonores
retentissent et l’écran DEL indique zéro.
• Touchez le bouton pour réinitialiser le minuteur.
5. Ouvrez soigneusement le système de collations et retirez
immédiatement la gaufre à l’aide d’une pince ou d’un autre
ustensile approprié.
6. Continuez à cuire des gaufres en répétant les étapes 2à5
de cette procédure.
• Si les gaufres commencent à coller sur les plaques de
cuisson, vaporisez les plaques inférieures et supérieures
de matière grasse à base d’huile. Continuez à vaporiser
les plaques entre les gaufres au besoin.
Page is loading ...
Page is loading ...
Page is loading ...
Page is loading ...
Page is loading ...
Page is loading ...
Page is loading ...
Page is loading ...
-
 1
1
-
 2
2
-
 3
3
-
 4
4
-
 5
5
-
 6
6
-
 7
7
-
 8
8
-
 9
9
-
 10
10
-
 11
11
-
 12
12
-
 13
13
-
 14
14
-
 15
15
-
 16
16
-
 17
17
-
 18
18
-
 19
19
-
 20
20
-
 21
21
-
 22
22
-
 23
23
-
 24
24
-
 25
25
-
 26
26
-
 27
27
-
 28
28


Ask a question and I''ll find the answer in the document
Finding information in a document is now easier with AI
in other languages
Related papers
-
Hatco HL Series Owner's manual
-
Hatco FWM Series Owner's manual
-
-
-
-
-
-
-
-
Other documents
-
Steba 18.12.00 Datasheet
-
Clearline Jumbo Sandwich Grill User manual
-
Kenwood SM634 User manual
-
 Russell Hobbs 20930 User manual
-
Cuisinart WMR-C - Classic Round Waffle Maker Operating instructions
-
Cuisinart WMR-CA User manual
-
Cuisinart WMB-2BI User manual
-
-
-
George Foreman GFOM1 User manual
