Page is loading ...

THANK YOU
We appreciate the trust and confidence you have placed in Hampton Bay through the purchase of this light. We strive to continually create quality
products designed to enhance your home. Visit us online to see our full line of products available for your home improvement needs. Thank you for
choosing Hampton Bay!
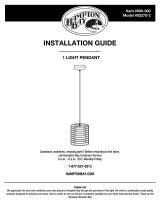
Item #000-000
Model #SBL-004263
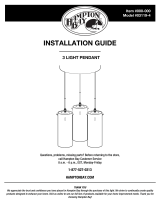
INSTALLATION GUIDE
1 LIGHT PENDANT
Questions, problems, missing parts? Before returning to the store,
call Hampton Bay Customer Service
8 a.m. - 6 p.m., EST, Monday-Friday
1-877-527-0313
HAMPTONBAY.COM

2
Table of Contents
Table of Contents .......................................................... 2
Safety Information ......................................................... 2
Warranty ......................................................................... 2
Pre-Installation .............................................................. 3
Planning Installation ................................................................3
Tools Required .........................................................................3
Hardware Included ...................................................................3
Package Contents ....................................................................4
Installation ..................................................................... 5
Safety Information
Turn off the electricity and read this instruction manual before
installation.
The installation must be handled by a qualified electrician with a
license.
Ensure that the power is off before replacing the bulb and
cleaning the fixture.
WARNING: To reduce the risk of fire or injury, use this
light indoors only.
WARNING: Risk of electric shock. Do not operate the
luminaire with a missing or damaged shield. Do not use if
there is any damage to the light or cord insulation. Inspect
periodically.
Warranty
ONE YEAR MANUFACTURER WARRANTY
WHAT IS COVERED
The manufacturer warrants this light fixture to be free from defects in materials and workmanship for a period of one (1) year from date of
purchase. This warranty applies only to the original consumer purchaser and only to products used in normal use and service. If this product
is found to be defective, the manufacturer’s only obligation, and your exclusive remedy, is the repair or replacement of the product at the
neglect or mishandling. This warranty shall not apply to any product that is found to have been improperly installed, setup, or used in any
way not in accordance with the instruction supplied with the product. This warranty shall not apply to a failure of the product as a result of
an accident misuse, abuse, negligence, alteration, or faulty installation, or any other failure not relating to faulty material or workmanship.
wear and tear.
WHAT IS NOT COVERED
This warranty shall not apply to any product that is found to have been improperly installed, set-up, or used in any way not in accordance
with the instructions supplied with the product. This warranty shall not apply to a failure of the product as a result of an accident, misuse,
abuse, negligence, alteration, or faulty installation, or any other failure not relating to faulty material or workmanship. This warranty shall
not apply to the finish on any portion of the product, such as surface and/or weathering, as this is considered normal wear and tear. The
manufacturer does not warrant and specially disclaims any warranty, whether express or implied, of fitness for a particular purpose, other
than the warranty contained herein. The manufacturer specifically disclaims any liability and shall not be liable for any consequential or
incidental loss or damage, including but not limited to any labor / expense costs involved in the replacement or repair of said product.
Contact the Customer Service Team at 1-877-527-0313 or visit www.HamptonBay.com.

3 HAMPTONBAY.COM
Please contact 1-877-527-0313 for further assistance.
Pre-Installation
PLANNING INSTALLATION
Compare all parts with the Hardware Included and Package Contents lists below. If any part is missing or damaged, do not install this
product. Call the Customer Service Team at 1-877-527-0313 or visit www.HamptonBay.com.
TOOLS REQUIRED
Phillips
screwdriver
Wire cutters
HARDWARE INCLUDED
NOTE: Hardware not shown to actual size.
Part Description Quantity
A
A
Wire connector 3
BB Mounting bar with screws and nuts 1
CC Mounting screw 2
DD Mounting nut 2
AA
BB
CC
DD

4
Pre-Installation (continued)
PACKAGE CONTENTS
NOTE: This product does not come with a bulb. You
will need to supply one 40-Watt max. Type A bulb or
energy saving equivalent (LED or CFL).
Part Description Quantity
A
Canopy 1
B Plastic beads and drops chain 10
C Plastic beads and drops chain 10 x 3
D Fixture 1
A
B
C
D

5 HAMPTONBAY.COM
Please contact 1-877-527-0313 for further assistance.
Installation
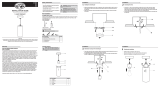
1
Installing the mounting bar
2
Connecting the wires
□ Adjust the preassembled screws and nuts attached to the
mounting bar (BB) so that they are the same width as the
holes in the canopy (A). Ensure that the ends of the screws
point away from the outlet box.
□ Attach the mounting bar with preassembled screws (BB) to
the outlet box using the mounting screws (CC).
□ Connect the “L” live wire from the light to the black live
wire from the main power supply. Connect the “N” neutral
wire from the light to the white neutral wire from the main
power supply. Connect the earth (ground) bare copper wire
from the light and the green earth (ground) wire from the
main power to the green screw on the mounting bar (BB).
□ Connect each wiring connection using wire connectors (AA)
and gently tuck all connections into the outlet box.
BB
CC
A
AA
BB

6
Installation (continued)
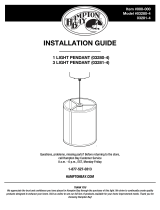
3
Attaching the canopy to the
mounting bar
4
Completing the installation
□ Fasten the canopy (A) to the mounting bar (BB) by inserting
the canopy (A) through the screws of the mounting bar (BB)
and securing in place with the nuts (DD).
□ To adjust the fixture to your desired hanging length,
unscrew the nut on the canopy (A) and then shorten or
lengthen the fixture cord to the desired length.
□ Hang the plastic beads and drops chain (B) onto the upper
hanging hooks of the fixture body (D).
□ Hang the plastic beads and drops chain (C) onto the lower
hanging hooks of the fixture body (D).
□ Install the bulb (not included) into the socket on the fixture
body (D).
□ Ensure the installation is complete and then turn on the
power.
A
BB
DD
B
D
C

Questions, problems, missing parts? Before returning to the store,
call Hampton Bay Customer Service
8 a.m. - 6 p.m., EST, Monday-Friday
1-877-527-0313
HAMPTONBAY.COM
Retain this manual for future use.
/