2-654-464-12(1) DSC-R1
2-654-464-12 (1)
© 2005 Sony Corporation Printed in Japan
Printed on 100% recycled paper using VOC
(Volatile Organic Compound)-free vegetable
oil based ink.
continued on the reverse
Digital Still Camera
Operating Instructions
Before operating the unit, please read this manual and “User’s Guide/Troubleshooting” (separate
volume) thoroughly, and retain them for future reference.
Refer to “User’s Guide/Troubleshooting”
(separate volume)
Explains advanced techniques and what to do if you experience trouble with
your camera.
Read This Firs
Read This Firs
DSC-R1
http://www.sony.net/
Checking the accessories supplied
• AC-L15A AC Adaptor (1) • Lens hood (1) • Shoulder strap (1)
• Power cord (mains lead) (1) • Lens cap (1) • CD-ROM (Cyber-shot
application software/Image
Data Converter SR) (2)
• Operating instructions:
“Read This First” (this
manual) (1)
• Operating instructions:
“User’s Guide/
Troubleshooting” (1)
• Rechargeable battery pack
NP-FM50 (1)
• USB cable (1)
• Video cable (1)
Notes
• Charge the supplied NP-FM50 battery pack before using the camera for the first time.
• The LCD screen and the LCD finder are manufactured using extremely high-precision technology so
over 99.99% of the pixels are operational for effective use. However, there may be some tiny black
points and/or bright points (white, red, blue or green in color) that constantly appear on the LCD screen.
These points are normal in the manufacturing process and do not affect the recording in any way.
• The camera is a precision instrument. Be careful not to bump the lens or the LCD screen, and not to
apply force to it. Attach the strap to prevent the camera from damage by being dropped, etc. t “User’s
Guide/Troubleshooting” (page 18)
On carrying or storing
–Close the LCD screen toward the body.
–Set the zoom fully to the W position to put the lens in.
–Attach the lens cap.
Additional information on this product and answers to frequently asked questions can be
found at our Customer Support Website.
Using the AC Adaptor
Use the camera connected to a wall outlet (wall socket) as illustrated above.
• Connect the AC Adaptor to an easily accessible wall outlet (wall socket). If any trouble occurs, immediately
disconnect the plug from the wall outlet (wall socket).
• After use, disconnect the AC Adaptor both from the camera and from the wall outlet (wall socket).
• This set is not disconnected from the AC power source (mains) as long as it is connected to the wall outlet
(wall socket) even if the set itself has been turned off.
• Do not use the AC Adaptor placed in a narrow space, such as between a wall and furniture.
To check the remaining battery time
Set the POWER switch to ON to turn on and check the time on the LCD screen.
To remove the battery pack
Open the cover and slide the battery eject lever in the direction of the arrow. Be careful not to
drop the battery pack.
To use your camera abroad — Power sources
You can use your camera and the AC Adaptor (supplied) in any country or region where the
power supply is within 100 V to 240 V AC, 50/60 Hz. Use a commercially available AC plug
adaptor [a], if necessary, depending on the design of the wall outlet (wall socket) [b].
• It takes about one minute until the correct battery remaining
time appears.
• The displayed time remaining may not be correct under
certain circumstances.
• Do not use an electronic transformer (travel
converter), as this may cause a malfunction.
110min
Remaining indicator
Remaining time
Battery eject lever
AC-L15A
To change the date and time
Select [Clock Set] in the (Setup) screen and perform the procedure in step 3 above.
t “User’s Guide/Troubleshooting” (pages 32 and 82)
On the clock display
• If you selected [D/M/Y] in step 3-1, set the time on a 24-hour cycle.
• Midnight is indicated as 12:00 AM, and noon as 12:00 PM.
When turning on the power
• Unless you set the clock, the Clock Set screen appears each time the camera is turned on.
• The following screen appears when the camera is turned on for the second time or afterwards.
To turn off the power
Set the POWER switch to OFF sliding in the arrow direction.
• If the camera is running on battery power and you do not operate the camera for certain time, the camera
turns to Power Save mode (POWER lamp: red) automatically to prevent wearing down the battery pack. To
change the setting t “User’s Guide/Troubleshooting” (page 72)
Changing the language setting
You can change the screen display to show messages in a specified language. To change the
language setting, press MENU to display the menu screen. Select (Setup) with the control
button, then, select [ Language] in (Setup1), and select the desired language. t “User’s
Guide/Troubleshooting” (page 80)
10M
94
M AF
110
min
ON
POWER
OFF
A
1
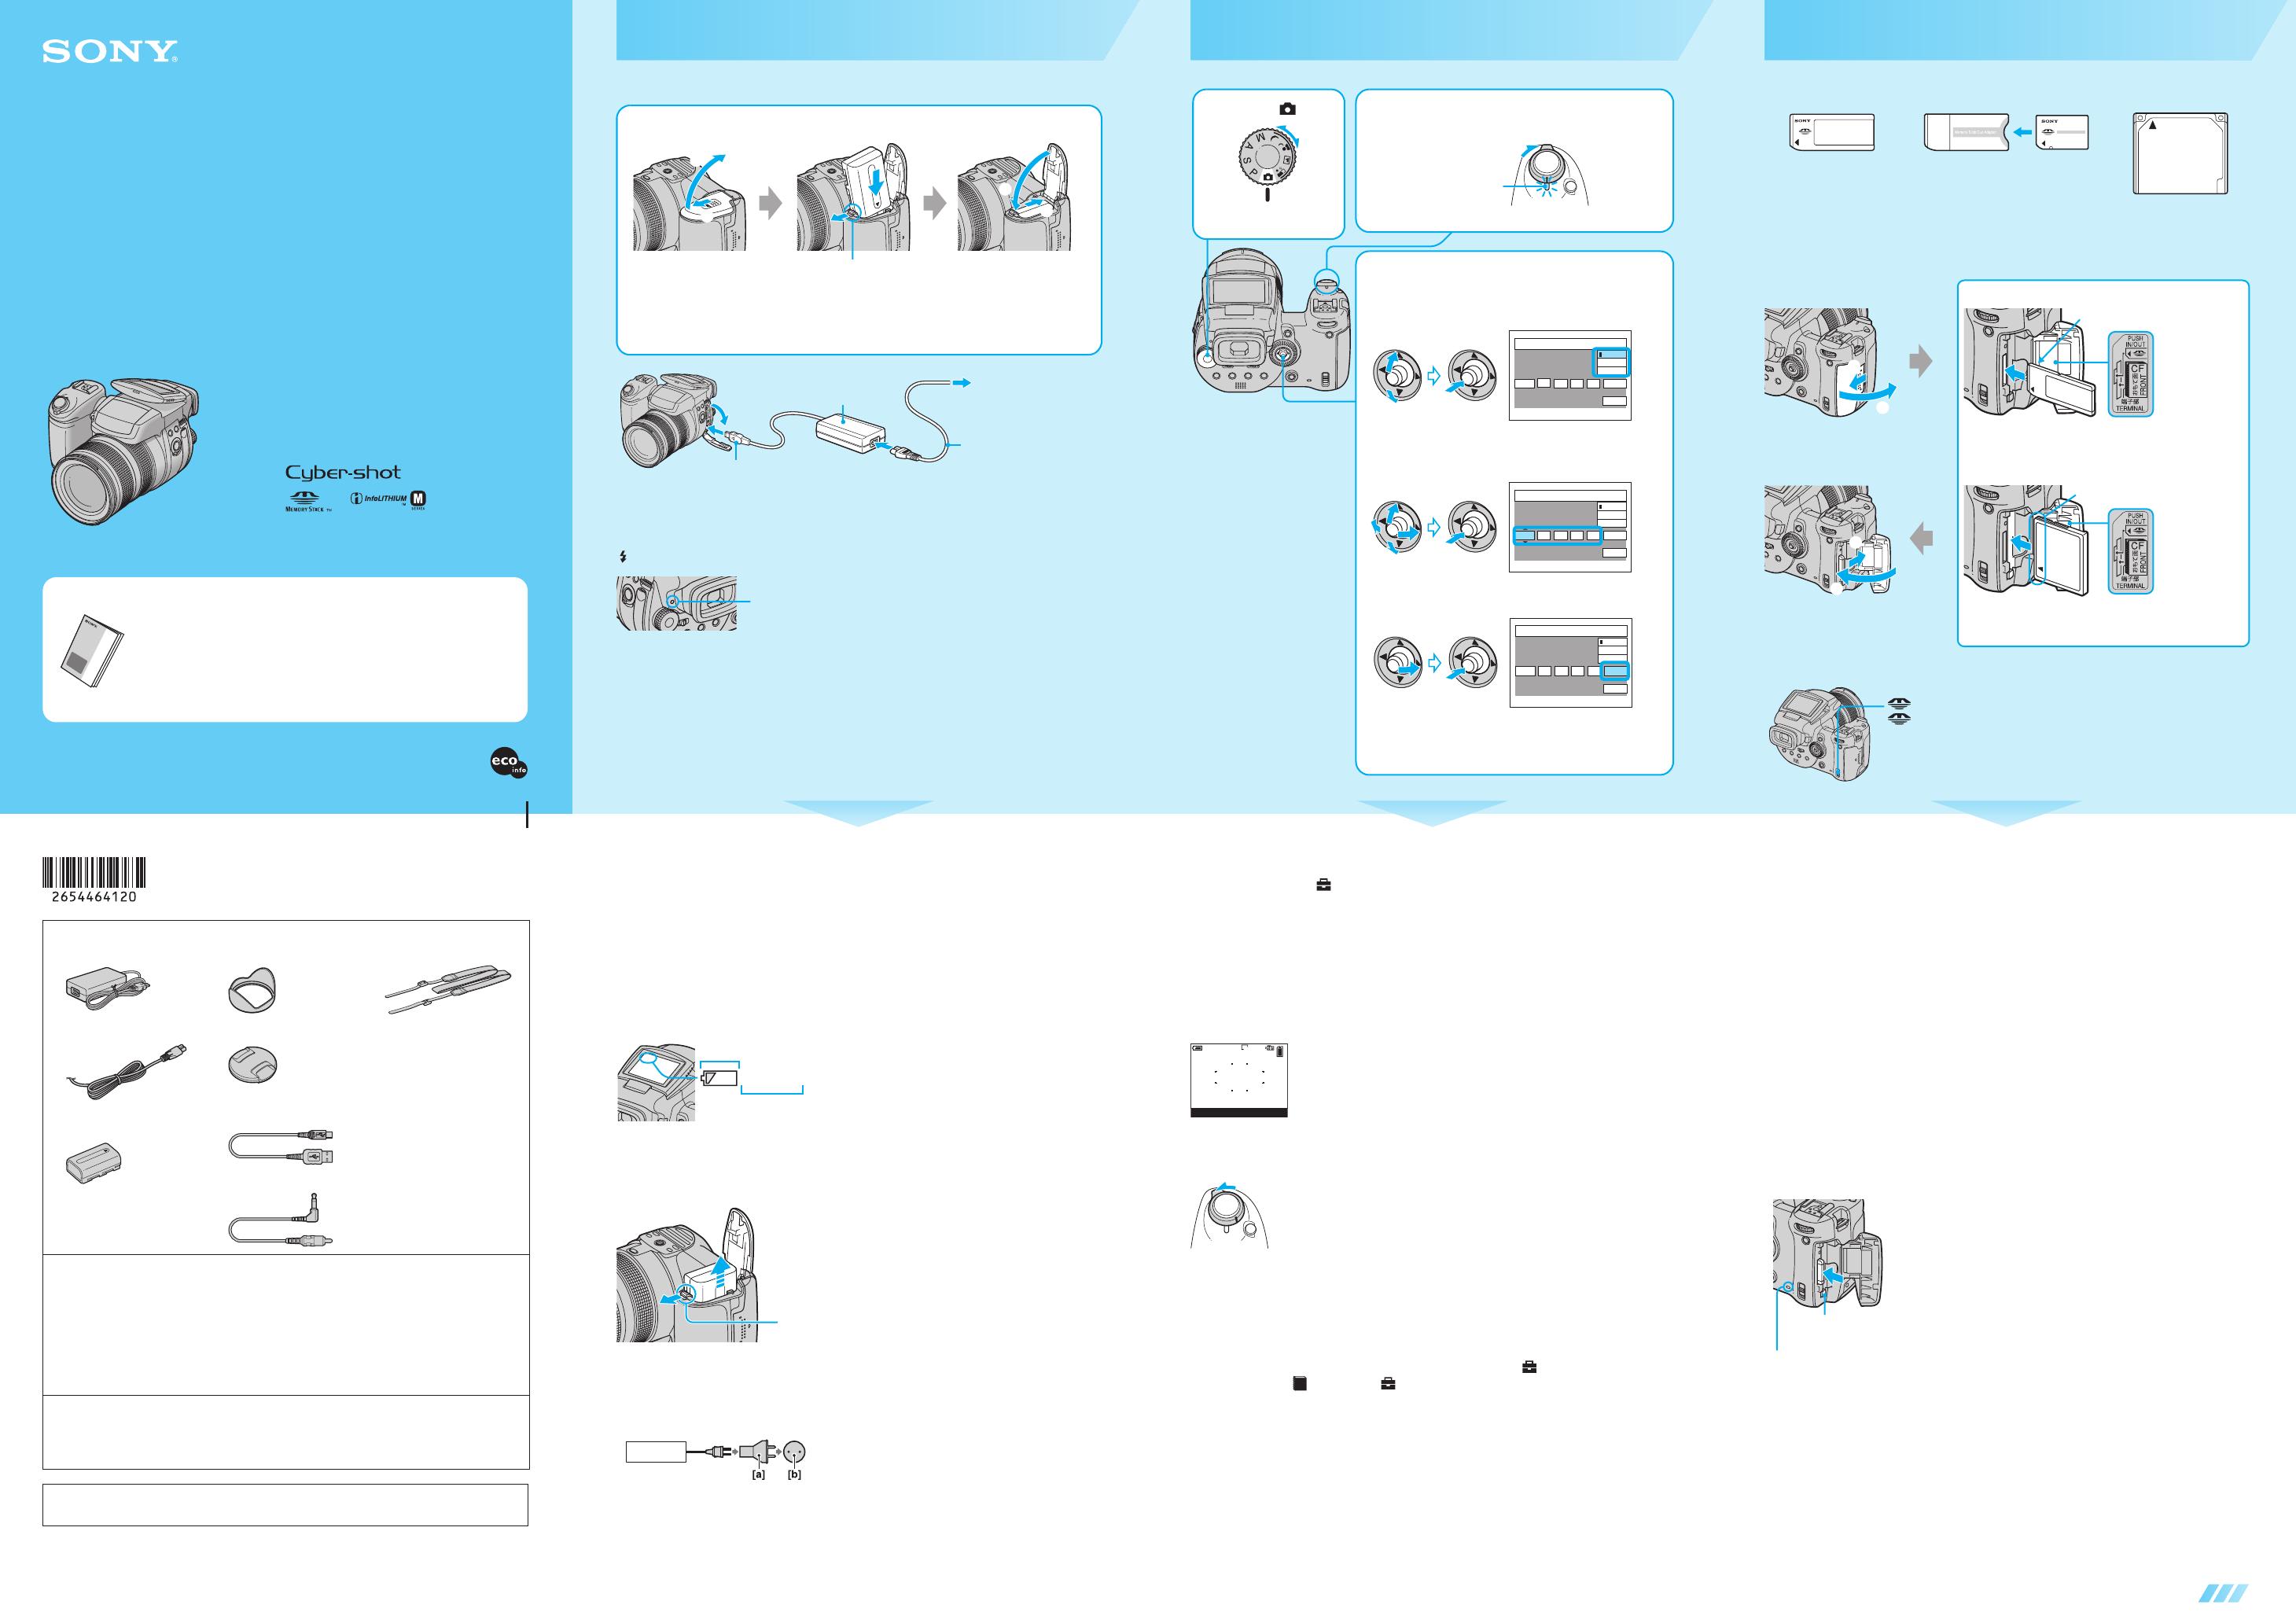
Insert a recording medium (not
supplied)
Available recording medium for the camera
You can use a “Memory Stick”, “Memory Stick Duo” (using Memory Stick Duo Adaptor)
Microdrive, or CompactFlash card (CF card) as a recording medium.
Switching the recording medium
“Memory Stick” “Memory Stick Duo”
(using Memory Stick Duo Adaptor)
Microdrive/
CompactFlash
1
2
1
2
Insert the “Memory Stick” all the way in until it clicks.
Terminal side
“Memory Stick”
Microdrive/CompactFlash
Terminal side
Insert the Microdrive/CF card all the way in from the connector
side as shown in the illustration.
Open the “Memory Stick”/CF
card cover.
Close the “Memory Stick”/CF
card cover.
/CF switch
: When recording images onto a “Memory Stick” or playing back images
from a “Memory Stick”.
CF: When recording images onto a Microdrive/CF card or playing back
images from a Microdrive/CF card.
Microdrive/CompactFlash
We have checked the compatibility of following Microdrives.
Hitachi Global Storage Technologies, Inc.
DSCM-11000 (1 GB)
3K4-2 2GB (HMS 360402D 5CF00)
3K4-4 4GB (HMS 360404D 5CF00)
3K6-4 4GB (HMS 360604D 5CF00)
3K6-6 6GB (HMS 360606D 5CF00)
We have checked the compatibility of CF cards compliant with CompactFlash Type I and Type
II, however, we cannot guarantee proper operation of all CF cards.
• Copying between media cannot be done with this camera.
• You can insert a “Memory Stick” and a Microdrive/CF card at the same time. However, you cannot record an
image onto both the media simultaneously.
• For more information about the “Memory Stick” t “User’s Guide/Troubleshooting” (page 122)
• The Microdrive is a compact and lightweight hard disk drive that complies with CompactFlash Type II
standards. For more information about the Microdrive t “User’s Guide/Troubleshooting” (page 124)
• Before using a Microdrive/CF card, be sure to format it using this camera. Otherwise, satisfactory
performance may not be obtained. t “User’s Guide/Troubleshooting” (page 78)
To remove a recording medium
Open the “Memory Stick”/CF card cover, then push the
“Memory Stick” in once or push the CF card eject lever so
that the Microdrive/CF card is ejected.
When the access lamp is lit
Never open the “Memory Stick”/CF card cover or turn off
the power. The data may be corrupted.
Access lamp
CF card eject lever
Battery eject lever
Turn the camera on/set the clock
1 Select . 2 Set the POWER switch to ON sliding
in the arrow direction.
ON
POWER
OFF
Lighting
(Green)
3 Set the clock with the multi-selector.
1 Select the date display format by moving the multi-
selector to v/V, then press the center of the multi-selector.
2 Select each item by moving to b/B and set the numeric
value by moving to v/V, then press the center of the
multi-selector.
3 Select [OK] by moving to B, then press the center of the
multi-selector.
• To cancel, select [Cancel] and press the center of the multi-selector.
2005
/:
/
1 1
12 00
AM
OK
Cancel
Clock Set
D/M/Y
M/D/Y
Y/M/D
2005
/:
/
1 1
12 00
AM
OK
Cancel
Clock Set
D/M/Y
M/D/Y
Y/M/D
2005
/:
/
1 1
10 30
AM
OK
Cancel
Clock Set
D/M/Y
M/D/Y
Y/M/D
Prepare the battery pack
Be sure to turn off your camera before charging starts.
/CHG lamp
Light on: Charging
Light off: Completed (Disconnect the AC Adaptor.)
• It takes approximately 180 minutes to charge a completely discharged battery pack using the AC Adaptor at a
temperature of 25°C (77°F). Charging may take longer under certain circumstances or conditions.
• The lamp also lights up while charging the flash.
1 Insert the battery pack.
Open the battery cover Firmly insert the battery pack all
the way while pressing the
battery eject lever with the tip
of the battery
Close the battery cover
1
2
1
2
1
Bottom
AC Adaptor
2 Open the cover, and pull it out. Connect the plug
to the DC IN jack.
To wall outlet
(wall socket)
Power cord
(mains lead)
v mark

