Page is loading ...

Whatís in the box? check that your package includes the following:
8 Channel DVR
Model: QSD2308C8
DVR Setup
Manual
Digital Peripheral Solutions, Inc.
8015 East Crystal Drive,
Anaheim, CA 92807
www.Q-See.com
Q-See is a registered trademark of Digital Peripheral Solutions, Inc.
USB Mouse
RCA-BNC X1
Remote Control and Batteries
DVR Power Supply & Cord
Camera Cables x8
Ethernet Cable
Cameras x8
DVR
12345
678910+
Power Supply & 8 Way Splitter
This Q-See product has undergone extensive quality control. If you have
any issues during the setup process, please contact our support department
before returning the product.
We have your solution!
1) Need assistance setting up the remote monitoring feature with your Q-See
DVR? Visit www.portforward.com/qsee
2) Visit our Q-See Support Section at www. Q-See.com for instant
troubleshooting tips, FAQs, DVR rmware downloads, Live Chat and More.
3) Contact our Support Team:
What’s in the box? check that your package includes the following:
Hard Drive (Pre-Installed)
CONGRATULATIONS
on your purchase!
On the Web: (24/7) Visit the Technical Support Section
www.Q-See.com
By Phone (Monday thru Friday, 9am-5pm (PST)
Tech Support 1 (877) 998 3440, ext 539
Customer Service 1 (877) 998 3440 ext. 538
By Email:
@

Page 1 Page 2
CONNECTIONS
A
1
Connections
DVR and Cameras
1 2 3 4 5
-/BACKUP RECORD SEARCH PLAY REWIND FF/PTZ STOP/ESC
POWER
6 7 8 910+/INFO +/MENU
FRONT VIEW
1
2
3
4
5
11
12
13
14
15
DIGITAL BUTTONS
-/BACKUP
+10
+/MENU
RECORD
6
7
8
9
10
SEARCH
PLAY
REWIND
FF/PTZ
STOP/ESC
INDICATOR LIGHTS
ENTER BUTTON
DIRECTION/ MULTI-SCREEN BUTTON
IR RECEIVER
USB PORT
REAR VIEW
1 3 4
2 11 13
12
5 6 7 8 9 10 15
14
ALARM IN
COM
VGA
NET
USB
PS/2
AUDIO OUT
VIDEO INVIDEO OUT
AUDIO IN
S-VIDEO
ALARM OUT
POWER
1
2
3
4
5
VIDEO OUT
SPOT OUT
AUDIO IN
S-VIDEO
PS/2 PORT
6
7
8
9
10
USB MOUSE PORT
RJ45 PORT
VGA PORT
ALARM IN
ALARM OUT/ PTZ
11
12
13
14
POWER INPUT
COM PORT
AUDIO OUT
VIDEO IN
1
2 3
14 13
4 5 6 7 9 10 118
12
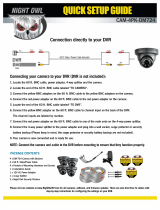
1
Connect 60 ft. extension cable to camera
Connect video end of 60 ft. cable to DVR, and connect the power end to the splitter
Connect 8 way splitter to AC adapter
Repeat the same process for cameras 2-8
Connect power supply to DVR, and then to a power source
A
ALARM IN
COM
VGA
NET
USB
PS/2
AUDIO OUT
VIDEO INVIDEO OUT
AUDIO IN
S-VIDEO
ALARM OUT
POWER
B
C
D
B
C
D
E
CAUTION: Use only the power adapters supplied with the Q-See unit. We recommend
Plugging the DVR and Cameras into a Transient Voltage Surge Protector
(UL-449 Rating)* 330 or lower clamping voltage, Joule rating 400.
Yellow: Video Out
Black: Power In

.
COM
VGA
NET
USB
PS/2
AUDIO OUT
VIDEO INVIDEO OUT
AUDIO IN
S-VIDEO
C
E
VGA
Page 3 Page 4Page 2
CONNECTING THE DVR TO A TV OR MONITOR
2
To Connect a TV:
Plug in the BNC–RCA adapter to the Video Out port on the back of the DVR (A).
Connect a RCA cable to the BNC-RCA adapter. (RCA Cable not included).
Connect the other end of the RCA cable to the Video Input on the TV.
To Connect a VGA Monitor:
Plug a VGA cable into the VGA port on the DVR (VGA Cable not included).
Connect the other end of the VGA cable to the Monitor.
Note: The monitor resolution should auto-congure. In case it does not, please set
your monitor resolution to 800 x 600 60hz.
Accessing the DVR menus from the front panel of the DVR:
2
Setup
A
Setting up the DVR to record
B
B1
B2
Use the Direction Keys and ENTER button to
put check marks in the boxes for the cameras
that you want to record. You can also setup the
record quality, resolution, and frame rate for the
cameras on this screen.
A1
A2
Push MENU to display the LOG IN screen (A1), and
enter the admin password:123456. This will display
SYSTEM SCREEN (A2). Use the Direction Keys to
move the cursor, the selected icon will have a square
around it.
BASIC: set time, date, video format, language,
and audio channel.
LIVE: to adjust camera images.
RECORD: enable channels to record, setup
resolution, frame rate, and video quality.
SCHEDULE: setup recording schedules.
ALARM: setup external alarm sensors. (optional)
MOTION: setup the system to record when
motion is detected.
PTZ: setup Pan-Tilt-Zoom cameras.
(PTZ Cameras not included)
USER: setup users on the system.
NETWORK: setup the unit for remote access.
TOOLS: access hard drive info, update rmware,
and restore system defaults.
Before you can record, enable recording on
the channels where you want to record, by
following the SYSTEM screen instructions
above (A2). Select RECORD (B1) to display
RECORD screen (B2).
A
B
C
D
E
A
B
D
VIDEO OUT

Page 5 Page 6
There are 3 modes for recording:
1. Manual Recording:
Push the RECORD button on the DVR front panel. It will record until you push the STOP
button. If the system is password protected it will ask for a password to stop recording.
2. Motion Detection Recording:
Go to MAIN MENU. Use the Direction Keys to select MOTION (GREEN box B3) and select
ENTER, this will display the MOTION screen (B4). Add a check mark in the ENABLE box
to enable motion detection for the camera (GREEN box B4). Select the AREA SET option
(RED box B4), and select ENTER. This will display (B5) screen.
B3 B4
B5
In the detection area RED means inactive so
motion in this area will NOT trigger recording. The
transparent area means active, so motion in this
area will trigger recording. Select the All option
(RED box) to make the entire area sensitive, or
select the CUSTOM option (GREEN box) to setup
specic active areas, using Direction Keys, ENTER
button, or USB mouse. Select the SENSITIVITY
option (ORANGE box) select ENTER to change
values: 1 to 8 with 8 being the most sensitive.
Select SAVE to the save settings.
B6
Setup the motion recording schedule. Go to the
SCHEDULE option on the SYSTEM menu to
display the SCHEDULE screen. Select the
MOTION option using Direction Keys and the
ENTER button to put a check mark in the motion
box (ORANGE box)(B6). Select the days and
times for each camera to record on motion, green
means the time is active. Click the OK button to
save the settings.
3. Time Schedule Recording:
Go to SYSTEM menu, use Direction Keys to select the SCHEDULE option (RED box)(B7)
and select ENTER, to display the Schedule screen (B8). If you want to record all the time
(continuous recording), use Direction Keys to go to the ALWAYS option and select ENTER
to put a check mark in the box. To program the DVR to record on a schedule, use Direction
Keys and ENTER to select the days and times for the camera to record motion, green =
active. Click on OK to save the settings. You can setup special recording times on holidays,
see section 3.3.3 for Scheduled Recording in the DVR User Manual for instructions.
B7 B8
Playback Files:
C
C1
Press the SEARCH button on the DVR, if the
system is password protected it will ask for
a user name and password. The SEARCH
box will display. Search by time or event.
TO SEARCH BY TIME:
Select TIME SEARCH option (RED box).
This will display TIME screen shown in(C2).
Use Direction Keys to select the date you
wish to view (the highlighted dates have
recorded les available to view.) Hit ENTER
to display the TIME SEARCH screen (C3).
C2

.
Page 7 Page 8Page 6
C4
TO SEARCH BY EVENT: Click on Event search
option (GREEN box)(C1). This will display the
EVENTS screen shown (C4). Select camera(s)
(RED box), and the event type (motion or sensor)
(GREEN box), then select the le you want to play
and select Enter.
NOTE: Recording will not be interrupted while you
are in Playback mode.
Backup Files
D
3
Enjoy
Congratulations! You have just completed the Quick Start Guide.
If you require further assistance after reading the User Manual,
please contact Technical Support:
On the Web: (24/7) Visit the Technical Support Section
www.Q-See.com
By Phone: (Monday thru Friday, 9am-5pm (PST)
1 (877) 998 3440, ext 539
By Email:
For more information about Q-See Products, please contact customer service:
1 (877) 998 3440, ext 538 (Monday thru Friday, 9am-5pm)
or view our selection online at www.Q-See.com
C3
Select the number of cameras you wish to display
(RED box) and put check marks in the boxes for the
cameras to display. For example: (C3) illustration, 4
camera view has been selected displaying cameras
2, 4, 9, and 12. The area on the time line in GREEN
show les available, the top line is hours and the
bottom line is minutes. Use Direction Keys to select
the time you want, and then click the PLAY icon to play
D1
D2
Tip: If you stop recording while backing up the
les, the backup will go faster.
Insert a USB ash drive or USB hard drive
into the USB port on the back of the DVR.
Push the BACKUP button on the DVR front
panel, which will display the Backup window
(D1). (If the system is password protected it
will ask for a user name and password.)
Select the camera (red box), and use
DIRECTION KEYS and ENTER on the DVR
front panel to select the start time and end
time. Change the date by clicking the DATE
button on the screen. Click BACKUP, which
will display the Backup Info window (D2).
Click OK to begin backup.
A Progress Bar will display. When the backup is complete, a dialog box will appear
as “Backup Complete”. You can now play these backup les in a third party media
player installed on your PC.
Setting Up Your DVR for Network or Internet Access:
For instructions, please refer to the Remote Access Quick Start Guide.
For additional help with port forwarding for internet access, please visit website:
www.portforward.com/qsee
/