7
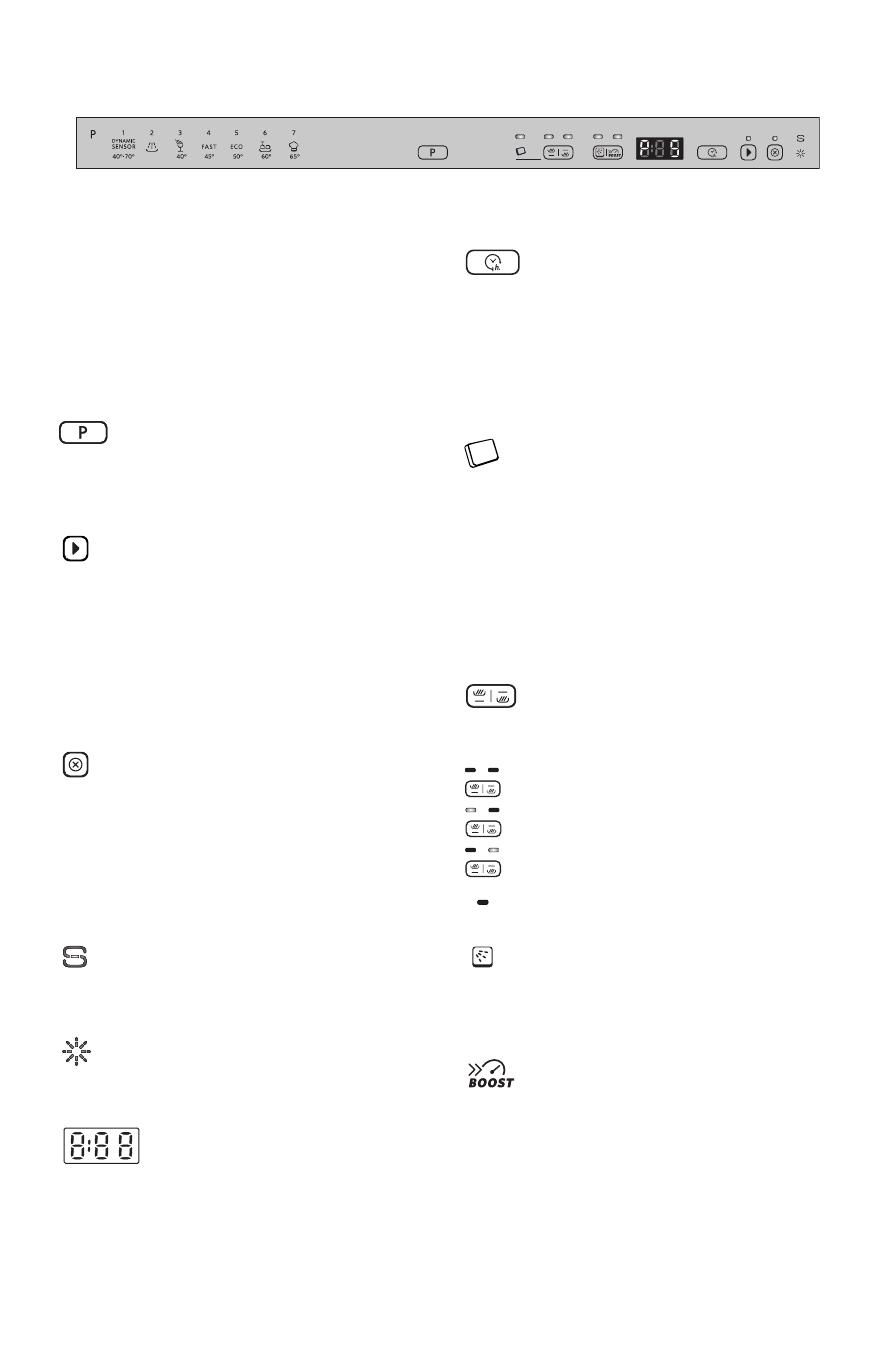
Options and display description
Before using the appliance for the first time
carefully read this quick reference guide and
the assembly instructions!
The control panel of this dishwasher activates
pushing any button except cancel/off button.
For energy saving the control panel
deactivates automatically after 30 seconds if
no cycle has started.
Program selection button
Push “P” button (repeatedly) until selected
program number is shown on the display (P1...Px)
- (see Table of programs” - next page).
Start/resume button
Push this button to start the selected program:
the indicator lights up and goes off at the end of
the program. When the door is opened during a
washing cycle, the cycle is temporarily paused:
the Start indicator blinks. To resume the cycle
push Start button and close the door within 3
seconds.
Cancel/off button
Push this button to switch off the control panel.
If pressed when a program is running it cancels
the program ongoing draining water for 1
minute. If pressed when the dishwasher is
switched off, it drains any possible liquids
from dishwasher (1 minute process).
Salt indicator
When lit (at the end of the cycle), the salt
reservoir needs to be refilled.
Rinse aid indicator
When lit (at the end of the cycle), the rinse aid
dispenser needs to be refilled.
Wash time display
Indicated the cycle duration and the remaining
time (h:min).
With “Delayed start” selected it indicates the time
remaining until program start (h.00) - below 1h
(0:min).
If “Fx Ey” messages appears on the display,
see chapter “What to do if...”.
Delayed start button
Push the button (repeatedly) to delay the start of
the program. Adjustable from 1 to 24 hours.
With each press of the button, the delayed start
indicator increases by one hour and after 24
restarts from 0. Then press the START button.
The dishwasher will start after the set time.
Tablet setting
This setting allows to optimize the cycle
performances according the type of detergent
used.
Push the MULTIZONE button for 3 seconds (until
the indicator lights up) if you are using the
combined detergents in tablet.
If you are using powder or gel detergent, the
Tablet indicator on the control panel has to be off.
Multizone
Allows you to choose the washing zones. Press
this button (repeatedly) to select the wash zones:
both racks
only lower rack
only upper rack
- indicator lits
Dynamic clean
Thanks to the additional power jets this option
provides a more intensive and powerful wash in
the lower rack, in the specific area.
Boost
The Boost option delivers a cut by 50% of the
duration for the main cycles, while ensuring an
optimal level of washing and drying. In order to
do that, it will require additional water and
energy compared to the regular full-lenght cycles.
Press this button to activate or deactivate the
function. This function can be used with the
programs indicated in the program table.


