
USER MANUAL

2
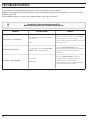
SAFETY INSTRUCTIONS
Before using the appliance, read these safety
instructions. Keep them nearby for future
reference.
These instructions and the appliance itself provide
important safety warnings, to be observed at all
times. The manufacturer declines any liability for
failure to observe these safety instructions, for
inappropriate use of the appliance or incorrect
setting of controls.
Very young children (0-3 years) should be kept
away from the appliance. Young children (3-8
years) should be kept away from the appliance
unless continuously supervised. Children from 8
years old and above and persons with reduced
physical, sensory or mental capabilities or lack of
experience and knowledge can use this appliance
only if they are supervised or have been given
instructions on safe use and understand the
hazards involved. Children must not play with the
appliance. Cleaning and user maintenance must
not be carried out by children without supervision.
WARNING: The appliance and its accessible
parts become hot during use. Care should be taken
to avoid touching heating elements. Children less
than 8 years of age must be kept away unless
continuously supervised.
Never leave the appliance unattended
during food drying. If the appliance is suitable
for probe usage, only use a temperature probe
recommended for this oven - risk of re.
Keep clothes or other ammable materials
away from the appliance, until all the components
have cooled down completely - risk of re. Always
be vigilant when cooking foods rich in fat, oil or
when adding alcoholic beverages - risk of re. Use
oven gloves to remove pans and accessories. At
the end of cooking, open the door with caution,
allowing hot air or steam to escape gradually
before accessing the cavity - risk of burns. Do not
obstruct hot air vents at the front of the oven - risk
of re.
Exercise caution when the oven door is in the
open or down position, to avoid hitting the door.
PERMITTED USE
CAUTION: The appliance is not intended to
be operated by means of an external switching
device, such as a timer, or separate remote
controlled system.
This appliance is intended to be used in
household and similar applications such as: sta
kitchen areas in shops, oces and other working
environments; farm houses; by clients in hotels,
motels, bed & breakfast and other residential
environments.
No other use is permitted (e.g. heating rooms).
IMPORTANT TO BE READ AND OBSERVED
This appliance is not for professional use. Do
not use the appliance outdoors.
Do not store explosive or ammable substances
(e.g. gasoline or aerosol cans) inside or near the
appliance - risk of re.
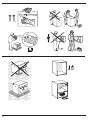
INSTALLATION
The appliance must be handled and installed by
two or more persons - risk of injury. Use protective
gloves to unpack and install - risk of cuts.
Installation, including water supply (if any)
and electrical connections, and repairs must
be carried out by a qualied technician. Do not
repair or replace any part of the appliance unless
specically stated in the user manual. Keep
children away from the installation site. After
unpacking the appliance, make sure that it has
not been damaged during transport. In the event
of problems, contact the dealer or your nearest
After-sales Service. Once installed, packaging
waste (plastic, styrofoam parts etc.) must be
stored out of reach of children - risk of suocation.
The appliance must be disconnected from the
power supply before any installation operation -
risk of electrical shock. During installation, make
sure the appliance does not damage the power
cable - risk of re or electrical shock. Only activate
the appliance when the installation has been
completed.
Carry out all cabinet cutting works before tting
the appliance in the furniture and remove all wood
chips and sawdust. Do not obstruct the minimum
gap between the worktop and the upper edge of
the oven - risk of burns.
Do not remove the oven from its polystyrene foam
base until the time of installation.
After installation, the bottom of the appliance
must no longer be accessible - risk of burn.
Do not install the appliance behind a decorative
door - risk of re.
ELECTRICAL WARNINGS
The rating plate is on the front edge of the oven
(visible when the door is open).
It must be possible to disconnect the appliance
from the power supply by unplugging it if plug
is accessible, or by a multi-pole switch installed
upstream of the socket in accordance with the
wiring rules and the appliance must be earthed
in conformity with national electrical safety
standards.
Do not use extension leads, multiple sockets
or adapters. The electrical components must not
be accessible to the user after installation. Do not
use the appliance when you are wet or barefoot.
Do not operate this appliance if it has a damaged
power cable or plug, if it is not working properly,
or if it has been damaged or dropped.

3
EN
If the supply cord is damaged, it must be
replaced with an identical one by the manufacturer,
its service agent or similarly qualied persons in
order to avoid a hazard - risk of electrical shock.
In case of replacement of power cable, contact
an authorized service center.
CLEANING AND MAINTENANCE
WARNING: Ensure that the appliance is switched
o and disconnected from the power supply
before performing any maintenance operation;
never use steam cleaning equipment - risk of
electric shock.
Do not use harsh abrasive cleaners or metal
scrapers to clean the door glass since they can
scratch the surface, which may result in shattering
of the glass.
Ensure the appliance is cooled down before
any cleaning or maintenance. - risk of burn.
WARNING: Switch o the appliance before
replacing the lamp - risk of electrical shock.
DISPOSAL OF PACKAGING MATERIALS
The packaging material is 100% recyclable and is marked with the
recycle symbol
. The various parts of the packaging must therefore
be disposed of responsibly and in full compliance with local authority
regulations governing waste disposal.
DISPOSAL OF HOUSEHOLD APPLIANCES
This appliance is manufactured with recyclable or reusable materials.
Dispose of it in accordance with local waste disposal regulations.
For further information on the treatment, recovery and recycling of
household electrical appliances, contact your local authority, the
collection service for household waste or the store where you purchased
the appliance. This appliance is marked in compliance with European
Directive 2012/19/EU, Waste Electrical and Electronic Equipment (WEEE).
By ensuring this product is disposed of correctly, you will help prevent
negative consequences for the environment and human health.
The
symbol on the product or on the accompanying documentation
indicates that it should not be treated as domestic waste but must be
taken to an appropriate collection center for the recycling of electrical
and electronic equipment.
ENERGY SAVING TIPS
Only preheat the oven if specied in the cooking table or your recipe.
Use dark lacquered or enamelled baking trays as they absorb heat better.
Food requiring prolonged cooking will continue to cook even once the
oven is switched o.
ECO DESIGN DECLARATION
This appliance meets the Eco Design requirements of European
Regulations n.65/2014 and 66/2014 in conformity to the European
standard EN 60350-1.

4
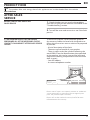
1. Control panel
2. Fan
3. Light
4. Runners for accessories
(the level is indicated on the wall
of the cooking compartment)
5. Door
6. Upper heating element/grill
7. Identification plate
(do not remove)
8. Lower heating element
(not visible)
1
2
3
4
5
7
8
6
PRODUCT DESCRIPTION
CONTROL PANEL
1. SELECTION KNOB
For switching the oven on by
selecting a function.
Turn to the
position to switch the
oven off.
2. TIMER KNOB
Useful as a timer.
Does not activate or interrupt
cooking.
3. THERMOSTAT KNOB
Turn to select a desired
temperature, activating the
selected function.
4. LED THERMOSTAT /
PREHEATING
Switches on during the heating
process. Switches off once the
desired temperature is reached.
0
5
10
15
20
25
30
35
40
45
50
60
60
80
100
120
140
160
180
200
220
250
1 2 3 4

5
EN
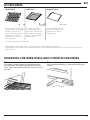
ACCESSORIES
WIRE SHELF DRIP TRAY BAKING TRAY
The wire shelf can be used
to grill food or as a support
for pans, cake tins and
other ovenproof cooking
receptacles. Useful for
grilling bread, meat, fish
and vegetables.
Use as an oven tray
for cooking meat, fish,
vegetables, focaccia, etc.
or position underneath
the wire shelf to collect
cooking juices.
Use for cooking all bread
and pastry products, but
also for roasts, fish en
papillotte, etc.
* Available only on certain models
The number of accessories may vary depending on which model is purchased.
ADDITIONAL ACCESSORIES: Other accessories that are not supplied can be purchased separately from the After-
sales Service.
*
*
1. Insert the wire shelf onto the level you require
by holding it tilted slightly upwards and resting
the raised rear side (pointing upwards) down first.
Then slide it horizontally along the runners as far as
possible.
2. The other accessories, such as the baking tray,
are inserted horizontally by sliding them along the
runners.
INSERTING THE WIRE SHELF AND OTHER ACCESSORIES

6
OFF
For switching off the oven.
LIGHT
For switching on the light in the compartment.
CONVENTIONAL
For cooking any kind of dish on one shelf only.
It is best to use the 2nd shelf.
CONVENCTION BAKE
For baking cakes with juicy fillings on a single
shelf. This function can also be used for cooking on
two shelves. Switch the position of the dishes to
cook food more evenly.
GRILL
For grilling steaks, kebabs and sausages,
cooking vegetables au gratin or toasting bread.
When grilling meat, we recommend using a drip tray
to collect the cooking juices: Position the tray on any
of the levels below the wire shelf and add 200 ml of
drinking water.
GRATIN
For roasting large joints of meat (legs, roast
beef, chicken). We recommend using a drip tray to
collect the cooking juices: Position the tray on any
of the levels below the wire shelf and add 500 ml of
drinking water.
DEFROSTING
For defrosting food more quickly.
FUNCTIONS
A new oven may release odours that have been left
behind during manufacturing: this is completely
normal.
Before starting to cook food, we therefore
recommend heating the oven with it empty in order
to remove any possible odours.
Remove any protective cardboard or transparent film
from the oven and remove any accessories from inside
it.
Heat the oven to 250 °C for about one hour.
The oven must be empty during this time.
Follow the instructions for setting the function
correctly.
Please note: It is advisable to air the room after using the
appliance for the first time.
USING THE APPLIANCE FOR THE FIRST TIME
1. SELECT A FUNCTION
To select a function, turn the selection knob to the
symbol for the function you require.
2. ACTIVATE A FUNCTION
To start the function you have selected, turn the
thermostat knob to set the temperature you require.
To interrupt the function at any time, switch off the
oven, turn the selection knob and the thermostat knob
to
and .
3. PREHEATING PHASE
Once the function has been activated, the LED
thermostat will switch on signalling that the
preheating process has begun.
At the end of this process, the LED thermostat
switches off indicating that the oven has reached the
set temperature: at this point, place the food inside
and proceed with cooking.
Please note: Placing the food in the oven before preheating
has nished may have an adverse eect on the nal cooking
result.
. SETTING THE TIMER
This option does not interrupt or activate cooking
but allows you to use the minute minder both while a
function is active and when the oven is off.
To activate the timer, turn the timer knob right round
in an clockwise direction and then turn it back in the
opposite direction to the desired duration: An
acoustic signal will warn you when the countdown
is finished.
DAILY USE

7
EN
USEFUL TIPS
HOW TO READ THE COOKING TABLE
The table indicates the best function to use for any
given food, to be cooked on one or more shelves
at the same time. Cooking times start from the
moment food is placed in the oven, excluding pre-
heating (where required). Cooking temperatures
and times are purely for guidance and will depend
on the amount of food and type of accessory used.
Use the lowest recommended settings to begin
with and, if the food is not cooked enough, then
switch to higher settings. Use the accessories
supplied and preferably dark-coloured metal cake
tins and baking trays. You can also use Pyrex pans
and accessories or ones made from china, but bear
in mind that cooking times will be slightly longer.
For best results, follow the recommendations in the
cooking table carefully when selecting which of
the supplied accessories to place on which of the
shelves.
COOKING DIFFERENT FOODS AT THE SAME TIME
Using the “Convection Bake” function, you can cook
different foods simultaneously (for example: fish
and vegetables), using different shelves. Switch
shelves two thirds of the way through cooking,
if necessary. Remove the food which requires a
shorter cooking time and leave the food which
requires a longer cooking time in the oven.
DESSERTS
-Cook delicate desserts with the conventional
function on one shelf only. Use dark-coloured
metal baking pans and always place them on the
wire shelf supplied. To cook on more than one
shelf, select the “Convection bake” function and
position the baking pans on different shelves to
facilitate the circulation of hot air.
- Use dark-coloured metal baking pans and always
place them on the wire shelf supplied.
- To check whether a leavened cake is cooked,
insert a wooden toothpick into the centre of the
cake. If the toothpick comes out clean, the cake is
ready.
If using non-stick cake tins, do not butter the edges
as the cake may not rise evenly around the edges.
- If the item “swells” during baking, use a lower
temperature next time and consider reducing the
amount of liquid you add or stirring the mixture
more gently.
- For desserts with moist fillings or toppings (such
as cheesecake or fruit tarts), use the “Convection
bake” function. If the base of the cake is soggy,
lower the shelf and sprinkle the bottom of the cake
with breadcrumbs or biscuit crumbs before adding
the filling.
MEAT
- Use any kind of oven tray or pyrex dish suited
to the size of the piece of meat being cooked.
For roast joints, it is best to add some stock to
the bottom of the dish, basting the meat during
cooking for added flavour. Please note that steam
will be generated during this operation. When the
roast is ready, let it rest in the oven for another 10-
15 minutes, or wrap it in aluminium foil.
- When grilling pieces of meat, choose cuts of the
same thickness to obtain even cooking. Very thick
pieces of meat require longer cooking times. To
prevent the meat from burning on the outside,
lower the position of the wire shelf, keeping the
food farther away from the grill. Turn the meat two
thirds of the way through cooking. Take care when
opening the door as steam will escape.
To collect the cooking juices, we recommend
placing a dripping pan filled with 200 ml of
drinking water directly underneath the wire shelf
on which the food is placed. Refill as necessary.
PIZZA
Lightly grease the trays to ensure the pizza has a
crispy base. Scatter the mozzarella over the pizza
two thirds of the way through cooking.

8
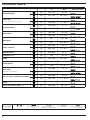
COOKING TABLE
RECIPE FUNCTION PREHEAT
TEMPERATURE
(°C)
DURATION
(MIN)
LEVEL
AND ACCESSORIES
Leavened cakes
Yes 150 - 170 30 - 90
2
Yes 150 - 170 30 - 90 ***
4
1
Filled cake
(cheese cake, strudel, fruit pie)
Yes 160 - 200 35 - 90
2
Yes 160 - 200 35 - 90 ***
4
2
Biscuits/tartlets
Yes 160 - 180 15 - 35
2 / 3
Yes 150 - 170 20 - 40 ***
4
2
Choux buns
Yes 180 - 200 40 - 60
2
Yes 170 - 190 35 - 50 ***
4
2
Meringues
Yes 90 150 - 200
2
Yes 90 140 - 200 ***
4
2
Pizza / Focaccia
Yes 220 - 250 10 - 25
1 / 2
Yes 200 - 240 15 - 30 ***
4
2
Small bread 80g Yes 180 - 200 30 - 45
2
Bread loaf 500 g Yes 180 50 - 70
1 / 2
Bread Yes 180 - 200 30 - 80 ***
4
2
Frozen pizzas
Yes 250 10 - 20
2
Yes 250 10 - 20 ***
4
2
Salty cakes
(vegetable pie,quiche)
Yes 180 - 200 30 - 45
2
Yes 170 - 200 40 - 60 ***
4
2
Vols-au-vents / pu pastry crackers
Yes 190 - 200 20 - 30
2
Yes 180 - 190 15 - 40 ***
4
2
Lasagne / baked pasta / canneloni
/ ans
Yes 190 - 200 45 - 65
2
Lamb / veal / beef /pork 1 kg Yes 190 - 200 80 - 110
2
ACCESSORIES
Wire shelf
Baking dish on the wire
shelf
Baking tray/Drip tray or
baking dish on the wire shelf
Drip tray / Baking tray
Drip tray / Baking tray with
200 ml of water

9
EN
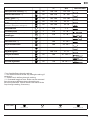
* Turn food halfway through cooking
** Turn food two thirds of the way through cooking (if
necessary).
*** Switch levels halfway through cooking.
**** Estimated length of time: dishes can be removed
from the oven at different times depending on
personal preference. Switch shelves two-thirds of the
way through cooking, if necessary.
RECIPE FUNCTION PREHEAT
TEMPERATURE
(°C)
DURATION
(MIN)
LEVEL
AND ACCESSORIES
Roast pork with crackling 2 kg Yes 180 - 190 110 - 150
2
Chicken/rabbit/duck 1 kg Yes 200 - 230 50 - 100
2
Turkey / goose 3 kg Yes 180 - 200 150 - 200
2
Baked sh/en papillote 0,5 kg (llets,
whole)
Yes 170 - 190 30 - 45
2
Stued vegetables
(tomatoes, courgettes, aubergines)
Yes 180 - 200 50 - 70
2
Toasted bread 5’ 250 2 - 6
5
Fish llets/slices 5’ 250 15 - 30 *
4
3
Sausages/kebabs/spare ribs/
hamburgers
5’ 250 15 - 30 *
5
4
Roast chicken 1-1,3 kg - 200 - 220 60 - 80 **
3
1
Roast beef rare 1 kg - 200 35 - 50 **
3
Leg of lamb/knuckle - 200 60 - 90 **
3
Roast potatoes - 200 - 220 35 - 55 **
3
Vegetable gratin - 200 - 220 25 - 55
3
Lasagne and meat Yes 200 50 - 100 ****
4
1
Meat and potatoes Yes 190- 200 45 - 100 ****
4
1
Fish and vegetables Yes 180 30 - 50 ****
4
2
FUNCTIONS
Conventional Grill Gratin Convenction bake

10
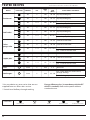
RECIPE FUNCTION PREHEAT. LEV
TEMP.
(°C)
COOK
TIME
(MIN.)
ACCESSORIES* AND NOTES
Shortbread
Yes 3 150 30 - 40 Drip tray/baking tray
Yes 3 150 25 - 35 Drip tray/baking tray
Yes 2 - 4 160
20 - 30 **
Lev. 4: baking tray
Lev. 2: Drip tray/baking tray
Small cakes
Yes 3 160 25 - 35 Drip tray/baking tray
Yes 3 160 25 - 35 Drip tray/baking tray
Yes 2 - 4 150
20 - 35 **
Lev. 4: baking tray
Lev. 2: Drip tray/baking tray
Fatless
sponge cake
Yes 3 150 35 - 45 Cake tin on wire shelf
Yes 2 150 30 - 40 Cake tin on wire shelf
Yes 1 - 4 160
35 - 45 **
Lev. 4: Cake tin on wire shelf
Lev. 1: Cake tin on wire shelf
2 apple pies
Yes 2 185 70 - 90 Cake tin on wire shelf
Yes 2 175 70 - 90 Cake tin on wire shelf
Yes 1 - 4 175
75 - 95 **
Lev. 4: Cake tin on wire shelf
Lev. 1: Cake tin on wire shelf
Toast
5 min 5 250 2 - 4 Wire shelf
Hamburgers
5 min 5 250 25 - 30
Lev. 5: Wire shelf (turn food halfway
through cooking)
Lev. 4: Baking tray with water
* You can obtain any accessories that are not
supplied from our After-sales service.
** Switch level halfway through cooking.
Energy eciency class (in accordance with the IEC
60350-1 standard): Refer to the specic table to
conduct the test.
TESTED RECIPES
Compiled for the certification authorities in
accordance with the standard IEC 60350-1
FUNCTIONS
Conventional Grill Gratin Convection bake EcoConvection bake

11
EN
CLEANING
ACCESSORIES
Do not use steam cleaning
equipment.
Use protective gloves during all
operations.
Carry out the required
operations with the oven cold.
Disconnect the oven from the
power supply.
Do not use wire wool, abrasive
scourers or abrasive/corrosive
cleaning agents, as these could
damage the surfaces of the
appliance.
EXTERIOR SURFACES
• Clean the surfaces with a damp microfibre cloth.
If they are very dirty, add a few drops of pH-neutral
detergent. Finish off with a dry cloth.
• Do not use corrosive or abrasive detergents. If
any of these products inadvertently comes into
contact with the surfaces of the appliance, clean
immediately with a damp microfibre cloth.
Soak the accessories in a washing-up liquid
solution after use, handling them with oven gloves
if they are still hot.
Food residues can be removed using a washing-up
brush or a sponge.
INTERIOR SURFACES
• After every use, leave the oven to cool and then
clean it, preferably while it is still warm, to remove
any deposits or stains caused by food residues To
dry any condensation that has formed as a result
of cooking foods with a high water content, let the
oven to cool completely and then wipe it with a
cloth or sponge.
• Clean the glass in the door with a suitable liquid
detergent.
• The door can be easily removed and refitted to
facilitate cleaning of the glass.
• The top heating element of the grill can be
lowered to clean the upper panel of the oven .

12
MAINTENANCE
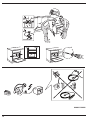
1. Open the door fully.
2. Lower the catches as far as possible.
3.
b
a
Close the door as much as you can.
~60°
4. Take a firm hold of the door with both hands – do
not hold it by the handle.
Simply remove the door by continuing to close it
while pulling it upwards at the same time until it is
released from its seating.
5.
a
b
Put the door to one side, resting it on a soft
surface.
Use protective gloves during all
operations.
Carry out the required
operations with the oven cold.
Disconnect the oven from the
power supply.
REMOVING THE DOOR
~15°

13
EN
1. Move the door towards the oven, aligning the
hooks of the hinges with their seating.
2. Secure the upper part into its seating.
3. Lower the door and then open it fully.
4. Lower the catches into their original position:
Make sure that you lower them down completely.
b
a
5. Try closing the door and check to make sure that
it lines up with the control panel. If it does not, repeat
the steps above: The door could become damaged if
it does not work properly.
REFITTING THE DOOR

14
1. After removing the door and resting it on a soft
surface with the handle downwards, simultaneously
press the two retaining clips and remove the upper
edge of the door by pulling it towards you.
2. Lift and firmly hold the inner glass with both
hands, remove it and place it on a soft surface before
cleaning it.
3. To correctly reposition the inner glass, make sure
that the “R” is visible in the right-hand corner and the
clear surface (not printed) is facing up.
First insert the long side of the glass indicated by “R”
into the support seats, then lower it into position.
4. Refit the upper edge: A click will indicate correct
positioning. Make sure the seal is secure before
refitting the door.
CLICK & CLEAN ‑ CLEANING THE GLASS

15
EN
1. Disconnect the oven from the power supply.
2. Unscrew the cover from the light, replace the bulb
and screw the cover back on the light.
3. Reconnect the oven to the power supply.
Please note: Use 25 W/230 V type G9, T300 °C halogen lamps.
The bulb used in the product is specically designed for
domestic appliances and is not suitable for general room
lighting within the home (EC Regulation 244/2009).
Light bulbs are available from our After-sales Service.
- Do not handle bulbs with your bare hands as your
ngerprints could damage them. Do not use the oven until
the light cover has been retted.
REPLACING THE LIGHT
1. Remove the heating element from its seating.
2. Lower the heating element.
3. To return the heating element to its position, lift it
up, pull it slightly towards you and make sure that the
tab support is in its proper seating.
LOWERING THE UPPER HEATING ELEMENT
(Only in some models)

16
TROUBLESHOOTING
Any problems or malfunctions that may occur can often be easily resolved.
Before contacting the After-sales Service, check the following table to see whether you can resolve the
problem yourself.
If the problem persists, contact your nearest After-sales Service Centre.
Read the safety instructions carefully
before carrying out any of the following work
PROBLEM POSSIBLE CAUSE REMEDY
The oven is not working.
Disconnection from the mains
electricity.
Fault.
Make sure that the oven is connected
to the main electricity supply.
Turn off the oven and restart it to see if
the fault persists.
Cooking will not start.
Temperature not set/thermostat
knob in the wrong position.
Turn the thermostat knob to the
temperature or the position you require
to activate the function you have
selected.
The light is not working.
O ven OFF.
Bulb gone.
Turn the selection knob to select a
function and switch on the oven.
If the fault persists, follow the
instructions for replacing the bulb given
in the “Maintenance” section.

17
EN
AFTER-SALES
SERVICE
BEFORE CONTACTING OUR AFTER-
SALES SERVICE
IF THE PROBLEM PERSISTS AFTER HAVING
PERFORMED ALL OF THE NECESSARY CHECKS,
CONTACT YOUR NEAREST AFTER-SALES SERVICE
CENTRE.
1. Check whether you can resolve the problem
yourself using any of the measures described in the
“Troubleshooting” section.
2. Turn off the oven and restart it to see if the fault
persists.
To receive assistance, call the number given on
the warranty leaflet enclosed with the product or
follow the instructions on our website. Be prepared
to provide:
• A brief description of the fault
• The exact type of model of your product
• The assistance code (the number following the
word SERVICE on the identification plate attached
to the product; this can be seen on the left-hand
edge of the cooking compartment when the oven
door is open).
• Your full address
• A contact telephone number
Model: xxxXXXXxx
XXXXXXXXXX
XXXXXX
XXXXXXXXXX
XXXXXXXXXX
XXXXXXXXXXXXXXXXXXXX
XXXXXXXXXX
Please note: If repairs are required, contact an authorised
service centre that is guaranteed to use original spare
parts and perform repairs correctly.
Please refer to the enclosed warranty leaflet for more
information on the warranty.
PRODUCT FICHE
WWW
The product fiche with energy data of this appliance can be downloaded from the website
docs.indesit.eu
XXXXXX XXXXXX XXXXX XXXXXXX

18
x2
90°C

19
EN
557
525
549
570
595
423
20
595
5
89° max
97
478
4
min 560
560
600
min 560
560
5
40
40
583+2

20
= =
x 2
4 0 0 01112 8 431
-
 1
1
-
 2
2
-
 3
3
-
 4
4
-
 5
5
-
 6
6
-
 7
7
-
 8
8
-
 9
9
-
 10
10
-
 11
11
-
 12
12
-
 13
13
-
 14
14
-
 15
15
-
 16
16
-
 17
17
-
 18
18
-
 19
19
-
 20
20


Ask a question and I''ll find the answer in the document
Finding information in a document is now easier with AI
Related papers
-
Bosch GIN81AEF0G Owner's manual
-
Whirlpool SA3 540 H IX User guide
-
-
-
Hotpoint KFW 3543 H IX UK User guide
-
-
HOTPOINT/ARISTON FA2 540 H IX HA User guide
-
Ariston FA3 540 H IX A User guide
-
-
HOTPOINT/ARISTON FA4 840 P IX HA User guide
Other documents
-
Indesit IFW 6530 WH Owner's manual
-
Whirlpool AKP 604 IX Daily Reference Guide
-
Whirlpool IFW 6530 IX UK Setup and user guide
-
Indesit IFW 6544 H IX UK User guide
-
-
Whirlpool FA2 540 H IX HA User guide
-
-
Mepamsa ME 52 H XS Daily Reference Guide
-
Dominox DO 52 H XS Daily Reference Guide
-
Franke FSL 52 H XS Daily Reference Guide