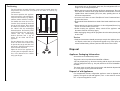
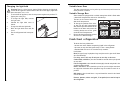
AEG SANTO2642-6KG is a fridge freezer with advanced features to keep your food fresh and organized. It has a spacious interior with adjustable storage shelves, a variable inner door, and a variable storage box for customized storage options. The fresh food refrigeration compartment is perfect for storing fruits, vegetables, and dairy products, while the freezing compartment can be used to freeze and store frozen food. The ice box is ideal for making and storing ice cubes.
AEG SANTO2642-6KG is a fridge freezer with advanced features to keep your food fresh and organized. It has a spacious interior with adjustable storage shelves, a variable inner door, and a variable storage box for customized storage options. The fresh food refrigeration compartment is perfect for storing fruits, vegetables, and dairy products, while the freezing compartment can be used to freeze and store frozen food. The ice box is ideal for making and storing ice cubes.


-
 1
1
-
 2
2
-
 3
3
-
 4
4
-
 5
5
-
 6
6
-
 7
7
-
 8
8
-
 9
9
-
 10
10
-
 11
11
-
 12
12


AEG SANTO2642-6KG is a fridge freezer with advanced features to keep your food fresh and organized. It has a spacious interior with adjustable storage shelves, a variable inner door, and a variable storage box for customized storage options. The fresh food refrigeration compartment is perfect for storing fruits, vegetables, and dairy products, while the freezing compartment can be used to freeze and store frozen food. The ice box is ideal for making and storing ice cubes.
Ask a question and I''ll find the answer in the document
Finding information in a document is now easier with AI
Related papers
Other documents
-
Electrolux SANTO 2642-6 KG User manual
-
-
Aeg-Electrolux SN71840-5I User manual
-
-
-
Aeg-Electrolux SC71840-5I User manual
-
-
Electrolux 40-4I User manual
-
-