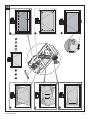
SMART Technologies UX60 (ix systems) Installation guide
- Type
- Installation guide

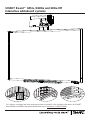
SMART Board™ 685ix, D685ix and 685ix-MP
SMART Board™ 685ix, D685ix and 685ix-MP
interactive whiteboard systems
interactive whiteboard systems
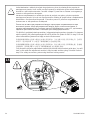
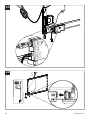
For cautions, warnings and other important product information, see Important Information for SMART
Board 685ix and D685ix Interactive Whiteboard Users (smarttech.com/kb/137499).
Page is loading ...
Page is loading ...
Page is loading ...

99-00982-21 B0 5
Twój produkt SMART zawiera instrukcjĊ i czĊĞci do instalacji tylko na Ğcianach o metalowej
lub drewnianej konstrukcji szkieletowej (ryglowej) i niektórych murowanych.
JeĞli musisz zainstalowaü produkt SMART na Ğcianach Īelbetowych, Ğcianach tynkowanych
na listwach podtynkowych, Ğcianach o nietypowej konstrukcji lub innych typach Ğcian, zwróü
siĊ do lokalnego organu nadzoru budowlanego o wskazówki, zalecenia i wytyczne dotyczące
bezpiecznej pracy.
Seu produto SMART inclui instruções e peças para instalação em paredes de metal e viga de
madeira e somente em determinados tipos de parede de alvenaria.
Caso você precise instalar seu produto SMART em parede de concreto reforçado, em
paredes com acabamento em placas de argamassa, paredes de construção pouco comuns
ou outros tipos de paredes, consulte a autoridade de construção local para obter instruções,
recomendações e práticas de trabalho seguras.
O seu produto SMART inclui instruções e peças para a instalação apenas em paredes de
vigas de metal e de madeira e em determinadas paredes de alvenaria.
Se necessitar de instalar o seu produto SMART em paredes de betão reforçado, paredes
com acabamento em estuque, paredes de construção não convencional ou outros tipos de
paredes, consulte a sua autoridade local sobre edifícios para obter instruções,
recomendações e práticas seguras de trabalho.
ȼ ɤɨɦɩɥɟɤɬ ɩɪɨɞɭɤɬɚ SMART ɜɯɨɞɹɬ ɢɧɫɬɪɭɤɰɢɢ ɢ ɞɟɬɚɥɢ, ɧɟɨɛɯɨɞɢɦɵɟ ɞɥɹ ɦɨɧɬɚɠɚ
ɩɪɨɞɭɤɬɚ ɧɚ ɦɟɬɚɥɥɢɱɟɫɤɢɟ ɢɥɢ ɞɟɪɟɜɹɧɧɵɟ ɤɚɪɤɚɫɧɵɟ ɫɬɟɧɵ ɢ ɧɚ ɤɢɪɩɢɱɧɵɟ ɫɬɟɧɵ
ɨɩɪɟɞɟɥɟɧɧɨɝɨ ɬɢɩɚ.
ȼ ɫɥɭɱɚɟ ɧɟɨɛɯɨɞɢɦɨɫɬɢ ɦɨɧɬɚɠɚ ɩɪɨɞɭɤɬɚ
SMART ɧɚ ɠɟɥɟɡɨɛɟɬɨɧɧɵɟ ɫɬɟɧɵ, ɫɬɟɧɵ ɫɨ
ɲɬɭɤɚɬɭɪɧɨɣ ɨɬɞɟɥɤɨɣ, ɫɬɟɧɵ ɫ ɧɟɨɛɵɱɧɨɣ ɤɨɧɫɬɪɭɤɰɢɟɣ ɢɥɢ ɧɚ ɫɬɟɧɵ ɞɪɭɝɨɝɨ ɬɢɩɚ,
ɨɛɪɚɬɢɬɟɫɶ ɜ ɦɟɫɬɧɵɟ ɤɨɦɩɟɬɟɧɬɧɵɟ ɫɬɪɨɢɬɟɥɶɧɵɟ ɨɪɝɚɧɵ ɡɚ ɢɧɫɬɪɭɤɰɢɹɦɢ,
ɪɟɤɨɦɟɧɞɚɰɢɹɦɢ ɢ ɩɪɢɟɦɚɦɢ ɛɟɡɨɩɚɫɧɨɣ ɪɚɛɨɬɵ.
SMART-produkten inkluderar endast anvisningar och delar för montering på väggar med
reglar av trä eller metall och på vissa typer av murade väggar.
Om du behöver montera SMART-produkten på väggar av förstärkt betong,
gipsputsade väggar, väggar med ovanlig konstruktion eller andra typer av väggar ska du
tala med lokal myndighet för bygginspektion för att få anvisningar, rekommendationer och
säkra arbetsmetoder.
䄺ਞᙼⱘ 60$57 ѻક᠔䰘ᏺⱘᅝ㺙ᣛफঞ㒘ӊҙ䗖⫼Ѣ䞥ሲ᷅䴶ǃ༈᷅䴶⡍ᅮ
ᴤ䴶DŽ
བᵰᙼ䳔㽕ᅝ㺙 60$57 ѻક㟇䩶ㄟ⏋ޱೳ䴶ǃ♄⊹ᵓᴵ䫎䴶ǃ⡍⅞ᓎᴤ䴶݊Ҫ⾡㉏
䴶ᰃˈ䇋䆶ᔧഄᓎㄥⳌ݇ᴎᵘ㦋পᣛ⼎ঞᓎ䆂ˈҹ⹂ֱᮑᎹᅝܼDŽ
൞ऱ ˦ˠ˔˥˧ ขࢬॵऱڜᇘਐق֗ิٙႛᔞش࣍८᥆ᛥਪᛥ૿Εֵᙰᛥਪᛥ૿ࡉࡳفޗ
ᛥ૿Ζʳ
ڕ൞Ꮑڜᇘ ˦ˠ˔˥˧ ข۟ᙓᕩՒᛥΕۊࣽࣨයᔮ૿ᛥΕ৬ޗᛥ૿ࢨࠡהጟᣊᛥ૿
ழΔᓮᇬᅝچ৬ᗰઌᣂᖲᣂ༈ޣਐق֗৬ᤜΔאᒔঅਜՠڜ٤Ζ
Your SMART product includes instructions and parts for installation on metal and wood stud
walls and certain masonry wall types only.
In the event that you need to install your SMART product on reinforced concrete walls, walls
with plaster lath finishing, walls of unusual construction or other types of walls, refer to your
local building authority for instructions, recommendations and safe work practices.

6 99-00982-21 B0
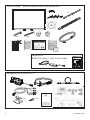
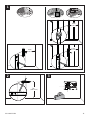
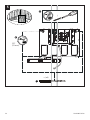
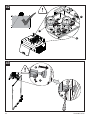
d (x 2) k (×3)
SMART GoWire™ Auto-Launch Cable
(GW-MP, GW-MPP)
SBX800i4
771/2"
(196.9cm)
680
655/8" (166.9cm)
491/4"
(125.1cm)
×7
×7
#2
×2
1 2
3
4
5
6
7 8
9
10
11
12
8
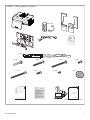
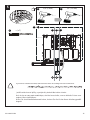
a (×12) b (×12) c (×2) d (×2)
×2
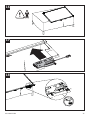
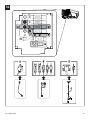
SMART Board™ 685ix or D685ix interactive whiteboard
SB685ix-MP
SMART Go-Wire™ auto launch cable
Extended control panel (ECP)

Page is loading ...
Page is loading ...

10 99-00982-21 B0
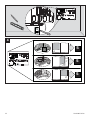
ࠦࡦࠢ࠻ߩࠞ࠙ࡦ࠲࠙ࠚࠗ࠻߇ᨒߩ㊄ዻㇱಽࠆߪო㕙ߦᡂࠇࠆ႐วߪޔ5$KZ
ోࠆߪ৻ㇱಽ߇᳓ᐔߢߪࠅ߹ߖࠎޕု⋥᳓ᐔߦᱜߒߊขࠅઃߌߥ߅ߒߡߊߛߐ
ޕ
zi]WW 㢌G㉘㾌⪰G㠸䚨GἬ⫠⏈G⯜☔G㉔㡴G㫵㉔㢨ḔG㈏ὤ▙ⷱ㜄G㍌䓽㢨㛨㚰G䚝⏼␘ UG㡔␏㡸G
㉘㾌䚔G⚀⏈G⋆㢨⪰G⬒㻈ḔG㍌㫵㡰⦐G㉘㾌䚨㚰G㥉ㇵ㤵㡰⦐G㣅┍䚔G㍌G㢼㏩⏼␘ U
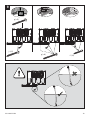
Alle linjene du tegner for å installere SB600ix må være rette og plane på en loddrett vegg. Du
må installere enheten plant og loddrett for at det skal fungere.
Alle lijnen die u trekt als hulp voor de montage van de SB600ix moeten recht, verticaal
waterpas en loodrecht op muur staan. De unit werkt alleen naar behoren als deze recht,
verticaal waterpas en loodrecht op de muur is gemonteerd.
Wszelkie linie kreĞlone w celu instalacji SB600ix muszą byü proste i wypoziomowane na
pionowej Ğcianie. Aby urządzenie dziaáaáo prawidáowo, naleĪy instalowaü je prosto, w sposób
wypoziomowany i wypionowany.
Todas as linhas que você desenhar para instalar o SB600ix deverão ser retas e estar
niveladas em uma parede vertical. Você deve instalar a unidade reta, nivelada e vertical para
que ela funcione apropriadamente.
Todas as linhas que desenhar para instalar o SB600ix deverão ser rectas e niveladas numa
parede a prumo. Para que a unidade funcione correctamente, deverá ser instalada direita,
nivelada e a prumo.
ȼɫɟ ɥɢɧɢɢ, ɩɪɨɜɨɞɢɦɵɟ ɞɥɹ ɦɨɧɬɚɠɚ SB600ix, ɞɨɥɠɧɵ ɛɵɬɶ ɩɪɹɦɵɦɢ ɢ ɜɵɪɨɜɧɟɧɧɵɦɢ
ɜɟɪɬɢɤɚɥɶɧɨ ɩɨ ɨɬɜɟɫɭ. Ⱦɥɹ ɤɨɪɪɟɤɬɧɨɣ ɪɚɛɨɬɵ ɩɪɨɞɭɤɬ ɧɟɨɛɯɨɞɢɦɨ ɭɫɬɚɧɚɜɥɢɜɚɬɶ ɩɨ
ɩɪɹɦɨɣ ɥɢɧɢɢ, ɧɚ ɨɞɧɨɦ ɭɪɨɜɧɟ ɢ ɫɬɪɨɝɨ ɜɟɪɬɢɤɚɥɶɧɨ.
Alla linjer som du ritar för montering av SB600ix måste vara helt våg- och lodräta på väggen.
Du måste montera enheten helt våg- och lodrätt för att den ska fungera på rätt sätt.
᠔᳝ᅝ㺙 6%L[ ᯊ᠔⬏ⱘ㒓ൖⳈ䴶Ϟ䛑ᖙ乏ᰃヨⳈ∈ᑇⱘDŽᴀ㺙㕂䳔Ⳉゟǃ∈ᑇঞ
ൖⳈഄᅝ㺙ᠡ㛑ℷᐌ䖤䕀DŽ
ࢬڶڜᇘ TC711jy ழࢬऱᒵڇিऴᛥ૿ՂຟؘႊਢऴࡉֽؓऱΖءᇘᆜᏁऴمΕֽؓ֗
িऴऱڜᇘթ౨إൄሎ᠏Ζ
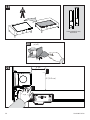
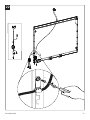
All of the lines that you draw to install the SB600ix must be straight and level on a plumb wall.
You must install the unit straight, level and plumb for it to operate properly.

99-00982-21 B0 11
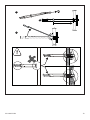
78"
(198.1 cm)
2×
Installation Template for UF55/UF55w Projector System
Part of the SMART Board™ 600i3 Interactive Whiteboard System
SMART Technologies
www.smarttech.com/support www.smarttech.com/contactsupport
99-00914-20 REV A0
'&&(&!(.'
4" (10.2 cm)
7" (17.8 cm)
28" (71 cm)
7" (17.8 cm) × 4
2" (5.1 cm)
7" (17.8 cm) 7" (17.8 cm) 7" (17.8 cm)
FP
FP
FP
1
B
A
2 3

12 99-00982-21 B0
2×
Installation Template for UF55/UF55w Projector System
Part of the SMART Board™ 600i3 Interactive Whiteboard System
SMART Technologies
www.smarttech.com/support www.smarttech.com/contactsupport
99-00914-20 REV A0
'&&(&!(.'
4" (10.2 cm)
7" (17.8 cm)
28" (71 cm)
7" (17.8 cm) × 4
2" (5.1 cm)
7" (17.8 cm) 7" (17.8 cm) 7" (17.8 cm)
5
5
5
17
14
2×
Installation Template for UF55/UF55w Projector System
Part of the SMART Board™ 600i3 Interactive Whiteboard System
SMART Technologies
www.smarttech.com/support www.smarttech.com/contactsupport
99-00914-20 REV A0
'&&(&!(.'
4" (10.2 cm)
7" (17.8 cm)
28" (71 cm)
7" (17.8 cm) × 4
= 28" (71 cm)
2" (5.1 cm)
7" (17.8 cm) 7" (17.8 cm) 7" (17.8 cm)
15
16
4
Page is loading ...
Page is loading ...

99-00982-21 B0 15
A
B
C
c (×7)
1/4" (6 mm)
1/2" (13 mm)
5
A
B
+
C
+
A
B
+
C
+
B
C
+
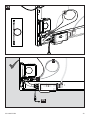
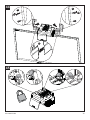
If you have a metal stud wall, drill the holes twice according to these instructions.
Jestliže máte kovové pĜíþky, vyvrtejte díry dvakrát dle tohoto návodu.
Hvis du har en væg med metalstolper, skal der bores huller, som er dobbelt så store som
angivet i disse instruktioner.
Wenn Sie eine Metallständerwand haben, bohren Sie die Löcher dieser Anleitung gemäß
doppelt.
Page is loading ...
Page is loading ...
Page is loading ...
Page is loading ...

20 99-00982-21 B0
I
nstallation Template
f
or UF55
/
UF55w Pro
j
ector
Sy
stem
Part o
f
the
S
MART Board™ 600i3 Interactive Whiteboard
S
ystem
S
MART Technologies
www.smarttech.com
/
support www.smarttech.com
/
contactsuppor
t
99
-
009
14-2
0
REV A
0
'&&(&!(.'
7"
(
17.8 cm
)
28"
(
71 cm
)
7" (17.8 cm) × 4
=
28"
(
71 cm
)
7"
(
17.8 cm
)
7"
(
17.8 cm
)
7"
(
17.8 cm
)
4" (10.2 cm)
2×
Installation Template for UF55/UF55w Projector System
Part of the SMART Board™ 600i3 Interactive Whiteboard System
SMART Technologies
www.smarttech.com/support www.smarttech.com/contactsupport
99-00914-20 REV A0
'&&(&!(.'
4" (10.2 cm)
7" (17.8 cm)
28" (71 cm)
7" (17.8 cm) × 4
= 28" (71 cm)
2" (5.1 cm)
7" (17.8 cm) 7" (17.8 cm) 7" (17.8 cm)
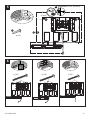
b (×10) z (×10)
10
B B
A A
a (×10) y (×10)

99-00982-21 B0 21
2×
Installation Template for UF55/UF55w Projector System
Part of the SMART Board™ 600i3 Interactive Whiteboard System
SMART Technologies
www.smarttech.com/support www.smarttech.com/contactsupport
99-00914-20 REV A0
'&&(&!(.'
4" (10.2 cm)
7" (17.8 cm)
28" (71 cm)
7" (17.8 cm) × 4
2" (5.1 cm)
7" (17.8 cm) 7" (17.8 cm) 7" (17.8 cm)
4×
13
11
12
B
A

22 99-00982-21 B0
14
A
B
C
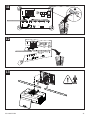
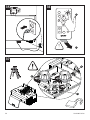
Fully insert the projector adjustment module into the wall mount bracket guide pins. You will
hear a click when the adjustment module is fully inserted and the spring is locked. Refer to
step 15 to safely secure the system using the three locking screws.
SeĜizovací modul projektoru zcela zasuĖte do vodicích kolíkĤ nástČnného držáku. Po
správném usazení seĜizovacího modulu a zajištČní pružiny uslyšíte cvaknutí. Postup
bezpeþného upevnČní systému pomocí tĜí pojistných šroubĤ najdete v kroku 15.
Indsæt projektorens justeringsmodul helt i vægmonteringsskinnens styrestifter. Der høres et
klik, når justeringsmodulet er gået helt på plads, og fjederen låser. Se trin 15 for at fastgøre
systemet sikkert ved hjælp af de tre låseskruer.
15
Page is loading ...

24 99-00982-21 B0
h (×3)
15
Insira totalmente o módulo de ajuste do projetor nos pinos de orientação do suporte de
montagem na parede. Você ouvirá um clique quando o módulo de ajuste estiver totalmente
inserido e a mola estiver travada. Consulte a etapa 15 para fixar o sistema com segurança
usando os três parafusos de aperto.
Introduza completamente o módulo de ajuste do projecto nos pinos guia do suporte de
montagem na parede. Irá ouvir um clique quando o módulo de ajuste estiver completamente
introduzido e a mola estiver bloqueada. Consulte o passo 15 para fixar seguramente o
sistema com os três parafusos de bloqueio.
ɉɨɥɧɨɫɬɶɸ ɜɫɬɚɜɶɬɟ ɪɟɝɭɥɢɪɨɜɨɱɧɵɣ ɦɨɞɭɥɶ ɩɪɨɟɤɬɨɪɚ ɜ ɧɚɩɪɚɜɥɹɸɳɢɟ ɲɬɵɪɢ
ɦɨɧɬɚɠɧɨɣ ɩɥɚɧɤɢ. Ʉɨɝɞɚ ɪɟɝɭɥɢɪɨɜɨɱɧɵɣ ɦɨɞɭɥɶ ɛɭɞɟɬ ɩɨɥɧɨɫɬɶɸ ɜɫɬɚɜɥɟɧ, ɚ
ɩɪɭɠɢɧɚ ɡɚɛɥɨɤɢɪɨɜɚɧɚ, ɜɵ ɭɫɥɵɲɢɬɟ ɳɟɥɱɨɤ. Ɉɛɪɚɳɚɣɬɟɫɶ ɤ ɩɭɧɤɬɭ 15, ɝɞɟ ɨɩɢɫɚɧɨ
ɧɚɞɟɠɧɨɟ ɤɪɟɩɥɟɧɢɟ ɫɢɫɬɟɦɵ ɫ ɩɨɦɨɳɶɸ ɬɪɟɯ ɛɥɨɤɢɪɭɸɳɢɯ ɜɢɧɬɨɜ.
För till fullo in projektorjusteringsmodulen i väggmonteringskonsolens styrpelare. Du kommer
att höra ett klick när justeringsmodulen till fullo är införd och fjädern är låst. Se steg 15 för att
säkert säkerställa systemet med hjälp av de tre låsskruvarna.
ᇚᡩᕅᴎ䇗ᭈഫᅠܼᦦܹຕᣖᓣᅝ㺙ᬃᶊᇐ䫔ݙDŽᔧᅠܼᦦܹࠄԡϨㇻ⠛䫕ᅮৢˈӮࠄ
੨ໄDŽ䇋খ䯙ℹ偸ҹՓ⫼ϝ乫䫕㋻㶎䩝ᅝܼഄᅮ㋏㒳DŽ
ᇛᡩᕅ″䂓ᭈพᅠܼᦦܹຕᓣᅝ㺱ᬃᶊᇢṓܻDŽ⭊ᅠܼᦦܹࠄԡϨᔜㇻ䥪ᅮᕠˈᙼ᳗㙑
ࠄ౧㙆DŽ䂟গ䮅ℹ倳 ҹՓ⫼ϝ业䥪㎞㶎㍆䞬ᅝܼഄᅮ㋏㍅DŽ
Fully insert the projector adjustment module into the wall mount bracket guide pins. You will
hear a click when the adjustment module is fully inserted and the spring is locked. Refer to
step 15 to safely secure the system using the three locking screws.
Page is loading ...

Page is loading ...
Page is loading ...
Page is loading ...
Page is loading ...
Page is loading ...
Page is loading ...

99-00982-21 B0 33
C
VG
A
O
u
t
VG
A
1
VGA 2
C
ontrol
Audio
O
u
t
A
ud
i
o
I
n
Audio In
Composite Video
S
-Video
H
DMI
ECP
D
C
5
V 1A
DC 5V 2A
100V - 240V
50 Hz - 60 Hz
B
A
B
A B C
31
Page is loading ...
Page is loading ...

36 99-00982-21 B0
2
2
2
2
Input
Menu
Display
Mute
Hide
Mode
Vol
37
A
B
C
35 36
A
B
Page is loading ...
Page is loading ...
Page is loading ...
Page is loading ...

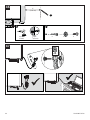
99-00982-21 B0 41
A B C
D E F
A
B
C
D
E
F
+
+
+
+
=
10 mm
41
Page is loading ...
Page is loading ...
Page is loading ...
Page is loading ...
Page is loading ...


www.smarttech.com/support www.smarttech.com/contactsupport
Hardware environmental compliance
SMART Technologies supports global efforts to ensure that electronic equipment is manufactured, sold and disposed of in a safe
and environmentally friendly manner.
Waste Electrical and Electronic Equipment Regulations (WEEE directive)
Waste Electrical and Electronic Equipment regulations apply to all electrical and electronic equipment sold within the
European Union. When you dispose of any electrical or electronic equipment, including SMART Technologies products,
we strongly encourage you to properly recycle the electronic product when it has reached end of its life. If you require
further information, please contact your reseller or SMART Technologies for infor mation on which recycling agency to
contact.
Restriction of Certain Hazardous Substances (RoHS directive)
This product meets the requirements of the European Union’s Restriction of Certain Hazardous Substances (RoHS) Directive
2002/95/EC. Consequently, this product also complies with other regulations that have arisen in various geographical areas, and
that reference the European Union’s RoHS directive.
Batteries
Batteries are regulated in many countries. Check with your reseller to fi nd out how to recycle used batteries.
Packaging
Many countries have regulations restricting the use of certain heavy metals in product packaging. The packaging used by SMART
Technologies to ship products complies with packaging laws.
China’s Electronic Information Products Regulations
China regulates products that are classifi ed as Electronic Information Products (EIP). SMART Technologies products fall under this
classifi cation and meet the requirements for China’s EIP regulations.
U.S. Consumer Product Safety Improvement Act
The United States has enacted the Consumer Product Safety Improvement Act which limits the lead (Pb) content in products used
by children. SMART Technologies is committed to complying with this initiative.
99-00982-21 B0
©2010–2011 SMART Technologies ULC. All rights reserved. SMART Board, SMART GoWire, smarttech, the SMART logo and all SMART taglines
are trademarks or registered trademarks of SMART Technologies ULC in the U.S. and/or other countries. All third-party product and company
names may be trademarks of their respective owners. US5448263; US6141000; US6320597; US6326954; US6337681; US6540366; US6741267;
US6747636; US7151533; US7289113; US7499033; US7626577; US7687736; US7757001; CA2058219; CA2252302; Other patents pending.
03/2011.
*99-00982-21-B0*
-
 1
1
-
 2
2
-
 3
3
-
 4
4
-
 5
5
-
 6
6
-
 7
7
-
 8
8
-
 9
9
-
 10
10
-
 11
11
-
 12
12
-
 13
13
-
 14
14
-
 15
15
-
 16
16
-
 17
17
-
 18
18
-
 19
19
-
 20
20
-
 21
21
-
 22
22
-
 23
23
-
 24
24
-
 25
25
-
 26
26
-
 27
27
-
 28
28
-
 29
29
-
 30
30
-
 31
31
-
 32
32
-
 33
33
-
 34
34
-
 35
35
-
 36
36
-
 37
37
-
 38
38
-
 39
39
-
 40
40
-
 41
41
-
 42
42
-
 43
43
-
 44
44
-
 45
45
-
 46
46
-
 47
47
-
 48
48


SMART Technologies UX60 (ix systems) Installation guide
- Type
- Installation guide
Ask a question and I''ll find the answer in the document
Finding information in a document is now easier with AI
in other languages
Related papers
-
SMART Technologies UX60 (ix systems) Installation guide
-
-
-
-
Smart SMART Board 885-SMP User manual
-
-
-
-
-


