The Time Ranger™ can be used as a "turn on and go" metal
detector (see page 4 ). However, you'll find a lot more if you read
the manual to acquaint yourself with the many performance-
enhancing features which the Time Ranger™ offers.
◆ Waterproof searchcoil
◆ Touchpad control panel
◆ Microprocessor-controlled
◆ LCD screen with Target-ID readout
◆ Readout of ground mineral conditions
◆ Numeric readout of target conductivity
◆ SMARTTRAC™ computerized Ground Balancing
◆ Programmable target type acceptance or rejection
◆ All Metal Pinpoint Mode for pinpointing target position
◆
Self-Tuning All Metal Mode for maximum depth in mineralized ground
◆
Search for coins, lost jewelry, relics, gold nuggets, and other valuable metals
TimeRanger
™
Metal Detector
Owner’s Manual
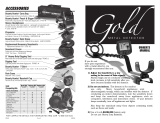
The new improved Time Ranger™ is a top-of-the-line professional
metal detector with the kind of depth performance and sophisticated
features demanded by the serious metal detector enthusiast. A
large LCD screen displays the current operating status at all times,
and displays probable target type and depth when metal is detected.
All features are either named on the touchpads or displayed on the
screen, making it easy for you to program it the way you want.

CONTENTS
Quick Start (if you're really impatient) . . . . . . . . . . . . . . . . . . . . .4
THE BASICS OF METAL DETECTING
Types of metal detecting
Coinshooting" . . . . . . . . . . . . . . . . . . . . . . . . . . . . . . . . . . .5
Relic Hunting . . . . . . . . . . . . . . . . . . . . . . . . . . . . . . . . . . .5
Gold Prospecting . . . . . . . . . . . . . . . . . . . . . . . . . . . . . . . . .5
Cache Hunting . . . . . . . . . . . . . . . . . . . . . . . . . . . . . . . . . .5
Shallow Water Hunting . . . . . . . . . . . . . . . . . . . . . . . . . . . .6
How metal detectors work . . . . . . . . . . . . . . . . . . . . . . . . . .6
Capabilities and limitations
Depth . . . . . . . . . . . . . . . . . . . . . . . . . . . . . . . . . . . . . . . . .7
Target Identification . . . . . . . . . . . . . . . . . . . . . . . . . . . . . .7
Requirement for Motion . . . . . . . . . . . . . . . . . . . . . . . . . . . .8
Ground Balancing . . . . . . . . . . . . . . . . . . . . . . . . . . . . . . . .8
Discrimination . . . . . . . . . . . . . . . . . . . . . . . . . . . . . . . . . . .8
Depth Reading . . . . . . . . . . . . . . . . . . . . . . . . . . . . . . . . . . .8
Air Testing . . . . . . . . . . . . . . . . . . . . . . . . . . . . . . . . . . . . . .9
Getting Started
Assembly
. . . . . . . . . . . . . . . . . . . . . . . . . . . . . . . . . . . . . . . .10
Batteries . . . . . . . . . . . . . . . . . . . . . . . . . . . . . . . . . . . . . . . .11
Headphones . . . . . . . . . . . . . . . . . . . . . . . . . . . . . . . . . . . . . .12
THE CONTROL PANEL
Zones . . . . . . . . . . . . . . . . . . . . . . . . . . . . . . . . . . . . . . . . . .12
Touchpad Buttons . . . . . . . . . . . . . . . . . . . . . . . . . . . . . . . . .13
Numeric Target-ID Readout . . . . . . . . . . . . . . . . . . . . .14
Probable Target-ID Fields . . . . . . . . . . . . . . . . . . . . . . . . .14-15
OPERATION OF THE METAL DETECTOR
Introduction: Selecting Operating Modes . . . . . . . . . . . . . .16
Discrimination with Visual Target-ID . . . . . . . . . . . . . . . . . .16
All Meal “Pinpoint” . . . . . . . . . . . . . . . . . . . . . . . . . . . . . . . .16
Self-Tuning Mode . . . . . . . . . . . . . . . . . . . . . . . . . . . . . . . . .16

DISCRIMINATION AND TARGET-ID MODES
Preset Program #1 (Low Discrimination) . . . . . . . . . . . . . . . .17
Preset Program #2 (Medium Discrimination) . . . . . . . . . . . . .17
Preset Program #3 (High Discrimination) . . . . . . . . . . . . . . . .17
Discrimination/Target Mode (Fully Programmable) . . . . . . . .17
Blanker ("Zap") . . . . . . . . . . . . . . . . . . . . . . . . . . . . . . . . . . .18
To use the Sniff Feature . . . . . . . . . . . . . . . . . . . . . . . . . . . . .19
ALL METAL MODES
All Metal Pinpoint Mode . . . . . . . . . . . . . . . . . . . . . . . . . . . . .20
SmartTrac™ (Ground Balancing) . . . . . . . . . . . . . . . . . . . . . .20
Preset Program #4 (Self-Tuning All Metal Mode) . . . . . . . . . . .21
SEARCH TECHNIQUE
How to Sweep the Searchcoil . . . . . . . . . . . . . . . . . . . . . . . . .22
How to Pinpoint Targets . . . . . . . . . . . . . . . . . . . . . . . . . . . . .23
Pinpointing a Target in the Self-Tuning Mode . . . . . . . . . . . . .23
Retrieving targets (Some tips) . . . . . . . . . . . . . . . . . . . . . . . . .24
False Signals and Chatter; Using the Sensitivity Control . . . . .25
Estimating Target Size, Depth and Shape . . . . . . . . . . . . . . . .26
Tips on Ground Balancing . . . . . . . . . . . . . . . . . . . . . . . . . . .27
TYPES OF METAL DETECTING: DESCRIPTIONS AND TIPS
Coinshooting . . . . . . . . . . . . . . . . . . . . . . . . . . . . . . . . . . . . . .29
Relic Hunting . . . . . . . . . . . . . . . . . . . . . . . . . . . . . . . . . . . . .30
Gold Prospecting . . . . . . . . . . . . . . . . . . . . . . . . . . . . . . . . . . .31
Cache Hunting . . . . . . . . . . . . . . . . . . . . . . . . . . . . . . . . . . . .33
Shallow Water Hunting . . . . . . . . . . . . . . . . . . . . . . . . . . . . . .34
TROUBLESHOOTING . . . . . . . . . . . . . . . . . . . . . . . . . . . . . . . . . . .35
LEARNING MORE . . . . . . . . . . . . . . . . . . . . . . . . . . . . . . . . . . . . .36
SPECIFICATIONS . . . . . . . . . . . . . . . . . . . . . . . . . . . . . . . . . . . . .37
TREASURE HUNTER'S CODE OF ETHICS . . . . . . . . . . . . . . . . . .39
FIRST TEXAS PRODUCTS WARRANTY . . . . . . . . . . . . . . . . . . . . .39
ACCESSORIES . . . . . . . . . . . . . . . . . . . . . . . . . . . . . . . . .Back Cover

If you want to get started quickly, do the following.
1. Assemble the detector (see instructions on page 10).
2. Install two alkaline 9-volt batteries (see instructions on page 11).
3. Press the Power ON/OFF button. The machine should turn on,
giving several beeps and turning on the LCD screen.
4. When first turned on, the Time Ranger™ starts out in preset
Program #1. This is a "Motion Discrimination & Target-ID Mode"
with iron and foil rejected. This means that the searchcoil has to
be in motion over a metal object to detect it, and that the
machine will ignore objects which it has decided are probably
iron or foil. Sensitivity starts out at medium, which is the most a
beginner should use.
5. If the searchcoil is not in motion and not close to metal, the
detector should be silent. If you experience false signals from
electrical interference, from the soil itself, or from lots of trash
metal, press the Sensitivity minus button to reduce sensitivity.
This will usually make the unwanted signals go away.
6. Toss a coin on the ground and sweep back and forth over it a few
times to get a feel for how the machine responds.
7. You are now ready to search for nonferrous metals such as coins,
to a depth of 6-8 inches under most conditions.
8. The All Metal Pinpoint Mode makes recovering a target much
easier (See page 23 for details). Learn to use it at first without
SmartTrac™ Ground Balancing.
QUICK START (if you're really impatient)
4

5
THE BASICS OF METAL DETECTING
TYPES OF METAL DETECTING
The Time Ranger™ is suitable for all five of the main types of
metal detecting:
1. Coinshooting-- searching for coins, usually in places like parks
and people's yards. Usually there is a lot of aluminum trash like
pulltabs and bottle caps, so ability to distinguish between metal
trash and coins is important. Since coinshooting is usually done
in places where you're not permitted to dig holes with a shovel,
extreme depth capability is not essential. Some towns have
ordinances prohibiting metal detectors in parks, so if you have
any doubt, check first.
2. Relic Hunting-- searching for historical artifacts, including coins,
mostly in places like fields and vacant lots where digging holes is
okay. The most common unwanted metal is iron (nails, fence wire,
parts of wheeled vehicles, etc.) but you may actually be searching
for iron objects. For relic hunting, the important features are
excellent depth capability and the ability to ignore iron metals
(Discrimination). Before you go relic hunting, obtain permission
from the property owner. Some public lands are protected by law
from relic hunting, so if you intend to hunt on public land, check
first with the administrator to make sure it's not illegal.
3. Gold Prospecting-- searching for gold nuggets. Because most
nuggets are tiny, high sensitivity is needed. And because gold is
usually associated with iron minerals in the soil, an accurate
Ground Balancing system is also needed. Ability to identify
targets or to ignore iron is relatively unimportant. It's best to use
a small accessory searchcoil. If you're going gold prospecting,
search in areas where gold is known to be present -- it's very rare
nowadays to discover a new gold location. Learn to recognize
posted claims and don't search on them without first getting
permission. Prospecting clubs often have their own claims which
are open to members.
4. Cache Hunting-- searching for a specific buried cache, typically a
jar or strongbox containing money or gold or silver bullion. This
requires a ground balanced All Metal Mode. It's best to use an
oversize accessory searchcoil. Always make sure the issue of
ownership is resolved before you dig a cache.

5. Shallow Water Hunting-- All First Texas Products searchcoils
are waterproof, allowing you to search in shallow water. However,
if you're searching around water, please be careful not to get the
electronics housing wet. Because water is electrically conductive,
mimicking the effects of metal, searching in the wet zone of
beaches usually requires sensitivity to be reduced. If it's salt
water, Discrimination is usually necessary to avoid false signals.
Avoid salt spray, as it will work its way into the control housing
and damage the electronics-- such damage is not covered under
warranty.
HOW METAL DETECTORS WORK
Most metal detectors for finding buried objects are of the "VLF
Induction Balance" type. Here's how they work.
The searchcoil (also called "search head" or "loop") on the end of the
rod ("stem") contains two electrical induction coils which are like
antennas. The larger (outer) coil transmits a rapidly alternating
magnetic field, "illuminating" the region surrounding the searchcoil.
If metal is present, its electrical conductivity distorts the magnetic
field. If iron metal is present, its magnetism also distorts the
magnetic field, but in a different way, allowing the metal detector to
distinguish between ferrous and nonferrous metals.
The smaller (inner) coil is a receiving antenna which detects changes
in the magnetic field caused by the presence of metal. The electronic
circuit amplifies this weak signal, analyzes it to determine what kind
of change is occurring as the searchcoil is swept past the metal
object, and then conveys the information to the user in the form of
an audio tone and (usually) a visual display of some type.
The iron minerals which are present in most soils also distort the
magnetic field, often obscuring the weaker signals from small or
deeper objects. This can cause the object to go undetected, or to be
misidentified if it is detected. Much of the technology that goes into
modern metal detectors is devoted to the task of eliminating the
unwanted signals from iron minerals in the soil, while not losing the
signals from metals. The technology in the new improved
Time
Ranger™ embodies the knowledge and experience of two of the best
known engineers in the metal detection industry.
6

CAPABILITIES AND LIMITATIONS
DEPTH
The Time Ranger™ can detect U.S. coins to a depth of about 9-11
inches under good conditions. Large objects (55 gallon drums,
manhole covers, etc.) can be detected to a depth of several feet.
Electrical interference from power lines and from electrical
appliances and electronic equipment can reduce detection depth, or
cause audible interference making it necessary for the user to
reduce the sensitivity setting. Soils with large amounts of iron or
salt minerals, may also reduce detection depth or necessitate a
reduction in the sensitivity setting.
TARGET IDENTIFICATION
The Time Ranger™ identifies the probable type of metal object
("target") by measuring its “effective electrical conductivity”, which is
displayed as a number from 1 to 299 on the LCD screen. The
"effective electrical conductivity" of an object depends on its metallic
composition, size, shape, and orientation relative to the searchcoil.
Since coins are minted to tightly controlled specifications, they can
be identified with good accuracy. Identification of pulltabs and foil
is less consistent because these kinds of targets come in wide
variety. In general, smaller objects, and objects made from lower
conductivity alloys such as iron, bronze, brass, lead, pewter, zinc,
etc. will read lower on the effective conductivity scale. Larger
objects and objects made from higher conductivity alloys such as
silver, copper, and aluminum, will tend to read higher. The notable
exceptions are gold, which usually reads low because it's rarely
found in large pieces; and zinc pennies, which read moderately high
because of their size and shape. Although nails and other iron and
steel objects will usually read as iron ring-shaped pieces of iron (for
instance steel washers and harness rings) will usually give medium
to high readings. Flat pieces of iron or steel, such as can lids, will
occasionally do the same.
Most targets can be identified correctly in air out to about 7-10
inches. The minerals in many soils will cause identification to be
less accurate. However in most soils effective Target Identification
can be had to a depth of at least 4 to 6 inches.
7

REQUIREMENT FOR MOTION
Like other modern metal detectors, the Time Ranger™ searchcoil
must be kept in motion in order to both detect and identify targets.
The All Metal Pinpoint Mode continues to detect metal if searchcoil
motion stops over the target. This mode is used primarily to
pinpoint the exact location of a target so that it can be retrieved with
a minimum of digging, and does not provide Target Identification.
The
Time Ranger™ also features a Self-Tuning All Metal Mode in
Program #4. Under most conditions, this is the deepest and most
sensitive mode. It is used primarily for gold prospecting and for
relic hunting in areas where there isn't a lot of metal trash, and
does not provide Target Identification.
GROUND BALANCING
To achieve maximum depth in both the All Metal Pinpoint and Self-
Tuning All Metal Modes, the Time Ranger™ offers SmartTrac™
computerized Ground Balancing to cancel the effects of iron
minerals in the ground. This does not affect the other
(Discrimination/Target-ID) modes. The All Metal Pinpoint Mode can
be used for pinpointing objects at moderate depth in most soils
without prior Ground Balancing.
DISCRIMINATION
"Discrimination" refers to a metal detector's ability to ignore metal
objects in selected categories, especially iron and aluminum. This
makes searching an area where there's a lot of metal trash much
more pleasant. The
Time Ranger™ offers a wide variety of
discrimination features which you can select according to conditions
and your personal preference.
DEPTH READING
The estimated "Depth reading" is based on the strength of the
signal. It is calibrated for typical coin-size objects. Small objects
will read deeper than they actually are, and large objects will read
shallower than they actually are.
8

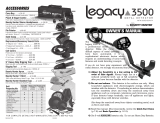
AIR TESTING
There may be times when you want to test or demonstrate the metal
detector without sweeping it over the ground, for instance if it's not
fully assembled, or if you're indoors. Place the searchcoil in a spot
where it's stable and more than two feet away from any large
masses of metal, including the reinforcing steel which is usually
present in concrete. If you're wearing a wristwatch or jewelry on
your hand or arm, remove it. Then, test or demonstrate by waving
metal objects ("targets") briskly several inches in front of the
searchcoil.
The SmartTrac™ Ground Balancing system cannot be tested or
demonstrated in air unless you happen to have appropriate
specimens of iron minerals or electronic ferrite available.
Position of detector and object when air testing the Time Ranger™
9

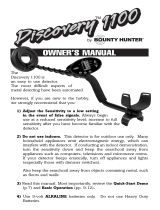
Getting Started
Assembly
Assembling your Time Ranger™ is
easy and does not require any tools.
Using the following diagram as your
guide, just follow these easy steps.
▲To assemble the
Time Ranger™
1. Using the supplied bolt and
knurled knob, attach the searchcoil
to the lower stem. Twist stem
locking nut counter clockwise.
2. Press the button on the upper end
of the lower stem and slide the
lower stem into the upper stem.
Adjust the stem to a length that
lets you maintain a comfortable
upright posture, with your arm
relaxed at your side. Tighten the
stem locking nut.
3. Wind the searchcoil cable around
the stem. Leave enough slack in
the cable to let you adjust the coil
when you are hunting on uneven
ground. Then tighten the knob at
the end of the searchcoil.
TIP:
To adjust the coil, simply loosen
the knob.
4. Insert the coil’s plug into the
matching connector on the con-
trol housing. Be sure the holes
and pins line up correctly.
CAUTION:
• Do not force the plug in.
Excess force will cause
damage.
• To disconnect the cable,
pull on the plug. Do not
pull on the cable.
10
Searchcoil
Searchcoil
Cable
Upper
Stem
Control
Housing
Plug
Lower
Stem
Lower
Stem
Upper
Stem
Connector
on back of
control housing
Bolt
Knurled
Knob
Bottom view
Bottom side
Stem
locking
nut

11
Batteries
IMPORTANT: Always use ALKALINE batteries only.
Do not use so-called heavy duty batteries.
Always remove the batteries for prolonged storage.
DO NOT MIX OLD AND NEW BATTERIES
CHECK THE BATTERIES if your detector
exhibits any of the following symptoms:
1. The unit does not turn on.
2. Low speaker volume.
3. Unit beeps continuously or erratically.
The LCD screen shows battery
condition on the lower left.
If the dial indicates "
R", replace the batteries. If the dial
indicates "L", the batteries are low and may go dead quickly, so you
may want to replace them. When you replace batteries, replace both
at the same time.
TIP: Battery life is typically about 20 hours, or a little longer if
you use headphones.
▲Follow these steps to install the batteries.
1. Carefully remove the battery compartment door by pressing the
release clip on the right side of the door.
2. Snap one battery onto each of the terminals and place the batter-
ies inside the compartment. Insert both of the batteries with
terminals facing outward.
3, Replace the compartment door by carefully inserting opposite
side of clip first. Then press down on clip side until battery door
snaps into place.
Release
Clip
Alkaline Batteries
Release Clip of
Battery Door

THE CONTROL PANEL
The control panel on the front of the control housing consists
of the following zones:
• along the top, Probable Target-ID Fields which are used to
interpret the target signal data displayed on the LCD screen.
• in the middle, an LCD screen which displays operating status
and signal analysis data
• along the bottom and sides, touchpad "buttons" for controlling
operation of the detector
HEADPHONES
The Time Ranger™ is equipped with a standard 1/4 inch
headphone jack for use with any stereo headphone that has a 1/4
inch plug. Use headphones with built-in volume controls, because
without volume controls the sound may be too loud for you.
Using headphones improves battery life, and prevents the sounds
from annoying bystanders. It also allows you to hear more clearly
subtle changes in the sound when
in the All Metal Modes,
particularly if you're searching in
a noisy location.
Don't use headphones when
working in an area where it's
necessary to be able to hear for
reasons of safety, for instance
around vehicle traffic, or where
there may be rattlesnakes.
This device is to be used with
interconnecting cables/headphone
cables shorter than three meters.
12

13
Detector Touch Pads
POWER ON/OFF is used to turn the detector on.
ALL METAL / SMARTTRAC™ is used to select the All
Metal Pinpoint Mode of operation, to retune (reset) the
All Metal Pinpoint Mode if it has drifted; and, if it is held
down for more than two seconds, to perform the
SmartTrac™ computerized Ground Balancing maneuver.
SNIFF is used to enable the SNIFF Mode of operation.
BLANKER is used to enable the unit’s BLANKER
feature.
DISC TARGET
This button selects the programmable-
Target Discrimination Mode. When already in that mode,
if you tap the button, it activates the Accept and Reject
buttons to allow targets to be programmed to be either
accepted or rejected. When you’re done programming
targets, tap the DISC/TARGET button again to drop back
into Discrimination Mode ready to resume searching.
PROGRAM SELECT is used to select one of four predefined
search programs. The first three are Discrimination
programs and the fourth is Self-Tuning all metal mode.
ACCEPT and REJECT are used for Target Programming
in the Discrimination Mode.
Touchpad Buttons
The detector control panel includes several touch pads as shown
and described in the following table. These touch pads are used to
set detector operation.
SNIFF
ALL METAL
SMART
TRAC
PROGRAM
SELECT
DISC
TARGET
POWER
ON/OFF
BLANKER
POWER
ON/OFF
ALL METAL
SMART
TRAC
BLANKER
DISC
TARGET
PROGRAM
SELECT
SNIFF
HIGH (+) and LOW (-) are used to increase or decrease
the detector's sensitivity.

14
Numeric Target-ID Readout
This table shows the numbers typically associated with certain
commonly encountered nonferrous metal targets. Older silver US
coins usually read about the same as their modern clad equivalents.
Modern quarter-sized dollar coins like the Susan B. Anthony and the
Sacajawea read about the same as a quarter. Most Canadian coins
which are somewhat similar in appearance to U.S. coinage are minted
from a magnetic alloy which gives very inconsistent readings and may
register as iron. Most one-ounce silver bullion rounds will read in the
same range as the modern U.S. $1 Eagle bullion coin.
foil from gum wrapper 1 - 12
U.S. nickel 5¢ coin 20 - 33
aluminum pulltab 29 - 50
aluminum screwcap 55 - 75
zinc penny (post-1982) 68 - 78
aluminum soda pop can 70 - 105
copper penny, clad dime 90 - 100
quarter 25¢ coin, clad 110 - 122
50¢ coin, modern clad 124 - 132
old silver dollar coin 130 - 140
US silver Eagle $1 coin 130 - 165
Probable Target-ID Fields
The Probable Target-ID fields above the top of the LCD screen
represent the signal ranges produced by various coin and metal object
types. When a metal target is detected, the microprocessor analyzes
the signal and categorizes it based on what kinds of metal objects
usually produce that kind of signal. The microprocessor then lights
up an arrow along the top of the LCD screen which points to the
probable Target-ID field which corresponds to that signal category.
For instance, if the detected signal fits within the parameters
usually exhibited by zinc pennies and the electrically similar
aluminum screwcaps, the microprocessor may categorize the signal
as "zinc penny - aluminum screwcap". The LCD screen will then
point an arrow to the (Z-1¢ S-CAP) field above the LCD screen.
Above the specific Target-ID fields, there are two general fields, Gold
Range on the left and Silver Range on the right. Most silver jewelry
is larger and of higher conductivity alloy than most gold jewelry, so
silver jewelry will tend to fall to the right and gold to the left.
Since different metal objects can produce similar signals, and since
minerals in the soil can distort the signals, the probable Target-ID's
are just that-- probable. There is no way of knowing for sure what's
down there other than to dig the target up and see. Experienced
metal detector users have a rule of thumb-- "when in doubt, dig".

15
PROBABLE TARGET-ID Fields
Probable Target
ID
GOLD RANGE
SILVER RANGE
IRON / FOIL
Indicates that the target is probably iron or foil. Time Ranger™
has four levels of progressive iron Discrimination—from small
to large. Some rusted oxidized iron may occasionally register in
the
SILVER RANGE.
5¢
Located on the top portion of the control panel. The GOLD
RANGE
is located on the left and the SILVER RANGE is on
the right. Other metal types can appear in this range: for
example, iron, foil and nickel appear under
GOLD RANGE
and copper pennies appear under SILVER RANGE.
Description
Indicates that the target is possibly a nickel. Many gold rings
register as
5¢. A percentage of foil and many newer pull-tabs
are still detected as nickels.
Indicates that the object is probably a pull-tab. Some small
gold may also register as a pull tab.
Indicates that the target is probably a zinc penny (post 1982) or
a screw cap. This Target-ID is usually accompanied by a
medium tone. Other targets, such as large gold, may also
register in this field.
Indicates that the target is out of identification range.
These four fields indicate a coin type or an object or metal
within similar detection range. Many other objects are
identified in this range: for example, copper, brass and
oxidized metals such as cans, jewelry, tokens, medals, or
even junk metal objects that fall in the same range.
Copper pennies (pre-1982) will usually register in the
1¢/10¢ range.
PULL TAB
Z-1¢
S-CAP
DEEP TARGET
1¢
10¢
25¢
50¢
$1
Target Detection Dial
The Target Detection Dial is in the lower right-hand corner of the
LCD screen. When the machine detects a target, an arrow will
point to “+” if the target is accepted, and will point to “-” if the
target is rejected.

16
Introduction: Selecting Operating Modes
The Time Ranger™ offers three basic types of operation:
1.
Discrimination with Visual Target-ID Identification. This type
of operation requires the searchcoil to be in motion over the
target for the target to be detected. The Time Ranger™ offers an
array of Discrimination Modes: three preprogrammed modes
accessed by the PROGRAM SELECT button, a fully programmable
mode accessed by the DISC/TARGET button, and a target-
activated mode accessed by the SNIFF button.
2.
All Metal "Pinpoint". This mode is used primarily for locating
precisely where the object is so that it can be dug with minimum
effort. This mode does not provide Target-ID, and does not
require the searchcoil to remain in motion.
3.
Self-Tuning Mode. This is a high-sensitivity mode which detects
all metals, does not provide Target-ID, and does require the
searchcoil to remain in motion to detect a target.
When the machine is first turned on, it goes to Preset Program #1.
To access another mode, tap the corresponding button. If the other
mode you want is a different Preset Program, tap the PROGRAM SELECT
button until you've stepped to the one you want, as indicated on the
display screen.
If you are in a mode other than one of the Preset Programs, and tap
the PROGRAM SELECT button to get back to the Preset Program
selection, it will return to the Preset Program you were previously in.
OPERATION OF THE METAL DETECTOR

17
Preset Program #1 (Low Discrimination)
When the machine is first turned on, it goes to Program #1. This is a
Motion Discrimination & Target-ID Mode which rejects iron and foil,
as indicated by the
R's under those categories on the display screen.
Preset Program #2 (Medium Discrimination)
If you're in Program #1 and tap the PROGRAM SELECT button, it'll
step you to Program #2. This program is like Program #1, but it also
rejects pulltabs. Nickels are still accepted.
Preset Program #3 (High Discrimination)
If you're in Program #2 and tap the PROGRAM SELECT button, it'll
step you to Program #3. This is a Motion Discrimination & Target-ID
Mode like Program #2, but it also rejects targets in the zinc penny/
screwcap category, as indicated by the R's under the corresponding
categories. Nickels are still accepted.
If you're in Program #3 and tap the PROGRAM SELECT button
again, it'll step you to Program #4, which is entirely different.
Discrimination/Target Mode
(Fully Programmable)
The Discrimination/Target Mode gives the user the ability to accept
or reject any target category, including 4 levels of iron. Its
Discrimination (DISC) Mode is accessed by tapping the
DISC/TARGET button. When the machine is first turned on, it
detects ("accepts") all target categories. This makes it handy to use
for ID'ing targets which have been detected in the Self-Tuning All
Metal Mode (preset Program #4).
When you're already in DISCrimination Mode, if you tap the button
again, it switches to TARGET programming Mode. In this mode, the
ACCEPT and REJECT buttons are activated, and the machine does
not detect targets because it's waiting for you to enter ACCEPT or
REJECT target category selections. If at any time you are finished
making ACCEPT or REJECT selections, just tap the button again,
and it'll drop back into normal DISC operation.
TARGET PROGRAMMING MODE: In this mode, the machine is
waiting for you to select which target categories you want to accept
(see and hear), or reject (ignore). The machine flashes a blinking
DISCRIMINATION & TARGET ID MODES

18
arrow in the category it's waiting for you to decide. If you want to
accept that category, press ACCEPT and the machine will step to the
next category. It will also erase an R if there had previously been
one. If you want to reject that category, press REJECT and the
machine will place an R under that category to remind you that that
category is now rejected, and the arrow will step to the next
category. When you have the target categories selected the way you
want, just tap the DISC/TARGET button, and it'll drop out of
TARGET programming mode back into DISCrimination Mode.
The iron category is a special case. Iron is broken down into four
iron levels, which are indicated below the word TARGET on the
display screen.
Ir1 is small or deep iron objects. Ir2 is small to
medium iron objects, or iron objects which are relatively deep. Ir3
is medium size or depth iron objects. Ir4 is large shallow iron
objects. For certain types of relic hunting you may want to select
some iron categories and reject others; however in general you will
probably want to reject all four categories.
To erase all
R’s, hold the DISC/TARGET button down for 3 seconds.
▲Blanker ("Zap")
"Blanker" is not an operating mode, but a feature. It is different
from "blankers" found on some other metal detectors, and is similar
to the "zap" feature found on a few other models. The purpose of
the blanker is to automatically reject targets in the category of a
known metal object which was just detected. Here's how it's used.
If you're in programmable the Discrimination Mode, and you detect
an object in a category you don't wish to find, just tap the
BLANKER button. An R will be added under that category and
other objects in that same category will be rejected.
Note: Objects in classifications 1/10¢ and higher cannot be
blanked. To reject targets in those categories, you have to
use either SNIFF or the DISC/TARGET Mode.

19
▲To use the SNIFF Feature
The SNIFF feature allows you instantly reprogram the
DISC/TARGET Mode to detect only targets of a type which the
detector has just “seen”. Here’s how to use it.
1. If you’re not already in DISC/TARGET Mode, tap the
DISC/TARGET button.
2. Sweep the searchcoil over a target of the type you wish to detect,
excluding all other targets. Note the numerical target readout.
3. Tap the SNIFF button. the word SNIFF will appear on the screen. if
there were any R’s on the screen, they will disappear.
4. The machine will now reject (ignore) all targets, except those which
register within +/- 15 counts of the numerical value of the target which
was “sniffed”.

20
All Metal Modes
All Metal Pinpoint Mode When the ALL METAL-SMARTTRAC™
button is pushed, the detector switches to the All Metal Pinpoint
Mode. This mode detects all metals and unlike the other modes,
does not require to the searchcoil to remain in motion to detect a
target. However, because this mode tends to drift, you may
frequently have to tap the button again in order to retune (reset) the
signals to zero in order to restore sensitivity. For instructions on
how to pinpoint targets, see page 23.
SmartTrac™ (Ground Balancing)
Computer-assisted ground balancing increases the usable depth of
the All Metal Pinpoint Mode and the Self-Tuning All Metal Mode
(Program #4). It does this by cancelling interfering signals from iron
minerals in the ground.
This is a feature for the advanced user.
PROCEDURE FOR GROUND BALANCING
1. With the searchcoil more than half a foot above the ground, press
and hold the ALL METAL/SMARTTRACK™ button.
2. Immediately lower the searchcoil to within about half an inch of
the ground.
3. When you hear a wobbly tone (in about 2 seconds), release the
button.
▲The meaning of the beeps.
1. WARNING BEEP After you’ve been holding the button down for 1
second, there’s a beep to remind you not to hold the button
down unless you are intending to ground balance. When the
computer attempts to ground balance, your existing ground
balance setting (if any) will be lost.
2. WOBBLY TONE After you’ve been holding the button down for 2
seconds, there's a wobbly tone which tells you the computer is
ready to ground balance. When you release the button, the
computer will attempt to ground balance.
Page is loading ...
Page is loading ...
Page is loading ...
Page is loading ...
Page is loading ...
Page is loading ...
Page is loading ...
Page is loading ...
Page is loading ...
Page is loading ...
Page is loading ...
Page is loading ...
Page is loading ...
Page is loading ...
Page is loading ...
Page is loading ...
Page is loading ...
Page is loading ...
Page is loading ...
Page is loading ...
/