Bosch GAS RANGE COOKER User guide

Category
Ovens
Type
User guide
3FHJTUFS
ZPVS
OFXEFWJDFPO
.Z#PTDIOPXBOE
HFUGSFFCFOFGJUT
CPTDIIPNFDPN
XFMDPNF
en Instruction manual
Free standing cooker
HSB838357A
en
3
Table of contents
enI nst r uct i on manual
8 Intended use . . . . . . . . . . . . . . . . . . . . . . . . . . . . . 4
( Important safety information . . . . . . . . . . . . . . . 4
General information . . . . . . . . . . . . . . . . . . . . . . . . . . . 5
Cleaning function . . . . . . . . . . . . . . . . . . . . . . . . . . . . . 7
] Causes of damage . . . . . . . . . . . . . . . . . . . . . . . . 7
Hob . . . . . . . . . . . . . . . . . . . . . . . . . . . . . . . . . . . . . . 7
Oven . . . . . . . . . . . . . . . . . . . . . . . . . . . . . . . . . . . . . . 7
7 Environmental protection . . . . . . . . . . . . . . . . . . 8
Saving energy with your oven . . . . . . . . . . . . . . . . . . . 8
Saving energy with the hob . . . . . . . . . . . . . . . . . . . . . 8
Environmentally-friendly disposal . . . . . . . . . . . . . . . . . 8
* Getting to know your appliance . . . . . . . . . . . . . 9
The control panel . . . . . . . . . . . . . . . . . . . . . . . . . . . . . 9
Control panel . . . . . . . . . . . . . . . . . . . . . . . . . . . . . . . . 9
Buttons and display . . . . . . . . . . . . . . . . . . . . . . . . . . 10
The hob . . . . . . . . . . . . . . . . . . . . . . . . . . . . . . . . . . . 10
The oven . . . . . . . . . . . . . . . . . . . . . . . . . . . . . . . . . . 11
The storage drawer . . . . . . . . . . . . . . . . . . . . . . . . . . 11
Cooling fan. . . . . . . . . . . . . . . . . . . . . . . . . . . . . . . . . 11
_ Accessories . . . . . . . . . . . . . . . . . . . . . . . . . . . . 12
Locking function. . . . . . . . . . . . . . . . . . . . . . . . . . . . . 13
Special accessories . . . . . . . . . . . . . . . . . . . . . . . . . . 13
K Before using for the first time. . . . . . . . . . . . . . 14
Setting the clock . . . . . . . . . . . . . . . . . . . . . . . . . . . . 14
Baking out the oven . . . . . . . . . . . . . . . . . . . . . . . . . . 14
Cleaning the burner caps and cups. . . . . . . . . . . . . . 14
Cleaning the accessories. . . . . . . . . . . . . . . . . . . . . . 14
Fitting the threaded bushes for the rotary spit . . . . . . 14
1 Operating the appliance . . . . . . . . . . . . . . . . . . 15
Hob . . . . . . . . . . . . . . . . . . . . . . . . . . . . . . . . . . . . . 15
Oven . . . . . . . . . . . . . . . . . . . . . . . . . . . . . . . . . . . . . 15
Rotary spit . . . . . . . . . . . . . . . . . . . . . . . . . . . . . . . . . 15
O Time-setting options . . . . . . . . . . . . . . . . . . . . . 17
Timer . . . . . . . . . . . . . . . . . . . . . . . . . . . . . . . . . . . . . 17
Cooking time . . . . . . . . . . . . . . . . . . . . . . . . . . . . . . . 17
End time. . . . . . . . . . . . . . . . . . . . . . . . . . . . . . . . . . . 18
Clock . . . . . . . . . . . . . . . . . . . . . . . . . . . . . . . . . . . . . 18
Changing the basic settings. . . . . . . . . . . . . . . . . . . . 18
A Childproof lock. . . . . . . . . . . . . . . . . . . . . . . . . . 19
D Cleaning agent . . . . . . . . . . . . . . . . . . . . . . . . . . 19
Suitable cleaning agents . . . . . . . . . . . . . . . . . . . . . . 19
Keeping the appliance clean . . . . . . . . . . . . . . . . . . . 20
Cleaning the cooking compartment . . . . . . . . . . . . . . 20
. Cleaning function. . . . . . . . . . . . . . . . . . . . . . . . 21
Pyrolytic self-cleaning . . . . . . . . . . . . . . . . . . . . . . . . .21
p Rails. . . . . . . . . . . . . . . . . . . . . . . . . . . . . . . . . . . 22
Detaching the shelf supports . . . . . . . . . . . . . . . . . . .22
Refitting the shelf supports . . . . . . . . . . . . . . . . . . . . .22
q Appliance door . . . . . . . . . . . . . . . . . . . . . . . . . . 23
Removing and installing the door panels . . . . . . . . . .23
Removing and fitting the appliance door . . . . . . . . . .24
3 Trouble shooting . . . . . . . . . . . . . . . . . . . . . . . . 25
Error messages . . . . . . . . . . . . . . . . . . . . . . . . . . . . .25
Replacing the oven light bulb . . . . . . . . . . . . . . . . . . .26
4 Customer service . . . . . . . . . . . . . . . . . . . . . . . . 26
J Tested for you in our cooking studio. . . . . . . . 27
Table of dishes . . . . . . . . . . . . . . . . . . . . . . . . . . . . . .27
Tips for using your appliance . . . . . . . . . . . . . . . . . . .28
Produktinfo
Additional information on products, accessories,
replacement parts and services can be found at
www.bosch-home.com and in the online shop
www.bosch-eshop.com
en Intended use
4
8Intended use
Intended use
Read these instructions carefully. Only then
will you be able to operate your appliance
safely and correctly. Retain the instruction
manual and installation instructions for future
use or for subsequent owners.
Check the appliance for damage after
unpacking it. Do not connect the appliance if it
has been damaged in transport.
Only a licensed professional may connect
appliances without plugs. Damage caused by
incorrect connection is not covered under
warranty.
This appliance is intended for domestic use
only. The appliance must only be used for the
preparation of food and drink. The appliance
must be supervised during operation. Only
use this appliance indoors.
This appliance is intended for use up to a
maximum height of 2000 metres above sea
level.
This appliance is not intended for operation
with an external clock timer or a remote
control.
Do not use inappropriate child safety shields
or hob guards. These can cause accidents.
This appliance may be used by children over
the age of 8 years old and by persons with
reduced physical, sensory or mental
capabilities or by persons with a lack of
experience or knowledge if they are
supervised or are instructed by a person
responsible for their safety how to use the
appliance safely and have understood the
associated hazards.
Children must not play with, on, or around the
appliance. Children must not clean the
appliance or carry out general maintenance
unless they are at least 15 years old and are
being supervised.
Keep children below the age of 8 years old at
a safe distance from the appliance and power
cable.
Always slide accessories into the cooking
compartment the right way round.
~ "Accessories" on page 12
Close the safety valve on the gas supply line if
the cooker will not be used for a prolonged
period.
(Important safety
information
Impor t ant saf et y informat i on
:Warning – WHAT TO DO IF YOU SMELL
GAS!
Escaping gas may cause an explosion.
If you smell gas or notice any faults in the
gas installation:
Immediately shut off the gas supply or close
the gas cylinder valve.
Immediately extinguish all naked flames
and cigarettes.
Do not use any light or appliance switches
and do not pull any plugs out of sockets.
Do not use any telephones or mobile
phones within the building.
Open windows and ventilate the room.
Call the aftersales service or the gas
supplier.
:Warning – Risk of asphyxiation!
The use of a gas cooker leads to a build-up of
heat, moisture and products of combustion in
the room where the appliance is installed.
Ensure that the installation room is well
ventilated. The natural ventilation openings
must be kept open or a mechanical ventilation
device must be provided (e.g. an extractor
hood). Intensive and persistent use of the
appliance may mean that it is necessary to
have additional ventilation (e.g. opening a
window), or more effective ventilation (e.g.
operating the existing mechanical ventilation
device at a higher setting).
This appliance is approved for use with
Natural and ULPG gas.
DO NOT SPRAY AEROSOLS IN THE VICINITY
OF THIS APPLIANCE WHILE IT IS IN
OPERATION.
THIS APPLIANCE IS NOT TO BE INSTALLED
IN MARINE CRAFT OR IN CARAVANS.
DO NOT USE OR STORE FLAMMABLE
MATERIALS IN THE APPLIANCE STORAGE
DRAWER OR NEAR THE APPLIANCE.
DO NOT MODIFY THIS APPLIANCE.
SERVICING SHALL ONLY BE CARRIED OUT
BY AN AUTHORISED PERSON.
Important safety information en
5
General information
:Warning – Risk of fire!
A draught is created when the appliance
door is opened. Greaseproof paper may
come into contact with the heating element
and catch fire. Do not place greaseproof
paper loosely over accessories during
preheating. Always weight down the
greaseproof paper with a dish or a baking
tin. Only cover the surface required with
greaseproof paper. Greaseproof paper
must not protrude over the accessories.
Risk of fire!
Combustible objects that are left in the
cooking compartment may ignite. Never
store combustible items in the cooking
compartment. Never open the appliance
door if there is smoke inside. Switch off the
appliance and unplug the mains plug or
switch off the fuse in the fuse box. Shut off
the gas supply.
Risk of fire!
Hot oil and fat can ignite very quickly. Never
leave hot fat or oil unattended. Never use
water to put out burning oil or fat. Switch off
the hotplate. Extinguish flames carefully
using a lid, fire blanket or something similar.
Risk of fire!
The hotplates become very hot. Never
place combustible items on the hob. Never
place objects on the hob.
Risk of fire!
The appliance becomes very hot and
flammable materials could catch fire. Never
store or use flammable objects (e.g. spray
cans, cleaning agents) under the appliance
or in its immediate vicinity. Never place
flammable items on or in the appliance.
Risk of fire!
When gas hotplates are in operation without
any cookware placed on them, they can
build up a lot of heat. The appliance and the
extractor hood above it may become
damaged or be set on fire. Grease residue
in the filter of the extractor hood may ignite.
Only operate the gas burners with
cookware on them.
Risk of fire!
The rear of the appliance becomes very hot.
This may cause damage to the power
cables. Electricity and gas lines must not
come into contact with the rear of the
appliance.
:Warning – Risk of burns!
The appliance becomes very hot. Never
touch the interior surfaces of the cooking
compartment or the heating elements.
Always allow the appliance to cool down.
Keep children at a safe distance.
Risk of serious burns!
Accessories and ovenware become very
hot. Always use oven gloves to remove
accessories or ovenware from the cooking
compartment.
Risk of burns!
Alcoholic vapours may catch fire in the hot
cooking compartment. Never prepare food
containing large quantities of drinks with a
high alcohol content. Only use small
quantities of drinks with a high alcohol
content. Open the appliance door with care.
Risk of burns!
The hotplates and surrounding area
(particularly the hob surround, if fitted)
become very hot. Never touch the hot
surfaces. Keep children at a safe distance.
Risk of burns!
The accessible parts become very hot when
in operation. Never touch hot parts. Keep
children at a safe distance.
Risk of burns!
Empty cookware becomes extremely hot
when set on a gas hotplate that is in
operation. Never heat up empty cookware.
Risk of burns!
The storage drawer becomes hot when the
appliance is in operation. Never open the
storage drawer when the appliance is in
operation or immediately after using the
appliance. Keep children away from the
appliance.
Risk of burns!
Anything you store in the storage drawer
will become hot when the appliance is in
operation. Never touch anything in the
storage drawer while the appliance is in
operation or immediately after using the
appliance. Keep children away from the
appliance.
:Warning – Risk of scalding!
The accessible parts become hot during
operation. Never touch the hot parts. Keep
children at a safe distance.
Risk of scalding!
When you open the appliance door, hot
steam may escape. Open the appliance
door with care. Keep children at a safe
distance.
Risk of scalding!
Water in a hot cooking compartment may
create hot steam. Never pour water into the
cooking compartment when the cooking
compartment is hot.
en Important safety information
6
:Warning – Risk of injury!
Scratched glass in the appliance door may
develop into a crack. Do not use a glass
scraper, sharp or abrasive cleaning aids or
detergents.
Risk of injury!
Incorrect repairs are dangerous. Repairs
may only be carried out, and damaged
power and gas lines replaced, by an after-
sales engineer trained by us. If the
appliance is faulty, unplug the mains plug or
switch off the fuse in the fuse box. Shut off
the gas supply. Contact the after-sales
service.
Risk of injury!
The hinges on the appliance door move
when opening and closing the door, and
you may be trapped. Keep your hands away
from the hinges.
Risk of injury!
Faults or damage to the appliance are
dangerous. Never switch on a faulty
appliance. Unplug the appliance from the
mains or switch off the circuit breaker in the
fuse box. Shut off the gas supply. Contact
the after-sales service.
Risk of injury!
Unsuitable pan sizes, damaged or
incorrectly positioned pans can cause
serious injury. Observe the instructions
which accompany the cookware.
Risk of injury!
If the appliance is placed on a base and is
not secured, it may slide off the base. The
appliance must be fixed to the base.
:Warning – Risk of tipping!
Warning: In order to prevent tipping of the
appliance, this stabilizing means must be
installed. Refer to the instructions for
installation.
:Warning – Risk of electric shock!
Incorrect repairs are dangerous. Repairs
may only be carried out and damaged
power cables replaced by one of our
trained after-sales technicians. If the
appliance is defective, unplug the appliance
from the mains or switch off the circuit
breaker in the fuse box. Contact the after-
sales service.
Risk of electric shock and serious injury!
The cable insulation on electrical
appliances may melt when touching hot
parts of the appliance. Never bring
electrical appliance cables into contact with
hot parts of the appliance.
Risk of electric shock!
Do not use any high-pressure cleaners or
steam cleaners, which can result in an
electric shock.
Risk of electric shock!
A defective appliance may cause electric
shock. Never switch on a defective
appliance. Unplug the appliance from the
mains or switch off the circuit breaker in the
fuse box. Contact the after-sales service.
Risk of electric shock!
When replacing the cooking compartment
bulb, the bulb socket contacts are live.
Before replacing the bulb, unplug the
appliance from the mains or switch off the
circuit breaker in the fuse box.
:Warning – Hazard due to magnetism!
Permanent magnets are used in the control
panel or in the control elements. They may
affect electronic implants, e.g. heart
pacemakers or insulin pumps. Wearers of
electronic implants must stay at least 10cm
away from the control panel.
:Warning – Risk of overheating!
Covering the ventilation openings in the floor
of the appliance may cause it to overheat.
Always install the appliance on the feet
supplied.
Causes of damage en
7
Cleaning function
:Warning – Risk of burns!
; The appliance becomes very hot on the
outside during the cleaning function. Never
touch the appliance door. Allow the
appliance to cool down. Keep children at a
safe distance.
Risk of fire!
Loose food residues, grease and meat
juices may catch fire during pyrolytic
cleaning. Remove coarse dirt from the
cooking compartment and from the
accessories before every pyrolytic cleaning
cycle.
Risk of serious damage to health!
The appliance will become very hot during
the pyrolytic cleaning cycle. The non-stick
coating on baking trays and tins is
destroyed and noxious gases are released.
Never let non-stick baking trays and tins go
through the pyrolytic cleaning cycle. Only
enamelled accessories may be cleaned at
the same time.
Risk of fire!
The appliance will become very hot on the
outside during the pyrolytic cleaning cycle.
Never hang combustible objects, e.g. tea
towels, on the door handle. Do not place
anything against the front of the oven. Keep
children at a safe distance.
Risk of burns!
The cooking compartment will become very
hot during the pyrolytic cleaning cycle.
Never open the appliance door or move the
locking latch by hand. Allow the appliance
to cool down. Keep children at a safe
distance.
:Warning – Risk of burns!
The cooking compartment will become very
hot during the pyrolytic cleaning cycle. Never
open the appliance door or move the locking
latch by hand. Allow the appliance to cool
down. Keep children at a safe distance.
]Causes of damage
Ca u s e s of damage
Hob
Caution!
Only use the burners when cookware has been
placed on top. Do not heat up empty pots or pans.
The saucepan base will be damaged.
Clear up spills immediately. Use deep pots for
dishes with a lot of liquid. This will prevent the food
from boiling over.
Do not use roasting dishes if they must be heated
using two burners. This will cause heat
accumulation. The appliance could be damaged.
Cooking on gas burners releases extra heat and
moisture. Adjacent units may become damaged over
time. For long cooking times, switch on the cooker
hood or ventilate the room.
Observe the manufacturer's instructions when using
special ovenware.Aluminium foil and plastic
containers can melt and stick on hot burners.
Place the pot or pan centrally over the burner. This
will optimise transfer of the heat from the burner
flame to the pot or ban base. The handle does not
become damaged, and greater energy savings are
guaranteed.
Ensure that the gas burners are clean and dry. The
burner cup and burner cap must be positioned
exactly.
Ensure that the hotplate/burner is never switched on
when the hob cover is on, e.g. by children playing.
Oven
Caution!
Accessories, foil, greaseproof paper or ovenware on
the cooking compartment floor: do not place
accessories on the cooking compartment floor. Do
not cover the cooking compartment floor with any
sort of foil or greaseproof paper. Do not place
ovenware on the cooking compartment floor. This
will cause heat accumulation. The baking and
roasting times will no longer be correct and the
enamel will be damaged.
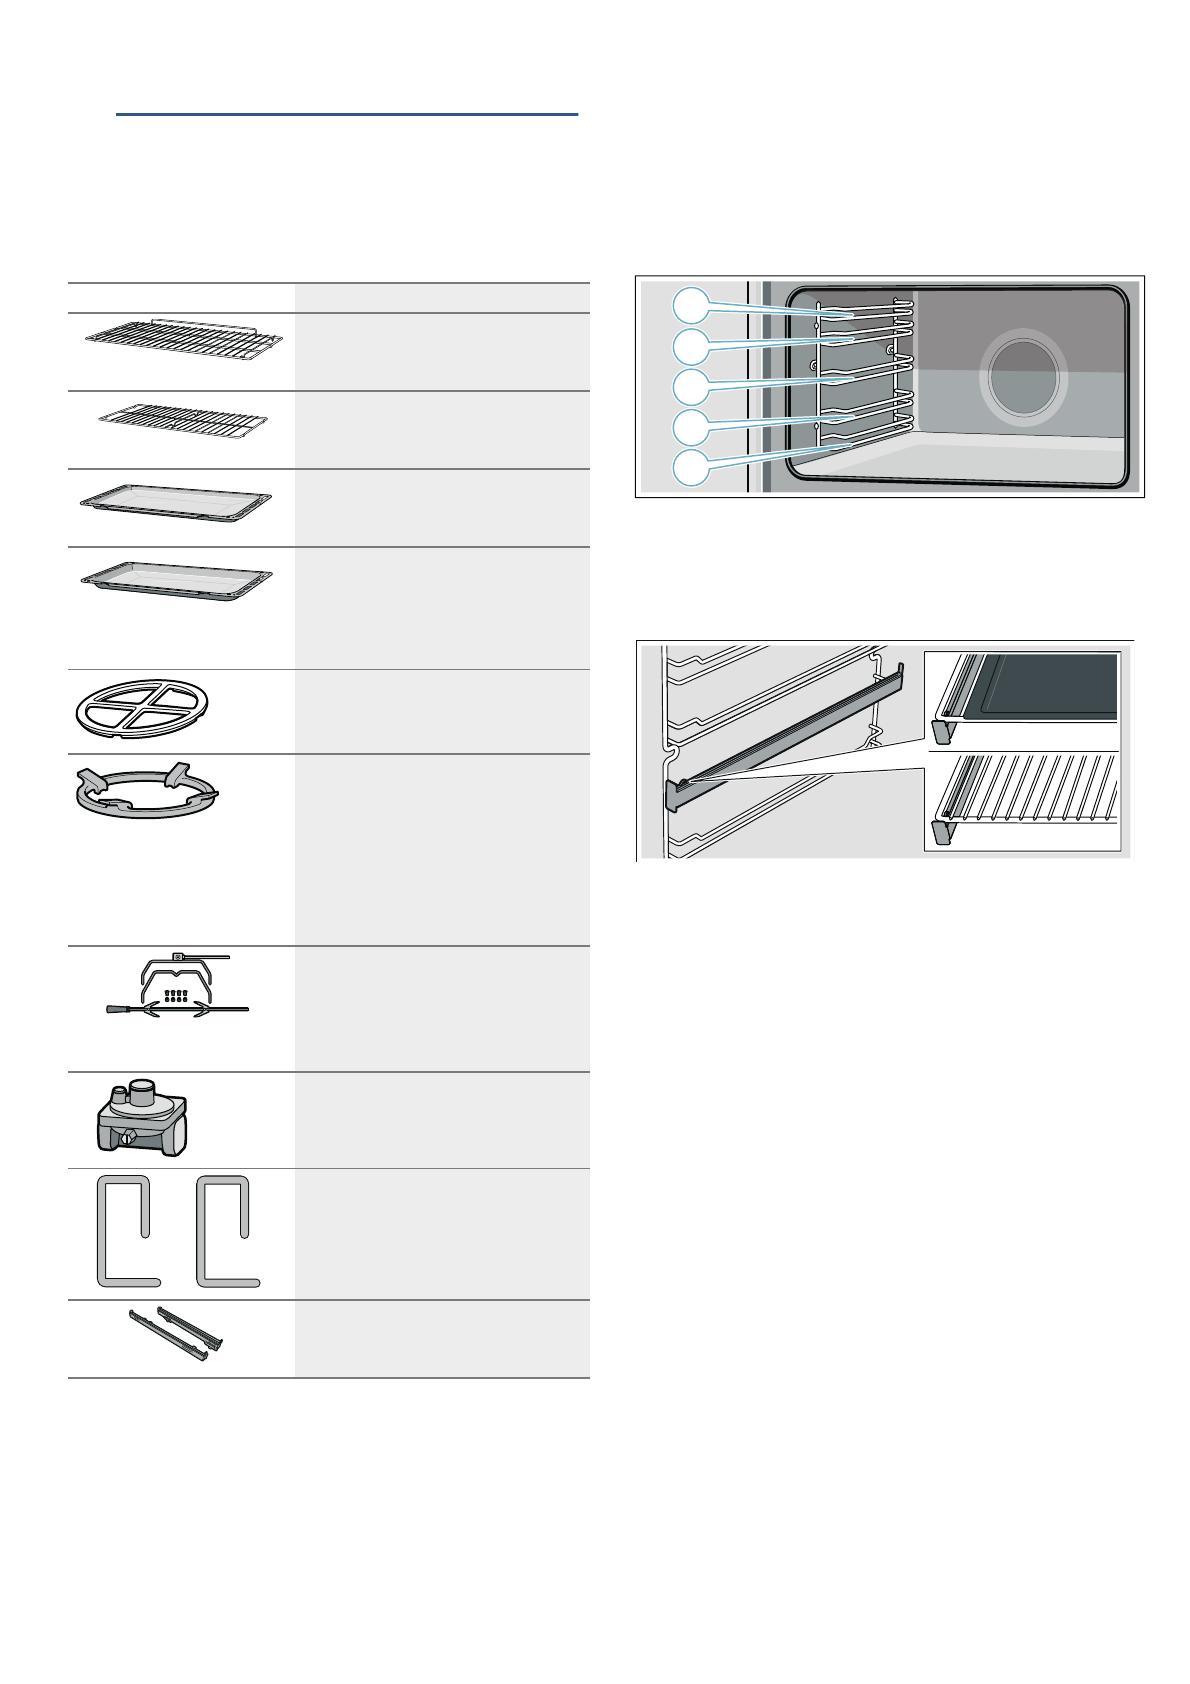
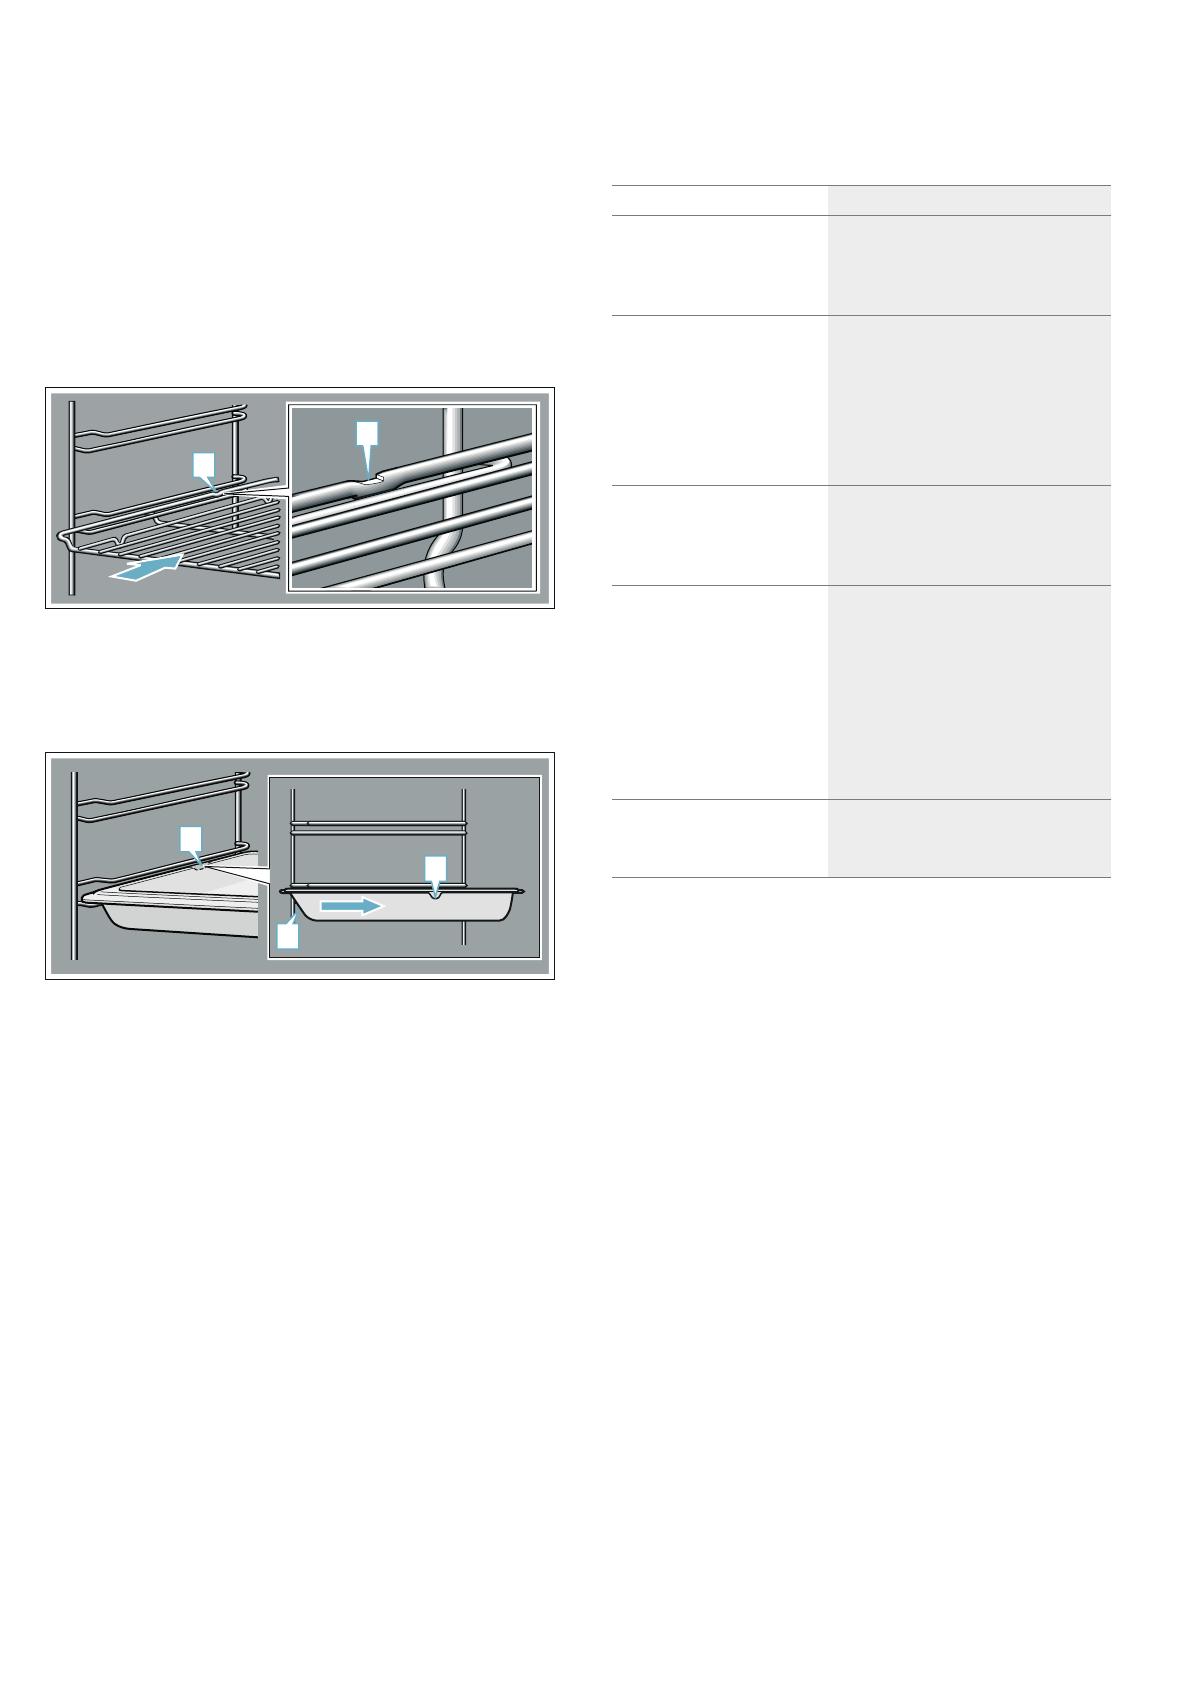
Inserting accessories: depending on the appliance
model, accessories can scratch the door panel
when closing the appliance door. Always insert the
accessories into the cooking compartment as far as
they will go.
Water in a hot cooking compartment: do not pour
water into the cooking compartment when it is hot.
This will cause steam. The temperature change can
cause damage to the enamel.
Moist food: do not store moist food in the cooking
compartment when it is closed for prolonged
periods This will damage the enamel.
Fruit juice: when baking particularly juicy fruit pies,
do not pack the baking tray too generously. Fruit
juice dripping from the baking tray leaves stains that
cannot be removed. If possible, use the deeper
universal pan.
Cooling with the appliance door open: only allow the
cooking compartment to cool when it is closed. Even
if the appliance door is only open a little, front panels
of adjacent units could be damaged over time.
en Environmental protection
8
Heavily soiled oven seal: if the oven seal is heavily
soiled, the oven door will no longer close properly
when the oven is in operation. The fronts of adjacent
units could be damaged. Always keep the oven seal
clean.
Oven door as a bearing surface: do not stand or
place objects on the oven door when it is open. Do
not hang objects on the oven door.
Carrying the appliance: do not carry or hold the
appliance by the door handle. The door handle
cannot support the weight of the appliance and
could break.
Heavy accessories: do not pull out heavily laden
accessories too far without first unloading them
sufficiently. Heavy accessories will tip when pulled
out. This causes pressure to be exerted on the shelf
supports in the cooking compartment, which can
damage the enamel. Relieve the strain on the
accessories when they are pulled out by raising
them slightly with one hand. Caution: always use an
oven cloth or oven gloves when handling hot
accessories.
7Environmental protection
En v i r o n ment al pr ot ec t i on
Your new appliance is particularly energy-efficient.
Here you can find tips on how to save even more
energy when using the appliance, and how to dispose
of your appliance properly.
Saving energy with your oven
Only preheat the oven if this is specified in the recipe
or in the operating instruction tables.
Use dark, black lacquered or enamelled baking tins.
They absorb the heat particularly well.
Open the oven door as infrequently as possible
while cooking, baking or roasting.
It is best to bake more than one cake, one after the
other. The oven is still warm. This reduces the
baking time for the second cake. You can also place
two loaf tins next to each other.
For longer cooking times, you can switch the oven
off 10 minutes before the end of the cooking time
and use the residual heat to finish cooking.
Saving energy with the hob
Always use a saucepan which is the correct size for
your food. A larger, less full saucepan requires a lot
of energy.
Always place a suitable lid on the saucepan.
Switch to a lower heat setting in good time.
The gas flame must always be in contact with the
base of the saucepan.
Environmentally-friendly disposal
Dispose of packaging in an environmentally-friendly
manner.
This appliance is labelled in accordance with
European Directive 2012/19/EU concerning
used electrical and electronic appliances
(waste electrical and electronic equipment -
WEEE). The guideline determines the
framework for the return and recycling of used
appliances as applicable throughout the EU.
Getting to know your appliance en
9
*Getting to know your
appliance
Get t i ng to know your appl i anc e
Use this section to familiarise yourself with your new
appliance. You will find information about the control
panel and hob, as well as the oven, types of heating
and accessories.
Depending on the appliance model, individual details
may differ.
The control panel
Control panel
Here, you can see an overview of the control panel. All
of the symbols never appear in the display at the same
time. Depending on the appliance model, individual
details may differ.
Buttons
The sensors are located under the individual buttons.
They must not be pressed too firmly. Only touch the
corresponding symbol.
Explanation
1 Splatter guard
2 Hob
3 Control panel
4 Oven
5 Storage compartment

Explanation
1 Control knob for oven temperature
2 Pyrolytic self-cleaning indicator light
3 Control panel
4 Control knob for oven functions
5 Control knob for hotplates
en Getting to know your appliance
10
Buttons and display
You can use the buttons to set various additional
functions. On the display, you can read the values that
you have set.
The time-setting option that is currently selected in the
display is indicated by brackets [ ] around the
corresponding symbol. Exception: For the clock, the 0
symbol only lights up if the time is being changed.
The hob
:Warning – Risk of burns!
Hot air flows out from the ventilation opening on the
hob. Never touch the ventilation opening.
Please note that, in the case of appliances with a hob
cover, the burners in the oven must also only be
switched on if the hob cover is open.
Types of gas burner
Precautions for use
The following advice is intended to help you save
energy and prevent pan damage:
Control knob for hotplates
This control knob is used to adjust the heat setting of
the gas burner hotplates.
The symbols above the control knob show you the gas
burner to which the control knob belongs.
Button Use
0 Time-setting options Selects the timer U, cooking time r,
end time p and clock 0.
D Childproof lock Locks and unlocks oven functions.
A
@
Minus
Plus
Decreases the set values.
Increases the set values.
Explanation
1 Wok burner (14.0MJ/h)
2 High-output burner (12.0MJ/h)
3 Standard burner (7.0MJ/h)
4 Ventilation opening
5 Economy burner (4.0MJ/h)
Gas burners Pot/pan diameter
Economy
burner
12- 14cm
Standard
burner
16- 22cm
High output
burner
18- 26cm
Wok burner 18- 26cm
Use pans which are the
right size for each burner.
Do not use small pans on
large burners. The flame
must not touch the sides of
the pan.
Do not use damaged pans,
which do not sit evenly on
the hob. Pans may tip over.
Only use pans with a thick,
flat base.
Do not cook without using
a lid and make sure the lid
is properly fitted. This
wastes energy.
Always centre the pan over
the burner, not to one side.
Otherwise it could tip over.
Do not place large pans on
the burners near the
control knobs. These may
be damaged by the very
high temperatures.
Place the pans on the pan
supports, never directly on
the burner.
Make sure that the pan
supports and burner caps
are correctly positioned
before using the appliance.
Pans should be placed on
the hob carefully.
Do not strike the hob and
do not place excessive
weight on it.
Never use two burners or
heat sources to heat one
single pan.
Do not use grill pans,
earthenware casserole
dishes, etc. for a long
period of time on
maximum power.
Setting Meaning
Û Off
Large flame, highest power
˜ Economy flame, lowest power
Getting to know your appliance en
11
The oven
In order to operate the oven, you require two operating
knobs: The function selector and the temperature
selector.
Control knob for oven
Function selector
Use the function selector to set the type of heating.
Temperature selector
You can use the temperature selector to set the
temperature.
There is a limit stop between settings 280and Û. Do
not turn the selector beyond this point.
The storage drawer
To open the storage drawer, take hold of the middle of
the panel and pull it towards you.
This drawer can be used to store hob or oven
accessories.
:Warning – Risk of fire!
Never leave flammable items in the storage drawer.
Cooling fan
The hot air escapes via the ventilation opening. The
cooling fan switches on and off as required. Caution.
Do not cover the ventilation slots. Otherwise the oven
will overheat.
To ensure that the cooking compartment cools down
more quickly after operation, the cooling fan continues
to run for a certain period afterwards.
Type of heating Use
< Hot air For baking and cooking on one
or more levels.
The fan distributes the heat from
the ring heating element in the
back panel evenly around the
cooking compartment.
# Eco For energy-optimised cooking of
selected dishes.
Heat is emitted evenly from the
top and bottom.
N Top/bottom
heating and fan
For cakes with very moist
toppings.
Heat is emitted evenly from the
top and bottom. The fan
circulates the hot air around the
food.
% Top/bottom
heating
For traditional baking and
roasting on one level. Especially
suitable for cakes with moist
toppings.
Heat is emitted evenly from the
top and bottom.
6 Bottom heating
and fan
For the final baking stage (such
as for moist fruit flans), for boiling
down, for dishes in a bain marie.
Heat is emitted from below. The
fan circulates the hot air around
the food.
; Bottom heat and
hot air
For preparing pizza and dishes
that require a lot of heat from
underneath.
The bottom heating element and
the ring heating element in the
back panel heat up.
7 Hot air grill For roasting poultry, whole fish
and larger pieces of meat.
The whole area below the grill
element becomes hot. The fan
circulates the hot air around the
food.
( Full-surface grill For grilling flat items, such as
steaks or sausages, for making
toast, and for browning food.
The whole area below the grill
element becomes hot.
G Grill/rotary spit Grill: For individual portions or
smaller quantities of steak,
sausages, fish and toast.
Rotary spit: For roasts, rolled
joints and poultry
q Pyrolytic self-
cleaning
For running a cooking
compartment self-cleaning
programme.
Setting Meaning
Û Off
50- 280 Temperature range in °C
Type of heating Use
en Accessories
12
_Accessories
Accessor i es
Your appliance is accompanied by a range of
accessories. Here, you can find an overview of the
accessories included and information on how to use
them correctly.
--------
The baking tray and the baking and roasting shelf can
be moved into five different heights within the cooking
compartment. Always insert them as far as they will go
so that the accessories do not touch the door panel.
Ensure that you always insert the accessories into the
cooking compartment the right way round.
Telescopic shelf set
The pull-out rails allow you to pull accessories out
completely. When inserting the adapter for the baking
and roasting shelf, ensure that it locks into place in front
of the indentation on the pull-out rails.
Note: The rotary spit must be inserted on level 1. In this
case, move the pull-out rails for the baking tray and the
baking and roasting shelf to the four upper levels.
:Warning – Risk of fire!
Under no circumstances should a roasting tin, baking
tray, frying pan or any other form of cookware be
placed directly on the oven floor. This causes the floor
of the appliance to overheat and can seriously damage
the appliance.
Accessories Description
Baking and roasting shelf
For ovenware, cake tins, joints, grilled
items, frozen meals.
Baking and roasting shelf
Designed to be placed into the univer-
sal pan or the baking tray.
Enamel baking tray
For tray bakes and small baked prod-
ucts.
Universal pan
For moist cakes, pastries, frozen meals
and large roasts. The universal pan can
be used to catch dripping fat when you
are grilling directly on the wire rack.
Espresso attachment
Attachment for an espresso pot, for
placing on the economy burner.
Wok ring
Attachment for a wok, for placing on
the wok burner.
When using the wok attachment, it is
possible to use cooking vessels with a
diameter greater than 26cm (woks, fry-
ing pans, pots, vessels with a curved
base, etc.).
Rotary spit
With rotary spit holder
For roasting joints and large poultry.
Only use in combination with a univer-
sal pan.
Pressure regulator
Pressure regulator for natural gas
mode.
Locking pins
For locking the hinges.
Telescopic shelf set
The pull-out rails allow you to pull
accessories out completely.
Accessories en
13
Locking function
The accessories can be pulled out approximately
halfway until they lock in place. The locking function
prevents the accessories from tilting when they are
pulled out. The accessories must be inserted into the
cooking compartment correctly for the tilt protection to
work properly.
When inserting the wire rack, ensure that the lug is at
the rear and is facing downwards. The open side must
be facing the appliance door and the outer rail must be
facing downwards ¾.
When inserting baking trays, ensure that lug is at the
rear and is facing downwards. The sloping edge of the
accessory ƒ must be facing towards the appliance
door.
Example in the picture: Universal pan
Special accessories
You can buy accessories from the after-sales service.
--------
D
D
D
D
E
Accessories Description
Enamel baking tray For tray bakes and small baked prod-
ucts.
Customer service number:
11012235
Universal pan For moist cakes, pastries, frozen
meals and large roasts.
The universal pan can be used to
catch dripping fat when you are grill-
ing directly on the wire rack.
After-sales service number:
11012236
Baking and roasting shelf For ovenware, cake tins, joints, grilled
items, frozen meals.
After-sales service number:
11012237
Wok ring Attachment for a wok; for placing on
the wok burner.
When using the wok attachment, it is
possible to use cooking vessels with a
diameter greater than 26cm (woks,
frying pans, pots, vessels with a
curved base, etc.).
After-sales service number:
00745721
Telescopic shelf set Telescopic shelf set for one level.
After-sales service number:
12006236
en Before using for the first time
14
KBefore using for the first
time
Be f o r e usi ng for the fi rst ti me
In this section, you can find out what you must do
before using your oven or hob to prepare food for the
first time. Read the following section beforehand.
~ "Important safety information" on page 4
Remove the appliance packaging and dispose of it
appropriately.
Setting the clock
After the appliance has been connected, the 0 symbol
and four zeros flash in the display.
1. Set the clock.
The clock in the display shows 12:00. The time
symbols light up and the brackets are around 0.
2. Use the @ or A button to set the clock.
After a few seconds, the time that has been set is
adopted.
Baking out the oven
Preparing the appliance
1. Remove accessories and hook-in racks from the
cooking compartment.
2. Fully remove any remaining packaging, such as
small pieces of polystyrene, from the cooking
compartment.
3. Some parts are covered with a protective film.
Remove the protective film.
4. Remove the protective film in the warming drawer.
5. Clean the outside of the appliance with a soft, damp
cloth.
6. Clean the cooking compartment with hot soapy
water.
Heating up the oven
To remove the new cooker smell, heat up the oven
when it is empty and closed.
1. Turn the temperature selector to the maximum
temperature.
2. Switch off the oven after 45minutes.
Recleaning the oven
1. Clean the cooking compartment with hot soapy
water.
2. Fit the hook-in racks.
Cleaning the burner caps and cups
1. Clean the burner caps (A) and cups (B) with water
and washing-up liquid.
2. Dry the parts well.
3. Place the burner cup (B) onto the burner (C).
4. Position the burner cap (A) exactly on the burner
cup (B).
Cleaning the accessories
Before using the accessories, clean them thoroughly
using a cloth and warm soapy water.
Fitting the threaded bushes for the rotary
spit
1. From above, place the threaded bushes into the
holes at the four corners of the universal pan.
2. Counter the ring nuts from below.
3. Use a screwdriver to tighten the threaded bushes.
$
%
&
Operating the appliance en
15
1Operating the appliance
Oper at i ng the appl i anc e
You have already learnt about the controls and how
they work. Now we will explain how to set your
appliance. You will learn about what happens when you
switch the appliance on and off, and how to select the
operating mode.
Hob
Switching on the gas burner
Notes
Appliances with a hob cover must only be switched
on if the hob cover is open.
The burner caps must always be positioned exactly
on top of the burner cups. The slots on the burner
cup must be free from obstruction. All parts must be
dry.
Ensure that the burner is not subjected to draughts
caused by air conditioning systems, fans or similar
appliances.
1. Press the control knob for the required burner and
turn it to the position.
The gas burner ignites.
2. Keep the control knob pressed for a few seconds
until the flame stabilises.
3. Set the desired flame setting.
The flame is not stable between positions Û and .
Always select a position between and ˜.
If the flame goes out
Switch off the control knob. Wait one minute and switch
the burner on again.
:Warning – Risk of fire!
If the flame goes out, gas will escape. Never leave the
gas burner unattended during operation. Ensure that
there are no draughts.
:Warning – Risk of deflagration!
If the burner does not ignite after 15 seconds, switch off
the control knob and open the door or window in the
room. Wait at least 1minute before igniting the burner
again.
If the gas burner does not ignite
In the event of a power cut or damp ignition plugs, light
the gas burner with a gas lighter or a match.
Switching off the gas burner
Turn the control knob for the required hotplate to
position Û.
Oven
Operating the oven
Switching on the oven
Note: Always keep the appliance door closed when it is
in operation.
1. Turn the function selector to the desired operating
mode.
2. Turn the temperature selector to set the desired
temperature.
The oven switches on.
The indicator lamp is lit when the oven is heating up. It
goes out during pauses in heating.
Note: The indicator lamp also lights up when the
function selector is in the off position and a temperature
is set. The oven only begins to heat up when an
operating mode is set.
Note: In order to save as much energy as possible, it
takes longer for the appliance to heat up with the ECO
heating function than with other heating functions.
Note: With the ECO heating function, the cooking
compartment is lit for 1minute after the oven door has
been closed or the heating function has been selected.
After a minute, the interior lighting will switch itself off
automatically.
Note: If the power supply is interrupted, the appliance
will stop. When the power supply is restored, the
appliance will not automatically resume operation. The
time and operating mode will need to be reset. If the
self-cleaning programme is stopped early, the cooking
compartment may not be completely clean.
Switching off the oven
1. Turn the function selector to the Û position.
2. Turn the temperature selector to the Û position.
The oven switches off.
Rotary spit
Preparing the rotary spit
1. Slide a retaining clip onto the rotary spit and screw
on the handle.
2. Place the roast as close as possible to the centre of
the rotary spit.
3. Use retaining clips to secure the roast in place.
Setting Meaning
˜ Economy flame, lowest power
Large flame, highest power
en Operating the appliance
16
4. Use milled screws to secure the retaining clips.
Inserting the rotary spit
:Warning – Risk of burns!
Never touch the hot surfaces of the cooking
compartment or the heating elements. Children must be
kept at a safe distance from the appliance at all times.
Open the appliance door carefully. Hot steam may
escape.
1. Insert the rotary spit frame into the threaded bushes
2. Place the rotary spit onto the rotary spit frame and
unscrew the handle.
3. Slide the universal pan into shelf position 1and slide
the rotary spit into the motor mount.
4. Close the appliance door.
Switching on the rotary spit
Note: When using the rotary spit, preheat the oven
using the ( type of heating. Only set the G type of
heating once the rotary spit has been inserted.
1. Turn the control knob for the oven to the G position.
2. Set the temperature.
Note: Add some water to the universal pan in order to
catch any fat that drips out.
Removing the rotary spit
:Warning – Risk of burns!
Never touch the hot surfaces of the cooking
compartment or the heating elements. Children must be
kept at a safe distance from the appliance at all times.
Open the appliance door carefully. Hot steam may
escape.
1. Opening the appliance door
2. Slowly pull the universal pan until it is halfway out of
the cooking compartment.
3. Completely remove the universal pan from the
cooking compartment and set it on the worktop.
4. Screw on the handle and remove the grill spit from
the grill spit frame.
Time-setting options en
17
OTime-setting options
Ti me- s et t i ng opt i ons
Your oven has various time-setting options. You can
use the 0 button to call up the menu and switch
between the individual functions. As long as the
symbols are lit, you can implement settings. The
[ ] brackets show you which time-setting function you
have currently selected. You can use the @ orA button
to directly change a time-setting function that has
already been set, if its time symbol is in brackets.
Timer
You can use the timer as a kitchen timer. It runs
independently of the oven. The timer has its own signal.
In this way, you can tell whether it is the timer or a
cooking time which has elapsed.
1. Press the 0 button once.
The time symbols light up in the display and the
brackets are around U.
2. Use the @ or A button to set the timer duration.
Default value for @button = 10 minutes
Default value for Abutton = 5 minutes
After a few seconds, the time setting is adopted. The
timer starts. The [U] symbol lights up in the display and
the timer duration counts down. The other time symbols
go out.
The timer duration has elapsed
A signal sounds. 00:00is shown in the display. Use
the 0 button to switch off the timer.
Changing the timer duration
Use the @ or A button to change the timer duration.
After a few seconds, the change is adopted.
Cancelling the timer duration
Use the A button to reset the timer duration to 00:00.
The change will be adopted after a few seconds. The
timer is switched off.
Checking the time settings
If several time-setting options are set, the relevant
symbols are illuminated on the display. The symbol for
the time-setting option that is visible in the display is
shown in brackets.
To call up the U timer, r cooking time, p end time
or 0 clock, press the 0 button repeatedly until the
brackets are around the relevant symbol. The display
shows the value for a few seconds.
Cooking time
The cooking time for your dish can be set on the oven.
When the cooking time has elapsed, the oven switches
itself off automatically. This means that you do not have
to interrupt other work to switch off the oven. The
cooking time cannot be accidentally exceeded.
Example in the picture: cooking time 45minutes.
1. Use the function selector to set the type of heating.
2. Set the temperature or grill setting using the
temperature selector.
3. Press the 0 button twice.
00:00is shown in the display. The time symbols light
up and the brackets are around r.
4. Use the @ or A button to set the cooking time.
Default value for @ button = 30minutes
Default value for A button = 10minutes
The oven will start up after a few seconds. The cooking
time counts down in the display and the [r] symbol
lights up. The other time symbols go out.
The cooking time has elapsed
A signal sounds. The oven stops heating. 00:00is
shown in the display. Press the 0 button. You can set a
new cooking time using the @ or A button. Or press
the 0 button twice and turn the function selector to the
off position. The oven switches off.
Changing the cooking time
Use the @ or A button to change the cooking time. After
a few seconds, the change is adopted. If the timer has
been set, press the 0 button beforehand.
Cancelling the cooking time
Use the A button to reset the cooking time to 00:00.
After a few seconds, the change is adopted. The
cooking time is cancelled. If the timer has been set,
press the 0 button beforehand.
en Time-setting options
18
End time
You can change the time at which you want your dish to
be ready. The oven will start automatically and finish at
the desired time. You can, for example, put your dish in
the cooking compartment in the morning and set the
cooking time so that it is ready at lunch time.
Ensure that food is not left in the cooking compartment
for too long as it may spoil.
Example in the picture: It is 10:30, the cooking time is
45 minutes and you want the oven to finish cooking at
12:30.
1. Set the cooking time. ~ "Cooking time" on page 17
2. Set the function selector.
3. Set the temperature selector.
4. Press the 0 button twice.
5. Use the @ or A button to set the cooking time.
6. Press the 0 button.
The brackets are around p. The time when the dish
will be ready is displayed.
7. Use the @ or A button to delay the end time.
After a few seconds, the oven will apply the settings and
switch to standby. The display shows the time at which
the dish will be ready and the p symbol is displayed in
brackets. The U and 0 symbols go out. When the oven
starts, the cooking time counts down in the display and
the r symbol is displayed in brackets. The p symbol
goes out.
The cooking time has elapsed
A signal sounds. The oven stops heating. 00:00is
shown in the display. Press the 0 button. You can set a
new cooking time using the @ or A button. Or press
the 0 button twice and turn the function selector to the
off position. The oven switches off.
Changing the end time
Use the @ or A button to change the end time. After a
few seconds, the change is adopted. If the timer has
been set, first press the 0 button twice. Do not change
the end time if the cooking time has already started to
elapse. The cooking result would no longer be correct.
Cancelling the end time
Use the A button to reset the end time to the current
time. After a few seconds, the change is adopted. The
oven starts. If the timer has been set, first press the 0
button twice.
Clock
After the appliance is connected or following a power
cut, the 0 symbol and four zeros flash in the display.
1. Set the clock.
The clock in the display shows 12:00. The time
symbols light up and the brackets are around 0.
2. Use the @ or A button to set the clock.
After a few seconds, the time that has been set is
adopted.
Changing the clock
No other time-setting option should have been set.
1. Press the 0 button four times.
The time symbols light up in the display and the
brackets are around 0.
2. Use the @ or A button to change the clock.
After a few seconds, the time that has been set is
adopted.
Changing the basic settings
Your oven has various basic settings. These settings
can be customised to suit your requirements.
No other time-setting option should have been set.
1. Press and hold the 0 button for approx. 4seconds.
The current basic setting for the clock display is
shown in the display, e.g. c1 1for selection 1.
2. Use the @ or A button to change the basic setting.
3. Confirm by pressing the 0 button.
The next basic setting appears in the display. You
can scroll through all levels with the 0 button and
change the setting with the @ or A button.
4. To finish, press and hold the 0 button for approx.
4seconds.
All basic settings are applied.
You may change the basic settings at any time.
Basic setting Selection 1 Selection 2 Selection 3
c
1
Clock display always* only with
the 0
button
-
c
2
Signal duration
upon completion
of a cooking time
or timer period
approx.
10 secon
ds
approx.
2 minutes
*
approx.
5 minutes
c
3
Waiting time until
a setting is
applied
approx.
2 seconds
approx.
5 second
s*
approx.
10 secon
ds
* Factory setting
Childproof lock en
19
AChildproof lock
Childproof lock
The oven has a childproof lock to prevent children from
switching it on by accident.
The oven will not respond if any attempts to apply
settings are made.You can still set the clock and the
timer when the childproof lock is activated.
If the heating function and temperature or grill setting
have been set, the childproof lock interrupts heating.
Note: If a hob is being used, it will not be affected by
the childproof lock on the oven.
Activating the childproof lock
No cooking time or end time should be set.
Press and hold the D button for approx. 4 seconds.
The D symbol will appear on the display. The
childproof lock has now been activated.
Deactivating the childproof lock
Press and hold the D button for approx. 4 seconds.
The D symbol will go out on the display. The childproof
lock has now been deactivated.
DCleaning agent
Cl eani ng agent
With good care and cleaning, your appliance will retain
its appearance and remain fully functioning for a long
time to come. We will explain here how you should
correctly care for and clean your appliance.
:Warning – Risk of electric shock!
Do not use any high-pressure cleaners or steam
cleaners, which can result in an electric shock.
:Warning – Risk of burns!
The appliance becomes very hot. Never touch the
interior surfaces of the cooking compartment or the
heating elements. Always allow the appliance to cool
down. Keep children at a safe distance.
Suitable cleaning agents
Observe the following information to ensure that the
different surfaces are not damaged by using the wrong
type of cleaning agent.
Do not use any of the following
on the hob:
Undiluted washing-up liquid or dishwasher
detergent,
Abrasive materials, scouring sponges,
Aggressive cleaners such as oven spray or stain
removers,
High-pressure cleaners or steam jet cleaners.
Do not use any of the following
on the oven:
Any harsh or abrasive cleaning agents,
Cleaning agents with a high concentration of
alcohol,
Hard scouring pads or sponges,
High-pressure cleaners or steam cleaners.
Wash new sponge cloths thoroughly before use.
:Warning – Risk of burns!
The appliance becomes very hot. Never touch the
interior surfaces of the cooking compartment or the
heating elements. Always allow the appliance to cool
down. Keep children at a safe distance.
Area Cleaning
Appliance exte-
rior
Hot soapy water:
Clean with a dish cloth and then dry with a soft
cloth. Do not use glass cleaner or a glass scraper.
Stainless steel
front
Hot soapy water:
Clean with a dish cloth and then dry with a soft
cloth.
Remove flecks of limescale, grease, starch and
albumin (e.g. egg white) immediately. Corrosion
can form under such flecks.
Special stainless steel cleaning products suitable
for hot surfaces are available from our after-sales
service or from specialist retailers. Apply a very
thin layer of the cleaning product with a soft cloth.
en Cleaning agent
20
--------
Notes
Slight differences in colour on the front of the
appliance are caused by the use of different
materials, such as glass, plastic and metal.
Shadows on the door panels, which look like
streaks, are caused by reflections made by the
interior lighting.
Enamel is baked on at very high temperatures.This
can cause some slight colour variation. This is
normal and does not affect operation.
The edges of thin trays cannot be completely
enamelled. As a result, these edges can be rough.
This does not impair the anti-corrosion protection.
Keeping the appliance clean
Always keep the appliance clean and remove dirt
immediately so that stubborn deposits of dirt do not
build up.
:Warning – Risk of fire!
Loose food remnants, fat and meat juices may catch
fire. Before using the appliance, remove the worst of the
food remnants from the cooking compartment, heating
elements and accessories.
Tips
Clean the cooking compartment after each use. This
will ensure that dirt cannot be baked on.
Always remove flecks of limescale, grease, starch
and albumin (e.g. egg white) immediately.
Use the universal pan for baking very moist cakes.
Use suitable ovenware for roasting, e.g. a roasting
dish.
Cleaning the cooking compartment
1. Pour 0.4litres of water into the centre of the cooking
compartment floor.
2. Set the type of heating 6.
3. Use the temperature controller to set 50 °C.
4. Switch off the appliance after 18minutes.
5. Allow the appliance to cool down.
6. Clean the cooking compartment with a cloth.
:Warning – Risk of burns!
The appliance becomes very hot. Never touch the
interior surfaces of the cooking compartment or the
heating elements. Always allow the appliance to cool
down. Keep children at a safe distance.
Aluminium and plas-
tic
Glass cleaner:
Clean with a soft cloth.
Gas hob and pan
supports
Hot soapy water.
Use very little water. Water must not be allowed to
enter the appliance through the base of the burn-
ers.
Clean boiled-over liquids and spilt food immedi-
ately.
You can remove the pan supports. Do not clean
the pan supports in the dishwasher.
Gas burners, hot-
plate
Remove the burner cups and caps, clean them
with soapy water.
The gas outlet openings must remain free from
obstruction.
Ignition plugs: Small, soft brush.
The gas burners only work properly when the igni-
tion plugs are clean. Dry all parts thoroughly.
Ensure that they are positioned correctly when
they are refitted.
The burner caps are coated in black enamel. The
colour may change over time. This does not affect
their function.
Do not clean the burner caps in the dishwasher.
Enamel surfaces
(smooth surfaces)
Hot soapy water:
Clean with a dish cloth and then dry with a soft
cloth. Remove flecks of limescale, grease, starch
and albumin (e.g. egg white) immediately. Corro-
sion can form under such flecks.
Special stainless steel cleaning products suitable
for hot surfaces are available from our after-sales
service or from specialist retailers. Apply a very
thin layer of the cleaning product with a soft cloth.
Door panels Hot soapy water:
Clean with a dish cloth and then dry with a soft
cloth.
Do not use a glass scraper or a stainless steel
scouring pad.
Glass cover for
the interior light-
ing
Hot soapy water:
Clean with a dish cloth and then dry with a soft
cloth.
If the cooking compartment is heavily soiled, use
oven cleaner.
Door seal
Do not remove.
Hot soapy water:
Clean with a dish cloth.
Do not scour.
Rails Hot soapy water:
Soak and clean with a dish cloth or brush.
Accessories Hot soapy water:
Soak and clean using a dishcloth or brush.
If there are heavy deposits of dirt, use a stainless
steel scouring pad.
Enamelled accessories are dishwasher-safe.
  • Page 1 1
  • Page 2 2
  • Page 3 3
  • Page 4 4
  • Page 5 5
  • Page 6 6
  • Page 7 7
  • Page 8 8
  • Page 9 9
  • Page 10 10
  • Page 11 11
  • Page 12 12
  • Page 13 13
  • Page 14 14
  • Page 15 15
  • Page 16 16
  • Page 17 17
  • Page 18 18
  • Page 19 19
  • Page 20 20
  • Page 21 21
  • Page 22 22
  • Page 23 23
  • Page 24 24
  • Page 25 25
  • Page 26 26
  • Page 27 27
  • Page 28 28
  • Page 29 29
  • Page 30 30
  • Page 31 31
  • Page 32 32

Bosch GAS RANGE COOKER User guide

Category
Ovens
Type
User guide

Ask a question and I''ll find the answer in the document

Finding information in a document is now easier with AI