
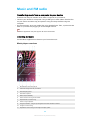
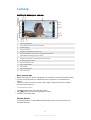
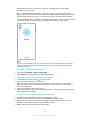
User guide
Xperia L3
I3312/I4312/I4332

Contents
Getting started............................................................................. 5
About this User guide......................................................................
5
Overview.......................................................................................... 6
Assembly - Single SIM...................................................................... 7
Assembly - Dual SIM........................................................................ 8
Screen protection............................................................................. 9
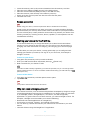
Starting your device for the rst time............................................. 9
Why do I need a Google account?.................................................. 9
Transferring content from your old device.................................... 10
Device security............................................................................ 11
Making sure your device is protected............................................ 11
Screen lock...................................................................................... 11
Fingerprint Manager ..................................................................... 12
SIM card protection........................................................................ 13
Using Dual SIM devices.................................................................. 13
Finding the IMEI number(s) of your device................................... 14
Finding, locking or erasing a lost device ...................................... 14
Using location services................................................................... 15
Learning the basics..................................................................... 16
Using the touchscreen................................................................... 16
Turning the screen on or o.......................................................... 18
Home screen.................................................................................. 18
Application screen......................................................................... 20
Navigating applications................................................................. 21
Widgets.......................................................................................... 23
Shortcuts and folders.................................................................... 24
Background.................................................................................... 25
Taking a screenshot....................................................................... 25
Notications................................................................................... 26
Icons in the status bar................................................................... 28
Battery and maintenance.......................................................... 30
Charging your device.................................................................... 30
Battery and power management.................................................. 31
Updating your device.................................................................... 32
Restarting, resetting and repairing............................................... 33
Improving memory performance.................................................. 34
Backing up and synchronising data.......................................... 36
Backing up and synchronising with a Google account ............... 36
Backing up and transferring data using a computer.................... 37
2

Backing up and transferring data using a memory card ............. 3
7
Synchronising with Microsoft Exchange ActiveSync..................... 37
Downloading applications......................................................... 39
Downloading applications on Google Play................................... 39
Downloading applications from other sources............................ 39
Internet and networks............................................................... 40
Internet and MMS settings ........................................................... 40
Wi-Fi .............................................................................................. 40
Sharing your mobile data connection........................................... 42
Controlling data usage.................................................................. 44
Selecting a SIM card for data trac.............................................. 44
Selecting mobile networks............................................................ 45
Basic settings............................................................................. 46
Accessing settings......................................................................... 46
Volume, vibration and sound........................................................ 46
Silence your device with Do not disturb....................................... 47
Screen settings.............................................................................. 48
Screen pinning............................................................................... 49
Application settings...................................................................... 50
Resetting your applications........................................................... 51
Language settings.......................................................................... 51
Date and time................................................................................ 52
Multiple user accounts.................................................................. 52
Typing text.................................................................................. 53
On-screen keyboards..................................................................... 53
Editing text..................................................................................... 54
Calling......................................................................................... 55
Making calls................................................................................... 55
Receiving calls............................................................................... 56
Forwarding calls............................................................................. 57
Blocking a number........................................................................ 58
Contacts...................................................................................... 59
Adding and editing contacts......................................................... 59
Grouping contacts......................................................................... 60
Transferring contacts..................................................................... 60
Backing up contacts....................................................................... 61
Messaging and chat................................................................... 63
Reading and sending messages................................................... 63
Messaging settings....................................................................... 64
Setting up email............................................................................ 65
3

Music and FM radio.................................................................... 66
T
ransferring music from a computer to your device ................... 66
Listening to music......................................................................... 66
Listening to the radio.................................................................... 68
Camera........................................................................................ 70
Getting to know your camera........................................................ 70
Exposure, colour and light conditions........................................... 73
People, seles and smiling faces.................................................. 74
Portrait sele.................................................................................. 75
Bokeh eect................................................................................... 75
Using various capturing modes..................................................... 75
Resolution and memory................................................................ 77
Additional camera settings............................................................ 77
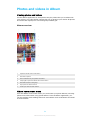
Photos and videos in Album...................................................... 79
Viewing photos and videos........................................................... 79
Album home screen menu............................................................ 79
Connectivity................................................................................ 81
Connecting your device to USB accessories.................................. 81
NFC (Near Field Communication)................................................... 81
Bluetooth wireless technology...................................................... 83
Smart apps and features that save you time............................ 86
Using your device as a wallet........................................................ 86
Clock and Calendar..................................................................... 87
Calendar......................................................................................... 87
Clock............................................................................................... 87
Accessibility................................................................................ 90
Magnication................................................................................. 90
Font size......................................................................................... 90
Display size.................................................................................... 90
Colour correction........................................................................... 90
Mono audio.................................................................................... 91
Support application.................................................................... 92
About the Support app................................................................. 92
Legal information....................................................................... 93
General........................................................................................... 93
Warranty, SAR, and usage guidelines........................................... 93
4

Getting started
About this User guide
T
his is the Xperia L3 User guide for the Android™ 8.1 software version. If you’re not
sure which software version your device is running, you can check it in the Settings
menu.
Note
System and application updates can present the features in your device in another way than
describe
d in this User guide. The Android version might not be aected in an update. For
more information about software updates, see
Updating your device
on page 32.
To check the current software version and model number of your device
• Find and tap Settings > System > About phone. The current software version is
displayed under Build number. The current model number is displayed under
Model.
Limitations to services and features
Some of the services and features described in this User guide may not be
supported in all countries or regions, or by all networks or service providers. The
GSM International Emergency Number can always be used in all countries, regions,
networks and by all service providers, provided that the device is connected to the
mobile network. Please contact your network operator or service provider to
determine the availability of any specic service or feature and whether additional
access or usage fees apply.
The use of certain features and applications described in this guide may require
access to the internet. You may incur data connection charges when you connect
to the internet with your device. Contact your wireless service provider for more
information.
5
Int
ernet version. For personal use only.

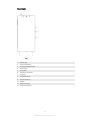
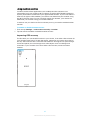
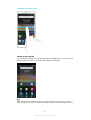
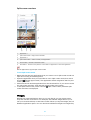
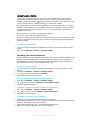
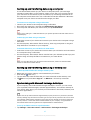
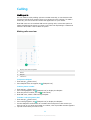
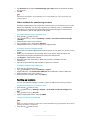
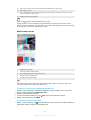
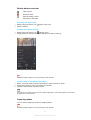
Overview
1 Headset jack
2 Second microphone
3 Charging/Notication light
4 Front camera
5 Ear speaker
6 Proximity/Light sensor
7 Power key
8 Fingerprint sensor
9 Volume/Zoom key
10 Speaker
11 USB port/Charger
12 Primary microphone
6
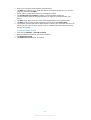
Int
ernet version. For personal use only.

13 Wi-Fi/Bluetooth®/GPS antenna
14 Dual camera
15 Flash LED
16 NFC™ detection area
17 Nano SIM/Memory card slot
18 Main antenna
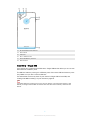
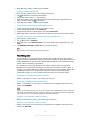
Assembly - Single SIM
Your device only supports nano SIM cards. Single SIM devices allow you to use one
SIM card and a memory card.
The SIM and memory cards go in dierent parts of the nano SIM and memory card
tray. Make sure you don’t confuse the two.
For information on how to check if your device is Single SIM or Dual SIM, see
Finding the IMEI number(s) of your device
on page 14.
Note
To prevent data loss, make sure you turn o your devic
e or unmount the memory card
before you drag out the holder to remove the nano SIM card or memory card from the
device.
7
Int
ernet version. For personal use only.

To insert a nano SIM card and a memory card
Note
Do not cut your SIM card, as this may damage your device.
1 Open the slo
t cover.
2 Drag out the card tray.
3 Place the SIM card securely in the SIM card tray.
4 Place the memory card securely in the memory card tray.
5 Gently push the card tray back into the slot until it ts into place.
6 Close the slot cover.
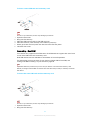
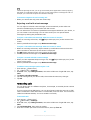
Assembly - Dual SIM
Your device only supports nano SIM cards. Dual SIM devices support the use of one
or two nano SIM cards and a memory card.
Dual SIM devices are not available in all markets or from all operators.
For information on how to check if your device is Single SIM or Dual SIM, see
Finding the IMEI number(s) of your device
on page 14.
Note
To prevent data loss, make sure you turn o your devic
e or unmount the memory card
before you drag out the holder to remove the nano SIM card (or cards) or memory card from
the device.
To insert the nano SIM cards and the memory card
Note
Do not cut your SIM card, as this may damage your device.
1 Open the slo
t cover.
2 Drag out the card tray.
8
Int
ernet version. For personal use only.

3 Inser
t the memory card in the correct orientation into the memory card slot.
4 Place the main SIM card (SIM1) securely in the SIM card tray.
5 Place the second SIM card (SIM2) securely in the SIM card tray.
6 Place the memory card securely in the memory card tray.
7 Gently push the card tray back into the slot until it ts into place.
8 Close the slot cover.
Screen protection
Note
Before using your device, remove all protection lms t
o enable full functionality.
Screen covers and protectors may help you protect your device against damage.
We recommend you use only those screen covers intended for your Xperia device.
The use of third-party screen protection accessories may prevent your device from
working correctly by covering sensors, lenses, speakers, or microphones and can
invalidate the warranty.
Starting your device for the rst time
It is recommended that you charge the battery for at least 30 minutes before
starting up your device for the rst time. You can still use your device while it is
charging. For more information on charging, see
Charging your device
on page
30.
The rst time you start your device, a setup guide helps you to congure basic
settings, personalise your device, and sign in to your accounts, for example a
Google™ account.
To turn on your device
1 Long press the power key until your device vibrates.
2 Enter your SIM card PIN when requested, then tap
(Done icon).
3 W
ait a moment for your device to start.
Hint
Your SIM card PIN is initially supplied by your network operator, but you can change it later
fr
om the Settings menu. To correct a mistake made while entering your SIM card PIN, tap
(Backspace icon).
T
o turn o the device
1 Long press the power key until the options menu opens.
2 Tap Power o.
Note
It may take a while for the device to shut down.
Why do I need a Google account?
Your device from Sony runs on the Android platform developed by Google. A range
of Google applications and services is available on your device when you purchase
it, for example, Gmail™, Google Maps™, YouTube™, and the Google Play
application. To get the most out of these services, you need a Google account. For
example, a Google account enables you to do the following:
• Download and install applications on Google Play.
• Synchronise your email, contacts, and calendar using Gmail.
• You can back up, restore and transfer your data from an old device to your new
device.
• Chat with friends using the Google Duo™ application.
9
Int
ernet version. For personal use only.

• S
ynchronise your browsing history and bookmarks using the Google Chrome™
web browser.
• Identify yourself as the authorised user after a software repair using Xperia
Companion.
• Remotely nd, lock, or clear a lost or stolen device using the Find my device
services.
For more information about Android and Google, go to
http://
support.google.com
.
To set up a Google account on your device
1 Find and tap Settings > Users & accounts > Add account > Google.
2 Follow the on-screen instructions to create a Google account, or sign in if you
already have an account.
Transferring content from your old device
There are several ways to transfer your data from an old device to your new device.
• Synchronise data using Google account
• Copy and transfer data using a computer
• Copy and transfer data using an SD card
Synchronising data using a Google account
You can transfer data by synchronising with a Google account. First, back up your
data to the Google server from your old phone using your Google account. Then,
set the same Google account on your new device. Depending on which contents to
backup and synchronise, there are several ways.
• Gmail, Calendar, Contacts: Log in with the same Google account that you were
using on your old device. Then, your Gmail, Calendar, and Contacts will be
automatically synchronised with your Google account.
• Image (photo), video: Back up your data from the old device to the Google server
using Google Photos. Then, synchronise with your Google account on the new
device.
• Applications, setting, call history: Back up automatically using Google Drive on
your old device. Then, synchronise with your Google account on your new device.
• Music and other document les: Manually back up your media les from the old
device using Google Drive. Then, synchronise with your Google account on the
new device.
For more information, see
Backing up and synchronising with a Google account
on
page 36.
Transferring data using a computer
If you are storing large volumes of data on your device, you can transfer your data
using a computer. For more information, see
Backing up and transferring data
using a computer
on page 37.
Transferring data using an SD card
You can transfer media les and contacts using an SD card. For more information,
see
Backing up and transferring data using a memory card
on page 37.
10
Int
ernet version. For personal use only.

Device security
Making sur
e your device is protected
Your device includes security options, strongly recommended in case of loss or
theft.
Note
When using a security option to protect your device, it is crucial to remember the details
pr
ovided at set up.
Screen lock
Set a secure screen lock on your device using a PIN, password, pattern, or
ngerprint to prevent others from using your device without permission. Once the
screen lock is set, it is not possible to unlock the screen or erase the content via a
Factory data reset without providing the screen lock information.
Find my device
Use the Find my device service to remotely locate, lock, unlock, or erase the
content on a lost device. After you have signed in to your Google account, Find my
device is turned on by default.
SIM card lock
Lock your SIM cards with a PIN to protect your subscription against misuse. The PIN
is required every time you restart your device.
IMEI number
Keep a copy of the IMEI number. If your device is stolen, some network providers
can use this number to stop the device from accessing the network in your country
or region.
Backup
Back up the content on your device in case your device is damaged, lost or stolen.
• To back up with a Google account, see
Backing up and synchronising with a
Google account
on page 36.
• To back up using a computer, see
Backing up and transferring data using a
computer
on page 37.
• To back up using a memory card, see
Backing up and transferring data using a
memory card
on page 37.
Screen lock
When the screen is locked you have to unlock it with a swipe gesture or with your
personal pattern, PIN, password or ngerprint. Initially, the unprotected screen
swipe is set, but it is recommended to use a more secure screen lock to protect
your device.
The security level of each lock type is listed below in order of weakest to strongest:
• Swipe: no protection, but you have quick access to the Home screen.
• Pattern: draw a simple pattern with your nger to unlock your device.
• PIN: enter a numeric PIN of at least four digits to unlock your device.
11
Int
ernet version. For personal use only.

• P
assword: enter an alpha-numeric password to unlock your device.
• Fingerprint: place your registered nger on the sensor to unlock your device.
Hint
The Smart Lock feature lets you set your device to unlock automatically in certain situations,
such as when c
onnected to a Bluetooth device or carrying your device with you. Go to
http://www.support.google.com/
and search “smart lock” for more information.
To create or change a screen lock
Note
It is very important that you remember your screen lock when using a pattern, PIN or
pas
sword. If you forget this information, it may not be possible to restore important data
such as contacts and messages.
1 Find and tap Settings > Lock screen & security > Screen lock.
2 If requested, conrm your current screen lock.
3 Choose an option and follow the on-screen instructions.
4 When a secure screen lock is used, you can set the power key to lock the screen,
set the screen lock activation time and create a lock screen message by tapping
(Settings icon).
Hint
If you use a Microsoft® Exchange ActiveSync® (EAS) account, the EAS security settings may
limit the lock screen type to only a PIN or password. Contact your network administrator to
check the implemented network security policies.
Fingerprint Manager
Register your ngerprint to use it as an additional security method for unlocking
your device or authenticating purchases. You can register up to 5 ngerprints on
your device.
The pattern, PIN, or password screen lock serves as a backup unlock method when
a ngerprint is used as a screen lock. Before registering your ngerprint, make sure
the sensor is clean and without any visible moisture.
To register a ngerprint for the rst time
1 Find and tap Settings > Lock screen & security > Fingerprint Manager.
2 Tap Next. If prompted conrm your pattern, PIN, or password, or select your
backup screen lock method and follow the on-screen instructions to set it up.
3 Follow the on-screen instructions to complete ngerprint registration.
To register additional ngerprints
1 Find and tap Settings > Lock screen & security > Fingerprint Manager.
2 Conrm your pattern, PIN, or password.
3 Tap Add ngerprint, then follow the on-screen instructions.
To delete a registered ngerprint
1 Find and tap Settings > Lock screen & security > Fingerprint Manager.
2 Conrm your pattern, PIN, or password.
3 Tap (Delete icon) to delete the ngerprint.
T
o rename a registered ngerprint
1 Find and tap Settings > Lock screen & security > Fingerprint Manager.
2 Select a registered ngerprint in the list, then enter a name and tap OK.
12
Internet version. For personal use only.

SIM card protection
Y
ou can lock and unlock each SIM card that you use in your device with a PIN.
When a SIM card is locked, the subscription linked to the card is protected against
misuse, meaning that you have to enter a PIN every time you start your device.
If you enter the PIN incorrectly too many times, your SIM card will get blocked. You
then need to enter your PUK (Personal Unblocking Key) and a new PIN. Your PIN
and PUK are supplied by your network operator.
To set up a SIM card lock
1 Find and tap Settings > Lock screen & security > SIM card lock.
2 Dual SIM users, select a SIM card.
3 Tap the Lock SIM card switch to enable.
4 Enter the SIM card PIN and tap OK. The SIM card lock is now active and you will be
prompted to enter your PIN every time you restart your device.
To change the SIM card PIN
1 Find and tap Settings > Lock screen & security > SIM card lock.
2 Dual SIM users, select a SIM card.
3 Tap Change SIM PIN.
4 Enter the old SIM card PIN and tap OK.
5 Enter the new SIM card PIN and tap OK.
6 Re-type the new SIM card PIN and tap OK.
To unlock a blocked SIM card using the PUK code
1 Enter the PUK code and tap
(Done icon).
2 Ent
er a new PIN code and tap
(Done icon).
3 Re-ent
er the new PIN code and tap
(Done icon).
No
te
If you enter an incorrect PUK code too many times, you need to contact your network
oper
ator to get a new SIM card.
Using Dual SIM devices
If you are using a Dual SIM device, it works with either one or two SIM cards
inserted. You can get incoming communication to both SIM cards and select which
number to place outgoing communication from. Before using multiple SIM cards,
you need to enable them and select a SIM card which will handle data trac.
You can forward calls that come in on SIM 1 to SIM 2 when SIM 1 is unreachable,
and vice versa. This function is called Dual SIM reachability. You must enable it
manually. See
Forwarding calls
on page 57.
To enable or disable the use of two SIM cards
1 Find and tap Settings > Network & Internet > Dual SIM.
2 Tap the SIM card switches to enable or disable the SIM cards.
To rename a SIM card
1 Find and tap Settings > Network & Internet > Dual SIM.
2 Select a SIM card and enter a new name for it.
3 Tap OK.
To select which SIM card handles data trac
1 Find and tap Settings > Network & Internet > Dual SIM > Mobile data.
2 Select the SIM card you want to use for data trac.
13
Int
ernet version. For personal use only.

Finding the IMEI number(s) of your device
Y
our device has one or two unique identication numbers that are referred to as
IMEI or Product ID. You should keep a copy of this. You may require it if your device
is stolen or when contacting support.
To view your IMEI number(s) using the dialpad
1 Find and tap
(Phone icon).
2 T
ap
(Dialpad icon).
3 Ent
er *#06# into the dialpad. The IMEI number(s) are displayed automatically.
To view your IMEI number(s) on the label strip
1 Open the slo
t cover and drag out the card tray.
2 Drag the strip outwards using your ngernail. The strip displays the IMEI
number(s).
Finding, locking or erasing a lost device
Google oers a location and security web service called Find my device. After you
have signed in to a Google account, Find my device is turned on by default. If you
lose your device, you can use Find my device to:
• Find and show where your device is located on a map.
• Lock your device and present a message on the lock screen.
• Unlock your device and reset it by erasing its content.
• Activate the ringer, even if the sound is turned o.
Your device must be turned on, have an internet connection, and have the location
service activated. The Find my device service may not be available in all countries
or regions.
For additional information about Find my device, go to
https://
support.google.com/
and search for “Find my device.”
To verify that your device can be found
• Go to
https://www.google.com/android/nd
and sign in using your Google
account.
14
Int
ernet version. For personal use only.

Using location services
L
ocation services allow applications such as Maps and the camera to use
information from your mobile or Wi-Fi network as well as GPS (Global Positioning
System) information to determine your approximate location. If you’re not within a
clear line of sight to GPS satellites, your device can determine your location using
the Wi-Fi function. And if you’re not within range of a network, your device can
determine your location using your mobile network.
In order to use your device to nd out where you are, you need to enable location
services.
To enable or disable location services
1 Find and tap Settings > Lock screen & security > Location.
2 Tap the switch to enable or disable location services.
Improving GPS accuracy
The rst time you use the GPS function in your device, it can take a few minutes for
your location to be found. To help the search, make sure you have a clear view of
the sky. Stand still and don’t cover the GPS antenna. GPS signals can pass through
clouds and plastic, but not through most solid objects such as buildings and
mountains. If your location isn’t found after a few minutes, move to another
location.
15
Int
ernet version. For personal use only.

Learning the basics
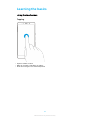
Using the t
ouchscreen
Tapping
• Open or sele
ct an item.
• Mark or unmark a checkbox or option.
• Enter text using the on-screen keyboard.
16
Int
ernet version. For personal use only.

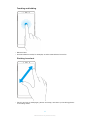
Touching and holding
• Move an item.
• Activate selection mode, for example, to select several items from a list.
Pinching in and out
• Pinch in and out on web pages, pho
tos and maps, and when you’re taking photos
or shooting videos.
17
Int
ernet version. For personal use only.

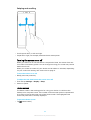
Swiping and scrolling
• Scr
oll up and down, or left and right.
• Swipe left or right, for example, between Home screen panes.
Turning the screen on or o
When your device is on and left idle for a set period of time, the screen dims and
turns o to save battery power. You can change how long your screen stays active
before it turns o.
When your screen is turned o, your device can be locked or unlocked, depending
on your screen lock setting. See
Screen lock
on page 11.
To turn the screen on or o
• Briey press the power key.
To adjust the idle time before the screen turns o
1 Find and tap Settings > Display > Sleep.
2 Select an option.
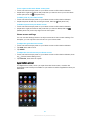
Home screen
The Home screen is the starting point for using your device. It’s similar to the
desktop on a computer screen. The number of Home screen panes is represented
by a series of dots at the lower part of the Home screen. The highlighted dot
shows the pane that is currently displayed.
To go to the Home screen
• Tap
(Home button).
18
Int
ernet version. For personal use only.

To browse the Home screen
Home screen panes
Y
ou can add new panes to your Home screen and delete panes. You can also set
the pane that you want to use as the main Home screen pane.
Note
When Google Feed is enabled, the left most pane is reserved for this service. The main
Home scr
een pane cannot be changed, and additional panes cannot be added to the left.
19
Int
ernet version. For personal use only.

To set a pane as the main Home screen pane
1 T
ouch and hold an empty area on your Home screen until the device vibrates.
2 Swipe left or right to browse to the pane that you want to set as your main Home
screen pane, then tap
(Set pane icon).
T
o add a pane to your Home screen
1 Touch and hold an empty area on your Home screen until the device vibrates.
2 Swipe the panes all the way to the right or left, then tap
(Add pane icon).
T
o delete a pane from your Home screen
1 Touch and hold an empty area on your Home screen until the device vibrates.
2 Swipe left or right to browse to the pane that you want to delete, then tap
(Delete pane icon) on the top-right corner of the pane.
Home scr
een settings
You can use the Settings shortcut to adjust some basic Home screen settings. For
example, you can adjust the size of icons on your Home screen.
To adjust the grid size of the screen
1 Touch and hold an empty area on your Home screen until the device vibrates.
2 Tap Grid, then select a size.
3 Tap APPLY.
To adjust the size of icons on your Home screen
1 Touch and hold an empty area on your Home screen until the device vibrates, then
tap
(Home screen settings icon).
2 T
ap Icon size, then select an option.
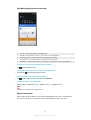
Application screen
The Application screen, which you open from the Home screen, contains the
applications that come pre-installed on your device as well as applications that you
download.
20
Int
ernet version. For personal use only.
Page is loading ...
Page is loading ...
Page is loading ...
Page is loading ...
Page is loading ...
Page is loading ...
Page is loading ...
Page is loading ...
Page is loading ...
Page is loading ...
Page is loading ...
Page is loading ...
Page is loading ...
Page is loading ...
Page is loading ...
Page is loading ...
Page is loading ...
Page is loading ...
Page is loading ...
Page is loading ...
Page is loading ...
Page is loading ...
Page is loading ...
Page is loading ...
Page is loading ...
Page is loading ...
Page is loading ...
Page is loading ...
Page is loading ...
Page is loading ...
Page is loading ...
Page is loading ...
Page is loading ...
Page is loading ...
Page is loading ...
Page is loading ...
Page is loading ...
Page is loading ...
Page is loading ...
Page is loading ...
Page is loading ...
Page is loading ...
Page is loading ...
Page is loading ...
Page is loading ...
Page is loading ...
Page is loading ...
Page is loading ...
Page is loading ...
Page is loading ...
Page is loading ...
Page is loading ...
Page is loading ...
Page is loading ...
Page is loading ...
Page is loading ...
Page is loading ...
Page is loading ...
Page is loading ...
Page is loading ...
Page is loading ...
Page is loading ...
Page is loading ...
Page is loading ...
Page is loading ...
Page is loading ...
Page is loading ...
Page is loading ...
Page is loading ...
Page is loading ...
Page is loading ...
Page is loading ...
Page is loading ...
-
 1
1
-
 2
2
-
 3
3
-
 4
4
-
 5
5
-
 6
6
-
 7
7
-
 8
8
-
 9
9
-
 10
10
-
 11
11
-
 12
12
-
 13
13
-
 14
14
-
 15
15
-
 16
16
-
 17
17
-
 18
18
-
 19
19
-
 20
20
-
 21
21
-
 22
22
-
 23
23
-
 24
24
-
 25
25
-
 26
26
-
 27
27
-
 28
28
-
 29
29
-
 30
30
-
 31
31
-
 32
32
-
 33
33
-
 34
34
-
 35
35
-
 36
36
-
 37
37
-
 38
38
-
 39
39
-
 40
40
-
 41
41
-
 42
42
-
 43
43
-
 44
44
-
 45
45
-
 46
46
-
 47
47
-
 48
48
-
 49
49
-
 50
50
-
 51
51
-
 52
52
-
 53
53
-
 54
54
-
 55
55
-
 56
56
-
 57
57
-
 58
58
-
 59
59
-
 60
60
-
 61
61
-
 62
62
-
 63
63
-
 64
64
-
 65
65
-
 66
66
-
 67
67
-
 68
68
-
 69
69
-
 70
70
-
 71
71
-
 72
72
-
 73
73
-
 74
74
-
 75
75
-
 76
76
-
 77
77
-
 78
78
-
 79
79
-
 80
80
-
 81
81
-
 82
82
-
 83
83
-
 84
84
-
 85
85
-
 86
86
-
 87
87
-
 88
88
-
 89
89
-
 90
90
-
 91
91
-
 92
92
-
 93
93


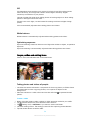
Sony I3312 Operating instructions
- Category
- Smartphones
- Type
- Operating instructions
Ask a question and I''ll find the answer in the document
Finding information in a document is now easier with AI
Related papers
-
Sony Xperia XZ Premium Owner's manual
-
Sony Xperia XZ1 Owner's manual
-
Sony H3123 - Black/ SBH-90C/ SCSH10 User guide
-
Sony H H8166 (Chrome Black) User manual
-
Sony H8276 User guide
-
Sony H H3413 Operating instructions
-
-
Sony Xperia I4293 User manual
-
-
Sony H H4113 User guide
