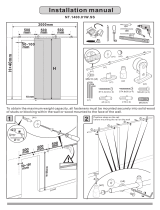
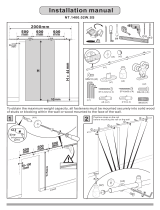
BDI 8929 ESP Owner's manual

Category
TV stands
Type
Owner's manual

This manual is also suitable for

1
Your Avion
®
Home Theater Furniture is engineered for easy assembly.
Carefully follow this procedure to prevent any damage.
Placement and Maintenance
Avion
®
Home Theater Furniture is designed for indoor use on level floors.
Clean glass with glass cleaner, and steel parts and wood veneer with a
moist cloth.
Step 1
Unpack and Identify
Unpack and identify the components at left. Note that some components
are shipped inside the cabinet. The assembly workspace should be a non-
marring surface such as carpet. For missing hardware pieces, please
contact BDI Customer Service at [email protected]. For all
other concerns, please contact your BDI Retailer.
Step 2
Install Handles
Install Handles (K) on the doors and drawers using the
M4 x 25mm
Screws (J) and the Phillips Screwdriver (A) supplied.
Component List
C - Hollow Bolt Wrench
x 1
F - Assembled Cabinet
x 1
E - 1/4”-20 x 2”
Machine Screw x 10
D - Hollow Bolts x 4
Pre-installed on
Metal Legs (H)
G - Metal Rail x 2
J -M4 x 25mm Screws
x 8
B - 4mm Hex Drivers
x 2
A - Phillips Screwdriver
x 1
I - Wood Leg x 1
K - Handle x 4
L - Adjustable Shelf
x 2
M - Back Panel x 2
Designed by BDI Design Studio.
These distinctive product configurations are protected by US and international
patents, trade dress, and/or copyright laws. “Avion” and BDI are trademarks of
Becker Designed, Inc. All Rights reserved. ©2009, BDI
Made in China. 89278929REV03042010v6
A v i o n
®
8927a n d 8929
a s s e m b l y i n s t r u c t i o n s
b d i u s a .c o m c u s t o m e r s e r v i c e @b d i u s a .c o m
H - Metal Leg x 2
K
J
2
a s s e m b l y i n s t r u c t i o n s
b d i u s a .c o m c u s t o m e r s e r v i c e @b d i u s a .c o m
3
F
Completed base
assembly
Step 3
Build and Install Base Assembly
Using the Hollow Bolt Wrench (C), remove the four (4) pre-installed
Hollow Bolts (D) from Metal Leg (H). screw the
Metal Rail (G) to the
top of Metal Leg (H) with Hollow Bolts (D).
Step 4
Carefully lay Assembled Cabinet (F) back-side down. Using one of
4mm Hex Drivers (B), attach the completed base assembly to the
bottom of the Assembled Cabinet (F)
with 1/4”-20 x 2” Machine
Screws (E)
. *Note: Each of the metal legs has levelers that can be
adjusted from inside the cabinet using one of the 4mm Hex Drivers
(B).
E x 8
H
H
D
G
G
Detail view of Hollow Bolts (D)
connecting the Metal Rail (G) to
the top of Metal Leg (H).
D
G
H
H
Completed base assembly
NOTE: Make sure
that the larger bolt
opening on Metal Rail
(G) faces toward the
floor.
3
a s s e m b l y i n s t r u c t i o n s
b d i u s a .c o m c u s t o m e r s e r v i c e @b d i u s a .c o m
Completed base
assembly
Step 5
Install Wood Leg (I) at rear-center edge of cabinet bottom using two
(2) 1/4”-20 x 2” Machine Screws (E) and one of 4mm Hex Drivers
(B). Wood Leg (I) must straddle the rearmost Metal Rail (G), as
indicated in drawing.
NOTE: One (1) fastening
screw is installed from
cabinet interior. The other
fastening screw is installed
from cabinet exterior, near
back edge of cabinet, and
is most easily installed with
cabinet in upright position.
E
E
I
I
Step 6
Install both Back Panels (M) to the backside of the cabinet.
*Note: Velcro straps are included as wire management for your
convenience.
Optional Flat Panel TV Mount
This BDI cabinet is compatible with BDI’s Flat-
Panel TV Mount #9970
(sold separately), with
the following features:
attaches easily to the back of the cabinet
accommodates most TVs up to 60”
swivel allows for rotating for optimal viewing
allows adjustable TV mounting height
accepts and route cables to and from the TV
F
or more information, visit www.bdiusa.com
4
a s s e m b l y i n s t r u c t i o n s
b d i u s a .c o m c u s t o m e r s e r v i c e @b d i u s a .c o m
5
Step 7
Optional fabric speaker or glass insert panel
Avion’s drawer and door fronts feature removable/replaceable panel
inserts to permit customization of your cabinet’s appearance and utility.
(Contact BDI Customer Service at [email protected])
Installing optional panel inserts is quick and easy:
1. From the inside of the door, and starting at one corner of the
pre-installed Glass or Speaker panel insert, carefully pull away all four
sections of the panel retention trim, running along the perimeter of the
insert. (Use a blunt, tapered object or your finger to start removing the
rubber material.)
2. Once the trim material is completely pulled away, remove the pre-
installed panel insert and replace it with the desired panel insert.
3. Re-install the trim, pressing it carefully back into the groove around
the new panel insert, section by section, to complete the panel insert
installation.
Step 8
Center channel speaker option
If you decide to use your top/center drawer area for a center channel
speaker, the drawer may be easily removed. In order to do this, follow
the steps below.
Step 9
Option: Removing Center Drawer Divider
Remove Center Drawer Divider by lifting Divider straight up.
Drawer Divider Pins can be removed by hand.
a. Remove rubber trim and
glass panel.
b. Replace insert panel
Fully extend drawer and locate plastic lever
on drawer slide.
Simultaneously on the LEFT side of drawer, lift UP on plastic lever AND on the RIGHT
side of drawer, push DOWN on plastic lever and pull STRAIGHT OUT the entire drawer
assembly. Remove drawer slides from interior side panels using a Phillips screwdriver.
5
a s s e m b l y i n s t r u c t i o n s
b d i u s a .c o m c u s t o m e r s e r v i c e @b d i u s a .c o m
STEP 2 - Adjust Door Hinges (if needed)
The doors on your cabinet should be evenly spaced and the doors should open and close freely without rubbing against the
door frame.
If the cabinet’s doors appear out of alignment, this condition can be
corrected with minor adjustment to the European hinges on each
door.
Because these hinges are infinitely adjustable, adjusting one
hinge element can sometimes cause the need for adjustments
to other elements. But with a few adjustments, you can modify
the orientation of the cabinet doors to make sure that they hang
perfectly within your cabinet.
Use a Phillips screwdriver to adjust the door hinges:
By adjusting
• Screw 1, the door will move LEFT or RIGHT
within the frame. Make minor adjustments at both top and
bottom hinges for best results.
By adjusting • Screw(s) 2, the door will move UP or DOWN
within the frame (the top and bottom hinges must be adjusted the
same amount).
By adjusting • Screw 3 the entire door will move IN or OUT,
opening or closing the gap between the door frame and cabinet
(this screw rarely needs adjustment).
1.
2.
3.
3.
1.
2.
*
2.
*
Thank you for choosing BDI.
Your BDI home theater cabinet is engineered to include a range of adjustments. Please read and retain this guide so that
you can fully enjoy the look and use of your cabinet for years to come.
Unless manual leveling is required or you wish to prevent the cabinet from rolling, you may prefer to keep the cabinet’s
levelers up and off the floor. This allows easier cabinet movement for greater access to rear panels and wire-
management, and permits easier cleaning/vacuuming underneath the cabinet.
By following the steps in this guide, you can be sure that your BDI cabinet is in optimum tune and adjustment. If you need
additional assistance, contact BDI at [email protected].
Fine tuning your BDI Avion Home Theater Furniture
After unpacking and assembling your cabinet, inspect it to be sure that it is sitting level on the floor, that all doors appear
level, and that they open and close freely without rubbing or binding.
Due to uneven floors or perhaps gentle jostling during shipment, your BDI cabinet may not appear to be in perfect
alignment when first assembled or when loaded with heavier electronic equipment. Such alignment issues are usually
minimized or eliminated with only a few minor adjustments.
STEP 1 - Level the cabinet (if needed)
Levelers are integrated into each leg assembly and are accessed from inside
the cabinet. If your floor is uneven, you may extend one or more levelers (with the
provided 4mm Hex Drivers (B)) to attain a level, stable cabinet placement. Turning
the leveler clockwise will extend the leveler; turning it counter-clockwise will retract it.
INCORRECT! Door is
out of alignment with
the rest of the unit.
CORRECT! Door is sit-
ting squarely and evenly
spaced on tops and
sides.
  • Page 1 1
  • Page 2 2
  • Page 3 3
  • Page 4 4
  • Page 5 5

BDI 8929 ESP Owner's manual

Category
TV stands
Type
Owner's manual
This manual is also suitable for

Ask a question and I''ll find the answer in the document

Finding information in a document is now easier with AI