Page is loading ...

Zen User Manual 1
User Manual
Zen
Revision 11.6
September, 2023
© Tempest Lighting, Inc.
For Zen enclosures manufactured after September 2022

Zen User Manual 2
Table of Contents
Table of Contents ........................................................................................................................................................................................ 2
Approvals – US/Canada .......................................................................................................................................................................... 5
Approvals – Europe ................................................................................................................................................................................ 6
Approvals – China ................................................................................................................................................................................... 7
Introduction ................................................................................................................................................................................................ 8
IMPORTANT: Safety Advisories .............................................................................................................................................................. 8
Installation ................................................................................................................................................................................................... 9
Dimensions, Weights & Rigging Points ................................................................................................................................................ 10
Mounting Hardware Options ............................................................................................................................................................... 11
Mounting Bolts ................................................................................................................................................................................. 11
Unistrut Kit ........................................................................................................................................................................................ 11
Other Mounting Options .................................................................................................................................................................. 11
Wiring the Enclosure ................................................................................................................................................................................ 12
Power Wiring ........................................................................................................................................................................................ 12
SAFETY NOTICE ................................................................................................................................................................................. 12
Electrical Standards .......................................................................................................................................................................... 12
Wiring Access .................................................................................................................................................................................... 13
Using the Conduit Knockouts ........................................................................................................................................................... 13
Wiring Access .................................................................................................................................................................................... 13
Wiring Paths ...................................................................................................................................................................................... 14
Wiring: All models, North America/Japan – Single Feed ................................................................................................................ 15
Wiring: All models, North America/Japan – Split Feed .................................................................................................................. 16
Wiring: All models, International – Single Feed .............................................................................................................................. 17
Wiring: All models, International – Split Feed ................................................................................................................................ 18
Installing the Projector ............................................................................................................................................................................. 19
General:............................................................................................................................................................................................. 19
Blower Baffle..................................................................................................................................................................................... 20
Projector Clamps .............................................................................................................................................................................. 20
Zen Temperature Sensor ................................................................................................................................................................. 21
Projector-Specific Mounting Notes ..................................................................................................................................................... 22
Panasonic PT-RZ34K, RQ35K, RQ50K ............................................................................................................................................... 22
Power Connections – Projector and Aux Equipment ......................................................................................................................... 23
Important: Zen only - Check Lamp-on Current ................................................................................................................................... 23
Enclosure Operation ................................................................................................................................................................................. 24
Zen PWM Fan Control Settings ........................................................................................................................................................ 24
Remote Monitoring Connections ........................................................................................................................................................ 26

Zen User Manual 3
DEC4 Ethernet Adapters – 51.D4.15, 51.D4.23 .................................................................................................................................. 27
51.D4.15 Default Configuration ....................................................................................................................................................... 27
51.D4.15 Additional Support ........................................................................................................................................................... 27
RS485 (DMX/RDM) Cable Terminations .......................................................................................................................................... 28
Line Termination Switch Settings .................................................................................................................................................... 29
System Manager Installation ........................................................................................................................................................... 30
Enclosure Management ................................................................................................................................................................... 32
Enclosure Monitoring ....................................................................................................................................................................... 32
DMX Control ..................................................................................................................................................................................... 34
Firmware Uploads ............................................................................................................................................................................ 34
Remote Configuration ...................................................................................................................................................................... 34
Tempest Equipment Management Protocol .................................................................................................................................. 35
Zen Digital Enclosure Control ................................................................................................................................................................... 36
Schematic (PWM) ............................................................................................................................................................................. 36
DEC4 Main Functions ........................................................................................................................................................................... 37
Firmware Revision ............................................................................................................................................................................ 37
Factory Settings – Data Modes ............................................................................................................................................................ 37
Hardware Indicators & Fuses ............................................................................................................................................................... 38
DEC System Control Board ............................................................................................................................................................... 38
Zen PWM Fan Transition board ....................................................................................................................................................... 39
Control Interface .............................................................................................................................................................................. 40
Zen DEC4 Operating Modes ................................................................................................................................................................. 41
RDM Only Monitor (Factory Default) .............................................................................................................................................. 41
RDM+DMX Control ........................................................................................................................................................................... 41
RDM+DMX Service ........................................................................................................................................................................... 41
User Interface LCD Display ............................................................................................................................................................... 42
Control Interface Operation ............................................................................................................................................................ 42
Control Menu ........................................................................................................................................................................................ 43
Set DMX Options .............................................................................................................................................................................. 43
Set Temp Units ................................................................................................................................................................................. 44
Set Temp Ranges .............................................................................................................................................................................. 44
Set Max Humidity ............................................................................................................................................................................. 44
Set Lamp Options ............................................................................................................................................................................. 44
Set Fan Function ............................................................................................................................................................................... 45
Status Display .................................................................................................................................................................................... 46
DEC4 Firmware Updates ...................................................................................................................................................................... 48
Direct Firmware Update (System Control Board only) ................................................................................................................... 48
Indirect Firmware Updates (System Control Board and RS485 Board) ......................................................................................... 52

Zen User Manual 4
Requirements ................................................................................................................................................................................... 52
Installation Procedure ...................................................................................................................................................................... 52
Routine Maintenance ............................................................................................................................................................................... 57
Clean Port Glass ................................................................................................................................................................................ 57
Check Filter ....................................................................................................................................................................................... 57
Zen - Check Temperature/Humidity Sensor ................................................................................................................................... 58
For After Sales Support .................................................................................................................................................................... 58
Troubleshooting ........................................................................................................................................................................................ 59
Warranty ................................................................................................................................................................................................... 60

Zen User Manual 5
Approvals – US/Canada
Tempest Lighting, Inc. declares that the Projector Enclosure Series
listed below are authorized to use the marking specified by UL LLC:
Blizzard, Part Number 52.xxx
Whisper, Part Number 53.xxx
Typhoon, Part Number 54.xxx
Cyclone, Part No. 55.xxx
Tacit, Part No. 56.xxx
Zen, Part No. 57.xxx
Tempest projector Enclosures are UL Listed, File Number E498709.
September, 2023
Tempest Lighting, Inc.

Zen User Manual 6
Approvals – Europe
CERTIFICATE AND DECLARATION OF CONFORMITY
FOR CE MARKING
Tempest Lighting, Inc.
11845 Wicks Street, Sun Valley, CA 91352, USA
t: +1 818 787 8984 f: +1 818 252 7101 e: info@tempest.biz
www.tempest.biz
Tempest Lighting, Inc. declares that their
Zen Projector Enclosure Series 57.xxx.xx
complies with the Essential Requirements of the following EU Directives:
Low Voltage Directive 2014/35/EU Test Report 60065-6500-01-14
Electromagnetic Compatibility Directive 2014/30/EU Test Report 61000-6500-03-14
and further conforms with the following EU Harmonized Standards:
EN 60065 : 2014/AC:2016 Test Report 60065-6500-01-16
EN 60529:1991/AC:2016-12 Test Report 60529-6500-02-16
EN 61000-6-3:2007+A1:2011 Test Report 61000-6500-03-14
EN61000-6-1:2007 Test Report 61000-6500-03-14
EN55015:2019/A11:2020 Test Report 61000-6500-03-14
Dated: 21st July 2021
Position of signatory: President
Name of Signatory: Tim Burnham
Signed below:
on behalf of Tempest Lighting, Inc.
. . . . . . . . . . . . . . . . . . . . . . . . . . . . .

Zen User Manual 7
Approvals – China

Zen User Manual 8
Introduction
Thank you for purchasing a Tempest enclosure! We have worked hard to provide you with the very
best product available for its purpose, and we shall continue to do everything possible to ensure
that it works well for you for many years to come.
Please read this manual before starting work!
In the event of difficulty, please contact your Tempest reseller or Tempest direct:
+1 818 787 8984
We will do everything we can to help you get the very best results from your Tempest enclosure.
IMPORTANT: Safety Advisories
• All installation and rigging work done must where applicable be designed and built in
accordance with norms and standards of the local authority having jurisdiction of the
installation site. It is the responsibility of the installer to obtain such approvals as may be
required to achieve full compliance.
• All electrical work must be carried out by a suitably licensed electrical contractor in full
compliance with local electrical standards.
• Lifting: some enclosures and the equipment inside them may be heavy. Use properly
rated lifting equipment where appropriate and never attempt to carry out work with
fewer than the number of workers needed to lift safely.
• It is the responsibility of the installer to ensure that all local building, safety and electrical
codes are strictly adhered to in the installation of this enclosure. Tempest Lighting, Inc.,
its employees and agents are in no way responsible for damage arising from failure to
follow either the instructions in this manual or building, safety and electrical codes
prevailing at the installation location.
• Do not attempt to install or operate the enclosure before fully reading and understanding
this manual
• Never allow anyone who has not read this manual to open the enclosure or perform
maintenance on the projector within.
• Never leave the enclosure unattended when open.
• Always make sure all bolts and latches are tight and safety locks are in place after
performing any form of maintenance on the unit.
• Do not open any electrical boxes until power has been shut off to all supply lines to the
enclosure (including the one powering the projector).
• Do not open the enclosure in wet weather.

Zen User Manual 9
Installation
Integral Cooling
Everything is in the box – air is drawn in through an acoustic foam labyrinth in the enclosure base, and exhausted out of the front
of the enclosure, driven by a variable-speed blower behind the projector, muffled by a further acoustic foam exhaust labyrinth
above the projector chamber.
Note that the exhaust blower captures all the exhaust air leaving the back of the projector, preventing recirculation in the
projector chamber. For projectors with exhausts other than on the back face of the projector chassis, consult Tempest.
DO NOT OBSTRUCT THE AIR INLET AND EXHAUST VENTS.
Exhaust
Labyrinth
Blower
Inlet
Labyrinth
Inlet
Filter
Exhaust
Baffle
Air Inlet
Exhaust

Zen User Manual 10
Dimensions, Weights & Rigging Points
Download Detailed PDF and DWG 2D drawings, and 3D CAD Blocks at www.tempest.biz
Zen
A in
A mm
B in
B mm
C in
Cmm
D in
D mm
E in
E mm
W lb
W kg
57.100L
40
1,016
32
813
24
610
38
965
30
762
89
40
57.150L
48
1,219
32
813
24
610
46
1,168
30
762
107
48
57.210L
54
1,372
34
864
29
737
52
1,321
32
813
154
70
57.305L
56
1,422
34
864
32
813
54
1,372
32
813
165
75
57.310L
62
1,575
34
864
29
737
60
1,524
32
813
177
80
57.320L
70
1,778
37
940
32
813
68
1,727
35
889
240
109
57.324L
60
1,524
37
940
35
889
58
1,473
35
889
225
102
57.525L
67
1,702
37
940
29
737
65
1,651
35
889
208
95
Projector Maximum Dimensions/Power (models 57.100-150)
Zen
L in
W in
H in
L mm
W mm
H mm
Watts
57.100L
27
24.5
10
686
622
254
1,250
57.150L
35
24.5
12
889
622
305
1,800
Rigging Points:
M12-1.75, six places top, 4
places bottom surface
Power & Data
Conduit Entries:
US ¾” NPT
International PG21
User Interface
(Zen +)

Zen User Manual 11
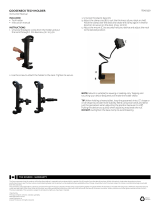
Mounting Hardware Options
Mounting Bolts
• HANGING: Each Enclosure MUST be mounted with
all six rigging points.
• STANDING: Each Enclosure must be mounted with
all four rigging points.
• All mountings must be made using the M12
threaded holes on the enclosure chassis.
• Use an 8mm hex key to secure the M12 socket cap
screws provided.
IMPORTANT SAFETY NOTICE
Installer must ensure that all mounting points are secure
and conform to local safety regulations. Tempest Lighting
Inc. accepts no responsibility for damage or injury arising
from inappropriate or unsafe installation.
Unistrut Kit
If mounting positions for the corner bolts are not
convenient, use the Unistrut Kit (55.UR.xxx) to add two
Unistrut rails to the top or bottom of the enclosure.
Using standard Unistrut channel nuts, the enclosure may
now be attached at any point along the Unistrut rails.
Other Mounting Options
Tempest has a wide range of mounting accessories, and
unparalleled experience mounting projector enclosures –
contact us to discuss special needs at [email protected].
8mm
M12-1.75 bolts
Use 8mm hex key
HANGING: Use all
six rigging points
STANDING: Use all
four rigging points

Zen User Manual 12
Wiring the Enclosure
Power Wiring
SAFETY NOTICE
All power wiring must be performed by a competent electrician, appropriately licensed in the jurisdiction where the installation takes place. All electrical work must be done in full compliance with
all electrical and safety norms applicable to the installation site. Isolate all power feeds before opening the enclosure.
Tempest Lighting, Inc., its employees and agents will not be held responsible for damage or injury caused by disregarding this notice.
Electrical Standards
Important:
Zen enclosures run on any electrical supply, from 100-250VAC, 50/60Hz.
North America and Japan: 200-208VAC using two hots and no neutral is acceptable, but a neutral should be installed to
supply the two auxiliary equipment outlets at 100-120V.
Power feed Rating:
EITHER Single Feed:
Single circuit, power rating to suit projector plus 150W
OR Split Feed (see next section):
One circuit, power rating to suit projector, AND
One circuit, power rating 200W for enclosure
Note:
(1) AC Fans are 200-250Vac
(2) DC Fans are 48Vdc
(3) Fan Power Supply is autoranging between 100-240VAC, 50/60Hz
(4) DEC Controller is autoranging for any voltage 90-265VAC, 50/60Hz

Zen User Manual 13
Wiring Access
You have a choice of conduit entry points: either on the
top or the back panel.
Conduit openings accept PG21 (International, 29mm
hole) and ¾” NPT (North America) conduit fittings.
Use permanent or flexible conduit to connect power and
signal cables to your enclosure.
ALWAYS RUN POWER AND SIGNAL CABLES IN SEPARATE
CONDUITS.
Using the Conduit Knockouts
Use a screwdriver to bend the inner conduit blank covers
back inside the enclosure. It is not necessary to break off
the cover tabs – just bend them right back.
Wiring Access
Remove the wiring cover and conduit plate screws and
washers and remove both covers.
(Zen pictured here)
Conduit Entries:
Back Panel
Conduit Entries:
Top Panel
Inside view
Wiring Cover
Conduit Plate

Zen User Manual 14
Wiring Paths
Follow these wiring entry paths, depending on whether you choose top or rear wiring access:
Top Wiring Access Rear Wiring Access
Illustrations show Zen
Power Wires Signal Wires
Power Wires
Signal Wires
Conduit Plate
Feed signal wire(s)
through this hole to
the projector chamber

Zen User Manual 15
Wiring: All models, North America/Japan – Single Feed
Single Feed Wiring (most common)
Enclosure and projector are fed from the
same branch circuit.
Fuse rating: projector power + 400W
Use the two short wires in the Split Feed
Wiring Kit to link L1 – L1 and L2 – L2
Neutral is required for
aux power outlets at
100-120VAC
For clarity, internal wiring is not shown

Zen User Manual 16
Wiring: All models, North America/Japan – Split Feed
Split Feed Wiring
The enclosure and projector are fed from
separate branch circuits:
Projector power: fuse to projector power rating
Enclosure Power: 400W
IMPORTANT:
Cut the links on the DEC4 circuit board
before connecting power to the
enclosure, as shown here:
Then:
Connect the two wires in the Split Feed
Wiring Kit from the terminal block
to the DEC4 power terminals,
as follows:
DEC4 TERMINAL BLOCK
SPLIT L ---------- L1 PROJECTOR
SPLIT N --------- L2 PROJECTOR
Neutral is required for
aux power outlets at
100-120VAC

Zen User Manual 17
Wiring: All models, International – Single Feed
Single Feed Wiring (most common)
Enclosure and projector are fed from the
same branch circuit.
Fuse rating: projector power + 400W
Use the two short wires in the Split Feed
Wiring Kit to link L1 – L1 and L2 – L2
For clarity, internal wiring is not shown

Zen User Manual 18
Wiring: All models, International – Split Feed
Split Feed Wiring
The enclosure and projector are fed from
separate branch circuits:
Projector power: fuse to projector power rating
Enclosure Power: 400W
IMPORTANT:
Cut the links on the DEC4 circuit board
before connecting power to the
enclosure, as shown here:
Then:
Connect the two wires in the Split Feed
Wiring Kit from the terminal block
to the DEC4 power terminals,
as follows:
DEC4 TERMINAL BLOCK
SPLIT L ---------- L1 PROJECTOR
SPLIT N --------- L2 PROJECTOR
For clarity, internal wiring is not shown

Zen User Manual 19
Installing the Projector
General:
The projector sets on a pair of vibration-isolated
bridges, accessible from either side.
IMPORTANT: The back of the projector MUST
press snugly against the foam pad on the front of
the blower baffle. This is to prevent recirculation
of exhaust air, which would require higher fan
speed to maintain a good working temperature
and therefore make more noise.
When the projector is aligned, use the clamps to
hold the projector feet in place. If you ever need
to remove the projector for service, remove the
clamps on one side, but leave the other clamps
in place to reposition the projector accurately
after service.
Measure the distance between projector feet.
Loosen the projector bridge screws (both sides)
and position the bridges to align with the
projector feet.
Tighten the projector bridge screws.
Blower Baffle
Blower baffle
foam pad
Projector foot
clamp
Projector Bridge

Zen User Manual 20
Blower Baffle
Depending on the projector and lens, the blower
baffle depth will vary to place the front of the
lens in an optimal relationship to the port glass.
The blower baffle height is adjustable. Position it
to fit snugly around the projector exhaust vents
on the projector back panel.
Projector Clamps
With the projector in position, complete the
projector alignment.
Slide all four projector clamps up to the
projector feet and tighten the projector clamp
knobs.
Tip:
If you ever need to remove the projector for
service, remove the clamps from one side only,
and slide the projector out. When you replace the
projector, slide it up to the fixed clamps and your
alignment should still be good.
Blower Baffle height
adjustment screw (both
sides)
Blower Baffle
Blower baffle
foam pad
Projector Clamp
Projector Clamp
Knob
/