
Installation Instructions
SAFPAC17-527SAFPAC17-527
Alternate Action
Food Waste Disposer Control System
This control system provides safe and convenient remote on/o switching This control system provides safe and convenient remote on/o switching
that alternates power between two 120 Vac loads.that alternates power between two 120 Vac loads.
The system consists of the following:The system consists of the following:
(1) SAFPAC power module with two grounded outlets(1) SAFPAC power module with two grounded outlets
(1) Push button(1) Push button
(1) Air tubing (6 ft. length)(1) Air tubing (6 ft. length)
OPERATIONOPERATION
When the push button is pressed, the electrical power is switched between When the push button is pressed, the electrical power is switched between
the two outlets on the SAFPAC power module. This feature allows a second the two outlets on the SAFPAC power module. This feature allows a second
appliance to be plugged in (such as a hot water dispenser) and momentarily appliance to be plugged in (such as a hot water dispenser) and momentarily
interrupts its power to run the disposer. The SAFPAC power module interrupts its power to run the disposer. The SAFPAC power module
automatically turns the second appliance back on when the disposer is automatically turns the second appliance back on when the disposer is
switched o.switched o.
CAUTION:CAUTION: To avoid damage to this equipment or to the equipment being To avoid damage to this equipment or to the equipment being
controlled, do not turn on and o rapidly.controlled, do not turn on and o rapidly.
Plug power coPlug power cord from SAFPAC power module into a dedicated rd from SAFPAC power module into a dedicated grounded grounded
120 Vac outlet that is continuously energized.120 Vac outlet that is continuously energized.
ELECTRICAL RATINGELECTRICAL RATING
13 Amps (non-inductive) @ 120 Vac13 Amps (non-inductive) @ 120 Vac
WARNING - TO AVOID RISK OF INJURYWARNING - TO AVOID RISK OF INJURY
For indoor use in dry locations onlyFor indoor use in dry locations only
The SAFPAC power module is intended to be used at room temperatureThe SAFPAC power module is intended to be used at room temperature
Do not exceed specied electrical ratingsDo not exceed specied electrical ratings
Do not crimp or damage tubingDo not crimp or damage tubing
No user serviceable components insideNo user serviceable components inside
Opening controller will void manufacturer’s warrantyOpening controller will void manufacturer’s warranty
INSTALLATION INSTRUCTIONS INSTALLATION INSTRUCTIONS
Read all instructions before installing control system.Read all instructions before installing control system.
1. 1. The push button The push button MUSTMUST be mounted within 5 feet of the controller outlet. be mounted within 5 feet of the controller outlet.
Mount the push button either directly through a standard sink hole Mount the push button either directly through a standard sink hole
or through the counter top by drilling a 1 1/4” diameter hole. Select a or through the counter top by drilling a 1 1/4” diameter hole. Select a
location which is convenient for user operation and easily accessible for location which is convenient for user operation and easily accessible for
service and/or removal. The push button body can be mounted through service and/or removal. The push button body can be mounted through
surfaces up to 2” thick.surfaces up to 2” thick.
2. 2. Remove the mounting nut from the push button. The rubber gasket Remove the mounting nut from the push button. The rubber gasket
MUSTMUST be located between the threaded body ange and the mounting be located between the threaded body ange and the mounting
surface. Insert the threaded body through the mounting hole and surface. Insert the threaded body through the mounting hole and
re-secure the mounting nut. Tighten to ensure a watertight seal.re-secure the mounting nut. Tighten to ensure a watertight seal.
3. 3. Securely connect one end of the air tubing to the tting on the push Securely connect one end of the air tubing to the tting on the push
button.button.
4. 4. Mount controller module within 3 feet of wall outlet, disposer and Mount controller module within 3 feet of wall outlet, disposer and
second appliance to be controlled. Use two #8 screws (not provided). second appliance to be controlled. Use two #8 screws (not provided).
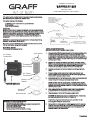
Orient module as shown in gure above.Orient module as shown in gure above.
5. 5. Route the air tubing to the SAFPAC power module in a convenient path Route the air tubing to the SAFPAC power module in a convenient path
where it will not be kinked, cut or become disconnected. where it will not be kinked, cut or become disconnected.
NOTE: DO NOTNOTE: DO NOT route the air tubing taut, The tubing should sag to a route the air tubing taut, The tubing should sag to a
level that is lower than the SAFPAC power module (see gure above). level that is lower than the SAFPAC power module (see gure above).
Securely connect the remaining end of the air tubing to the tting on the Securely connect the remaining end of the air tubing to the tting on the
SAFPAC power module.SAFPAC power module.
6. 6. Plug power cord from the SAFPAC power module into a dedicated, Plug power cord from the SAFPAC power module into a dedicated,
grounded 120 Vac wall outlet that is continuously energized.grounded 120 Vac wall outlet that is continuously energized.
7. 7. Plug the disposer into the SAFPAC power module outlet.Plug the disposer into the SAFPAC power module outlet.
CAUTION:CAUTION: the disposer may begin to operate. If it does, simply the disposer may begin to operate. If it does, simply press press
and release the push button to turn the disposer o. and release the push button to turn the disposer o.
If applicable, plug the second appliance to be controlled into the If applicable, plug the second appliance to be controlled into the
remaining SAFPAC power module outlet.remaining SAFPAC power module outlet.
8. 8. Be sure that the control system is operating properly before using the Be sure that the control system is operating properly before using the
disposer. Press and release the push button to turn the disposer ON. disposer. Press and release the push button to turn the disposer ON.
Press and release the push button again to turn the disposer OFF, Press and release the push button again to turn the disposer OFF,
returning power to the second outlet.returning power to the second outlet.
POWER MODULEPOWER MODULE
Push button
Threaded
Body Flange
Air Tubing
Connection
Rubber
Gasket
Mounting
Surface
Mounting Nut
Air Tubing
Connection
LIT045 REV ALIT045 REV A

 1
1

Delta Faucet 72050-BL Installation guide
InSinkErator STS-OOSN Installation guide
Viking Range STSK Installation guide
Westbrass ASB-2B3-26 Installation guide
Hotpoint HDA3600H50BB Installation guide
Franke WD 3428 Installation guide
ProFlo PFAS202ZSS Installation guide
Hobart LEGACY 60-QUART Installation Operation And Care