Page is loading ...
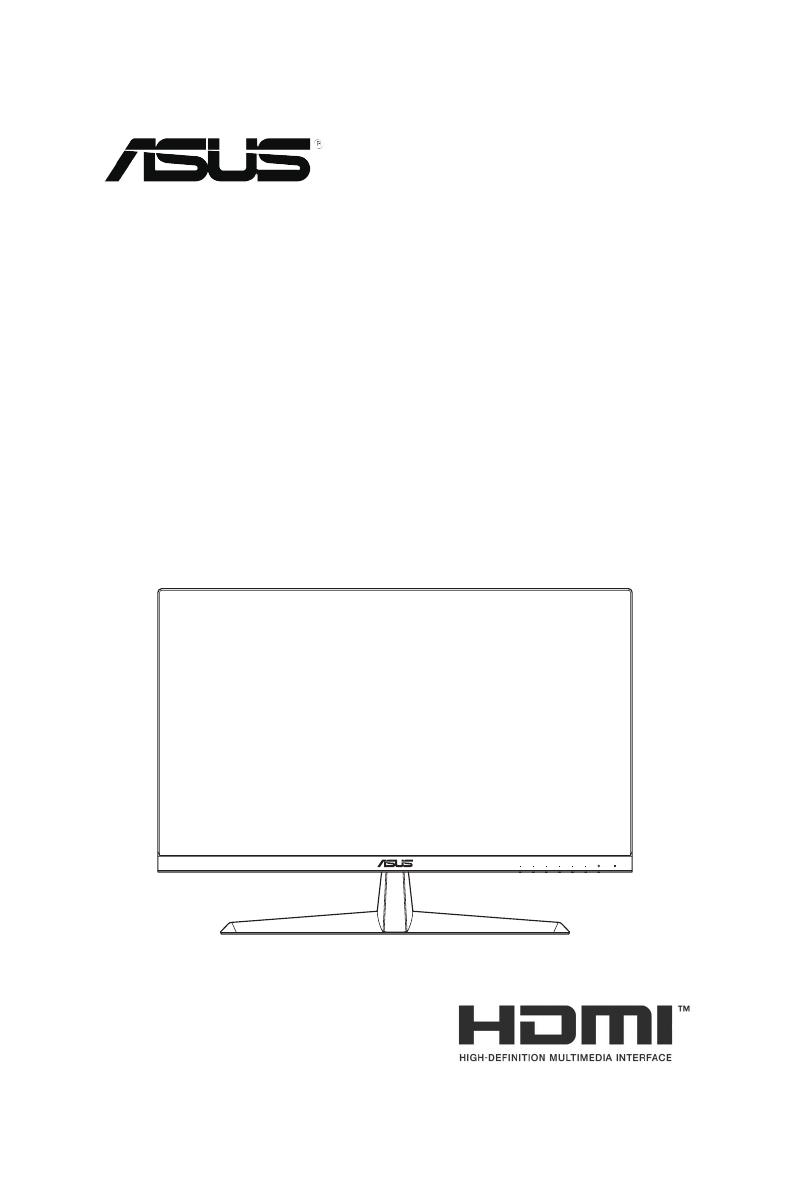
VY249HF Series
LCD Monitor
User Guide

ii
Copyright © 2023 ASUSTeK COMPUTER INC. All Rights Reserved.
No part of this manual, including the products and software described in it, may be reproduced,
transmitted, transcribed, stored in a retrieval system, or translated into any language in any form or by any
means, except documentation kept by the purchaser for backup purposes, without the express written
permission of ASUSTeK COMPUTER INC. (“ASUS”).
Product warranty or service will not be extended if: (1) the product is repaired, modied or altered, unless
such repair, modication of alteration is authorized in writing by ASUS; or (2) the serial number of the
product is defaced or missing.
ASUS PROVIDES THIS MANUAL “AS IS” WITHOUT WARRANTY OF ANY KIND, EITHER EXPRESS
OR IMPLIED, INCLUDING BUT NOT LIMITED TO THE IMPLIED WARRANTIES OR CONDITIONS OF
MERCHANTABILITY OR FITNESS FOR A PARTICULAR PURPOSE. IN NO EVENT SHALL ASUS, ITS
DIRECTORS, OFFICERS, EMPLOYEES OR AGENTS BE LIABLE FOR ANY INDIRECT, SPECIAL,
INCIDENTAL, OR CONSEQUENTIAL DAMAGES (INCLUDING DAMAGES FOR LOSS OF PROFITS,
LOSS OF BUSINESS, LOSS OF USE OR DATA, INTERRUPTION OF BUSINESS AND THE LIKE),
EVEN IF ASUS HAS BEEN ADVISED OF THE POSSIBILITY OF SUCH DAMAGES ARISING FROM
ANY DEFECT OR ERROR IN THIS MANUAL OR PRODUCT.
SPECIFICATIONS AND INFORMATION CONTAINED IN THIS MANUAL ARE FURNISHED FOR
INFORMATIONAL USE ONLY, AND ARE SUBJECT TO CHANGE AT ANY TIME WITHOUT NOTICE,
AND SHOULD NOT BE CONSTRUED AS A COMMITMENT BY ASUS. ASUS ASSUMES NO
RESPONSIBILITY OR LIABILITY FOR ANY ERRORS OR INACCURACIES THAT MAY APPEAR IN THIS
MANUAL, INCLUDING THE PRODUCTS AND SOFTWARE DESCRIBED IN IT.
Products and corporate names appearing in this manual may or may not be registered trademarks or
copyrights of their respective companies, and are used only for identication or explanation and to the
owners’ benet, without intent to infringe.
First Edition
July 2023

iii
Contents
Notices ......................................................................................................... iv
TCO certied ............................................................................................... vi
Safety information ..................................................................................... vii
Care & cleaning ......................................................................................... viii
Takeback services ...................................................................................... ix
Product information for EU energy label .................................................. ix
Chapter 1: Product introduction
1.1 Welcome! ...................................................................................... 1-1
1.2 Package contents ......................................................................... 1-1
1.3 Monitor introduction .................................................................... 1-2
1.3.1 Front view ....................................................................... 1-2
1.3.2 Back view ........................................................................ 1-3
Chapter 2: Setup
2.1 Assembling the monitor arm/base ............................................. 2-1
2.2 Adjusting the monitor .................................................................. 2-2
2.3 Detaching the base (for VESA wall mount) ............................... 2-3
2.4 Connecting the cables ................................................................. 2-4
2.5 Turning on the monitor ................................................................ 2-4
Chapter 3: General Instructions
3.1 OSD (On-Screen Display) menu ................................................. 3-1
3.1.1 Howtorecongure .......................................................... 3-1
3.1.2 OSDfunctionintroduction ............................................... 3-2
3.2 Specications ............................................................................. 3-10
3.3 Product dimensions ................................................................... 3-12
3.4 Troubleshooting (FAQ) .............................................................. 3-13
3.5 Supported operating mode for HDMI signal ............................ 3-14
iv
Notices
Federal Communications Commission Statement
ThisdevicecomplieswithPart15oftheFCCRules.Operationissubject
tothefollowingtwoconditions:
• Thisdevicemaynotcauseharmfulinterference,and
• Thisdevicemustacceptanyinterferencereceivedincluding
interferencethatmaycauseundesiredoperation.
Thisequipmenthasbeentestedandfoundtocomplywiththelimitsfor
aClassBdigitaldevice,pursuanttoPart15oftheFCCRules.These
limitsaredesignedtoprovidereasonableprotectionagainstharmful
interferenceinaresidentialinstallation.Thisequipmentgenerates,uses
andcanradiateradiofrequencyenergyand,ifnotinstalledandusedin
accordancewiththeinstructions,maycauseharmfulinterferencetoradio
communications.However,thereisnoguaranteethatinterferencewill
notoccurinaparticularinstallation.Ifthisequipmentdoescauseharmful
interferencetoradioortelevisionreception,whichcanbedeterminedby
turningtheequipmentoffandon,theuserisencouragedtotrytocorrect
theinterferencebyoneormoreofthefollowingmeasures:
• Reorientorrelocatethereceivingantenna.
• Increasetheseparationbetweentheequipmentandreceiver.
• Connecttheequipmenttoanoutletonacircuitdifferentfromthatto
whichthereceiverisconnected.
• Consultthedealeroranexperiencedradio/TVtechnicianforhelp.
Theuseofshieldedcablesforconnectionofthemonitortothegraphics
cardisrequiredtoassurecompliancewithFCCregulations.Changesor
modicationstothisunitnotexpresslyapprovedbythepartyresponsible
forcompliancecouldvoidtheuser’sauthoritytooperatethisequipment.
ENERGY STAR complied product
ENERGYSTARisajointprogramoftheU.S.Environmental
ProtectionAgencyandtheU.S.DepartmentofEnergy
helpingusallsavemoneyandprotecttheenvironment
throughenergyefcientproductsandpractices.
AllASUSproductswiththeENERGYSTARlogocomplywiththeENERGY
STARstandard,andthepowermanagementfeatureisenabledbydefault.The
monitorandcomputerareautomaticallysettosleepafter10and30minutes
ofuserinactivity.Towakeyourcomputer,clickthemouseorpressanykeyon
thekeyboard.Pleasevisithttp://www.energystar.gov/powermanagement for
detailinformationonpowermanagementanditsbenetstotheenvironment.
Inaddition,pleasevisithttp://www.energystar.govfordetailinformationonthe
ENERGYSTARjointprogram.

v
NOTE:EnergyStarisNOTsupportedonFreeDOSandLinux-based
operatingsystem.
Thisproductimplementspowermanagementfunctionality.Incaseofno
signalinputafter10seconds,theproductautomaticallygoestosleep/
standbymode.
Canadian Department of Communications Statement
ThisdigitalapparatusdoesnotexceedtheClassBlimitsforradio
noiseemissionsfromdigitalapparatussetoutintheRadioInterference
RegulationsoftheCanadianDepartmentofCommunications.
ThisclassBdigitalapparatuscomplieswithCanadianICES-003.
ThisClassBdigitalapparatusmeetsallrequirementsoftheCanadian
Interference-CausingEquipmentRegulations.
CetappareilnumériquedelaclasseBrespectetouteslesexigencesdu
RéglementsurlematérielbrouillerduCanada.

vi
TCO certied
Athird-partycerticationaccordingtoISO14024
Say hello
to a more sustainable product
ITproductsareassociatedwithawiderangeofsustainabilityrisks
throughouttheirlifecycle.Humanrightsviolationsarecommonin
thefactories.Harmfulsubstancesareusedbothinproductsandtheir
manufacture.Productscanoftenhaveashortlifespanbecauseofpoor
ergonomics,lowqualityandwhentheyarenotabletoberepairedor
upgraded.
This product is a better choice.ItmeetsallthecriteriainTCO
Certied,theworld’smostcomprehensivesustainabilitycerticationfor
ITproducts.Thankyouformakingaresponsibleproductchoice,that
helpdriveprogresstowardsamoresustainablefuture!
CriteriainTCOCertiedhavealife-cycleperspectiveandbalance
environmentalandsocialresponsibility.Conformityisveriedby
independentandapprovedveriersthatspecializeinITproducts,social
responsibilityorothersustainabilityissues.Vericationisdoneboth
beforeandafterthecerticateisissued,coveringtheentirevalidity
period.Theprocessalsoincludesensuringthatcorrectiveactionsare
implementedinallcasesoffactorynon-conformities.Andlastbutnot
least,tomakesurethatthecerticationandindependentvericationis
accurate,bothTCOCertiedandtheveriersarereviewedregularly.
Want to know more?
ReadinformationaboutTCOCertied,fullcriteriadocuments,news
andupdatesattcocertied.com.Onthewebsiteyou’llalsondour
ProductFinder,whichpresentsacomplete,searchablelistingofcertied
products.

vii
Safety information
• Beforesettingupthemonitor,carefullyreadallthedocumentationthat
camewiththepackage.
• Topreventfireorshockhazard,neverexposethemonitortorainor
moisture.
• Nevertrytoopenthemonitorcabinet.Thedangeroushighvoltagesinside
themonitormayresultinseriousphysicalinjury.
• Ifthepowersupplyisbroken,donottrytofixitbyyourself.Contacta
qualifiedservicetechnicianoryourretailer.
• Beforeusingtheproduct,makesureallcablesarecorrectlyconnectedand
thepowercablesarenotdamaged.Ifyoudetectanydamage,contactyour
dealerimmediately.
• Slotsandopeningsonthebackortopofthecabinetareprovidedfor
ventilation.Donotblocktheseslots.Neverplacethisproductnearorovera
radiatororheatsourceunlessproperventilationisprovided.
• Themonitorshouldbeoperatedonlyfromthetypeofpowersource
indicatedonthelabel.Ifyouarenotsureofthetypeofpowersupplytoyour
home,consultyourdealerorlocalpowercompany.
• Usetheappropriatepowerplugwhichcomplieswithyourlocalpower
standard.
• Donotoverloadpowerstripsandextensioncords.Overloadingcanresultin
fireorelectricshock.
• Avoiddust,humidity,andtemperatureextremes.Donotplacethemonitorin
anyareawhereitmaybecomewet.Placethemonitoronastablesurface.
• Unplugtheunitduringalightningstormorifitwillnotbeusedforalong
periodoftime.Thiswillprotectthemonitorfromdamageduetopower
surges.
• Neverpushobjectsorspillliquidofanykindintotheslotsonthemonitor
cabinet.
• Toensuresatisfactoryoperation,usethemonitoronlywithULlisted
computerswhichhaveappropriateconfiguredreceptaclesmarkedbetween
100-240VAC.
• Ifyouencountertechnicalproblemswiththemonitor,contactaqualified
servicetechnicianoryourretailer.
• Adjustmentofthevolumecontrolaswellastheequalizertoothersettings
thanthecenterpositionmayincreasetheear-/headphonesoutputvoltage
andthereforethesoundpressurelevel.
• Ensuretoconnectthepowercordtoasocket-outletwithearthing
connection.
• Thesuppliedpoweradapterand/orpowercablearedesignedtousewith
theproductonly.Donotusewithotherproducts.
Thissymbolofthecrossedoutwheeledbinindicatesthattheproduct
(electrical,electronicequipment,andmercury-containingbuttoncell
battery)shouldnotbeplacedinmunicipalwaste.Pleasechecklocal
regulationsfordisposalofelectronicproducts.
viii
AEEE yönetmeliğine uygundur
Care & cleaning
• Beforeyouliftorrepositionyourmonitor,itisbettertodisconnectthe
cablesandpowercord.Followthecorrectliftingtechniqueswhen
positioningthemonitor.Whenliftingorcarryingthemonitor,graspthe
edgesofthemonitor.Donotliftthedisplaybythestandorthecord.
• Cleaning.Turnyourmonitoroffandunplugthepowercord.Cleanthe
monitorsurfacewithalint-free,non-abrasivecloth.Stubbornstains
mayberemovedwithaclothdampenedwithmildcleaner.
• Avoidusingacleanercontainingalcoholoracetone.Useacleaner
intendedforusewiththeLCD.Neverspraycleanerdirectlyonthe
screen,asitmaydripinsidethemonitorandcauseanelectricshock.
The following symptoms are normal with the monitor:
• Youmayfindslightlyunevenbrightnessonthescreendependingon
thedesktoppatternyouuse.
• Whenthesameimageisdisplayedforhours,anafterimageofthe
previousscreenmayremainafterswitchingtheimage.Thescreenwill
recoverslowlyoryoucanturnoffthePowerSwitchforhours.
• Whenthescreenbecomesblackorflashes,orcannotworkanymore,
contactyourdealerorservicecentertofixit.Donotrepairthescreen
byyourself!
Conventions used in this guide
WARNING:Informationtopreventinjurytoyourselfwhentrying
tocompleteatask.
CAUTION:Informationtopreventdamagetothecomponents
whentryingtocompleteatask.
IMPORTANT:InformationthatyouMUSTfollowtocompletea
task.
NOTE:Tipsandadditionalinformationtoaidincompletingatask.

ix
Where to nd more information
Refertothefollowingsourcesforadditionalinformationandforproduct
andsoftwareupdates.
1. ASUS websites
TheASUSwebsitesworldwideprovideupdatedinformationonASUS
hardwareandsoftwareproducts.Refertohttp://www.asus.com
2. Optional documentation
Yourproductpackagemayincludeoptionaldocumentationthatmay
havebeenaddedbyyourdealer.Thesedocumentsarenotpartof
thestandardpackage.
3. About Flicker
https://www.asus.com/Microsite/display/eye_care_technology/
Takeback services
ASUSrecyclingandtakebackprogramscomefromourcommitmenttothe
higheststandardsforprotectingourenvironment.Webelieveinproviding
solutionsforourcustomerstobeabletoresponsiblyrecycleourproducts,
batteriesandothercomponentsaswellasthepackagingmaterials.
Pleasegotohttp://csr.asus.com/english/Takeback.htmfordetailrecycling
informationindifferentregion.
Product information for EU energy label
VY249HF VY249HF-W
1-1 Chapter 1: Product Introduction
1.1 Welcome!
ThankyouforpurchasingtheASUS®LCDmonitor!
ThelatestwidescreenLCDmonitorfromASUSprovidesabroader,
brighterandcrystal-cleardisplay,plusahostoffeaturesthatenhanceyour
viewingexperience.
Withthesefeatures,youcanenjoytheconvenienceanddelightfulvisual
experiencethatthemonitorbringstoyou!
1.2 Package contents
Checkyourpackageforthefollowingitems:
LCDmonitor
Monitorarm
Monitorbase
Quickstartguide
Warrantycard
Powercord
HDMIcable
L-shapedscrewdriver(optional)
4screws
Ifanyoftheaboveitemsisdamagedormissing,contactyourretailer
immediately.
Ifyouneedtoreplacethepowercordortheconnectioncable(s),pleasecontact
ASUScustomerservice.
Chapter1: Productintroduction
1-2
ASUS LCD Monitor VY249HF Series
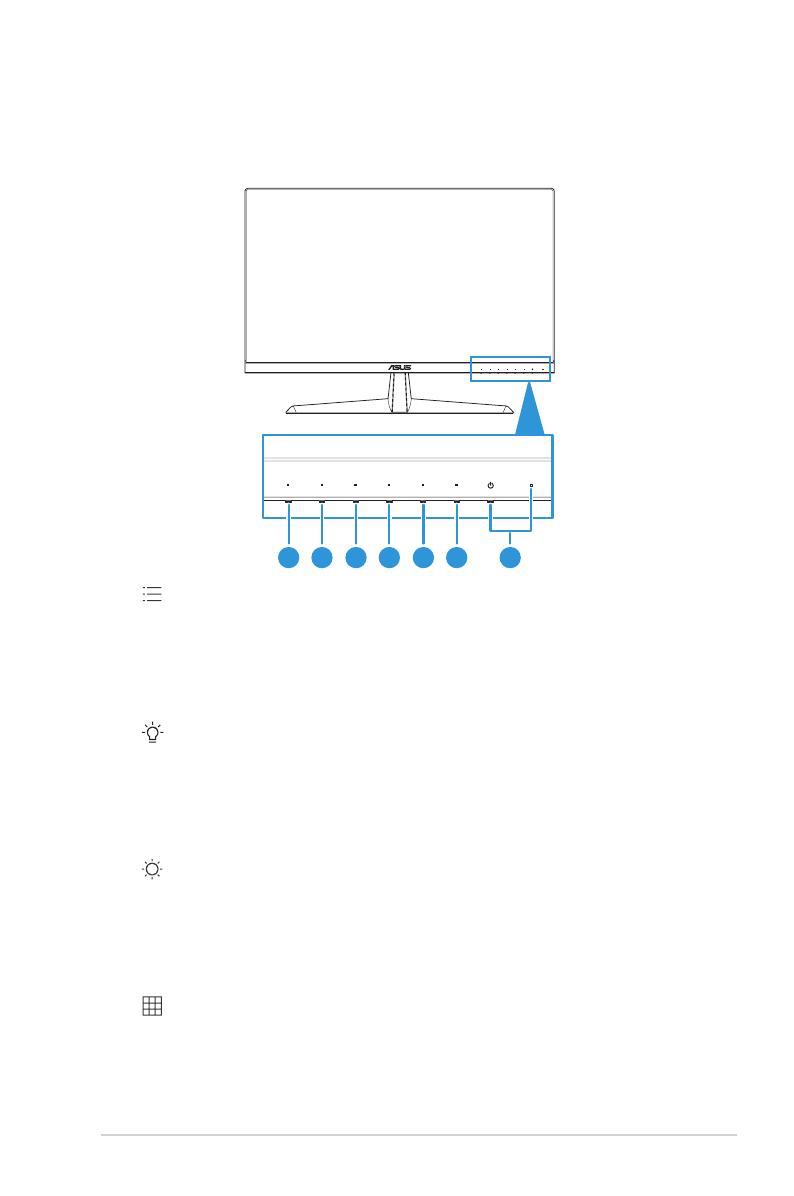
1.3 Monitor introduction
1.3.1 Front view
1 2 3 4 5 6 7
1. MenuButton:
• PressthisbuttontodisplaytheOSDmenuwhentheOSDisoff.
• EnterstheOSDmenu.
• TogglestheKeyLockfunctionbetweenonandoffwithalong
pressfor5seconds.
2. ShortcutKey1:
• PressthisbuttontodisplaytheOSDmenuwhentheOSDisoff.
• Default:Bluelightfilterhotkey.
• Tochangethehotkeyfunction,gototheShortcut>Shortcut1
menu.
3. ShortcutKey2:
• PressthisbuttontodisplaytheOSDmenuwhentheOSDisoff.
• Default:Brightnesshotkey.
• Tochangethehotkeyfunction,gototheShortcut>Shortcut2
menu.
4. QuickFitButton:
• PressthisbuttontodisplaytheOSDmenuwhentheOSDisoff.
• ThisisahotkeytoactivatetheQuickFitfunctiondesignedfor
alignment.
1-3 Chapter 1: Product Introduction
5. EnergySavingbutton
:
• PressthisbuttontodisplaytheOSDmenuwhentheOSDisoff.
• TurnsonandofftheEnergySavingmode.
6. Exitbutton:
• PressthisbuttontodisplaytheOSDmenuwhentheOSDisoff.
• ExitstheOSDmenu.
7. Powerbutton/powerindicator:
• Turnsthemonitoron/off.
• Thecolordefinitionofthepowerindicatorisasthebelowtable.
Status Description
White ON
Amber Standbymode
Off Off
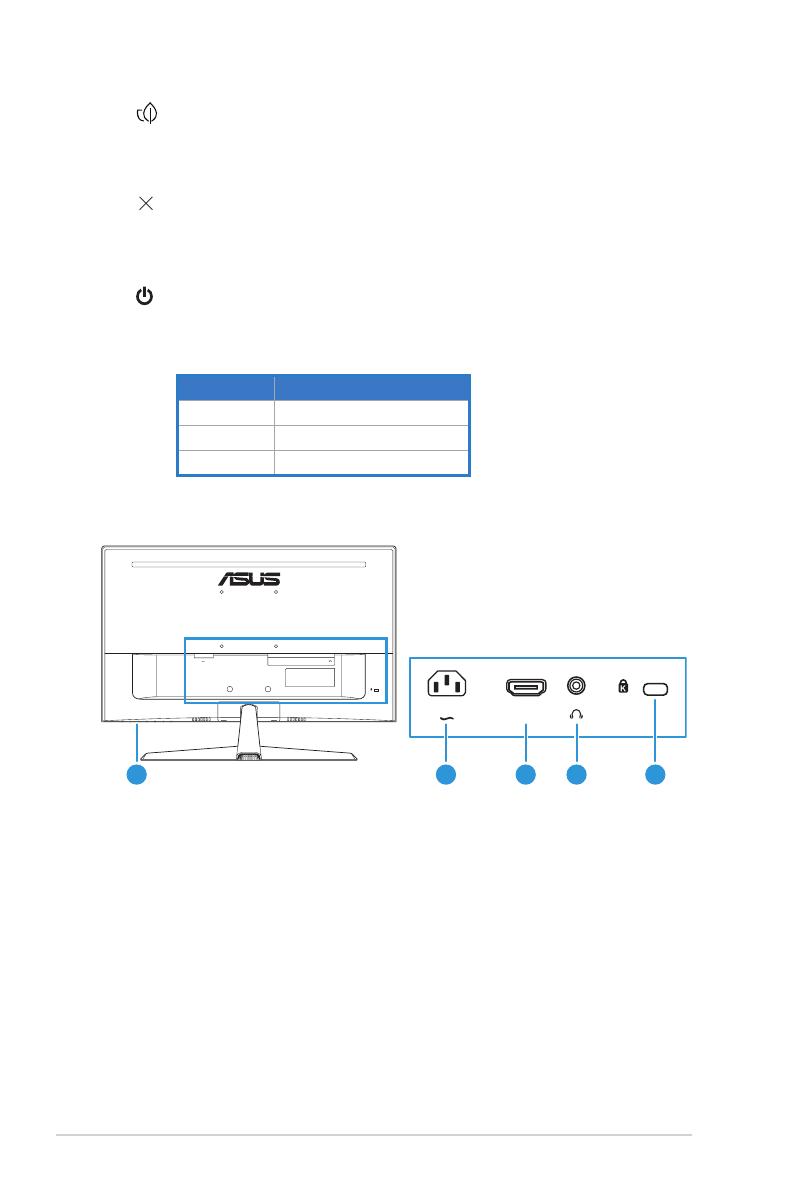
1.3.2 Back view
HDMI
1 2 3 4 5
HDMI
1. Control buttons.
2. AC-IN port.Thisportconnectsthepowercord.
3. HDMI port.ThisportisforconnectionwithanHDMIcompatible
device.
4. Earphone jack.ThisportisonlyavailablewhenanHDMIcableis
connected.
5. Kensington lock slot.

1-4
ASUS LCD Monitor VY249HF Series
Chapter2: Setup
2-1 Chapter 2: Setup
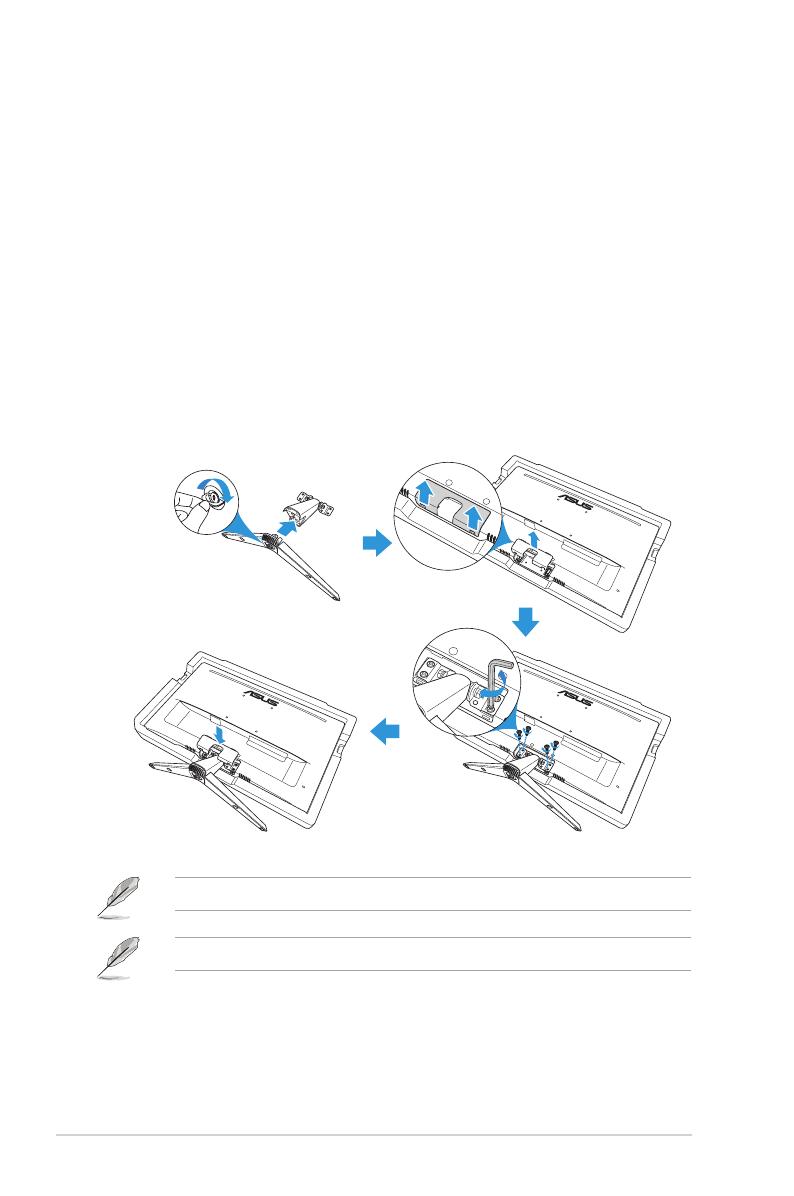
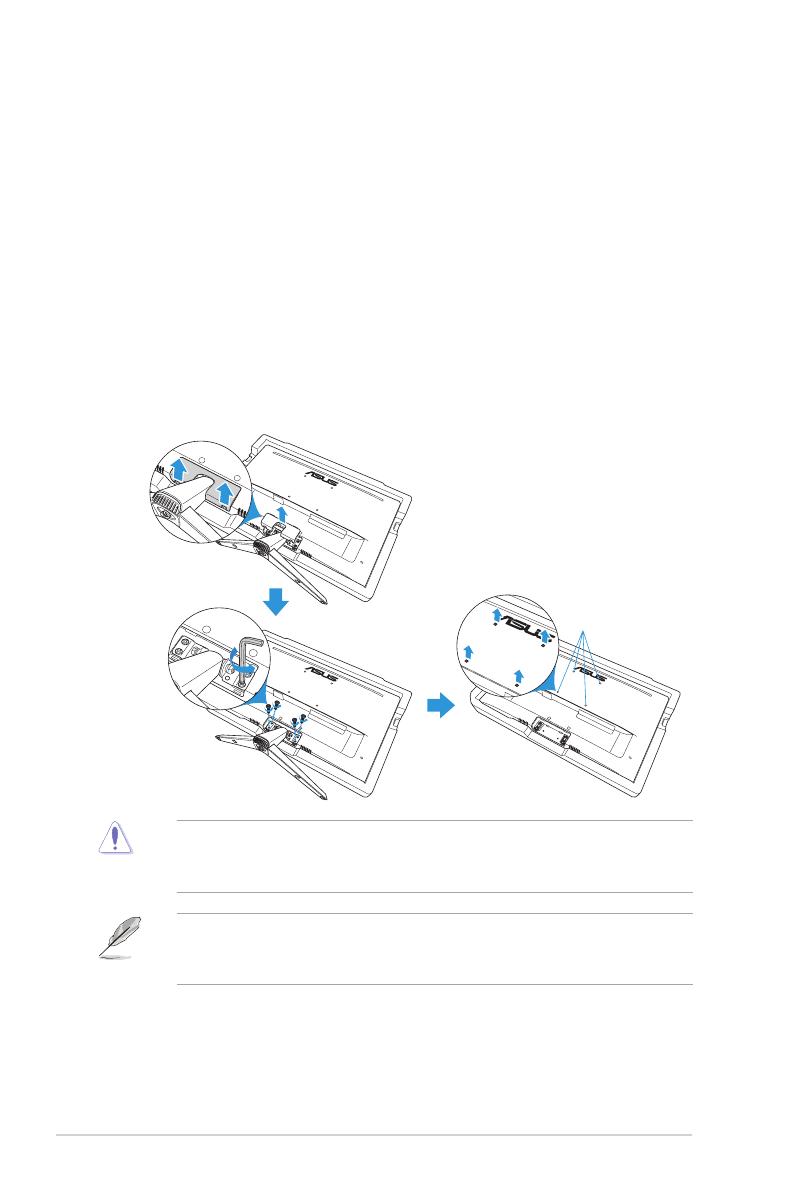
2.1 Assembling the monitor arm/base
Toassemblethemonitorbase:
1. CarefullyplacethemonitorontheEPSfoam,withthescreenfacing
down.
2. Attachthebasetothearm.
3. Liftthescrewringandturnitclockwisetosecurethebase.
4. Removethestandcover.
5. Placethearmhingeofthethestandassemblyontoitscompartment
ontherearofthemonitor.ThenusetheL-shapedscrewdriverto
secureitwithfourscrews.
6. Installthestandcovertotherearofthemonitor.
Basescrewsize:M6x12mm.
Hingescrewsize:M4x10mm.
2-2
ASUS LCD Monitor VY249HF Series
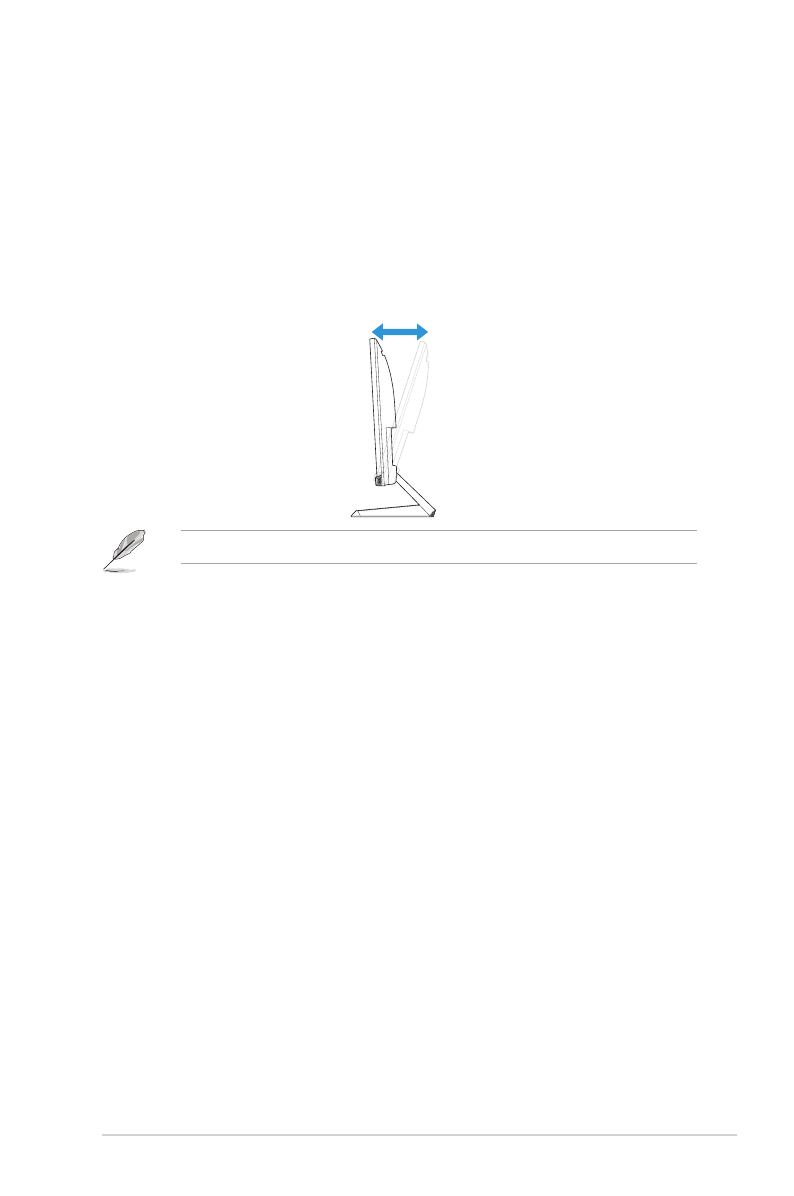
2.2 Adjusting the monitor
• Foroptimalviewing,werecommendthatyoulookatthefullfaceofthe
monitor,thenadjustthemonitortotheanglethatismostcomfortable
foryou.
• Holdthestandtopreventthemonitorfromfallingwhenyouchangeits
angle.
• Therecommendedadjustingangleis+22° to-5°.
-5˚ to +22˚
Itisnormalthatthemonitorslightlyshakeswhileyouadjusttheviewingangle.
2-3 Chapter 2: Setup
2.3 Detaching the base (for VESA wall mount)
Thedetachablearm/baseofthismonitorisspeciallydesignedforVESA
wallmount.
Todetachthearm/base:
1. Disconnectpowerandsignalcables.Carefullyplacethemonitoron
theEPSfoam,withthescreenfacingdown.
2. Removethestandcover.
3. UsetheL-shapedscrewdrivertoremovethefourscrews.Then
removethestandassembly.
4. Removethefourrubberpads.Thenalignandinstallthewallmount
bracketontherearofthemonitor.
Screw holes for
VESA wall mount
(100 x 100 mm)
• Werecommendthatyoucoverthetablesurfacewithsoftclothtoprevent
damagetothemonitor.
• Holdthebasewhileremovingthescrew.
• TheVESAwallmountkit(100x100mm)ispurchasedseparately.
• UseonlytheULListedWallMountBracketwithminimumweight/load
22.7kg(Screwsize:M4x10mm).
2-4
ASUS LCD Monitor VY249HF Series
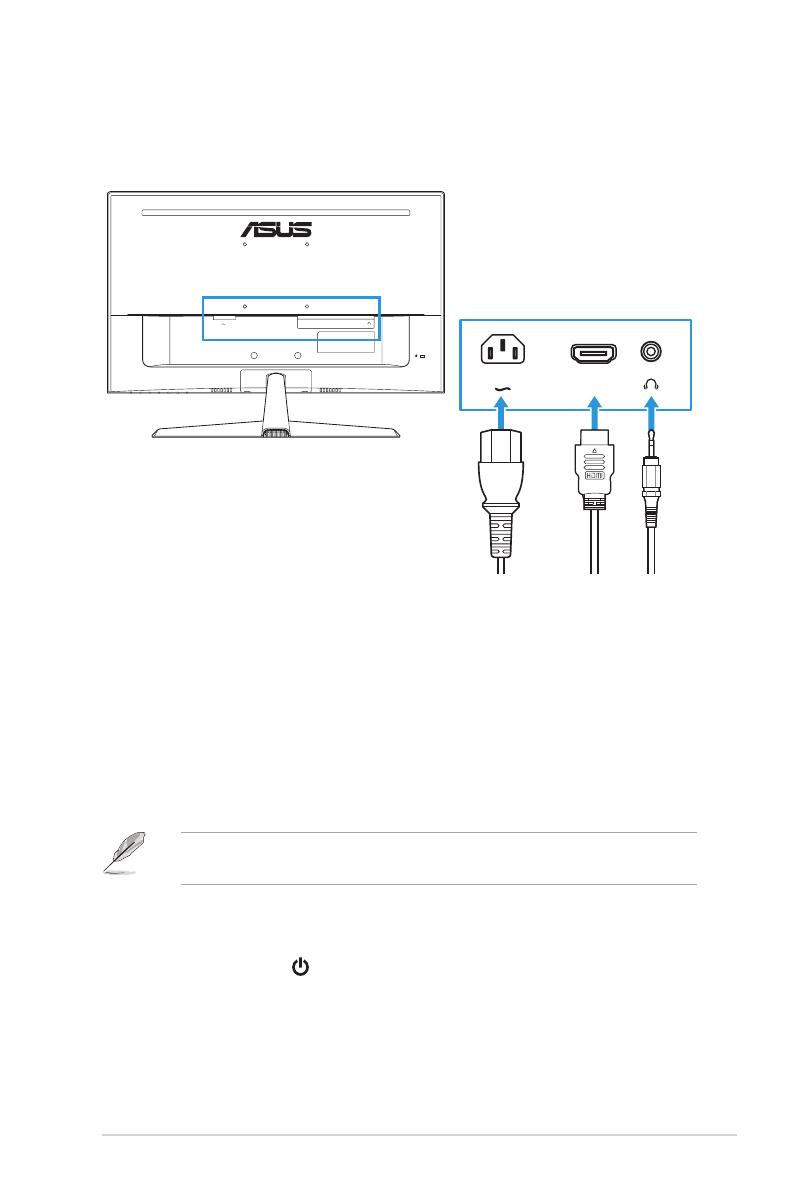
2.4 Connecting the cables
Connectthecablesasthefollowinginstructions:
HDMI
HDMI
• To connect the power cord:Connectoneendofthepowercord
securelytothemonitor’sACinputport,theotherendtoapower
outlet.
• To connect the HDMI cable:
a. PlugoneendoftheHDMIcabletothemonitor’sHDMIport.
b. ConnecttheotherendoftheHDMIcabletoyourcomputer's
HDMIport.
• To use the earphone:Connecttheendwithplugtypetothe
monitor’searphonejackwhenanHDMIsignalisfed.
Ifyouneedtoreplacethepowercordortheconnectioncable(s),pleasecontact
ASUScustomerservice.
2.5 Turning on the monitor
Pressthepowerbutton . See page 1-3forthelocationofthepower
button.Thepowerindicatorlightsupinwhitetoshowthatthemonitoris
ON.

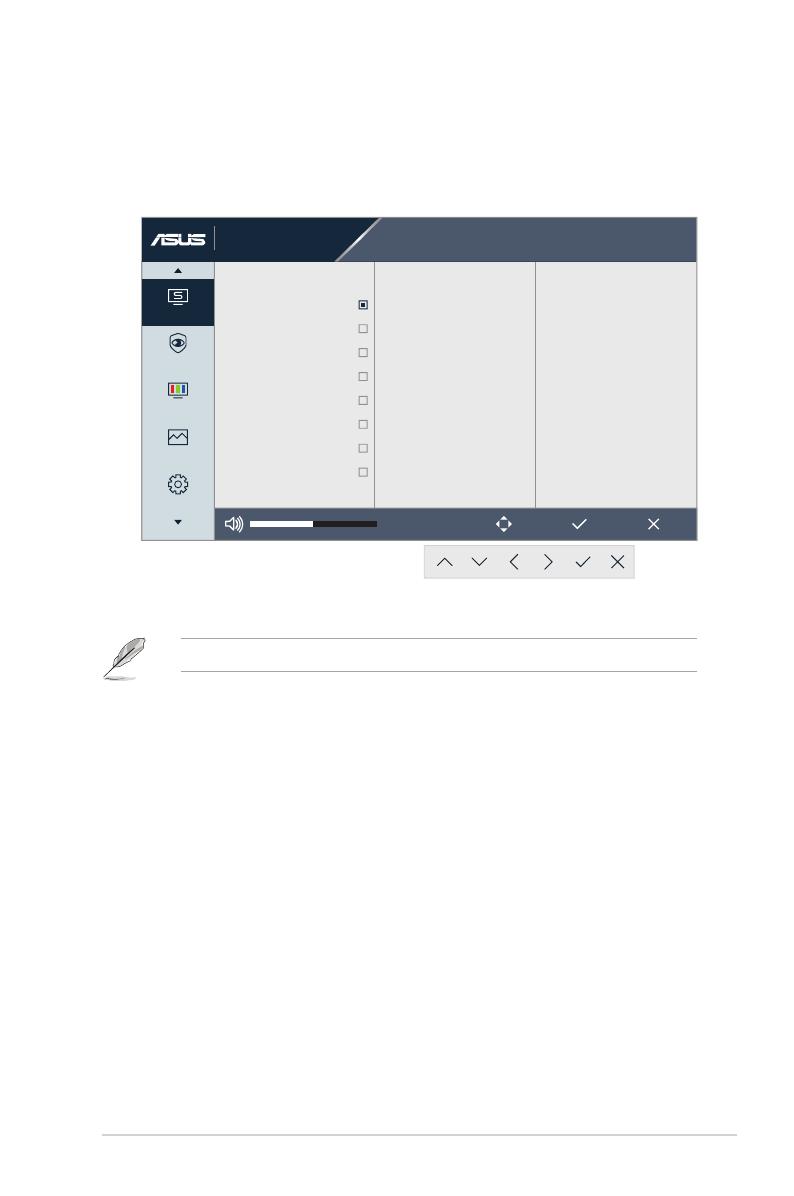
3-1 Chapter 3: General Instructions
3.1 OSD (On-Screen Display) menu
3.1.1 How to recongure
Standard Mode
sRGB Mode
Scenery Mode
Theater Mode
Game Mode
Night View Mode
Reading Mode
Darkroom Mode
Navigate Select Exit
1920 X 1080 100Hz
ASUS VY249HF
Splendid
Standard Mode
Brightness
90
Splendid
Eye Care
Color
Image
Settings
1. Pressanybutton(exceptthePowerbutton)todisplaytheOSDmenu.
2. Pressthe MenubuttontoactivatetheOSDmenu.
3. Pressthebuttonsasindicatedonthescreentonavigatethrough
thefunctions.Highlightthedesiredfunctionandpress to activate
it.Ifthefunctionselectedhasasub-menu,press or againto
navigatethroughthesub-menufunctions.Highlightthedesiredsub-
menufunctionandpress to activate it.
4. Press and tochangethesettingsoftheselectedfunction.
5. ToexitandsavetheOSDmenu,press repeatedlyuntiltheOSD
menudisappears.Toadjustotherfunctions,repeatsteps1-4.
Chapter3: GeneralInstructions
3-2
ASUS LCD Monitor VY249HF Series
3.1.2 OSD function introduction
1. Splendid
Thisfunctioncontainseightsub-functionsthatyoucanselectforyour
preference.
Standard Mode
sRGB Mode
Scenery Mode
Theater Mode
Game Mode
Night View Mode
Reading Mode
Darkroom Mode
Navigate Select Exit
1920 X 1080 100Hz
ASUS VY249HF
Splendid
Standard Mode
Brightness
90
Splendid
Eye Care
Color
Image
Settings
• Standard Mode:BestchoicefordocumenteditingwithSplendid
VideoEnhancement.
StandardModemeetsEnergyStar®requirements.
• sRGB Mode:Bestchoiceforviewingphotosandgraphicsfrom
PCs.
• Scenery mode:Bestchoiceforsceneryphotodisplayingwith
SplendidVideoEnhancement.
• Theater Mode:BestchoiceformoviewatchingwithSplendid
VideoEnhancement.
• Game Mode:BestchoiceforgameplayingwithSplendidVideo
Enhancement.
• Night View Mode:Bestchoiceforplayingdark-scenegameor
watchingdark-scenemoviewithSplendidVideoEnhancement.
• Reading Mode:Bestchoiceforbookreading.
• Darkroom Mode:Bestchoiceforaweakambientlight
environment.

3-3 Chapter 3: General Instructions
• IntheStandardmode,thefollowingfunction(s)arenotuser-congurable:
Saturation,Sharpness,ASCR,andMotionSync.
• InthesRGBmode,thefollowingfunction(s)arenotuser-congurable:
Brightness,Contrast,Saturation,ColorTemp.,Sharpness,ASCR,Color
Augmentation,andMotionSync.
• IntheReadingmode,thefollowingfunction(s)arenotuser-congurable:
Contrast,Saturation,ColorTemp.,ASCR,andMotionSync.
2. Eye Care
Inthisfunction,youcanadjustsettingstobetterprotectyoureyes.
Navigate Select Exit
Blue Light Filter
Rest Reminder 0
Color Augmentation
1920 X 1080 100Hz
ASUS VY249HF
Splendid
Standard Mode
Brightness
90
Splendid
Color
Image
Settings
Eye Care
• Blue Light Filter:Inthisfunction,youcanadjustthebluelight
filterfrom0tomax.
• 0:Nochanges.
• Max:Thehigherthelevel,thelessbluelightisscattered.
Whenbluelightfilterisactivated,thedefaultsettingsof
StandardModewillbeautomaticallyimported.Besides
maximumlevel,thebrightnessisuser-configurable.
Maximumistheoptimizedsetting.ItiscompliancewithTUV
lowbluelightcertification*.Thebrightnessfunctionisnot
userconfigurable.
*Whencoloraugmentationisindefaultvalue(50).
/