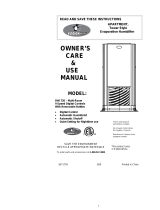
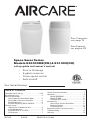
Space Saver Series
Models 836000HB(CN) & 831000(CN)
tble of contents
Humidifier Quick Set Up.....................................
2 & 3
Read Before Using .................................................. 4
General Information:
How Evaporative Humidifiers Work ................. 5
Get the Most from your Humidifier .................. 5
Wick Performance ............................................ 5
Cautions Regarding Water Additives .............. 5
Detailed set up:
Unpack and Assemble the Unit ........................ 6
Install Components .......................................... 7
Assemble Chassis and Base ............................ 7
Fill Reservoir ..................................................... 7
Locate Place for Humidifier .................................... 7
Operation: ............................................................... 8
Model 836000HB ............................................8
Model 831000 ..................................................8
Common to all models .....................................8
Maintenance ...........................................................9
How to Care for Your Humidifier ...................... 9
General Cleaning .............................................9
Disinfecting Unit ..............................................10
Replacement parts and Accessories .......................
11
Troubleshooting .. ...................................................12
Warranty ................................................................. 13
set up guide and owner’s manual
• Pour-in fill design
• 6-gallon reservoir
• Three speed control
• Auto shuto
1B73178 9/2019 PRINTED IN CHINA
Your Serial Number:
Pour Française,
voir page 13
Para Español,
ver pagina 29

2
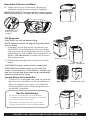
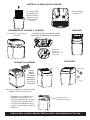
HUMIDIFIER QUICK SET UP
Use these basic instructions for setting up your unit.
Use the “Detailed Set Up” on page 6 for additional set up and operational information.
NOTE: To simplify instructions, model 836000HB is featured in most illustrations.
Images of the 831000 unit are included where needed.
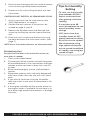
a. OPEN THE CARTON AND LIFT OUT OF THE CHASSIS (TOP SECTION)
b. NOTE THE FLOAT ROD STICKING UP THROUGH THE INNER PACKING.
c. CAREFULLY FREE THE FLOAT ROD FROM THE CARDBOARD PACKING.
d. REMOVE THE CARDBOARD INNER PACKING.
e. DO NOT THE DISCARD THE SMALL STYROFOAM CUBE. IT IS NOT PACKING.
UNPACK HUMIDIFIER
INVERT THE BASE AND
INSTALL THE CASTERS
REMOVE THE FLOAT ROD
FROM PACKING
INSTALL THE FLOAT
ROD IN THE BASE
LIFT OUT THE CHASSIS
UNPACK UNIT
REMOVE THE
PARTS BAG
AND OTHER CONTENTS
FROM BASE
INSERT
CASTERS
UNTIL
SHOULDER
IS FLUSH
WITH FLOOR
OF BASE
TWIST
RETAINER
TO SECURE
FLOAT ROD
ASSEMBLE CONTENTS OF BASE
ENSURE THE STY-
ROFOAM FLOAT IS
ATTACHED
TO FLOAT ROD
FOR HELP, CALL 1.800.547.3888 OR VISIT AIRCAREPRODUCTS.COM

3
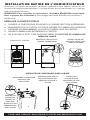
POSITION
SEE FOLLOWING MANUAL FOR DETAILED SET UP AND
OPERATING INSTRUCTIONS FOR SPECIFIC MODELS
HUMIDISTAT
FILLING UNIT
LEVEL
FLOAT ROD MUST MAKE CONTACT
WITH METAL SWITCH
ASSEMBLE CHASSIS AND BASE
FRONT
INSTALL WICK IN BASE
PLACE CHASSIS
ON BASE
FILL ONLY
T0 THE
“MAX
FILL LINE”
INSIDE
FRONT OF WICK
FACES
FRONT OF BASE
CURVED EDGE
LOCATE THE SERIAL NUMBER
LABEL ON UPPER BACK OF
THE CHASSIS, AND WRITE IT
ON THIS MANUAL COVER FOR
QUICK REFERENCE
LABEL WITH
SERIAL NUMBER
COMPLETED
INSTALLATION
FOR HELP, CALL 1.800.547.3888 OR VISIT AIRCAREPRODUCTS.COM
SOME DETAILS
OMITTED FOR
CLARITY
REMOVE FRONT LOUVERS
Model 831 000 only)

4
FOR HELP, CALL 1.800.547.3888 OR VISIT AIRCAREPRODUCTS.COM
READ BEFORE USING YOUR HUMIDIFIER
WARNING: means if the safety information is not followed someone could be seri-
ously injured or killed.
CAUTION: means if the safety information is not followed someone may be injured.
READ AND SAVE THESE INSTRUCTIONS
1. To reduce the risk of fire or shock hazard, this humidifier has a polarized plug
(one blade is wider than the other). Plug humidifier directly into a 120V, A.C.
electrical outlet. Do not use extension cords. If the plug does not fully fit into the
outlet, reverse plug. If it still does not fit, contact a qualified electrician to install
the proper outlet. Do not change the plug in any way.
2. Keep the electric cord out of trac areas. To reduce the risk of fire hazard,
never put the electric cord under rugs, near heat registers, radiators, stoves or
heaters.
3. Always unplug the unit before moving, cleaning or removing the fan assembly
section from the humidifier, or whenever it is not in service.
4. Keep the humidifier clean. To reduce the risk of injury, fire or damage to humid-
ifier, use only cleaners specifically recommended for humidifiers. Never use
flammable, combustible or poisonous materials to clean your humidifier
5. Do not put foreign objects inside the humidifier.
6. Do not allow unit to be used as a toy. Close attention is necessary when used
by or near children.
7. To reduce the risk of electrical hazard or damage to humidifier, do not tilt, jolt, or
tip humidifier while unit is running.
8. To reduce the risk of accidental electrical shock, do not touch the cord or con-
trols with wet hands.
9. To reduce the risk of fire, do not use near an open flame, such as a candle or
other flame source.
WARNINGS:
For your own safety, do not use humidifier if any parts are damaged or
missing.
To reduce risk of fire, electric shock, or injury always unplug before servicing or
cleaning.
To reduce the risk of fire or shock hazard, do not pour or spill water into
control or motor area. If controls get wet, let them dry completely and have unit
checked by authorized service personnel before plugging in.

5
FOR HELP, CALL 1.800.547.3888 OR VISIT AIRCAREPRODUCTS.COM
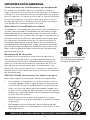
GENERAL INFORMATION
How Evaporative Humidiers Work
Your new humidifier adds humidity to your home
by drawing dry air into the humidifier though the
large top grille, then moisturizing it as it passes
through the saturated wick. The air becomes hu
-
midified, while any dust and hard water minerals
remain in the wick. Because the water is evapo
-
rated, there is just clean, moist air
.
Get the Most from Your Humidier
When first setting up your humidifier, place it in a
central area where the air can flow evenly through-
out the home. Initially, it may take up to 48 hours of
operation for humidity levels to rise, depending on
outdoor air temperatures and the tightness of your
home’s construction. To raise the humidity quickly,
run the humidifier on high during the day (lower the
fan speed at night, if needed, for sleeping.) More
helpful notes on location follow in the “Detailed
Set-Up” portion of this manual.
Wick Performance
As the evaporative wick traps accumulated
minerals from the water, its ability to absorb and
evaporate water decreases. We recommend
changing the wick at the beginning of every sea-
son and after every 30 to 60 days of operation
to maintain optimum performance. In hard water
areas, more frequent replacement may be nec-
essary to maintain your humidifier’s eciency.
CAUTIONS Regarding Water Additives
Only use cool, clean water to fill your humidifier.
• To maintain the wick’s integrity and perfor-
mance, never add anything to the water
except Essick Air brand Bacteriostat for
evaporative humidifiers.
• For best results do not use softened water.
If you only have softened water available,
you can use it, but mineral buildup will
occur more quickly. Use distilled or purified
water to extend the life of the wick.
• Never add essential oils to the water. It can
damage the plastic seals and cause leaks.
• Never add water treatment intended for
ultrasonic or rotobelt humidifiers.
WATER
TREATMENT
Replace wick every 30
to 60 days for best per-
formance.
48
HRS

6
FOR HELP, CALL 1.800.547.3888 OR VISIT AIRCAREPRODUCTS.COM
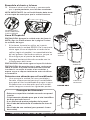
DETAILED SET UP
Unpack and Assemble the Unit
1. Open the box, revealing the chassis.
2. Remove any packaged literature on top.
3. Lift the chassis up and out of the carton.
4. Carefully pull the cardboard packing away
from around the float rod.
5. Remove cardboard and pull the base from the
carton.
NOTE
Do not dispose of the small Styrofoam
block. This is not packing material, it is the float.
6. Remove contents of the base including parts bag.
7. Turn the cabinet upside down. Remove the
casters from the parts bag and install them in
the base.
8. Casters should be fully inserted and fit snug
-
gly with stem shoulder reaching the cabinet
surface.
9. Set the base right-side up to install contents.
Install Components
10. Install the small Styrofoam float onto the float
rod. Insert the float into the correlating shape
on the base. Note the float rod retainer in the
back of the base.
11. Secure the float rod in position by twisting the
flexible float rod retainer around the upright rod
.
12. I
nstall the wick retainer (with the wick inside)
in the front of the base. Observe the word
“front” on the wick retainer and place it facing
the front (curved edge) of the humidifier base.
REMOVE PACKING FROM
AROUND FLOAT ROD
STYRO
FOAM
FLOAT
FLOAT
ROD
LOCATOR VIEW
FLOAT
LOCATION
FLOAT ROD RETAINER
WICK RETAINER
LOCATION
FRONT
FRONT
TWIST RETAINER
TO SECURE ROD
CASTER
LOCATION
REFERENCE
ONLY

7
FOR HELP, CALL 1.800.547.3888 OR VISIT AIRCAREPRODUCTS.COM
Fill Reservoir
CAUTION Turn unit o before filling.
NOTE Follow Cautions on page 5 regarding addi-
tives to water.
1.
If desired, lift out the louvers at the front of
the 831000 unit. Otherwise, pour cool water
into the reservoir through the louvers or grid
(depending on the model). Total capacity is six
gallons. Do not overfill as water will leak out
the overflow port.
2. Add bacteriostat per the instructions on the
bottle.
CAUTION Only pour water into the lower grille.
CAUTION Do not allow water to spill onto the
motor or control panel. If the motor or controls get
wet turn unit off and allow them to dry completely
before turning unit on again.
Locate Place for Humidifier
1. Once unit is assembled and filled up, centrally
position the humidifier so the humidified air
flows throughout the house. Consider the
following points when identifying where to
locate the humidifier:
Assemble Chassis and Base
13. Align the chassis to the base. Starting at
the back, bring the two sections together.
IMPORTANT NOTE: The float rod must make contact
with the metal switch in order for the unit to operate.
4
“
10 cm
HUMIDISTAT
Tips for Positioning
• On level surface near an inside wall.
• Located for best flow through your home.
• At least 4 inches from wall.
• Not next to thermostat or hot air vent.
• Not by window (to avoid condensation).
OVERFLOW PORT
FILL HERE
SOME DETAILS
OMITTED FOR
CLARITY
MODEL 836000HB
MODEL 831000

8
FOR HELP, CALL 1.800.547.3888 OR VISIT AIRCAREPRODUCTS.COM
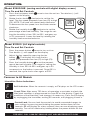
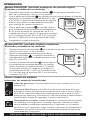
Model 836000HB (analog controls with digital display screen)
Turn On and Set Controls
.
1. Press the fan/power knob once to turn the unit on. Two dashes (--) will
appear on the display.
2. Rotate the fan knob
clockwise to set the fan
level. The fan speed proceeds from low (F1) to high
(F3). NOTE: The knob will rotate freely clockwise.
To decrease the fan speed, turn the knob counter-
clockwise.
3. Rotate the humidity knob
clockwise to set the
percentage of desired humidity. The range for set-
ting the humidity is from 25% to 65%, and goes up
in 5% increments. Lower the level by rotating the
humidity knob counterclockwise.
OPERATION:
35
Model 831000 (full digital controls)
Turn On and Set Controls
1. Press the power button once to turn unit on.
Two dashes (--) will appear on the display.
2. Adjust the fan speed by pressing the fan
button . The display will show the fan
speed as it proceeds from low (F1) to high (F3).
3. Press the humidity button to set the percent-
age of desired humidity. The range for setting the
humidity is from 25% to 65% and goes up in 5%
increments as the button is pressed. Once 65% is
reached,
the cycle starts over again at 25%.
35
Humidifier Status Indications
Refill Indication: When the reservoir is empty, an F displays on the LCD scree
n.
Check Filter: After every 720 hours of operation a reminder to check the
filter/wick condition is programmed to show CF on the display. Check the
condition of the filter/wick, and change it if necessary.
Clear the CF display
by unplugging the humidifier, waiting 60 seconds, and plugging it back in.
Control Lock: You can lock the controls to avoid unwanted changes to
your settings by pressing and holding the power button down for five
seconds. CL will display for a few seconds, then resume displaying room
humidity. Turn o this feature by holding down the power button for five
seconds.
Common to All Models

9
FOR HELP, CALL 1.800.547.3888 OR VISIT AIRCAREPRODUCTS.COM
MAINTENANCE
How to Care for Your Humidifier
CAUTION Turn the unit o and disconnect the power
before attempting any maintenance
.
Wick Replacement (Uses 1043 Superwick)
1. When it’s time to replace the wick, allow the unit
to run dry so the wick will be drier and easier to
remove.
2. With the unit turned o and unplugged, lift the chas-
sis (top part) o and set aside in a safe place.
3. Lift out the wick in the black wick retainer.
4. Unlatch the clips on the side of the retainer, open
and discard the used wick.
DO NOT DISCARD THE BLACK WICK RETAINER.
5. Insert a new 1043 wick and close wick retainer
using the small clips on the edge of the retainer.
General Cleaning
We recommend cleaning the unit regularly to keep it
free of scale and smelling fresh.
Recommended cleaning fluids:
• White vinegar to remove scale
• Household bleach for general disinfecting
(use for cleaning only).
N
OTE Regular use of an EPA approved bacteriostat, such
as part # 1970, added to the water reservoir helps keep the
interior of the unit from growing mildew or mold.
NOTE When cleaning, we recommend moving the humid
-
ifier to an area where water will not cause damage, such
as the kitchen or bathroom.
Cleaning the Unit
1. Before cleaning, we recommend allowing the unit
to run out of water to make cleaning easier. Turn
o and unplug the unit. Lift o the chassis and
empty the cabinet by removing the wick, wick
retainer, float rod, and Styrofoam float.
2. Place the wick retainer in the sink to drain. Open
the retainer and dispose of the used wick.
3. Pour out any water remaining in the base. Clean
the reservoir in the base by filling about half full
with clean water and adding about 1 cup of white
vinegar. Let it sit for 20 minutes, then pour the
water out. Rinse out reservoir completely.
4. Take a soft cloth dampened with white vinegar
and water solution and wipe down the interior and
exterior of base.
FRONT
OPEN THE RETAINER
REPLACE WICK &
CLOSE RETAINER
Performance Tips
• Wicks should be replaced at
least once each season, and
after every 30 to 60 days of
use.
• In areas with hard water,
replace wick more often.
• Use Essick Air Bacteriostat
(part # 1970) to reduce
bacteria and mineral buildup.
Follow directions on the bottle
.
Wick Care
:
• Wicks should not be
washed or rinsed.
• If cleaning the base be-
tween wick changes, run
the fan until the wick is
dry. Then lift the wicks out,
supporting them with your
hands, and set them aside
to be reinstalled after the
cleaning is complete
.

10
FOR HELP, CALL 1.800.547.3888 OR VISIT AIRCAREPRODUCTS.COM
Disinfecting Unit
Disinfect the humidifier at the end of the season, (or
more often if needed).
1. Clean as described above.
2. Fill reservoir half full of water and add 1 teaspoon
of household bleach. Use same bleach and water
solution to clean reservoir in base. Let sit for 20
minutes.
3. Rinse base thoroughly until no smell of bleach
remains.
4. Wipe down exterior with soft cloth dampened
with clean water, then dry unit with soft, clean
cloth.
5. If you plan to continue using the humidifier,
refill and install a new wick as described in this
manual.
6. If storing the humidifier for the season, place it in
the original carton, if available. Do not store in at
-
tic or other high temperature location, as damage
will occur.
5.
Rinse the base thoroughly with fresh water to remove
scale and cleaning solution before disinfection.
6. Prepare unit for use by filling the base with cool,
clean water.
CAUTION DO NOT OVERFILL, AS LEAKING MAY OCCUR.
7. Install a new wick into the wick retainer. See
“Wick Replacement” on page 9.
8. Position the wick retainer in the base as de
-
scribed on page 6, step 12.
9. Replace the Styrofoam float and float rod and
secure by twisting the retainer around the float
rod.
10. Place the chassis back onto the base ensuring
the float rod meets the small metal switch. (See
page 7.)
NOTE Ensure all assembly directions are followed carefully.
Tips for Humidity
Setting
• To start, set the humidity
level between 45-50%.
Adjust to desired level
after getting a baseline
reading.
• It may take up to 48
hours of operation to see
overall humidity levels
change.
• CDC tests show that
humidity levels of 43%
greatly reduce the ability
of the flu virus to spread.
• We recommend using
high speeds during the
day to spread humidified
air rapidly, and using low
speed at night.

11
FOR HELP, CALL 1.800.547.3888 OR VISIT AIRCAREPRODUCTS.COM
REPLACEMENT PARTS AND ACCESSORIES
BACTERIOSTAT
PART # 1970
HYGROMETER
PART # 1990
Reduces bacterial growth
in humidifier. Extends life
of wick. 32 oz
Reads and displays room
humidity and temperature
(C° and F°).
WICK MULTIPACKS
1
7
3
4
5
6
8
9
2
#
PART NAME
PART NUMBER BY MODEL
831000CN 836000HBCN
1 a
Chassis 1B72810 1B73184
2
Fan Blade 1B5060470
3
Float Rod 1B72125
4
Float Retainer 1B5460590
5
Float 1B5060400
6
Wick Retainer 4V3398020GRYP
7
Wick 1043
8
Base 4V3395020VWH
9
Casters 1B5460070 (Qty 4)
_
Manual 1B73178
REPLACEMENT PARTS FOR SALE
Note Chassis
illustration is
for reference
only and is not
intended to re-
flect a particular
model.
You may also be
interested in:
1043-2
1043-3

12
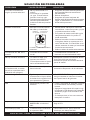
PROBLEM PROBABLE CAUSE SOLUTION
Unit does not operate on
any speed setting
• No power to unit.
• Unit has run out of water and
turned o automatically.
• Refill switch operation/im-
proper positioning of float
assy.
• Ensure polarized plug is fully inserted in wall
outlet.
• Refill reservoir.
• Ensure float assembly is correctly positioned
as described in “Water FiIl”
Motor does not turn on • Check motor/fan operation.
PRESSURE SWITCH
UNDERSIDE OF CHASSIS
•
Wick may be incorrectly installed
.
• CAUTION: Do not touch the fan when accom-
plishing this test, as the motor may turn on.
• To test the motor, turn unit ON and turn all
knobs fully ON.
• Turn the chassis over and insert finger into
tab where float rod is supposed to go. If
fan turns on, the fan and motor are working
correctly.
• Remove and reinstall wick correctly.
Display shows “00” • Unit just turned on. • Unit is initiating.
• Fan speed is in standby
Not enough humidity • Wick is old and ineective.
• Humidistat is not set high
enough
• Replace wick when clogged or hardened
with minerals.
• Increase humidity setting on control panel
Too much humidity.
(condensation becomes
heavy on cold surfaces in
room)
• Wick is old and ineective.
• Humidistat is not set high
enough
• Humidistat is set too high.
• Reduce humidistat setting or increase room
temperature
Water leak • Cabinet may have been
overfilled. There is a safety
overflow hole in rear of
cabinet.
• DO NOT OVERFILL cabinet. Correct water
level is indicated inside of cabinet side wall.
Odor • Clean and disinfect cabinet following Care
and Maintenance instructions.
• Add EPA registered Bacteria Treatment
according to instructions on the bottle.
• It may be necessary to replace the wick if
odor persists.
Control panel does not
respond to input. Display
shows CL
• Control lock feature has
been turned on to prevent
changes in settings.
• Press Humidity and Speed buttons at same
time for 5 seconds to deactivate feature.
Display flashes “20” • ROOM Humidity is lower than
20%.
• Will read actual humidity when level comes
up to 25%.
Display flashes ”—“ level comes up to 25%. • Will remain until humidity drops below 90%.
TROUBLESHOOTING

13
HUMIDIFIER TWO YEAR LIMITED WARRANTY POLICY
SALES RECEIPT REQUIRED AS PROOF OF PURCHASE FOR ALL WARRANTY CLAIMS.
This warranty is extended only to the original purchaser of this humidifier when the unit is
installed and used under normal conditions against defects in workmanship and materials as
follows:
• Two (2) years from date of sale on the unit, and
• Thirty (30) days on wicks and filters, which are considered disposable components and
should be replaced periodically.
The manufacturer will replace the defective part/product, at its discretion, with return freight
paid by the manufacturer. It is agreed that such replacement is the exclusive remedy available
from the manufacturer and that TO THE MAXIMUM EXTENT PERMITTED BY LAW, THE MANU-
FACTURER IS NOT RESPONSIBLE FOR DAMAGES OF ANY KIND, INCLUDING INCIDENTAL AND
CONSEQUENTIAL DAMAGE OR LOSS OF PROFITS OR REVENUES.
Some states do not allow limitations on how long an implied warranty lasts, so the above limita-
tions may not apply to you.
Exclusions from this warranty
We are not responsible for replacement of wicks and filters.
We are not responsible for any incidental or consequential damage from any malfunction,
accident, misuse, alterations, unauthorized repairs, abuse, including failure to perform reason-
able maintenance, normal wear and tear, nor where the connected voltage is more than 5%
above the nameplate voltage.
We are not responsible for any damage from the use of water softeners or treatments, chemi-
cals or descaling materials.
We are not responsible for the cost of service calls to diagnose the cause of trouble, or labor
charge to repair and/or replace parts.
No employee, agent, dealer or other person is authorized to give any warranties or conditions
on behalf of the manufacturer. The customer shall be responsible for all labor costs incurred.
Some states do not allow the exclusion or limitation of incidental or consequential damages,
so the above limitations or exclusions may not apply to you.
How to obtain service under this warranty
Within the limitations of this warranty, purchaser with inoperative units should contact
customer service at 800-547-3888 for instructions on how to obtain service within warranty
as listed above.
This warranty gives the customer specific legal rights, and you may also have other rights
which vary from province to province, or state to state.
Register your product at www.aircareproducts.com
If you have questions or issues with your unit, please contact us
right away. We can be reached Monday through Friday, 7:30 am -
5:30 pm CST. You can also email us at info@essickair.com
.

14
THIS PAGE INTENTIONALLY LEFT BLANK
Page is loading ...

16
INSTALLATION RAPIDE DE L’HUMIDIFICATEUR
Utilisez ces instructions de base pour configurer rapidement votre appareil. Utilisez les «In-
structions de configuration détaillées» à la page 20 pour plus d’informations sur la configu-
ration et le fonctionnement.
REMARQUE: Pour simplifier les instructions, le modèle 836000HB est présenté
dans la plupart des illustrations. Des images de l’unité 831000 sont incluses si
nécessaire.
POUR L’AIDE, APPELER 1.800.547.3888 OU VISITEZ AIRCAREPRODUCTS.COM
a. OUVREZ LE CARTON PUIS SOULEVEZ LE CHÂSSIS (SECTION SUPÉRIEURE)
b.
REMARQUEZ QUE LA TIGE DU FLOTTEUR DÉPASSE DE L’EMBALLAGE INTÉRIEUR.
c. DÉGAGEZ SOIGNEUSEMENT LA TIGE DE L’EMBALLAGE EN CARTON.
d. RETIREZ L’EMBALLAGE INTÉRIEUR DU CARTON.
e.
NE JETEZ PAS LE PETIT CUBE EN POLYSTYRÈNE. CE N’EST PAS DE L’EMBALLAGE.
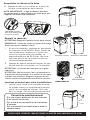
DÉBALLER L’HUMIDIFICATEUR
RETOURNEZ LA BASE PUIS
INSTALLEZ LES
ROULETTES
RETIREZ LA TIGE DU FLOT-
TEUR DE L’EMBALLAGE
INSTALLEZ LE
FLOTTEUR PUIS
SÉCURISEZ LA TIGE
DU FLOTTEUR
SOULEVEZ LE CHÂSSIS
DÉBALLER L’UNITÉ
RETIREZ LE SAC DE
PIÈCES ET AUTRE CON-
TENU DE LA BASE
INSÉREZ LES
ROULETTES
JUSQU’À CE
QUE LE RE-
BORD SOIT AU
MÊME NIVEAU
QUE LA BASE
INSTALLEZ LES COMPOSANTS DANS LA BASE
ASSUREZ-VOUS QUE LE
FLOTTEUR EN POLYSTY-
RÈNE EST ATTACHÉ À
LA TIGE

17
POUR L’AIDE, APPELER 1.800.547.3888 OU VISITEZ AIRCAREPRODUCTS.COM
POSITION
HUMIDISTAT
REMPLISSAGE DE L’UNITÉ
NIVELER
L’UNITÉ
LA TIGE DU FLOTTEUR DOIT ÊTRE EN
CONTACT AVEC LE COMMUTATEUR EN MÉTAL
ASSEMBLER LE CHÂSSIS ET LA BASE
FRONT
INSTALLER LA MÈCHE DANS LA BASE
PLACEZ LE CHÂSSIS SUR
LA BASE
REMPLIR
UNIQUE-
MENT POUR
“MAX FILL
LINE” À L’IN-
TÉRIEUR
L’AVANT DE LA
MÈCHE SE PLACE
SUR L’AVANT DE
LA BASE BORD
INCURVÉ
LOCALISEZ L’ÉTIQUETTE DU
NUMÉRO DE SÉRIE SUR LA
CHÂSSIS ET ÉCRIVEZLE SUR
LA COUVERTURE DU MANUEL
POUR UNE CONSULTATION
RAPID
ÉTIQUETTE AVEC LE
NUMÉRO DE SÉRIE
INSTALLATION
TERMINÉE
ENLEVER LES LOUVER
SUR L’AVANT (MODÈLE
831000 SEULEMENT
Page is loading ...
Page is loading ...
Page is loading ...
Page is loading ...
Page is loading ...
Page is loading ...
Page is loading ...
Page is loading ...
Page is loading ...
Page is loading ...
Page is loading ...
Page is loading ...

30
CONFIGURACIÓN RÁPIDA DEL HUMIDIFICADOR
Use estas instrucciones básicas para configurar la unidad. Utilice las “Instrucciones Detal-
ladas De Configuración” en pagina 34 para obtener información adicional de configura-
ción y operac
ión.
NOTA: Para simplificar las instrucciones, el modelo 836000HB aparece en la mayoría de
las ilustraciones. Las imágenes de la unidad 831000 se incluyen donde sea necesario.
a. ABRA LA CAJA Y LEVANTE CHASIS (SECCIÓN SUPERIOR)
b. OBSERVE LA VARILLA (VARILLA DEL FLOTADOR) QUE SALE POR EL EMBALAJE
INTERNO.
c. LIBERE CON CUIDADO LA VARILLA DEL EMBALAJE DE CARTÓN.
d. RETIRE EL EMBALAJE INTERNO DE CARTÓN.
e. NO DESCARTE EL CUBO PEQUEÑO DE POLIESTIRENO NO FORMA PARTE DEL
EMBALAJE.
Desempaque y ensamble el humidificador
INVIERTA LA BASE E INSTALE
LAS RUEDAS
EXTRAIGA LA VARILLA DEL
FLOTADOR DEL EMBALAJE
INSTALE EL FLOTADOR Y
SUJETE LA VARILLA DEL
FLOTADOR
LEVANTE Y RETIRE EL CHASIS
DESEMPAQUE
UNIDAD
RETIRE EL EMBALAJE
INTERNO DE CARTÓN.
INSERTE LAS
RUEDAS HASTA
QUE EL BORDE
QUEDE AL RAS
CON EL PISO
DE LA BASE
GIRE EL
RETENEDOR
PARA SUJETAR
LA VARILLA
DEL FLOTADOR
ENSAMBLE EL CONTENIDO DE LA BASE
VERIFIQUE QUE EL
FLOTADOR DE POLIE-
STIRENO ESTÉ SUJETOA
LA VARILLA FLOTANTE
PARA AYUDA, LLAME 1.800.547.3888 O VISITE AIRCAREPRODUCTS.COM

31
PARA AYUDA, LLAME 1.800.547.3888 O VISITE AIRCAREPRODUCTS.COM
POSICIÓN
HUMIDISTAT
LLENAR LA UNIDAD
NIVELAR
LA VARILLA DEL FLOTADOR DEBE
TOCAR EL INTERRUPTOR DE METAL
ENSAMBLE EL CHASIS Y LA BASE
FRONT
INSTALE LA MECHA EN LA BASE
COLOQUE EL CHASIS EN
LA BASE
LLENE
SOLO
HASTA
LA “LÍNEA
MÁXIMA
DE LLENA-
DO” EN EL
INTERIOR
EL FRENTE DE
LA MECHA SE
COLOCA EN EL
FRENTE DE LA
BASE BORDE
CURVO
OBSERVE LA ETIQUETA DEL
NÚMERO DE SERIE EN LA
PARTE SUPERIOR DEL CHASIS
Y ANOTE ESE NÚMERO EN
LA TAPA DEL MANUAL PARA
PODER CONSULTARLO RÁPID
AMENTE.
ETIQUETA CON
NÚMERO DE SERIE
INSTALACIÓN
COMPLETA
ALGUNOS
DETALLES
OMITIDOS POR
CLARIDAD
RETIRE LAS REJILLAS DELANTERAS
Modelo 831 000 solamente)
Page is loading ...
Page is loading ...
Page is loading ...
Page is loading ...
Page is loading ...
Page is loading ...
Page is loading ...
Page is loading ...
Page is loading ...
-
 1
1
-
 2
2
-
 3
3
-
 4
4
-
 5
5
-
 6
6
-
 7
7
-
 8
8
-
 9
9
-
 10
10
-
 11
11
-
 12
12
-
 13
13
-
 14
14
-
 15
15
-
 16
16
-
 17
17
-
 18
18
-
 19
19
-
 20
20
-
 21
21
-
 22
22
-
 23
23
-
 24
24
-
 25
25
-
 26
26
-
 27
27
-
 28
28
-
 29
29
-
 30
30
-
 31
31
-
 32
32
-
 33
33
-
 34
34
-
 35
35
-
 36
36
-
 37
37
-
 38
38
-
 39
39
-
 40
40


Ask a question and I''ll find the answer in the document
Finding information in a document is now easier with AI
in other languages
- français: Aircare 836000HB Manuel utilisateur
- español: Aircare 836000HB Manual de usuario
Related papers
-
Aircare CANYON 14416A Owner's manual
-
Aircare 831000 User manual
-
-
-
-
-
-
Aircare H12600 Operating instructions
-
 Essick EP9 700 Owner's manual
-