
INSTRUCTION MANUAL
MANUAL DE INSTRUCCIONES
Cordless Lawn Mower
Cortadora de Cesped
XML03
IMPORTANT: Read Before Using.
IMPORTANTE: Lea antes de usar.

2 ENGLISH
ENGLISH (Original instructions)
SPECIFICATIONS
Model: XML03
Mowing width (blade diameter) 460 mm (18″)
No load speed 2,500 /min
Maximum speed 3,300 /min
Part number of replacement mower blade 199367-2
Dimensions
(L x W x H)
during operation L: 1,455 mm to 1,680 mm (57-1/4″ to 66″)
W: 532 mm (21″)
H: 960 mm to 1,265 mm (37-3/4″ to 49-3/4″)
when stored
(without grass basket)
L: 1,010 mm to 1,125 mm (39-3/4″ to 44-1/4″)
W: 532 mm (21″)
H: 535 mm to 715 mm (21″ to 28-1/8″)
Rated voltage D.C. 36 V
Net weight 26.1 - 28.6 kg (57.6 - 63.1 lbs)
Protection degree IPX4
• Due to our continuing program of research and development, the specications herein are subject to change
without notice.
• Specications and battery cartridge may differ from country to country.
• The weight may differ depending on the attachment(s), including the battery cartridge. The lightest and heavi-
est combinations, according to EPTA-Procedure 01/2014, are shown in the table.
Applicable battery cartridge and charger
Battery cartridge
BL1815N / BL1820B / BL1830 / BL1830B / BL1840B / BL1850B / BL1860B
Charger DC18RC / DC18RD / DC18RE / DC18SD / DC18SE / DC18SF
• Some of the battery cartridges and chargers listed above may not be available depending on your region of
residence.
WARNING: Only use the battery cartridges and chargers listed above. Use of any other battery cartridges
and chargers may cause injury and/or re.
SAFETY WARNINGS
Lawn Mower Safety Instructions
WARNING: When using electric lawn mow-
ers, basic safety precautions should always be
followed to reduce the risk of re, electric shock,
and personal injury; including the following.
Read All Instructions
Read, understand, and follow all instructions on the
mower and in the instruction manuals. Be thoroughly
familiar with the controls and the proper use of the
mower before starting.
WARNING!
1. Avoid Dangerous Environment - Never operate
the mower in damp or wet locations. Always be
sure of your footing: keep a rm hold on the han-
dle and walk; never run.
2. Don't Use In Rain.
3. Keep Children Away - All visitors should be kept
a safe distance from work area. Be alert and turn
mower off if a child enters the area. Use extra care
when approaching blind corners, shrubs, trees, or
other objects that may block your view of a child.
4. Dress Properly - Do not wear loose clothing
or jewelry. They can be caught in moving parts.
Use of rubber gloves and substantial footwear is
recommended when working outdoors. Do not
operate the mower when barefoot or wearing open
sandals.
5. Use Safety Glasses- Always use face or dust
mask if operation is dusty.
6. Use Right Appliance - Do not use lawn mower for
any job except that for which it is intended.
7. Don't Force Lawn Mower - It will do the job better
and safer at the rate for which it was designed.
8. Don't Overreach - Keep proper footing and
balance at all times. Do not mow near drop offs,
ditches, or embankments. You could lose your
footing or balance.

3 ENGLISH
9. Stay Alert - Watch what you are doing. Use com-
mon sense. Do not operate lawn mower when you
are tired. Do not operate machine while under the
inuence of alcohol or drugs. A moment of inat-
tention while operating the mower may result in
serious personal injury.
10. Disconnect Lawn Mower - Disconnect the lawn
mower from the power supply or remove the bat-
tery when not in use, before servicing, cleaning,
removing material from the lawn mower, or chang-
ing accessories such as blades, and the like.
11. Store Idle Lawn Mower Indoors - When not in
use, lawn mower should be stored in an indoor dry
and locked-up place - out of reach of children.
12. Maintain Lawn Mower With Care - Keep cutting
edges sharp and clean for best and safest per-
formance. Follow instructions for lubricating and
changing accessories. Inspect lawn mower cord
periodically and if damaged, have it repaired by
an authorized service facility. Keep handles dry,
clean, and free from oil and grease.
13. Keep machine free of grass, leaves, or other
debris build up. Keep guards in place and in
working order.
14. Keep blades sharp.
15. Keep hands and feet away from cutting area.
Keep clear of the discharge opening at all
times.
16. Objects struck by the lawn mower blade can
cause severe injuries to persons. The lawn
should always be carefully examined and
cleared of all objects prior to each mowing.
Stay behind the handle when the engine
(motor) is running.
17. If the mower strikes a foreign object, follow
these steps:
• Stop the mower. Release the switch. Wait
until the blade comes to a complete stop.
• Remove the lock key and the battery
cartridge.
• Inspect the mower for any damage.
• Repair any damage before restarting and
operating the mower. Replace the blade if it
is damaged in any way.
18. Use identical replacement blades only.
19. This cutting machine is capable of amputating
hands and feet and throwing objects. Failure
to observe the following safety instructions
could result in serious injury or death.
20. Only allow responsible adults, who are familiar
with the instruction, to operate the mower.
21. Be sure the area is clear of other people before
mowing. Stop mower if anyone enters the area.
22. Never direct discharged material toward
anyone. Avoid discharging material against a
wall or obstruction. Material may ricochet back
toward the operator. Stop the blade when crossing
gravel surfaces.
23. Do not pull the mower backwards unless
absolutely necessary. When you are compelled
to back the mower from a fence or other similar
obstruction, look down and behind before and
while moving backwards.
24. Release switch lever and wait for blade rota-
tion to stop before crossing driveways, walks,
roads and any gravel-covered areas. Also
remove the lock key if you leave it, reach to pick
up or remove something out of your way, or for
any other reason that may distract you from what
you are doing.
25.
Do not operate machine without the entire grass
catcher, discharge guard, rear guard, or other
safety protective devices in place and working.
26. Stop the motor and remove the lock key when-
ever you leave the equipment, before cleaning
the mower or unclogging the chute and mak-
ing any repairs or inspections.
27. Shut the motor off and wait until the blade
comes to a complete stop before removing the
grass catcher. Beware that the blades coast after
turn off.
28. Mow only in daylight or good articial light.
29.
If the equipment should start to vibrate unusually,
stop the motor and check immediately for the
cause. Vibration is generally a warning of trouble.
30. Do not insert the lock key into mower until it is
ready to be used.
31. Don't grasp the exposed cutting blades or
cutting edges when picking up or holding the
appliance.
32. Check the blades or blade bolts carefully for
cracks or damage before operation. Replace
cracked or damaged blades or blade bolts
immediately.
33. Never attempt to make wheel height adjust-
ments while mower is running.
34.
Check the grass basket frequently for wear or
deterioration. For storage, always make sure the
grass basket is empty. Replace a worn grass bas-
ket with a new factory replacement one for safety.
35. Check grass basket components and the
discharge guard frequently and replace with
manufacturer’s recommended parts, when
necessary.
36. Mow across the face of slopes, never up and
down. Exercise extreme caution when chang-
ing direction on slopes. Do not mow exces-
sively steep slopes. Poor footing could cause a
slip and fall accident.
37. Watch for holes, ruts, bumps, rocks, or other
hidden objects. Uneven terrain could cause a slip
and fall accident. Tall grass can hide obstacles.
38. Do not mow on wet grass or excessively steep
slopes. Poor footing could cause a slip and fall
accident.
39. Check the blade mounting bolt at frequent
intervals for proper tightness.
40. Keep all nuts, bolts, and screws tight to
be sure the equipment is in safe working
condition.
41. Never remove or tamper with safety devices.
Check their proper operation regularly. Never
do anything to interfere with the intended
function of a safety device or to reduce the
protection provided by a safety device.
42. Maintain or replace safety and instruction
labels, as necessary.

4 ENGLISH
43. Battery tool use and care
• Prevent unintentional starting. Ensure
the switch is in the off-position before
connecting to battery pack, picking up
or carrying the machine. Carrying the
machine with your nger on the switch or
energizing machine that have the switch on
invites accidents.
• Disconnect the battery pack from the
machine before making any adjust-
ments, changing accessories, or storing
machine. Such preventive safety measures
reduce the risk of starting the machine
accidentally.
•
Recharge only with the charger specied by
the manufacturer. A charger that is suitable for
one type of battery pack may create a risk of re
when used with another battery pack.
•
Use machines only with specically desig-
nated battery packs. Use of any other battery
packs may create a risk of injury and re.
• When battery pack is not in use, keep it
away from other metal objects, like paper
clips, coins, keys, nails, screws or other
small metal objects, that can make a
connection from one terminal to another.
Shorting the battery terminals together may
cause burns or a re.
• Under abusive conditions, liquid may be
ejected from the battery; avoid contact.
If contact accidentally occurs, ush with
water. If liquid contacts eyes, seek medi-
cal help. Liquid ejected from the battery may
cause irritation or burns.
• Do not use a battery pack or machine
that is damaged or modied. Damaged or
modied batteries may exhibit unpredict-
able behaviour resulting in re, explosion
or risk of injury.
• Do not expose a battery pack or machine
to re or excessive temperature.
Exposure to re or temperature above
130°C (265°F) may cause explosion.
• Follow all charging instructions and do
not charge the battery pack or machine
outside of the temperature range
specied in the instructions. Charging
improperly or at temperatures outside of the
specied range may damage the battery and
increase the risk of re.
• Have servicing performed by a quali-
ed repair person using only identical
replacement parts. This will ensure that the
safety of the product is maintained.
• Do not modify or attempt to repair the
machine or the battery pack except as
indicated in the instructions for use and
care.
• Do not charge lawn mower in rain, or in
wet locations.
• When replacing batteries, all batteries
should be replaced at the same time.
Mixing fresh and discharged batteries could
increase internal cell pressure and rupture
the discharged battery.
• Do not dispose of the battery(ies) in
a re. The cell may explode. Check with
local codes for possible special disposal
instructions.
• Do not open or mutilate the battery(ies).
Released electrolyte is corrosive and may
cause damage to the eyes or skin. It may be
toxic if swallowed.
• Do not charge battery in rain, or in wet
locations.
44. Do not use the machine when there is a risk of
lightning.
45. When you use the machine on muddy ground,
wet slope, or slippery place, pay attention to
your footing.
46. Avoid working in poor environment where
increased user fatigue is expected.
47. Do not use the machine in bad weather where
visibility is limited. Failure to do so may cause
fall or incorrect operation due to low visibility.
48. Do not replace the battery in the rain.
49. Do not submerge the machine into a puddle.
50. Do not leave the machine unattended outdoors
in the rain.
51. Do not insert or remove the lock key in the
rain.
52. When wet leaves or dirt adhere to the suc-
tion mouth (ventilation window) due to rain,
remove them.
53. Do not wash the machine with high pressure
water.
54. When washing the machine, be sure to remove
the battery and lock key and close the battery
cover, and pour water toward the bottom of the
machine to which the blade is attached.
55. When storing the machine, avoid direct sun-
light and rain, and store it in a place where it
does not get hot or humid.
56. Perform inspection or maintenance in a place
where rain can be avoided.
57. After using the machine, remove the adhered
dirt and dry the machine completely before
storing. Depending on the season or the area,
there is a risk of malfunction due to freezing.
58. Do not wet the terminal of battery with liquid
such as water, or submerge the battery. Do not
leave the battery in the rain, nor charge, use,
or store the battery in a damp or wet place. If
the terminal get wet or liquid enters inside of bat-
tery, the battery may be short circuited and there is
a risk of overheat, re, or explosion.
59. After removing the battery from the machine or
charger, be sure to attach the battery cover to
the battery and store it in a dry place.
60. Do not replace the battery with wet hands.
61. Do not use the machine in the snow.
62. If the cut-off grass is wet, it is likely to be
clogged inside of the machine. Check the con-
dition of the machine regularly, and remove the
adhered grass as necessary.
SAVE THESE INSTRUCTIONS.

5 ENGLISH
WARNING: Use of this product can create
dust containing chemicals which may cause
respiratory or other illnesses. Some examples of
these chemicals are compounds found in pesti-
cides, insecticides, fertilizers and herbicides.
Your risk from these exposures varies, depend-
ing on how often you do this type of work. To
reduce your exposure to these chemicals: work
in a well ventilated area, and work with approved
safety equipment, such as those dust masks that
are specially designed to lter out microscopic
particles.
Symbols
The followings show the symbols used for tool.
volts
direct current
no load speed
revolutions or reciprocation per minute
Important safety instructions for
battery cartridge
1. Before using battery cartridge, read all instruc-
tions and cautionary markings on (1) battery
charger, (2) battery, and (3) product using
battery.
2. Do not disassemble battery cartridge.
3. If operating time has become excessively
shorter, stop operating immediately. It may
result in a risk of overheating, possible burns
and even an explosion.
4. If electrolyte gets into your eyes, rinse them
out with clear water and seek medical atten-
tion right away. It may result in loss of your
eyesight.
5. Do not short the battery cartridge:
(1) Do not touch the terminals with any con-
ductive material.
(2) Avoid storing battery cartridge in a con-
tainer with other metal objects such as
nails, coins, etc.
(3) Do not expose battery cartridge to water
or rain.
A battery short can cause a large current
ow, overheating, possible burns and even a
breakdown.
6. Do not store the tool and battery cartridge in
locations where the temperature may reach or
exceed 50 °C (122 °F).
7. Do not incinerate the battery cartridge even if
it is severely damaged or is completely worn
out. The battery cartridge can explode in a re.
8. Be careful not to drop or strike battery.
9. Do not use a damaged battery.
10. The contained lithium-ion batteries are subject
to the Dangerous Goods Legislation require-
ments.
For commercial transports e.g. by third parties,
forwarding agents, special requirement on pack-
aging and labeling must be observed.
For preparation of the item being shipped, consult-
ing an expert for hazardous material is required.
Please also observe possibly more detailed
national regulations.
Tape or mask off open contacts and pack up the
battery in such a manner that it cannot move
around in the packaging.
11. Follow your local regulations relating to dis-
posal of battery.
12. Use the batteries only with the products
specied by Makita. Installing the batteries to
non-compliant products may result in a re, exces-
sive heat, explosion, or leak of electrolyte.
SAVE THESE INSTRUCTIONS.
CAUTION: Only use genuine Makita batteries.
Use of non-genuine Makita batteries, or batteries that
have been altered, may result in the battery bursting
causing res, personal injury and damage. It will
also void the Makita warranty for the Makita tool and
charger.
Tips for maintaining maximum
battery life
1. Charge the battery cartridge before completely
discharged. Always stop tool operation and
charge the battery cartridge when you notice
less tool power.
2. Never recharge a fully charged battery car-
tridge. Overcharging shortens the battery
service life.
3. Charge the battery cartridge with room tem-
perature at 10 °C - 40 °C (50 °F - 104 °F). Let
a hot battery cartridge cool down before
charging it.
4. Charge the battery cartridge if you do not use
it for a long period (more than six months).
ASSEMBLY
WARNING: Always be sure that the lock key
and battery cartridge are removed before carrying
out any work on the mower. Failure to remove the
lock key and the battery cartridge may result in seri-
ous personal injury from accidental start-up.
WARNING: Never start the mower unless it is
completely assembled. Operation of the tools in a
partially assembled state may result in serious per-
sonal injury from accidental start-up.

6 ENGLISH
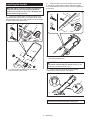
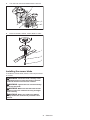
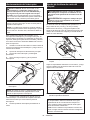
Installing the handle
NOTICE: When installing handles, position the
cords so that they are not caught by anything
between the handles. If the cord is damaged, the
mower switch may not work.
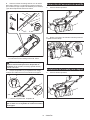
1. Attach the lower handle so that the holes in the
handle t in the protrusions on the mower body. Insert
the bolts from inside, then attach washer A from outside,
and then tighten the thumb nuts.
1
2
3
6
5
4
► 1. Lower handle 2. Washer A 3. Thumb nut
4. Protrusion 5. Hole 6. Bolt
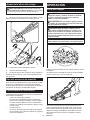
2. Align the hole in the lower handle with the hole
in the upper handle, then insert the bolts from inside,
then attach washer B from outside, and then tighten the
thumb nuts.
1
2
3
6
45
► 1. Upper handle 2. Hole 3. Washer B 4. Thumb nut
5. Lower handle 6. Bolt
CAUTION: Hold the upper handle rmly so
that it does not drop off your hand. Otherwise, the
handle may fall and cause an injury.
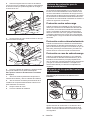
3. Attach holder A and holder B to the handle.
Position the cords as shown in the gure.
12
3
► 1. Cord 2. Holder A 3. Holder B
NOTE: When attaching holder A, be sure to x the
cord with the holder as shown in the gure.

7 ENGLISH
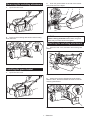
Removing the mulching attachment
1. Open the rear cover.
1
► 1. Rear cover
2. Remove the mulching attachment while holding
down the lever.
1
2
► 1. Lever 2. Mulching attachment
Installing the grass basket
1. Open the rear cover.
1
► 1. Rear cover
2. Hook the grass basket on the rod of the mower
body as shown in the gure.
13
2
► 1. Rod 2. Guard 3. Grass basket
NOTICE: Make sure that the guard on the grass
basket is facing downward. Otherwise, the grass
basket may not catch all of cut-off grass.
Attaching the mulching attachment
1. Open the rear cover, and then remove the grass
basket.
1
2
► 1. Rear cover 2. Grass basket
2. Attach the mulching attachment while holding
down the lever, and then release the lever to lock the
mulching attachment.
1
2
► 1. Lever 2. Mulching attachment

8 ENGLISH
FUNCTIONAL
DESCRIPTION
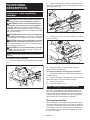
Installing or removing battery
cartridge
CAUTION: Always switch off the tool before
installing or removing of the battery cartridge.
CAUTION: Hold the tool and the battery car-
tridge rmly when installing or removing battery
cartridge. Failure to hold the tool and the battery
cartridge rmly may cause them to slip off your hands
and result in damage to the tool and battery cartridge
and a personal injury.
CAUTION: Make sure that you lock the battery
cover before use. Otherwise, mud, dirt, or water may
cause damage to the product or the battery cartridge.
CAUTION: Always install the battery cartridge
fully until the red indicator cannot be seen. If not,
it may accidentally fall out of the tool, causing injury to
you or someone around you.
CAUTION: Do not install the battery cartridge
forcibly. If the cartridge does not slide in easily, it is
not being inserted correctly.
NOTE: The tool does not work with only one battery
cartridge.
To install the battery cartridge;
1. Pull up the locking lever, and then open the battery
cover.
1
2
► 1. Battery cover 2. Locking lever
2. Align the tongue on the battery cartridge with the
slot on the mower then slide the cartridge until it locks in
place with a little click.
1
► 1. Battery cartridge
3. Insert the lock key in the place shown in the gure
as far as it will go.
1
► 1. Lock key
4. Close the battery cover and push it until it is
latched with the locking lever.
To remove the battery cartridge from the mower;
1. Pull up the battery cover locking lever and open
the battery cover.
2. Pull out the battery cartridge from the mower while
sliding the button on the front of the cartridge.
3. Pull out the lock key.
4. Close the battery cover.
Tool / battery protection system
The tool is equipped with a tool/battery protection sys-
tem. This system automatically cuts off power to the
motor to extend tool and battery life. The tool will auto-
matically stop during operation if the tool or battery is
placed under one of the following conditions:
Overload protection
When the battery is operated in a manner that causes
it to draw an abnormally high current, the tool automati-
cally stops and the main power lamp blinks in green. In
this situation, turn the tool off and stop the application
that caused the tool to become overloaded. Then turn
the tool on to restart.

9 ENGLISH
Overheat protection
When the tool or battery is overheated, the tool stops
automatically and the main power lamp lights up in red.
In this case, let the tool and battery cool before turning
the tool on again.
Overdischarge protection
When the battery capacity is not enough, the tool stops
automatically and the main power lamp blinks in red. In
this case, remove the battery from the tool and charge
the battery cartridges or change the battery cartridges
to fully charged ones.
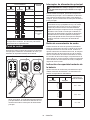
Indicating the remaining battery
capacity
Only for battery cartridges with the indicator
1
2
► 1. Indicator lamps 2. Check button
Press the check button on the battery cartridge to indi-
cate the remaining battery capacity. The indicator lamps
light up for a few seconds.
Indicator lamps Remaining
capacity
Lighted Off Blinking
75% to 100%
50% to 75%
25% to 50%
0% to 25%
Charge the
battery.
The battery
may have
malfunctioned.
NOTE: Depending on the conditions of use and the
ambient temperature, the indication may differ slightly
from the actual capacity.
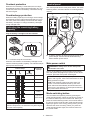
Control panel
The control panel has the main power switch, the mode
switching button, and the indicator of remaining battery
capacity.
2 31
4
5 6
► 1. Battery indicator 2. Mode switching lamp 3. Main
power lamp 4. Check button 5. Mode switching
button 6. Main power switch
Main power switch
WARNING: Always turn off the main power
switch when not in use.
To turn on the machine, press the main power switch.
The main power lamp lights up in green. To turn off the
machine, press the main power switch again.
NOTE: If the main power lamp lights up in red or
blinks in red or green, refer to the instructions for tool/
battery protection system.
NOTE: This machine employs the auto power-off
function. To avoid unintentional start up, the main
power switch will automatically shut down when the
switch lever is not pulled for a certain period after the
main power switch is turned on.
Mode switching button
You can switch the operating mode by pressing the
mode switching button. When the machine is turned on,
the machine starts up in the normal mode. When you
press the mode switching button, the machine shifts to
the energy-saving mode and the mode switching lamp
lights up in green. In the energy-saving mode, you can
decrease the noise at mowing. When you press the
mode switching button again, the machine returns to
the normal mode.

10 ENGLISH
Indicating the remaining battery capacity
Press the check button to indicate the remaining battery
capacities. The battery indicators correspond to each battery.
Battery indicator status
Remaining battery
capacity
On
Off
50% - 100%
20% - 50%
0% - 20%
Switch action
WARNING: Before installing the battery car-
tridge, always check to see that the switch lever
actuates properly and returns to the original posi-
tion when released. Operating a tool with a switch
that does not actuate properly can lead to loss of
control and serious personal injury.
NOTE: The mower does not start without pressing the
switch button even the switch lever is pulled.
NOTE: Mower may not start due to the overload
when you try to mow long or dense grass at a time.
Increase the mowing height in this case.
This mower is equipped with the interlock switch and han-
dle switch. If you notice anything unusual with either of
these switches, stop operation immediately and have them
checked by your nearest Makita Authorized Service Center.
1.
Install the battery cartridges. Insert the lock key into
the interlock switch and then close the battery cover.
2. Press the main power switch.
3. Press the switch button and hold it.
4. Grab the upper handle and pull the switch lever.
1
3
2
► 1. Switch button 2. Upper handle 3. Switch lever
NOTE: If the lock key is not inserted, the power lamp
blinks in green when you pull the switch lever.
5. Release the switch button as soon as the motor
starts running. The mower will continue to run until you
release the switch lever.
6. Release the switch lever to stop the motor.
Adjusting the mowing height
WARNING: Never put your hand or leg under
the mower body when adjusting the mowing
height.
WARNING: Always make sure that the lever
ts in the groove properly before operation.
The mowing height can be adjusted in the range of
between 20 mm (13/16″) and 75 mm (2-15/16″).
Remove the lock key, and then pull the mowing height
adjusting lever outward of the mower body and move it
to your desired mowing height.
1
► 1. Mowing height adjusting lever
Hold the front grip with one hand, and then move the
mowing height adjusting lever with the other hand.
1
2
► 1. Mowing height adjusting lever 2. Front grip
NOTE: The mowing height gures should be used
just as a guideline. Depending on the conditions of
the lawn or the ground, the actual lawn height may
become slightly different from the set height.
NOTE: Try a test mowing of grass in a less conspicu-
ous place to get your desired height.

11 ENGLISH
Adjusting the handle height
CAUTION: Before removing the bolts, hold
the upper handle rmly. Otherwise, the handle may
fall and cause an injury.
The handle height can be adjusted in three levels.
1. Loosen the thumb nuts of the lower handle, and
then remove the bolts, washer, and thumb nuts.
1
2
3
21
► 1. Thumb nut 2. Washer 3. Bolt
2. Adjust the handle height.
3. Insert the bolts from inside, then attach washers
from outside, and then tighten the thumb nuts.
Using mulching attachment
The mulching attachment allows you to return the cut
grass to the ground without gathering the cut grass in
the grass basket. When you operate the machine with
the mulching attachment, be sure to remove the grass
basket.
Electronic function
The machine is equipped with the electronic functions
for easy operation.
• Constant speed control
Electronic speed control for obtaining constant
speed. Possible to get ne nish, because the
rotating speed is kept constant even under load
condition.
• Soft start
The soft-start function minimizes start-up shock,
and makes the machine start smoothly.
OPERATION
Mowing
WARNING: Before mowing, clear away sticks
and stones from mowing area. Furthermore, clear
away any weeds from mowing area in advance.
WARNING: Always wear the safety goggles or
safety glasses with side shields when operating
the mower.
CAUTION: If the cut grass or foreign object
blocks up inside of the mower body, be sure to
remove the lock key and battery cartridge and
wear gloves before removing the grass or foreign
object.
NOTICE: Use this machine for mowing lawn only.
Do not mow weeds with this machine.
Firmly hold the handle with both hands when mowing.
The mowing speed guideline is approximately 1 meter
(3.3 ft.) per 4 seconds.
The center lines of the front wheels are guidelines to
mowing width. Using the center lines as guidelines,
mow in strips. Overlap by one half to one third the previ-
ous strip to mow the lawn evenly.

12 ENGLISH
12
33
► 1. Mowing width 2. Overlapping area 3. Center line
Change the mowing direction each time to prevent the
grass grain pattern from forming in just one direction.
Periodically check the grass basket for mowed grass.
Empty the grass before it becomes full. Before every
periodical check, be sure to stop the mower then
remove the lock key and the battery cartridge.
NOTE: Using the mower with the grass basket full
prevents smooth blade rotation and places an extra
load on the motor, which may cause breakdown.
Mowing a long-grass lawn
Do not try to cut long grass all at once. Instead, mow
the lawn in steps. Leave a day or two between mowings
until the lawn becomes evenly short.
NOTE: Mowing long grass to a short length all at
once may cause the grass to die. The cut grass may
also block up inside of the mower body.
Emptying the grass basket
WARNING: To reduce a risk of accident, reg-
ularly check the grass basket for any damage or
weakened strength. Replace the grass basket if
necessary.
1. Release the switch lever.
2. Remove the lock key.
3. Open the rear cover and take out the grass basket
by holding the handle.
1 2
3
► 1. Rear cover 2. Handle 3. Grass basket
4. Empty the grass basket.
MAINTENANCE
WARNING: Always be sure that the lock
key and battery cartridge are removed from the
mower before storing or carrying the mower or
attempting to perform inspection or maintenance.
WARNING: Always remove the lock key when
the mower is not in use. Store the lock key in a
safe place out of reach of children.
WARNING: Wear gloves when performing
inspection or maintenance.
WARNING: Always wear the safety goggles or
safety glasses with side shields when performing
inspection or maintenance.
NOTICE: Never use gasoline, benzine, thinner,
alcohol or the like. Discoloration, deformation or
cracks may result.
To maintain product SAFETY and RELIABILITY,
repairs, any other maintenance or adjustment should
be performed by Makita Authorized or Factory Service
Centers, always using Makita replacement parts.

13 ENGLISH
Maintenance
1. Remove the lock key and battery cartridges, and
then close the battery cover.
2. Put the mower on its side and clean grass clip-
pings accumulated on the underside of mower deck.
3. Pour water toward the bottom of the machine to
which the blade is attached.
NOTICE: Do not wash the machine with high
pressure water.
4. Check all nuts, bolts, knobs, screws, fasteners etc.
for tightness.
5. Inspect moving parts for damage, breakage, and
wear. Damaged or missing parts should be repaired or
replaced.
6. Store the mower in a safe place out of the reach of
children.
Carrying the mower
When carrying the mower, hold the front grip and lower
handle with two people as shown in the gure.
1
2
► 1. Lower handle 2. Front grip
Storing
Store mower indoors in a cool, dry and locked place.
Don't store the mower and charger in locations where
the temperature may reach or exceed 40 °C (104 °F).
1. Open the rear cover and take out the grass basket
by holding the handle.
1
3
2
► 1. Rear cover 2. Handle 3. Grass basket
2. Loosen the thumb nuts and fold the upper handle.
1
2
2
► 1. Upper handle 2. Thumb nut
Removing or installing the mower
blade
WARNING: Always remove the lock key and
battery cartridge when removing or installing the
blade. Failure to remove the lock key and battery
cartridge may cause a serious injury.
WARNING: The blade coasts for a few sec-
onds after releasing the switch. Do not start any
operation until the blade comes to a complete
stop.
WARNING: Always wear gloves when han-
dling the blade.
Removing the mower blade
1. Put the mower on its side so that the mowing
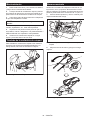
height adjusting lever comes to the upper side.
2. To lock the blade, insert a lumber or similar into
the mower.

14 ENGLISH
3. Turn the bolt counterclockwise with the wrench.
1
2
3
► 1. Mower blade 2. Wrench 3. Lumber
4. Remove the bolt, washer, mower blade in order.
1
2
3
► 1. Mower blade 2. Washer 3. Bolt
Installing the mower blade
To install the mower blade, take the removal procedure
in reverse.
WARNING: Install the blade carefully. It has
a top/bottom facing. Place the blade so that the
rotational direction arrow faces outward.
WARNING: Tighten the bolt clockwise rmly
to secure the blade.
WARNING: Make sure that the blade and all
the xing parts are installed correctly and tight-
ened securely.
WARNING: When you replace the blades,
always follow the instructions provided in this
manual.

15 ENGLISH
TROUBLESHOOTING
Before asking for repairs, conduct your own inspection rst. If you nd a problem that is not explained in the manual,
do not attempt to dismantle the tool. Instead, ask Makita Authorized Service Centers, always using Makita replace-
ment parts for repairs.
State of abnormality Probable cause (malfunction) Remedy
Mower does not start. Two battery cartridges are not installed. Install the charged battery cartridges.
Battery problem (under voltage) Recharge the battery cartridge. If recharging is not
effective, replace battery cartridge.
The lock key is not inserted. Insert the lock key.
Motor stops running after a little use. Battery's charge level is low. Recharge the battery cartridge. If recharging is not
effective, replace battery cartridge.
Cutting height is too low. Raise the cutting height.
Motor does not reach maximum
RPM.
Battery cartridge is installed improperly. Install the battery cartridge as described in this
manual.
Battery power is dropping. Recharge the battery cartridge. If recharging is not
effective, replace battery cartridge.
The drive system does not work
correctly.
Ask your local authorized service center for repair.
Cutting tool does not rotate:
stop the mower immediately!
Foreign object such as a branch is
jammed near the blade.
Remove the foreign object.
The drive system does not work
correctly.
Ask your local authorized service center for repair.
Abnormal vibration:
stop the mower immediately!
Blade is imbalanced, excessively or
unevenly worn.
Replace the blade.
OPTIONAL
ACCESSORIES
CAUTION: These accessories or attachments
are recommended for use with your Makita tool
specied in this manual. The use of any other
accessories or attachments might present a risk of
injury to persons. Only use accessory or attachment
for its stated purpose.
If you need any assistance for more details regard-
ing these accessories, ask your local Makita Service
Center.
• Mower blade
• Makita genuine battery and charger
NOTE: Some items in the list may be included in the
tool package as standard accessories. They may
differ from country to country.
MAKITA LIMITED WARRANTY
Please refer to the annexed warranty sheet for the
most current warranty terms applicable to this product.
If annexed warranty sheet is not available, refer to the
warranty details set forth at below website for your
respective country.
United States of America: www.makitatools.com
Canada: www.makita.ca
Other countries: www.makita.com

16 ESPAÑOL
ESPAÑOL (Instrucciones originales)
ESPECIFICACIONES
Modelo: XML03
Amplitud de corte del césped (diámetro de la cuchilla) 460 mm (18″)
Velocidad sin carga 2 500 r/min
Velocidad máxima 3 300 r/min
Número de pieza de la cuchilla de repuesto de la cortadora de
césped
199367-2
Dimensiones
(La x An x Al)
durante la operación Largo: 1 455 mm a 1 680 mm (57-1/4″ a 66″)
Ancho: 532 mm (21″)
Alto: 960 mm a 1 265 mm (37-3/4″ a 49-3/4″)
durante el almacenamiento
(sin el canasto para césped)
Largo: 1 010 mm a 1 125 mm (39-3/4″ a 44-1/4″)
Ancho: 532 mm (21″)
Alto: 535 mm a 715 mm (21″ a 28-1/8″)
Tensión nominal 36 V c.c.
Peso neto 26,1 kg - 28,6 kg (57,6 lbs - 63,1 lbs)
Grado de protección IPX4
• Debido a nuestro continuo programa de investigación y desarrollo, las especicaciones aquí incluidas están
sujetas a cambio sin previo aviso.
• Las especicaciones y el cartucho de batería pueden variar de país a país.
• El peso puede variar en función de los accesorios, incluido el cartucho de batería. En la tabla se muestra la
combinación de peso más ligero y más pesado conforme al procedimiento 01/2014 de EPTA.
Cartucho de batería y cargador aplicables
Cartucho de batería
BL1815N / BL1820B / BL1830 / BL1830B / BL1840B / BL1850B / BL1860B
Cargador DC18RC / DC18RD / DC18RE / DC18SD / DC18SE / DC18SF
• Algunos de los cartuchos de batería y cargadores enumerados arriba podrían no estar disponibles depen-
diendo de su área de residencia.
ADVERTENCIA: Use únicamente los cartuchos de batería y los cargadores indicados arriba. El uso de
cualquier otro cartucho de batería y cargador podría ocasionar una lesión y/o un incendio.
ADVERTENCIAS DE
SEGURIDAD
Instrucciones de seguridad sobre la
cortadora de césped
ADVERTENCIA: Al utilizar cortadoras de
césped eléctricas, siempre deben tomarse en
cuenta las precauciones básicas de seguridad
a n de reducir el riesgo de incendio, descarga
eléctrica y lesiones personales, incluyendo lo
siguiente.
Lea todas las instrucciones
Lea, comprenda y siga todas las instrucciones en la
cortadora de césped y en los manuales de instruccio-
nes. Familiarícese detalladamente con los controles y
el uso apropiado de la cortadora de césped antes de
empezar.
¡ADVERTENCIA!
1. Evite los entornos peligrosos - Nunca use
la cortadora de césped en lugares húmedos o
mojados. Asegúrese siempre de pisar sobre suelo
rme: mantenga una sujeción rme del mango y
camine; nunca corra.
2. No usar bajo la lluvia.
3. Mantenga a los niños alejados - Todos los visi-
tantes deberán ser mantenidos a una distancia
segura del área de trabajo. Esté alerta y apague
la cortadora de césped si algún niño ingresa al
área. Tenga especial cuidado al aproximarse a
esquinas poco visibles, arbustos, árboles u otros
objetos que le impidan divisar a algún niño.
4. Use vestimenta adecuada - No use prendas
sueltas ni joyas. Éstas podrían engancharse en
las piezas móviles. Cuando se trabaje en exterio-
res es recomendable usar guantes de hule y un
calzado resistente. No opere la cortadora de cés-
ped estando descalzo o con sandalias abiertas.
5. Use gafas de seguridad - Siempre utilice
careta o máscara contra polvo si la operación es
polvorienta.

17 ESPAÑOL
6. Use el aparato indicado - No utilice la cortadora
de césped para cualquier trabajo excepto para el
que fue diseñada.
7. No fuerce la cortadora de césped - Ésta hará el
trabajo mejor y de forma más segura a la veloci-
dad para la que fue diseñada.
8. No utilice el aparato donde no alcance -
Mantenga los pies sobre suelo rme y el equilibrio
en todo momento. No pode cerca de declives,
zanjas o diques. Podría perder su equilibrio o su
estabilidad al pisar.
9. Manténgase alerta - Preste atención a lo que
está haciendo. Use el sentido común. No utilice
la cortadora de césped cuando esté cansado. No
opere la máquina cuando esté bajo la inuencia
de alcohol o drogas. Un momento de distracción
mientras opera la cortadora de césped puede
ocasionar lesiones personales graves.
10.
Desconecte la cortadora de césped -
Desconecte la cortadora de césped del suministro
eléctrico o quite la batería si no la está usando, y
antes de dar mantenimiento, limpiarla, retirar mate-
rial acumulado en la cortadora de césped o reem-
plazar accesorios tales como cuchillas y similares.
11. Almacene la cortadora de césped en interiores
cuando no esté en uso - Cuando no se esté
utilizando, la cortadora de césped deberá almace-
narse en interiores en un lugar seco, bajo llave y
fuera del alcance de los niños.
12. Dé un debido mantenimiento a la cortadora de
césped - Mantenga los bordes de corte alados y
limpios para un mejor desempeño y mayor segu-
ridad. Siga las instrucciones para la lubricación y
cambio de accesorios. Inspeccione la cortadora
de césped periódicamente y en caso de presen-
tar daños, solicite su reparación a un centro de
servicio autorizado. Mantenga los mangos secos,
limpios y libres de aceite y grasa.
13. Mantenga la máquina libre de la acumulación
de césped, hojas y otros residuos.Conserve
los protectores en su lugar y en buenas condi-
ciones de funcionamiento.
14. Mantenga las cuchillas aladas.
15. Mantenga las manos y los pies alejados del
área de corte. Manténgase alejado de la aber-
tura de descarga en todo momento.
16. Los objetos que sean golpeados por la cuchi-
lla de la cortadora de césped pueden causar
lesiones personales graves. El césped debe
ser examinado cuidadosamente y despejado
de cualquier objeto antes de proceder a cor-
tarlo. Manténgase detrás del mango cuando el
motor esté funcionando.
17. Si la cortadora de césped llega a golpear algún
objeto extraño, siga los pasos a continuación:
• Pare la cortadora de césped. Suelte el
interruptor. Espere hasta que la cuchilla se
detenga por completo.
• Retire la llave de cierre y el cartucho de
batería.
• Inspeccione la cortadora de césped para ver
si hay algún daño.
• Repare cualquier daño antes de reiniciar y
usar la cortadora de césped. Remplace la
cuchilla si presenta algún tipo de daño.
18. Use solamente cuchillas de repuesto
idénticas.
19. Esta máquina cortadora es capaz de amputar
las manos y los pies, así como de lanzar obje-
tos. El no seguir las instrucciones de seguri-
dad indicadas a continuación podría ocasionar
lesiones graves o la muerte.
20. Solamente permita que los adultos responsa-
bles que estén familiarizados con las instruc-
ciones operen la cortadora de césped.
21. Asegúrese de que no haya otras personas en
el área de trabajo antes de cortar el césped.
Detenga la cortadora de césped en caso de
que alguna persona ingrese al área.
22.
Nunca dirija el material de desecho hacia ninguna
persona. Evite descargar el material de desecho
contra alguna pared u obstrucción. El material
puede rebotar y dirigirse al operador. Detenga la
cuchilla al atravesar supercies con grava.
23. No jale la cortadora de césped hacia atrás
a menos que sea absolutamente necesario.
Cuando sienta que debe hacer retroceder la cor-
tadora de césped para alejarla de alguna valla u
obstrucción similar, mire hacia abajo y detrás de
usted antes de desplazarse hacia atrás.
24. Libere la palanca interruptora y espere a que
la rotación de la cuchilla se detenga antes de
cruzar avenidas, caminos, calles y cualquier
área cubierta con grava. También retire la llave
de cierre en caso de dejar la máquina, levantar
o quitar algo del camino, o por alguna otra razón
que pueda distraerlo de lo que está haciendo.
25. No opere la máquina sin que el recolector de
césped, protector de descarga, protector tra-
sero o cualquier otro dispositivo de seguridad
estén en su lugar y funcionando.
26. Pare el motor y retire la llave de cierre siempre
que deje el equipo, antes de limpiar la corta-
dora de césped o despejar alguna obstrucción
en la tolva y efectuar alguna reparación o
inspección.
27. Apague el motor y espere a que la cuchilla se
haya detenido por completo antes de quitar el
recolector de césped. Tenga en cuenta que las
cuchillas siguen girando por inercia después de
apagar la herramienta.
28. Corte el césped solamente a la luz del día o en
buenas condiciones de iluminación articial.
29. Si por alguna razón el equipo comienza a
vibrar de manera anormal, pare el motor y
revise de inmediato para detectar la causa.
Generalmente la vibración es señal de que hay
algún problema.
30. No inserte la llave de cierre en la cortadora de
césped hasta que esté lista para usarse.
31. No sujete las cuchillas ni los bordes de corte
expuestos al levantar o sostener el aparato.
32. Revise cuidadosamente que las cuchillas o
los pernos de las cuchillas no tengan grietas o
daños antes de la operación. Reemplace inme-
diatamente las cuchillas o los pernos de las
cuchillas que presenten grietas o daños.
33. Nunca intente hacer ajustes en la altura de la
rueda mientras la cortadora de césped esté
funcionando.

18 ESPAÑOL
34. Revise el canasto para césped con frecuencia
para ver si presenta desgaste o deterioro. Al
almacenar el equipo, asegúrese siempre de
vaciar el canasto para césped. Por seguridad,
reemplace un canasto para césped desgastado
con un repuesto nuevo de fábrica.
35. Verique con frecuencia los componentes del
canasto para césped y el protector de des-
carga y reemplace con las piezas de repuesto
recomendadas por el fabricante en caso
necesario.
36. Corte el césped transversalmente a través de
las pendientes, nunca hacia arriba ni hacia
abajo. Aplique extrema precaución al cambiar
la dirección en las pendientes. Evite cortar el
césped en pendientes excesivamente inclina-
das. El no pisar sobre suelo rme puede ocasio-
nar resbalones y caídas accidentales.
37. Esté alerta de hoyos, surcos, protuberancias,
piedras u otros objetos ocultos. Las supercies
no niveladas pueden ocasionar resbalones y
caídas accidentales. El césped alto puede ocultar
algunos obstáculos.
38. No pode sobre césped mojado o en pendientes
excesivamente pronunciadas. El no pisar sobre
suelo rme puede ocasionar resbalones y caídas
accidentales.
39. Revise el perno de instalación de la cuchilla a
intervalos frecuentes para asegurar una ja-
ción apropiada.
40. Mantenga apretadas todas las tuercas, per-
nos y tornillos para asegurar que el equipo
se encuentre en condiciones seguras de
operación.
41. Nunca quite ni altere los dispositivos de
seguridad. Verique con regularidad que fun-
cionen correctamente. Nunca haga nada que
interera con la función para la que un dispo-
sitivo de seguridad fue diseñado, ni reduzca la
protección ofrecida por algún dispositivo de
seguridad.
42. Mantenga en su lugar o vuelva a colocar las
etiquetas de seguridad y de instrucciones
según se requiera.
43. Uso y cuidado de la herramienta a batería
• Evite una puesta en marcha accidental.
Asegúrese de que el interruptor esté en
la posición apagada antes de conectar
el paquete de baterías, levantar la herra-
mienta o cargarla. Cargar la herramienta
con su dedo en el interruptor o pasar energía
a la herramienta con el interruptor encendido
puede propiciar accidentes.
• Desconecte el paquete de baterías de
la herramienta antes de hacer cualquier
ajuste, cambiar accesorios o almacenar
la herramienta. Estas medidas de seguri-
dad preventivas reducen el riesgo de poner
en marcha la herramienta accidentalmente.
• Recargue sólo con el cargador especi-
cado por el fabricante. Un cargador que
sea adecuado para un tipo especíco de
paquete de batería puede generar un riesgo
de incendio al usarse con un paquete de
batería distinto.
• Use las herramientas únicamente con
los paquetes de baterías designados
especícamente para ellas. El uso de otros
paquetes de baterías puede generar riesgo
de lesiones e incendio.
• Cuando no se esté usando el paquete
de batería, manténgalo alejado de otros
objetos metálicos, como sujetapapeles
(clips), monedas, llaves, clavos, tornillos
u otros objetos pequeños de metal que
puedan crear una conexión entre una
terminal y otra. Causar un cortocircuito en
las terminales de la batería puede provocar
quemaduras o incendio.
• En condiciones de mal uso, podría esca-
par líquido de la batería; evite el contacto.
Si toca el líquido accidentalmente, enjua-
gue con agua. Si hay contacto del líquido
con los ojos, solicite atención médica. El
líquido expulsado de la batería puede causar
irritación o quemaduras.
• No utilice un paquete de baterías o una
herramienta que esté dañado/dañada o
haya sido modicado/modicada. Las
baterías dañadas o modicadas podrían
comportarse de manera impredecible
causando un incendio, explosión o riesgo
de lesión.
• No exponga un paquete de baterías o una
herramienta al fuego o a una temperatura
excesiva. La exposición al fuego a una
temperatura superior a 130 °C (265 °F)
podría causar una explosión.
• Siga todas las instrucciones relativas a
la carga y no cargue el paquete de bate-
rías o la herramienta fuera del rango de
temperatura especicado en las instruc-
ciones. Cargar de manera inapropiada o a
temperaturas fuera del rango especicado
podría dañar la batería e incrementar el
riesgo de incendio.
• Pida que el servicio lo realice un técnico
en reparaciones calicado y que utilice
únicamente piezas de repuesto idénticas
a las originales. Esto garantizará que se
mantenga la seguridad del producto.
• No modique ni intente reparar la herra-
mienta ni el paquete de baterías salvo
como se indique en las instrucciones
para el uso y cuidado.
• No cargue la cortadora de césped bajo la
lluvia ni en lugares húmedos.
• Al cambiar baterías, todas las baterías
deberán ser cambiadas al mismo tiempo.
Mezclar baterías nuevas con descargadas
podría aumentar la presión interna en las
celdas y romper la batería descargada.
• No arroje la(s) batería(s) al fuego. La celda
podría explotar. Consulte los códigos locales
para ver si hay instrucciones especiales
relativas al desecho.
• No abra ni dañe la(s) batería(s). Los
electrolitos liberados son corrosivos y pue-
den ocasionar daños en los ojos o la piel.
Pueden ser tóxicos si se llegan a tragar.

19 ESPAÑOL
• No cargue la batería bajo la lluvia ni en
lugares mojados.
44. No utilice la máquina cuando exista riesgo de
ser alcanzado por un rayo.
45. Cuando utilice la máquina sobre suelo emba-
rrado, inclinaciones mojadas o supercies
resbalosas, tenga cuidado al pisar.
46. Evite trabajar en un entorno deciente donde
sea probable que aumente la fatiga del
usuario.
47. No utilice la máquina cuando las condiciones
climáticas no sean buenas y la visibilidad sea
limitada. En caso contrario se podrían ocasionar
caídas u operaciones incorrectas debido a la baja
visibilidad.
48. No reemplace la batería bajo la lluvia.
49. No sumerja la máquina en los charcos.
50. No deje la máquina desatendida a la intempe-
rie bajo la lluvia.
51. No inserte ni retire la llave de cierre bajo la
lluvia.
52. Cuando debido a la lluvia se adhieran hojas
mojadas o tierra a la abertura de succión (ven-
tana de ventilación), retírelas.
53. No lave la máquina con agua a alta presión.
54. Al lavar la máquina, asegúrese de retirar
la batería y la llave de cierre y de cerrar la
cubierta de la batería, y vierta agua sobre la
parte inferior de la máquina a la que está aco-
plada la cuchilla.
55. Almacene la máquina lejos de la lluvia y la luz
directa del sol y en un sitio donde no haga
calor ni haya humedad.
56. Realice las inspecciones y labores de manteni-
miento en un sitio protegido de la lluvia.
57. Después de utilizar la máquina, quite la sucie-
dad adherida y séquela completamente antes
de guardarla. Dependiendo de la estación o de
la zona, existe el riesgo de un mal funcionamiento
por congelación.
58. No moje el terminal de la batería con líquidos,
como el agua, ni sumerja la batería en ellos.
No deje la batería bajo la lluvia, ni cargue,
utilice, o guarde la batería en un lugar húmedo
o mojado. Si el terminal se moja o entra líquido
dentro de la batería, la batería puede sufrir un
cortocircuito, con el consiguiente riesgo de sobre-
calentamiento, incendio o explosión.
59. Después de retirar la batería de la máquina o
el cargador, asegúrese de acoplar la cubierta
de la batería a la batería y de guardarla en un
lugar seco.
60. No reemplace la batería con las manos
mojadas.
61. No utilice la máquina en la nieve.
62. Si el pasto cortado está húmedo, probable-
mente se atascará en el interior de la máquina.
Verique el estado de la máquina regular-
mente, y retire el pasto adherido según sea
necesario.
GUARDE ESTAS
INSTRUCCIONES.
ADVERTENCIA: El uso de este producto
puede producir polvo que contenga sustancias
químicas que podrían causar enfermedades
respiratorias o de otro tipo. Algunos ejemplos de
estas sustancias químicas son los compuestos
encontrados en pesticidas, insecticidas, fertili-
zantes y herbicidas.
El riesgo al que se expone varía, dependiendo
de la frecuencia con la que realice este tipo de
trabajo. Para reducir la exposición a estas sus-
tancias químicas: trabaje en un área bien ven-
tilada y use un equipo de seguridad aprobado,
tal como las máscaras contra polvo que están
especialmente diseñadas para ltrar partículas
microscópicas.
Símbolos
A continuación se muestran los símbolos utilizados
para la herramienta.
volts o voltios
corriente directa o continua
velocidad sin carga
revoluciones o alternaciones por minuto,
frecuencia de rotación
Instrucciones importantes de
seguridad para el cartucho de
batería
1. Antes de utilizar el cartucho de batería, lea
todas las instrucciones e indicaciones de
precaución en el (1) el cargador de batería, (2)
la batería, y (3) el producto con el que se utiliza
la batería.
2. No desarme el cartucho de batería.
3. Si el tiempo de operación se ha acortado en
exceso, deje de operar de inmediato. Podría
correrse el riesgo de sobrecalentamiento,
posibles quemaduras e incluso explosión.
4. En caso de que ingresen electrolitos en sus
ojos, enjuáguelos bien con agua limpia y con-
sulte de inmediato a un médico. Esto podría
ocasionar pérdida de visión.
5. Evite cortocircuitar el cartucho de batería:
(1) No toque las terminales con ningún mate-
rial conductor.
(2) Evite guardar el cartucho de batería en un
cajón junto con otros objetos metálicos,
tales como clavos, monedas, etc.
(3) No exponga el cartucho de batería al
agua o la lluvia.
Un cortocircuito en la batería puede causar
un ujo grande de corriente, sobrecalenta-
miento, posibles quemaduras e incluso una
descompostura.

20 ESPAÑOL
6. No guarde la herramienta ni el cartucho de
batería en lugares donde la temperatura pueda
alcanzar o exceder los 50°C (122°F).
7. Nunca incinere el cartucho de batería incluso
en el caso de que esté dañado seriamente o
ya no sirva en absoluto. El cartucho de batería
puede explotar si se tira al fuego.
8. Tenga cuidado de no dejar caer ni golpear la
batería.
9. No use una batería dañada.
10. Las baterías de ión de litio están sujetas a los
requisitos reglamentarios en materia de bie-
nes peligrosos.
Para el trasporte comercial, por ej., mediante
terceros o agentes de transporte, se deben tomar
en cuenta los requisitos especiales relativos al
empaque y el etiquetado.
Para efectuar los preparativos del artículo que se
va a enviar, se requiere consultar a un experto
en materiales peligrosos. Si es posible, consulte
además otras regulaciones nacionales más deta-
lladas.
Pegue o cubra con cinta adhesiva los contactos
abiertos y empaque la batería de manera que ésta
no pueda moverse dentro del paquete.
11. Siga las regulaciones locales relacionadas al
desecho de las baterías.
12. Utilice las baterías únicamente con los pro-
ductos especicados por Makita. Instalar las
baterías en productos que no cumplan con los
requisitos podría ocasionar un incendio, un calen-
tamiento excesivo, una explosión o una fuga de
electrolito.
GUARDE ESTAS
INSTRUCCIONES.
PRECAUCIÓN: Utilice únicamente baterías
originales de Makita. El uso de baterías no origina-
les de Makita, o de baterías alteradas, puede ocasio-
nar que las baterías exploten causando un incendio,
lesiones personales y daños. Asimismo, esto inva-
lidará la garantía de Makita para la herramienta y el
cargador Makita.
Consejos para alargar al máximo
la vida útil de la batería
1. Cargue el cartucho de batería antes de que
se descargue completamente. Pare siem-
pre la operación y cargue el cartucho de
batería cuando note menos potencia en la
herramienta.
2. No cargue nunca un cartucho de batería que
esté completamente cargado. La sobrecarga
acortará la vida de servicio de la batería.
3. Cargue el cartucho de batería a una tempera-
tura ambiente de 10 °C - 40 °C (50 °F - 104 °F).
Si un cartucho de batería está caliente, déjelo
enfriar antes de cargarlo.
4. Cargue el cartucho de batería si no va a utili-
zarlo durante un período prolongado (más de
seis meses).
MONTAJE
ADVERTENCIA: Asegúrese siempre de que
la llave de cierre y el cartucho de batería se hayan
extraído antes de realizar cualquier trabajo en la
cortadora de césped. El no extraer la llave de cierre
y el cartucho de batería puede ocasionar lesiones
personales graves debido a un encendido accidental.
ADVERTENCIA: Nunca ponga en marcha la
cortadora de césped a menos que se encuentre
completamente ensamblada. La operación de
herramientas parcialmente ensambladas puede
ocasionar lesiones personales graves debido a un
encendido accidental.
Instalación del mango
AVISO: Cuando instale los mangos, posicione
los cables de tal manera que no queden engan-
chados con nada entre los mangos. Si un cable
está dañado, el interruptor de la cortadora de
césped podría no funcionar.
1. Acople el mango inferior de modo que sus oricios
encajen en las protuberancias del cuerpo de la corta-
dora de césped. Inserte los pernos por el interior, luego
acople la arandela A por el exterior, y por último apriete
las tuercas de mano.
1
2
3
6
5
4
► 1. Mango inferior 2. Arandela A 3. Tuerca de mano
4. Protuberancia 5. Oricio 6. Perno
Page is loading ...
Page is loading ...
Page is loading ...
Page is loading ...
Page is loading ...
Page is loading ...
Page is loading ...
Page is loading ...
Page is loading ...
Page is loading ...
Page is loading ...
Page is loading ...
-
 1
1
-
 2
2
-
 3
3
-
 4
4
-
 5
5
-
 6
6
-
 7
7
-
 8
8
-
 9
9
-
 10
10
-
 11
11
-
 12
12
-
 13
13
-
 14
14
-
 15
15
-
 16
16
-
 17
17
-
 18
18
-
 19
19
-
 20
20
-
 21
21
-
 22
22
-
 23
23
-
 24
24
-
 25
25
-
 26
26
-
 27
27
-
 28
28
-
 29
29
-
 30
30
-
 31
31
-
 32
32


Makita XML03 User manual
- Category
- Power tools
- Type
- User manual
Ask a question and I''ll find the answer in the document
Finding information in a document is now easier with AI
in other languages
- español: Makita XML03 Manual de usuario
Related papers
Other documents
-
Dolmar AM3653 Owner's manual
-
-
Craftsman 917.37707 User manual
-
Husqvarna XT722FE User manual
-
-
-
-
-
-