Page is loading ...

Owner's Manual
Manual del propietario
Read all instructions BEFORE
assembly and USE of product.
KEEP INSTRUCTIONS FOR
FUTURE USE.
Lea todas las instrucciones ANTES
de armar y USAR este producto.
CONSERVE LAS INSTRUCCIONES
PARA USO FUTURO.
IS0140.ES
©2015 Artsana USA, INC. 11/15

2 3
WARNING
Failure to follow these warnings and the instructions could
result in serious injury or death. For your child's safety, read
the labels and owner's manual before using the product.
• PLEASE READ THESE
INSTRUCTIONS CAREFULLY TO
ENSURE THE SAFETY OF YOUR
CHILD.
• ALWAYS PROVIDE THE
SUPERVISION NECESSARY FOR
THE CONTINUED SAFETY OF
YOUR CHILD.
• SUFFOCATION HAZARDS - Infants
have suffocated:
• In gaps between extra padding
and side of the bassinet, and
• On soft bedding.
• Use ONLY the pad provided
by Chicco. Never add a pillow,
comforter, or another mattress
for padding.
• SUFFOCATION HAZARD - When
using the bassinet extension, make
sure you fully unzip the extension.
NEVER partially unzip the extension.
Mattress must always be level.
• If a sheet is used with the pad,
use only a fitted sheet specifically
designed to t snug with at least 2”
(5cm) under all sides of the pad.
• Strings and cords can cause
strangulation! DO NOT place items
with a string around child’s neck such
as hood strings, pacier cords,etc.
• DO NOT suspend strings over the
bassinet or attach strings to toys.
• DO NOT place the bassinet near a
window where cords from blinds or
drapes can strangle a child.
• FALL HAZARD - To help prevent falls,
do not use this product when the
infant begins to push up on hands
and knees or has reached 20lbs (9kg),
whichever comes rst.
• DO NOT carry bassinet with child in
it.
• Be sure all sides are locked in position
whenever child is in product.
• Before use, remove and dispose of all
plastic bags and packaging materials
and keep them out of reach of
children.
• Do not use accessories, spare parts,
or any component not supplied or
approved by Chicco as they may
make the bassinet unsafe.
• Keep bassinet away from stoves,
heaters, fireplaces and other hazards
which can cause injury to your child.
• To reduce the risk of SIDS
(Sudden Infant Death Syndrome),
pediatricians recommend healthy
infants be placed on their back to
sleep unless otherwise advised by
your physician.
• DO NOT place more than one child
in bassinet.
• Never use this product if there are
any loose or missing fasteners, loose
joints, broken parts, or torn mesh/
fabric. Check periodically during
use. Contact Chicco for replacement
parts and instruction if needed.
Never substitute parts.
ADVERTENCIA
El incumplimiento de estas advertencias e instrucciones
puede ocasionar lesiones graves o la muerte. Por la seguridad
de su hijo, lea las etiquetas y el manual del propietario antes
de utilizar el producto.
• LEA ESTAS INSTRUCCIONES CON
ATENCIÓN PARA GARANTIZAR LA
SEGURIDAD DEL NIÑO.
• PROPORCIONE SIEMPRE LA
SUPERVISIÓN NECESARIA PARA LA
SEGURIDAD CONTINUA DEL NIÑO.
• RIESGOS DE ASFIXIA - Los bebés se
han asxiado en los siguientes casos:
• En los espacios entre una
colchoneta adicional y el lado de la
cuna, y
• Con ropa de cama muy mullida.
• SOLO use la colchoneta que
proporciona Chicco. Nunca agregue
una almohada, una colcha u otro
colchón para crear una superficie
más acolchada.
• PELIGRO DE ASFIXIA: al utilizar la
extensión de la cuna, asegúrese de
abrir completamente el cierre de la
extensión. NUNCA abra parcialmente
el cierre de la extensión. El colchón
debe estar siempre nivelado.
• Si se usa una sábana con la
colchoneta, utilice solamente una
sábana específicamente diseñada
para ajustarse bien, con por lo menos
2" (5 cm) debajo de todos los lados
del colchón.
• Las cuerdas y los cordones pueden
provocar estrangulamiento. No
coloque elementos con cuerda
alrededor del cuello del niño (como
cuerdas de capuchas, de chupetes,
etc.)
• NO cuelgue cuerdas en la cuna ni
coloque cuerdas en los juguetes.
• NO coloque la cuna cerca de
una ventana donde las cuerdas
de persianas o cortinas puedan
estrangular al niño.
• RIESGO DE CAÍDAS. Para ayudar
a prevenir caídas, no utilice este
producto cuando el bebé comience
a incorporarse con las manos y las
rodillas, o cuando pese 20 libras
(9 kg), lo que ocurra primero.
• NO traslade la cuna con el niño
dentro de esta.
• Siempre que el niño esté en la cuna,
asegúrese de que todos los lados
estén trabados en su lugar.
• Antes del uso, saque y deseche todas
las bolsas plásticas y materiales
de embalaje y guárdelos fuera del
alcance de los niños.
• No utilice accesorios, piezas de
repuesto ni componentes que
no hayan sido suministrados o
aprobados por Chicco, ya que podrían
comprometer la estabilidad de la
cuna.
• Mantenga la cuna lejos de estufas,
calentadores, chimeneas y otros
peligros que puedan provocar lesiones
a su niño.

6 7
Components
Componentes
D. - Canopy
D. - Capota
E. - Toys
E. - Juguetes
F. - Tote
F. - Bolso
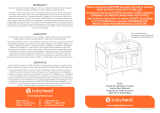
How to Assemble the Bassinet
Cómo armar la cuna
1. Stand the Bassinet Frame up and
swing the ends of the Bassinet out
and up. The Bassinet Frame will look
as shown.
1. Coloque la estructura de la cuna
en posición vertical y rote los
extremos de la cuna hacia afuera
y hacia arriba. La estructura de la
cuna se verá como se muestra en la
gura.
1
"CLICK"
"CLIC"

8 9
2
How to Assemble the Bassinet
Cómo armar la cuna
2. To attach the 4 legs, lay out the
legs next to the open Bassinet Frame
with the release button facing
towards each other, as shown.
Start at one end and insert each
of two legs into the corresponding
ends, make sure the Leg release
buttons are facing each other. The
snap buttons should lock into place.
Repeat for the other 2 legs on the
other end of the bassinet.
Pull on legs to make sure they are
securely attached.
2. Para colocar las 4 patas, coloque
las patas junto a la estructura abierta
de la cuna de modo que los botones
de liberación queden enfrentados,
como se muestra.
Comience en un extremo e inserte
cada una de las dos patas en los
extremos correspondientes; asegúrese
de que los botones de liberación de
las patas estén enfrentados unos
con otros. Los botones de broche
deben trabar las patas en su lugar.
Repita el paso para las otras 2 patas en
el otro extremo de la cuna.
Tire de las patas para asegurarse de
que estén sujetadas de forma segura.
"CLICK"
"CLIC"
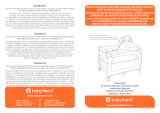
How to Assemble the Bassinet
Cómo armar la cuna
3. Insert the Mattress Pad into the
bottom of the Bassinet, as shown
Make sure Mattress Pad is level.
Make sure the zippers are facing down
when inserting the Mattress Pad.
3. Inserte la almohadilla del colchón
en la parte inferior de la cuna, como se
indica. Asegúrese de que la
almohadilla del colchón esté nivelada.
Asegúrese de que los cierres queden
hacia abajo al insertar la colchoneta.
WARNING
FALL HAZARD - To help prevent falls,
stop using the bassinet when infant
begins to push up on hands and
knees or weighs over 20lbs. (9kg),
whichever comes rst.
ADVERTENCIA
RIESGO DE CAÍDA - Para ayudar a
evitar caídas, no use la cuna cuando
el bebé comience a incorporarse
apoyándose en las manos y las
rodillas o cuando pese más de 20
libras (9 kg), lo que ocurra primero.
3

10 11
WARNING
SUFFOCATION HAZARD -
When
using the bassinet extension, make
sure you fully unzip the extension.
NEVER partially unzip the extension.
Mattress must always be level.
ADVERTENCIA
PELIGRO DE ASFIXIA: al utilizar la
extensión de la cuna, asegúrese de
abrir completamente el cierre de la
extensión. NUNCA abra parcialmente
el cierre de la extensión. El colchón
debe estar siempre nivelado.
Extending the Bassinet
Extender la cuna
4. Remove the Mattress Pad from
the Bassinet. Then lift up on the
fabric on the inside of the
Bassinet and unzip all the way
around.
4. Saque la almohadilla del colchón
de la cuna. Luego, levante la tela que
se encuentra dentro de la cuna y
abra el cierre por completo.
4
Extending the Bassinet
Extender la cuna
5. Make sure the Bassinet is
completely extended.
Insert the Mattress Pad into the
bottom of the Bassinet, as shown
Make sure Mattress Pad is level.
Make sure the zippers are facing
down when inserting the Mattress
Pad.
5. Asegúrese de que la cuna esté
completamente extendida.
Inserte la almohadilla del colchón en
la parte inferior de la cuna, como se
indica. Asegúrese de que la
almohadilla del colchón esté
nivelada.
Asegúrese de que los cierres queden
hacia abajo al insertar la colchoneta.
5

12 13
6. Insert both Canopy tabs into the
brackets on the Bassinet Hinge. Make
sure not to remove the plastic fabric
tabs from the Bassinet Hinge.
Unfold the Canopy, as shown.
6. Inserte ambas lengüetas de la
capota en los soportes de la bisagra
de la cuna. Asegúrese de no quitar
las lengüetas de tela plástica de la
bisagra de la cuna.
Despliegue la capota, como se indica.
6
Attaching the Canopy
Sujetar la capota
7. Slide the Toy strap into one of the
loops on the inside of the Canopy.
Fold the hook and loop strap together
to secure the toy, as shown.
7. Deslice la correa para juguetes por
uno de los nudos dentro de la capota.
Pliegue la correa de gancho y bucle
para asegurar el juguete, como se
indica.
7
Attaching Toys
Sujetar los juguetes

14 15
Closing and Transporting the Bassinet
Cierre y transporte de la cuna
8. Remove the Mattress Pad and the
Canopy from the Bassinet.
To release the legs, press in on the
Release Button on each leg and pull
the leg off of the Bassinet end as
shown.
8. Saque la almohadilla del colchón
y la capota de la cuna.
Para liberar las patas, presione el
botón de liberación en cada pata y
tire de la pata en dirección contraria
a la cuna como se muestra.
8
9. To Fold the bassinet, rst remove
the mattress. Then, press in on the
Release Buttons on the Bassinet
Hinge, as shown. The ends will fold
down.
9. Para plegar la cuna, primero quite
la colchoneta. Luego, presione los
botones de liberación en la bisagra de
la cuna, como se muestra. Los
extremos se plegarán.
9
Closing and Transporting the Bassinet
Cierre y transporte de la cuna

16 17
10. To transport your Bassinet, place
the Bassinet Frame, Mattress Pad,
Canopy and 4 legs into the Tote Bag,
as shown.
10. Para transportar la cuna, coloque
la estructura de la cuna, la
almohadilla del colchón, la capota
y las 4 patas en el bolso de mano,
como se indica.
Closing and Transporting the Bassinet
Cierre y transporte de la cuna
10
11
How to Remove the Mattress Padding
Cómo quitar la colchoneta
11. To remove the Mattress padding
from the Mattress Cover, ip the
Mattress over and locate both
zippers. Undo the zippers and pull out
both sections of padding, as shown.
To re-insert the Mattress padding
repeat step 11 in reverse. Make sure
to insert the padding with the board
side on the same side as the zipper
location.
When padding is replaced into cover,
Make sure the padding is at and
does not create gaps when placed
into bassinet.
11. Para sacar la colchoneta de la
funda del colchón, dé vuelta el
colchón y localice ambos cierres. Abra
los cierres y retire ambas secciones de
la colchoneta, como se indica.
Para volver a colocar la colchoneta,
repita el paso 11 en forma inversa.
Asegúrese de insertar la colchoneta
de forma que el lado de la tabla quede
del mismo lado que los cierres.
Cuando vuelva a colocar la
colchoneta en la funda, asegúrese de
que la colchoneta esté plano y que no
genere huecos cuando se coloque en
la cuna.

18 19
How to Remove the Fabric
Cómo quitar la tela del asiento
12. To remove the Bassinet Fabric
from the Bassinet Frame, pull out the
plastic tab from the bracket located
on the side of the Bassinet Hinge.
Repeat for the other side.
12. Para extraer la tela de la cuna
del bastidor, tire de la lengüeta
de plástico que está en el soporte
metálico del lado de la bisagra. Repita
del otro lado.
12
13. Locate the board in the Bassinet
Fabric. Undo the hook and loop
fastener, pull out the board and set
aside.
13. Localice la tabla en la tela de la
cuna. Abra el sujetador de gancho y
bucle, retire la tabla y déjela aparte.
13
How to Remove the Fabric
Cómo quitar la tela del asiento
WARNING
SUFFOCATION HAZARD - Do not
place child in the bassinet without
the center board properly in place.
ADVERTENCIA
PELIGRO DE ASFIXIA. No coloque al
niño en la cuna sin que la tabla
central esté correctamente en su
lugar.

20 21
14. Remove the Bassinet Hinges from
the Bassinet Frame. Locate 2 snap
buttons on the Bassinet Hinge as
shown. Press in on both snap
buttons, one at a time, and pull up
on the Bassinet Hinge to remove.
Repeat for the other Bassinet Hinge.
14. Quite las bisagras de la cuna de
la estructura de la cuna. Localice los
2 botones de broche en la bisagra de
la cuna, como se muestra. Presione
ambos botones de broche, uno a la
vez, y tire de la bisagra de la cuna para
retirarla. Repita el paso para la otra
bisagra.
14
How to Remove the Bassinet Hinge
Cómo quitar la bisagra de la cuna
15. To remove the Bassinet Frame
arms, lay the Bassinet Frame on its
side. Locate the zippers on each side
of the Bassinet Frame end, as shown.
Undo both zippers and pull out the
Bassinet Frame arm. Repeat for the
other side and set both arms aside.
15. Para quitar los brazos de la
estructura de la cuna, coloque la
estructura de la cuna sobre su lado.
Localice los cierres de cada lado del
extremo de la estructura de la cuna,
como se muestra. Abra los cierres y
retire el brazo de la estructura de la
cuna. Repita el paso para el otro lado
y deje ambos brazos aparte.
15
How to Remove the Fabric
Cómo quitar la tela del asiento

22 23
16
16. To reassemble the bassinet, first
attach the fabric to the Bassinet
Frame (see step 15).
To attach the Bassinet Hinges to the
Bassinet Frame arms, positioning the
hinge so that the bracket is facing
towards the inside of the bassinet, as
shown.
16. Para volver a armar la cuna,
primero je la tela al bastidor
(vea el paso 15).
Para jar las bisagras de la cuna a los
brazos del bastidor, coloque la bisagra
con el soporte metálico hacia el
interior de la cuna, como se muestra
en la imagen.
How to Reassemble
Cómo volver a armar la cuna
17. Line up the Bassinet Hinge end
with the keyway to the Bassinet
Frame arm with the pin and insert the
arm into the Hinge. (See g. A)
The keyway covers the pin and the
Snap Button will lock into position.
Attach the other side of the Bassinet
Hinge, again making sure the Snap
Button locks. Pull on the Hinge to
make sure it is securely attached.
Repeat steps 16 and 17 for the other
Bassinet Hinge.
17. Alinee el extremo de la bisagra de
la cuna con la ranura de
posicionamiento con el brazo de la
estructura de la cuna con la clavija e
inserte el brazo en la bisagra.
(Vea la gura A)
La ranura de posicionamiento cubre
la clavija y el botón de broche se
trabará en su posición. Coloque el
otro lado de la bisagra de la cuna,
y nuevamente asegúrese de que el
botón de broche se trabe. Tire de la
bisagra para asegurarse de que esté
bien colocada.
Repita los pasos 16 y 17 con la otra
bisagra.
17
A
Pin
Clavija
Keyway
Ranura de
posicionamiento
How to Reassemble
Cómo volver a armar la cuna

2524
18. Slide the plastic tab into the
bracket located on the side of the
Bassinet Hinge. Repeat for the other
side.
To complete the Bassinet
Fabric assembly, replace the board
and secure the hook and loop
fastener (see step 13).
18. Deslice la lengüeta plástica en el
soporte metálico que está junto a la
bisagra. Repita del otro lado.
Para completar el montaje de la tela
de la cuna, vuelva a colocar la tabla y
ajuste el sujetador de gancho y bucle
(vea el paso 13).
18
How to Reassemble
Cómo volver a armar la cuna
WARNING
SUFFOCATION HAZARD - Do not
place child in the bassinet without
the center board properly in place.
ADVERTENCIA
PELIGRO DE ASFIXIA. No coloque al
niño en la cuna sin que la tabla
central esté correctamente en su
lugar.
Cleaning and Maintenance
This product requires regular maintenance. The cleaning and maintenance of the bassinet must only
be carried out by an adult.
CLEANING
The bassinet and mattress have fabric covers that are completely removable and washable. Check the
product regularly for signs of wear and damage and to ensure that it is assembled correctly. Should
any part be damaged, do not use it and keep it out of reach of children. Do not clean the product with
solvents, abrasive or harsh products.
Please refer to the care label for instructions on cleaning the fabric parts of the bassinet.
CLEANING PARTS
Periodically wipe clean plastic parts with a soft damp cloth. Always dry the metal parts to prevent the
formation of rust. Do not immerse the oor boards in water. Wipe clean with a damp cloth and mild
detergent (do not use bleach).
Este producto requiere un mantenimiento regular. La limpieza y el mantenimiento de la cuna solo
deben ser realizados por un adulto.
LIMPIEZA
La cuna y la colchoneta tienen fundas de tela que son totalmente desmontables y lavables. Controle el
producto en forma regular para detectar desgaste y deterioro, y para asegurarse de que esté armado
correctamente. Si alguna de las piezas está dañada, no la utilice y manténgala fuera del alcance de los
niños. No limpie el producto con productos solventes, abrasivos ni agresivos.
Consulte las instrucciones sobre la limpieza de las partes de tela de la cuna en la etiqueta de cuidados.
LIMPIAR LAS PIEZAS
Limpie periódicamente las partes de plástico con un trapo suave y húmedo. Seque siempre las partes
de metal para evitar la formación de óxido. No sumerja las tablas de piso en agua. Límpielas con un
trapo húmedo y detergente suave (no use lejía).
Limpieza y mantenimiento

26
For More Information
Más información
For USA customers :
If you have any questions or comments about this product, or are missing any of
the parts, please do not return this product to the store. Contact us in one of the
following ways:
Para clientes de los EE. UU.:
Si tiene preguntas o sugerencias sobre este producto, o falta alguna de las partes,
no devuelva este producto a la tienda. Comuníquese con nosotros por alguno de
los siguientes medios:
@
(877)-424-4226
1826 William Penn Way
Lancaster, PA 17601
www.chiccousa.com

www.chiccousa.com
/