Kuppersberg GS 6020 User manual
- Category
- Dishwashers
- Type
- User manual

TECHNICAL PASSPORT
ПАСПОРТ ТЕХНИЧЕСКОГО ИЗДЕЛИЯ
GS 6020
DISHWASHERS
ПОСУДОМОЕЧНЫЕ МАШИНЫ

2 3
TECHNICAL PASSPORT ENGLISH ENGLISH TECHNICAL PASSPORT
Dishwasher Dishwasher
1
)
SAFETY INFORMATION .....................................................................................................................3
2
)
DISPOSAL ..................................................................................................................................................5
3
)
OPERATION INSTRUCTION ............................................................................................................. 6
CONTROL PANEL .................................................................................................................................6
DISHWASHER FEATURES ...............................................................................................................7
4
)
PRIOR USING FOR THE FIRST TIME ..........................................................................................7
WATER SOFTENER .............................................................................................................................7
LOADING THE SALT INTO THE SOFTENER ..........................................................................8
FILL THE RINSE AID DISPENSER...............................................................................................9
FUNCTION OF DETERGENT ..........................................................................................................11
5
)
LOADING THE DISHWASHER BASKETS ...................................................................................13
6
)
STARTING A WASHING PROGRAMME ........................................................................................18
WASH CYCLE TABLE ..........................................................................................................................18
TURNING ON THE APPLIANCE ....................................................................................................18
CHANGE THE PROGRAMME ..........................................................................................................19
FORGET TO ADD DISH ......................................................................................................................19
7
)
MAINTENANCE AND CLEANING ...................................................................................................20
8
)
TROUBLESHOOTING TIPS................................................................................................................23
ERROR CODES ....................................................................................................................................... 23
BEFORE CALLING FOR SERVICE ................................................................................................24
TECHNICAL INFORMATION ..........................................................................................................26
CONTENTS
READ THIS MANUAL
Dear Customer,
Please read this User Information
carefully and keep it to refer to at a
later date.
Pass it on to any subsequent owner
of the appliance.
This manual contains sections
of Safety Instructions, Operating
Instructions, Installation Instructions
and Troubleshooting Tips, etc.
Carefully read it before using the
dishwasher will help you to use and
maintain the dishwasher properly.
BEFORE CALLING
FOR SERVICE
To review the section on
Troubleshooting Tips will help you
to solve some common problemsby
yourself and not need to ask for the
help of professional technicians.
NOTE:
The manufacturer, following a
policy of constant development and
updating of the product, may make
modifi cations without giving prior
notice.
1. SAFETY INFORMATION
WARNING!
When using your dishwasher,
follow the basic precautions including
the following:
WARNING! HYDROGEN GAS IS
EXPLOSIVE
Under certain conditions, Hydrogen
gas may be produced in a hot-water
system that has not been used for
two weeks or more. HYDROGEN GAS
IS EXPLOSIVE. If the hot-water system
has not been used for such a period,
before using the dishwasher turn on
all hot-water faucets and let the water
fl ow from each for several minutes.
This will release any accumulated
hydrogen gas. As the gas is fl ammable,
do not smoke or use an open fl ame
during this time.
WARNING! PROPER USE
Do not abuse, sit on, or stand
on the door or dish basket of the
dishwasher.
Do not touch the heating
element during or immediately after
use.
Do not operate your dishwasher
unless all enclosure panels are properly
in place. Open the door very carefully if
the dishwasher is operating. There is a
risk of water squirting out.
Do not place any heavy objects
or stand on the door when it is open.
The appliance could tip forward.
When loading items to be
washed:
Locate sharp items so that
they are not likely to damage the door
seal;

4 5
TECHNICAL PASSPORT ENGLISH ENGLISH TECHNICAL PASSPORT
Dishwasher Dishwasher
Load sharp knives with the
handles up to reduce the risk of cut-
type injuries;
Warning: Knives and other
utensils with sharp points must be
loaded in the basket with their points
down or placed in a horizontal position.
When using your dishwasher,
you should prevent plastic items from
contacting with heating element.
Check that the detergent
receptacle is empty after completion of
the wash cycle.
Do not wash plastic items unless
they are marked dishwasher safe or
the equivalent. For plastic items not
so marked, check the manufacturer’s
recommendations.
Use only detergent and rinse
additives designed for an automatic
dishwasher. Never use soap, laundry
detergent, or hand washing detergent
in your dishwasher.
Other means for disconnection
from the supply must be incorporated
in the fi xed wiring with at least 3mm
contact separation in all poles.
Keep children away from
detergent and rinse aid, keep children
away from the open door of the
dishwasher, there could still be some
detergent left inside.
Young children should be
supervised to ensure that they do not
play with the appliance.
This product is not designed
for use by persons (including children)
who have reduced physical, sensory
or mental capacities or persons with
no experience or knowledge, unless
they are instructed and supervised in
the use of the appliance by a person
responsible for their safety.
Dishwasher detergents are
strongly alkaline. They can be extremely
dangerous if swallowed. Avoid contact
with skin and eyes, and keep children
away from the dishwasher when the
door is open.
The door should not be left in the
open position since this could present a
tripping hazard.
If the supply cord is damaged, it
must be replaced by the manufacturer
or its service agent or a similarly
qualifi ed person in order to avoid a
hazard.
Please dispose of packing
materials properly.
During installation, the power
supply must not be excessively or
dangerously bent or fl attened. •Do not
tamper with controls.
The appliance is to be connected
to the water mains using new hose sets,
and the old hose-sets should not be
reused.
Make sure that the carpet must
not obstruct the openings at the bottom
base.
Use the dishwasher only for its
intended function.
The dishwasher is intended for
indoor use only.
The dishwasher is not designed
for commercial use. It is intended for
use in domestic households and in
similar working and residen
READ AND FOLLOW THIS SAFETY
INFORMATION CAREFULLY
SAVE THESE INSTRUCTIONS
2. DISPOSAL
Dispose of the dishwasher
packaging material correctly. All
packaging materials can be recycled.
Plastic parts are marked with the
standard international abbreviations:
(e.g. PS for polystyrene, padding
material)
This appliance is identifi ed
according to the European guideline
2002/96/EC on waste electrical and
electronic equipment -WEEE. The
guideline specifi es the framework for
an EU-wide valid return and re-use of
old appliances.
WARNING!
Packaging material could be
dangerous for children!
For disposing of package and the
appliance please go to a recycling
centre. Cut off the power supply cable
and make the door closing device
unusable.
Cardboard packaging is
manufactured from recycled paper and
should be disposed in the waste paper
collection for recycling.
By ensuring this product is disposed
of correctly, you will help prevent
potential negative consequences for
the environment and human health,
which could otherwise be caused by
inappropriate waste handling of this
product.
For more detailed information
about recycling of this product, please
contact your local city offi ce and your
household waste disposal service.
IMPORTANT!
To get the best performance from
your dishwasher, read all operating
instructions before using it for the fi rst
time.

6 7
TECHNICAL PASSPORT ENGLISH ENGLISH TECHNICAL PASSPORT
Dishwasher Dishwasher
3. OPERATION INSTRUCTION
Control Panel
1. Program indicator light: when you
select a washing programme, the
corresponding light will display.
2. Program select button: Press the
button to select the program. The
«Eco wash” indicator will fl ash if it’s
connected to the power. Push the
button to switch the programme
from «Eco»~»Light»~ «Crystal’’—
»Rapid»—»Pre-rinse”—»Intensive»
and select the one you want.
3. Salt and rinse aid indicator light:
To come on when the softener or
dispenser needs to be refi lled
4. Display: To display delay time or
error codes or the estimated time
left for programme to run.
5. Delay time: This option will allow
you to delay the start time of any
wash cycle for up to 24 hours
(depending on model). Select
the delay start time you want by
pressing the DELAY pad. Multiple
pressing will increase the delay
hours.
6. ON/OFF Button: To turn on/off the
power supply.
7. Check water supply indicator: The
indicator lights up if the tap turn
off or water supply interrupted or
supply hose kinked.
8. Child lock : The “child lock”will
be available when you press the
button 3 seconds ,and the indicator
lights up after fl ashing times
9. 60 min programme: Daily wash in
only 1 hour.
10. 3 in 1 function : The product is
offered with additional functions,
The additional function could be
used with the programme such as
«intensive « « Eco» and « Light.»
11. After select the desired program,
close the door ,the dishwasher in
function status.
Dishwasher Features
1. Front View
2. Upper Basket
3. Spray Arms
4. Lower Basket
5. Water Softener
6. Detergent Dispenser
7. Rinse Aid Dispenser
8. Cutlery Tray
9. Cup Holder
4. PRIOR USING
FOR THE FIRST TIME
Before using your dishwasher
for the fi rst time:
A. Set the water softener
B. Pour 500ml of water inside
the salt container and then fi ll with
dishwasher salt
C. Fill the rinse aid dispenser
D. Function of detergent
А. Water Softener
The water softener must be set
manually, using the water hardness dial.
The water softener is designed to
remove minerals and salts from the
water, which would have a detrimental
or adverse effect on the operation of
the appliance. The higher the content
of these minerals and salts, the harder
the water is. The softener should be
adjusted according to the hardness
of the water in your area. Your local \
Afeiter Authority can advise you on the
hardness of the water in your area.
* Adjusting Salt Consumption
The dishwasher is designed to allow
for adjusting the amount of salt consumed
based on the hardness of the water
used. This is intended to optimize and
customize the level of salt consumption
so that the salt consumption could be
set proceed as follows:
1. Unscrew the cap from the salt
container
2. There is a ring on the container
with an arrow on it (see fi gure to
the side), if necessary, rotate the
ring in the anticlockwise direction
from the «-» setting towards the
«+» sign, based on the hardness
of the water being used. It is
recommended that adjustments
should be made in accordance with
the following schema:
* For optional

8 9
TECHNICAL PASSPORT ENGLISH ENGLISH TECHNICAL PASSPORT
Dishwasher Dishwasher
B. Loading the Salt into
the Softener
Always use saltintended for use with
dishwasher.
NOTE: If your model has no water
softener, you may skip this section
WATER SOFTENER
The hardness of the water varies
from place to place. If hard water is
used in the dishwasher, deposits will
form onthe dishes andutensils.
The appliance isequipped with
aspecial softener thatuses salts
specifi cally designed to eliminatelime
and mineralsfrom the water.
The salt container is located beneath
the lower basket and should be fi lled as
follows:
Attention!
Only use salt specifi cally designed
for use in dishwashers! All other types
of salt not specifi cally designed for
use in a dishwasher, especially table
salt, will damage the water softener. In
case of damages caused by the use of
unsuitable salt the manufacturer does
not give any warranty nor is liable for
any caused damages.
Only fi ll with salt just before
starting one of the complete washing
programmes.
This will prevent any grains of salt
or salty water, which may have been
split, remaining on the bottom of the
machine for any period of time, which
may cause corrosion.
After the fi rst wash cycle the control
panel light expires.
A. Remove the lower basket and
then unscrew and remove the cap from
the salt container.
1
B. If you are fi lling the container for
the fi rst time, fi ll 2/3 of its volume with
water (around 500ml).
2
C. Place the end of the funnel
(supplied) into the hole and introduce
about 1,2kg of salt. It is normal for a
small amount of water to come out of
the salt container.
D. Carefully screw the cap back on.
E. Usually, the salt warning light will
be off in 2-6 days after the salt container
is fi lled with salt.
NOTE:
1. The salt container must be refi lled
when the salt warning light in the
control panel comes on. Though
the salt container is fi lled enough,
the indicator light may not black
out before the salt fully dissolve. If
there is no salt warning light in the
control panel (for some models),
you can judge when to load the salt
into the softener by the cycles that
the dishwasher had run (see the
following schema).
2. If there are spills of the salt, a Pre-
rinse program could be run to wipe
them out.
C. Fill the Rinse Aid Dispenser
Function of Rinse Aid
Rinse aid is automatically added
during the last rinse, ensuring thorough
rinsing, spot and streak free drying.
Attention!
Only use branded rinse aid for
dishwasher. Never fi ll the rinse aid
dispenser with any other substances
(e.g. dishwasher cleaning agent, liquid
detergent). This would damage the
appliance.
When to Refi ll the Rinse Aid
Dispenser
If there is no rinse-aid warning light
on the control panel, you can judge the
amount of rinse-aid by the color of the
optical level indicator «D» located next
to the cap. When the rinse-aid container
is full the whole indicator will be dark
.As the rinse aid diminishes, the size
of the dark dot decreases. You should
never let the rinse aid get below 1/4
full.
As the rinse aid diminishes, the size
of the black dot on the rinse aid level
indicator changes, as illustrated below.
Full
3/4 full
1/2 full
1/4 full - Should refi ll to eliminate
spotting
Empty
D (Rinse-Aid
indicator)
WATERHARDNESS
Selector Position
Salt consumption (gram/cycle)
Autonomy (cycle s/2 kgs)
°dH °fH °Clark MmoI/I
0~10 0~17 0~12.5 0~1.7 / 0 /
10~25 17~44 12.5~31.3 1.7~4.4 - 20 60
25~50 44~89 31.3~62.5 4.4~8.9 Mid 40 40
>50 >89 >62.5 >8.9 + 60 25
Contact your local water board for
information on the hardness of your
water supply.

10 11
TECHNICAL PASSPORT ENGLISH ENGLISH TECHNICAL PASSPORT
Dishwasher Dishwasher
RINSE AID DISPENSER
1
To open the dispenser, turn the
cap to the «open» (left) arrow and lift
it out.
2
Pour the rinse aid into the
dispenser, be careful not to overfi ll.
3
Replace the cap by inserting it
aligned with «open» arrow and turning
it to the «closed» (right) arrow.
The rinse aid is released during
the fi nal rinse to prevent water from
forming droplets on your dishes that
can leave spots and streaks. It also
improves drying by allowing water to
sheet off the dishes. Your dishwashers
are designed to use liquid rinse aids. The
rinse aid dispenser is located inside the
door next to the detergent dispenser.
To fi ll the dispenser; open the
cap and pour the rinse aid into the
dispenser until the level indicator turns
completely black. The volume of the
rinse aid container is about 140ml.
Be careful not to overfi ll the
dispenser, because this could cause over
sudsing. Wipe away any spills with a
damp cloth. Don’t forget to replace the
cap before you close dishwasher door.
Attention!
Clean up any rinse aid split during
fi lling with an absorbent cloth to avoid
excess foaming during the next wash.
Adjusting Rinse Aid Dispenser
The rinse aid dispenser has four
or six settings. Always start with the
dispenser set on «4» If spots and
poor drying are problems, increase
NOTE:
Increase the dose if there are drops
of water or lime spots on the dishes
after washing.
Reduce it if there are sticky whitish
streaks on the dishes or a bluish fi lm on
glassware or knife blades.
D. Function of Detergent
Detergents with its chemical
ingredients are necessary to remove
dirt, crush dirt and transport it out of
the dishwasher. Most of commercial
quality detergents are suitable for this
purpose.
Concentrated Detergent
Based on their chemical composition,
dishwasher can be split in two basic
types:
conventional, alkaline detergents
with caustic components
Adjust lever
(Rinse)
low alkaline concentrated
detergents with natural enzymes
The use of «Eco» washing programme
in conjunction with concentrated
detergents reduces pollution and is
good for your dishes; these washing
programmes are specially matched to
the dirt-dissolving properties of the
enzymes of the concentrated detergent.
For this reason»Eco» washing
programme in which concentrated
detergents are used can achieve the
same results that can otherwise only be
achieved using «intensive» programme.
Detergent Tablets
Detergent tablets of different brands
dissolve at different speeds. For this
reason some detergent cannot dissolve
and develop their full cleaning power
during short programmes. Therefore
please use long programmes when
using detergent tablets, to ensure
the complete removal of detergent
residuals.
Detergent Dispenser
The dispenser must be refi lled
before the start of each washing cycle
following the instructions provided in
the Wash Cycle Table. Your dishwashers
use less detergent and rinse aid than
conventional dishwashers. Generally,
only one tablespoon of detergent is
needed fora normal wash load. Also,
more heavily soiled items need more
detergent. Always add the detergent just
before starting dishwasher, otherwise it
could get damp and will not dissolve
properly.
the amount of rinse aid dispensed by
removing the dispenser lid and rotating
the dial to «5». If the dishes still are not
drying properly or are spotted, adjust
the dial to the next higher number until
your dishes are spot-free. The dose is
factory set in position 5.

12 13
TECHNICAL PASSPORT ENGLISH ENGLISH TECHNICAL PASSPORT
Dishwasher Dishwasher
Amount of Detergent to Use
NOTE:
1
If the lid is closed: press release
button. The lid springs open.
2
Always add the detergent just
before starting each wash cycle.
Only use branded detergent aid for
dishwasher.
WARNING!
Dishwasher detergent is corrosive!
Take care to keep it out of reach of
children.
Use only detergent specifi cally
made for use in dishwashers. Keep your
detergent fresh and dry.
Don’t put powder detergent into the
dispenser until you’re ready to wash
dishes.
Fill in the detergent
Fill the detergent dispenser with
detergent.
The marking indicates the dosing
levels , as illustrated on the right:
1
The place of main wash cycle
detergent placed, «MIN»means
approximately 20g of detergent.
2
The place of pre-wash cycle
detergent placed , approximately 5g of
detergent.
1
2
Please observe the manufacturer’s
dosing and storage recommendations
as stated on the detergent packaging.
Close the lid and press until it locks
in place.
If the dishes are heavily soiled,
place an additional detergent dose in
the pre-wash detergent Chamber. This
detergent will take effect during the
pre-wash phase.
NOTE:
You fi nd information about the
amount of detergent for the single
programme on the last page. Please be
aware that according to the level soiling
and the specifi c hardness of water,
differences are possible. Please observe
the manufacturer’s recommendations
on the detergent packaging.
Detergents
There are 3 sorts of detergents
1. With phosphate and with chlorine
2. With phosphate and without
chlorine
3. Without phosphate and without
chloride.
Normally new pulverized detergent
is without phosphate. The water
softener function of phosphate is not
given. In this case we recommend to
fi ll salt in the salt container even when
the hardness of water is only 6 dH. If
detergents without phosphate were
used in case of hard water often white
spots appear at dishes and glasses. In
this case please add more detergent to
reach better results. Detergents without
chlorine do only bleach a little. Strong
and coloured spots will not removed
completely. In this case please choose
a programme with higher temperature.
5. LOADING THE
DISHWASHER BASKETS
For best performance of the
dishwasher, follow these loading
guidelines. Features and appearance
of baskets and silverware baskets may
vary from your model.
Attention before or after
Loading the Dishwasher Baskets
Scrape off any large amounts of
leftover food. It is not necessary to
rinse the dishes under running water.
Place objects in the dishwasher in the
following way:
1. Items such as cups, glasses, pots/
pans, etc. are stood upside down.
2. Curve items, or those with
recesses, should be at a slant so
that water can run off.
3. They are stacked securely and can
not tip over.
4. They do not prevent the spray arms
from rotating while washing takes
place.
Very small items should not be
washed in the dishwasher as they could
easily fall out of the baskets.
Removing the Dishes
To prevent water dripping from the
upper basket into the lower basket, we
recommend that you empty the lower
basket fi rst and then the upper basket.
Loading the Upper Basket
The upper basket is designed tohold
more delicate and lighterdishware
such as glasses,coffee and tea cup
andsaucers, as well as plates,small
bowls and shallowpans (as long as they
arenot too dirty). Position thedishes
and cookware sothat they do not get
movedby the spray of water.

14 15
TECHNICAL PASSPORT ENGLISH ENGLISH TECHNICAL PASSPORT
Dishwasher Dishwasher
Upper Basket
Upper basket
Type Item
A Cup
В Glass
С Saucer
D Serving bowl
E Serving bowl
Adjusting the Upper Basket
If required, the height of the upper
basket can be adjusted in order to create
more space for large utensils either in
the upper basket or lower basket. The
upper basket can be adjusted for height
by putting wheels of different height
into the rails. Long items, serving cutlery,
salad servers or knives should be placed
on the shelf so that they do not obstruct
the rotation of the spray arms. The shelf
can be folded back or removed when
not be required for use.
Loading the Lower Basket
We recommend that you place large
items which are most diffi cult to clean
in to the lower basket: pots, pans, lids,
serving dishes and bowls, as shown in
the fi gure below.
It is preferable to place serving
dishes and lids on the side of the
baskets in order to avoid blocking the
rotation of the top spray arm.
Pots, serving bowls, etc. must always
be placed top down.
Deep pots should be slanted to
allow water to fl ow out.
The bottom basket features fold
down tine rows so that larger or more
pots and pans can be loaded.
Lower Basket
Lower basket
Type Item
F Serving bowl
G Soup plate
H Dinner plate
I Dessert plate
J Oval plate
* Lower basket Folding racks
Folding racks consisting of two parts
that are located on the lower basket of
your machine are designed in order to
let you place big items easier as pots,
pans, etc. If requested, each part can be
folded separately, or all of them can be
folded and larger can be obtained. You
can use folding racks by rasing then
upwards, or by folding.
Lower Basket
* For optional
Cutlery tray
Arrange the cutlery in the tray as
shown. Cutlery should be placed to
ensure that water runs off freely.
Door side

16 17
TECHNICAL PASSPORT ENGLISH ENGLISH TECHNICAL PASSPORT
Dishwasher Dishwasher
Cutlery basket
Type Item
1 Tea spoons
2 Dessert spoons
3 Soup spoons
4 Gravy ladle
5 Serving fork
6 Forks
7 Knives
8 Serving spoons
For washing in the dishwasher the
following cutlery/dishes
Are not suitable
• Cutlery with wooden, horn china or
mother-of-pearl handles
• Plastic items that are not heat
resistant
• Older cutlery with glued parts that
is not temperature resistant
• Bonded cutlery items or dishes
• Pewter or cooper items
• Lead crystal glass
• Steel items subject to rusting
• Wooden platters
• Items made from synthetic fi bre
WARNING!
Do not let any item extend through
bottom
Are of limited suitability
Some types of glasses can become
dull after a large number of washes
Silver and aluminium parts have a
tendency to discolour during washing
Glazed patterns may fade if
machine washed frequently
NOTE: Do not put in items that
are dirty of cigarette ash, candle
wax, lacquer or paint. If you buy new
dishes please make sure that they are
suitable for dishwashers.
NOTE: Please do not overload your
dishwasher. There is only space for 12
standard dishes. Do not use dish that
is not suitable for dishwashers. This
is important for good results and for
reasonable energy consumption.
Loading Cutlery and Dishes
Before loading the dishes, you should:
• Remove large left-over
• Soften remnants of burnt food in
pans
When Loading the Dishes and
Cutlery, Please Note:
Dishes and cutlery must not impede
the rotation of the spray arms.
Load hollow items such as cups,
glasses, pans etc. with the opening
downwards so that water cannot
collect in the container or a deep base.
Dishes and items of cutlery must
not lie inside one another, or cover
each other
To avoid damage to glasses,
they must not touch
Load large items which are most
diffi cult to clean into the lower basket
The upper basket is designed
to hold more delicate and lighter
dishware such as glasses, coffee and
tea cups
A ttention!
Long bladed knives stored in
an upright position are a potential
hazard!
Long and/or sharp items of cutlery
such as carving knives must be
positioned horizontally in the upper
basket
D amage to Glassware
and other Dishes
P ossible causes:
Type of glass or manufacturing
process. Chemical composition of
detergent.
Water temperature and
duration of dishwasher programme.
Sug gested remedy:
Use glassware or porcelain
dishes that have been marked
dishwasher-proof by the manufacturer.
Use a mild detergent that
is described as kind of dishes. If
necessary, seek further information
from detergent manufacturers.
Select a programme with a low
temperature.
To prevent damage, take glass
and cutlery out of the dishwasher as
soon as possible after the programme
has ended.
A t the End of the Wash
When the working cycle has
finished, the buzzer of dishwasher
will ring for 6 times, then stop. Turn
off the appliance using the ON/OFF
button, shut off the water supply and
open the door of the dishwasher. Wait
a few minutes before unloading the
dishwasher to avoid handling the
dishes and utensils while they are still
hot and more susceptible to breakage.
They will also dry better.

18 19
TECHNICAL PASSPORT ENGLISH ENGLISH TECHNICAL PASSPORT
Dishwasher Dishwasher
6. STARTING A WASHING PROGRAMME
Wash cycle table
Program Cycle Selection Information
Description of
Cycle
Detergent
Pre/main
Running
Time
(min)
Energy
(kWh)
Water
(L)
Intensive
For the heaviest soiled loads, such as
pots, pans, casserole dishes and dishes
that have been sitting with dried food
on them for a while.
Pre-wash
Main wash (60°C)
Rinsel
Rinse2
Hot rinse
Drying
5/30
(or 3 in 1)
171 1.50 18
Eco
(*EN50242)
(Standard
Programme)
For normally soiled loads, such as pots,
plates, glasses and lightly soiled pans.
standard daily cycle.
Pre-wash
Main wash (46°C)
Rinse
Hot rinse
Drying
5/30
(or 3 in 1)
151 1.06 14
Light
Light wash cycle to be used for more
delicate items which are sensitive
to high temperatures.(Run cycle
immediately after use)
Pre-wash
Main wash (45°C)
Rinse
Hot rinse
Drying
5/20
( or 3 in 1)
147 0.95 14
Crystal
For lightly soiled loads, such as plates,
glasses, bowls and lightly soiled pans.
Main wash (40°C)
Rinse
Hot rinse
Drying
5/20 118 0.90 11
Rapid
A shorter wash for lightly soiled loads
that do not need drying.
Main wash (40°C)
Hot rinse
15 36 0.55 7
Pre-Rinse
To rinse dishes that you plan to wash
later that day
Pre-wash / 11 0.01 4
60 min
For lightly and normally soiled plates
and pans for everyday
Hot rinse 1
Hot rinse 2
Hot rinse (60°C)
Drying
5/20 60 1.00 11.5
* EN 50242: this program is the test cycle
The information for comparability test in accordance with EN50242,as follows:
-Capacity: 14 settings
-Position of upper basket: Lower position
-Rinse aid setting: 5 ( or 4 for four setting dispenser)
Turning on the Appliance
Starting a wash cycle...
Draw out the lower and upper basket, load the dishes and
1. push them back. It is recommended to load the lower basket fi rst, then the
upper one (see the section entitled «Loading the Dishwasher»). Pour in the
detergent (see the section entitled «Salt, Detergent and Rinse Aid»).
2. Insert the plug into the socket. The
power supply is 220-240V AC 50 Hz,
the specifi cation of the socket is 12
A 250 VAC.50 Hz.
Make sure that the water supply is
turned on to full pressure. Open the
door, press the ON/OFF button, Press the
«program.» button to select a desired
«Wash cycle». (See the section entitled
«Wash Cycle Table») . With a little force
to ensure the door is properly closed.
NOTE: A click could be heard when
the door is closed perfectly.
When the washing is over, you can
shut off the switch by pressing ON/OFF
button.
Change the Programme.
Premise: A cycle that is underway
can only be modifi ed if it has only been
running for a short time.
Otherwise, the detergent may
have already been released, and the
appliance may have already drained
the wash water. If this is the case, the
detergent dispenser must be refi lled
(see the section entitled « Fill in the
Detergent « ).
Open the door, Press current prog.
button more than three seconds to
cancel the programme, then you can
change the programme to the desired
cycle setting (see the section entitled
«Starting a wash cycle. . . « ). Then, close
the door.
NOTE: If you open the door when
washing, the machine pauses and
warning alarm rings, the display
appears E1. When you close the door,
the machine will keep on working after
10 seconds.
The 6 programme lights show the
state of the dishwasher:
a) All program lights off --> stand by
b) One of the program lights on -->
cycle running
c) One of the program lights blinking
--> pause
NOTE: If all the lights begin to
glimmer, that indicates the machine is
out of order, please turn off the main
power and water supply before calling
a service.
Forget to Add Dish
A forgotten dish can be added any
time before the detergent cup opens.
1. Open the door a little to stop the
washing.
2. After the spray arms stop working,
you can open the door completely.
3. Add forgotten dishes.
4. Close the door, the dishwasher will
work after ten seconds.
WARNING!
It is dangerous to open the door
when washing, because the hot water
may scald you.
Switch Off the Dishwasher
The digital display appears «—» and
the buzzer rings 6 times, only in this
case the programme has ended.
1. Switch off the dishwasher by
pressing the ON/OFF button.
2. Turn off the water tap!
Open the door carefully. Hot steam
may escape when the door is opened!

20 21
TECHNICAL PASSPORT ENGLISH ENGLISH TECHNICAL PASSPORT
Dishwasher Dishwasher
Hot dishes are sensitive to knocks.
The dishes should therefore be allowed
to cool down around 15 minutes before
removing from the appliance.
Open the dishwasher’s door,
leave it ajar and wait a few minutes
before removing the dishes. In this way
they will be cooler and the drying will
be improved.
Unloading the dishwasher
It is normal that the dishwasher is
wet inside.
Empty the lower basket fi rst and
then the upper one. This will avoid
water dripping from the upper basket
onto the dishes in the lower one.
7. MAINTENANCE AND
CLEANING
Filtering System
The fi lter is used to avoid the big
remnants and other sundries getting
inside he pump. The residue can
obstruct the fi lter in sometime.
The fi lter systemconsists of acoarse
fi lter, a fl at (Main fi lter) and a micro
fi Iter (fi ne fi lter).
1. Flat fi lter
Food and debris will be trapped by a
specialjet on the lowerspray arm.
2. Coarse fi lter
Big debris, suchas bone andglass
that couldclog the drain will betrapped
in thecoarse fi lter.
To remove an item caught in this
fi lter, gently squeeze the taps on the top
of this fi lter and lift it out.
3. Micro fi lter
This fi lter holdssoil and food residue
in thesump area and prevents itfrom
being redepositon the dishes during a
cycle.
Inspect thefi lters for
obstructionsevery time the dishwasher
has been used.
By unscrewing the coarse
fi lter, you can remove the fi lter system.
Remove any food remnants and clean
the fi ltersunder running water.
Step 1: contrarotate the Coarse
fi lter ,and then lift itup; Step 2: lift the
Flatfi Iter up
NOTE: If operate from step 1 to step
2, the fi lter system will be removed;
while operate from step 2 to step 1, the
fi lter system will be installed.
Filter assembly
For best performance and results,
the fi lter assembly must be cleaned. The
fi lter effi ciently removesfood particles
from the wash water, allowing it to
be recirculated during the cycle. For
this reason, itis a good idea to remove
the larger food particles trapped in
the fi lter after each wash cycle by
rinsingthe semicircular fi lter and cup
under running water. To remove the
fi lter assembly, pull on the cuphandle
in the upward direction. The entire
fi lter assembly should be cleaned once
a week. To cleanthe coarse fi lter and
the micro fi lter, use a cleaning brush.
Then, reassemble the fi lter parts as
shownin the fi gures above and reinsert
the entire assembly in the dishwasher,
positioning in its seat andpressing
downward. The dishwasher must never
be used without the fi lters. Improper
replacementof the fi lter may reduce the
performance level of the appliance and
damage dishes and utensils.
WARNING!
Never run the dishwasher without
the fi lters in place. When cleaning the
fi lters, don’t knock on them. Otherwise,
the fi lters could be contorted and the
performance of dishwasher could be
debased.
Cleaning the Spray Arms
It is necessary to clean the spray
arms regularly for hard water chemicals
will clog the spray arm jets and
bearings.
To remove the spray arms, screw
off the nut clockwise to take out the
washer on top of the spray arm and
remove the arm. Wash the arms in
soapy and warm water and use a soft
brush to clean the jets. Replace them
after rinsing thoroughly.

22 23
TECHNICAL PASSPORT ENGLISH ENGLISH TECHNICAL PASSPORT
Dishwasher Dishwasher
Caring for the Dishwasher
To clean the control panel, use
a lightly dampened cloth then dry
thoroughly.
To clean the exterior; use a good
appliance polish wax.
Never use sharp objects, scouring
pads or harsh cleaners on any part of
the dishwasher.
Protect Against Freezing
If your dishwasher is left in an
unheated place during the winter, ask a
service technical to:
1. Cut off electrical power to the
dishwasher.
2. Turn off the water supply and
disconnect the water inlet pipe
from the water valve.
3. Drain water from the inlet pipe and
water valve. (Use a pan to catch the
water).
4. Reconnect the water inlet pipe to
the water valve.
5. Remove the fi lter in the tub and the
bottom and use a sponge to use up
water in sump.
Cleaning the Door
To clean the edge around the door,
you should use only a soft warm,
damp rag. To prevent penetration of
water into the door lock and electrical
components, do not use a spray cleaner
of any kind.
Also, never use abrasive cleaners
or scouring pads on the outer surfaces
because they will scratch the fi nish.
Some papers towels can also scratch or
leave marks on the surface.
WARNING!
Never use a spray cleaner to clean
the door panel for it could damage the
door lock and electrical components. It
is not allowed to use the abrasive agent
or some paper towel because of the risk
of scratching or leaving spots on the
stainless steel surface.
How to Keep Your Dishwasher
in Shape
After Every Wash
After every wash, turn off the water
supply to the appliance and leave the
door slightly ajar so that moisture and
odors are not trapped inside.
Remove the Plug
Before cleaning or performing
maintenance, always remove the plug
from the socket. Do not run risks.
No Solvents or Abrasive Cleaning
To clean the exterior and rubber
parts of the dishwasher, do not use
solvents or abrasive cleaning products.
Use only a cloth and warm soapy
water. To remove spots or stains from
the surface of the interior, use a cloth
dampened with water and a little white
vinegar, or a cleaning product made
specifi cally for dishwashers.
When You Go on holiday
When you go on holiday, it is
recommended that you run a wash cycle
with the dishwasher empty and then
remove the plug from the socket, turn
off the water supply and leave the door
of the appliance slightly ajar. This will help the seals last longer and prevent odors
from forming in the appliance.
Moving the Appliance
If the appliance must be moved, try to keep it in the vertical position. If absolutely
necessary, it can be positioned on its back.
Seals
One of the factors that cause odors to form in the dishwasher is food that remains
trapped in the seals. Periodic cleaning with a damp sponge will prevent this.
Attention:
The installation of the pipes and electrical equipments should be done by
professionals.
WARNING
Electrical Shock Hazard!
Disconnect electrical power before installing dishwasher.
Failure to do so can result in death or electrical shock.
8. TROUBLESHOOTING TIPS
Error codes
When some malfunctions happen, the appliance will display error codes to warn you.
Codes Meanings Possible Causes
E1 Door open
The door is opened when the dishwasher
is operating
E2 Water inlet Water inlet malfunction
E3 Water drainage Water drainage malfunction
E4 Temperature sensor Temperature sensor malfunction
E5 Overfl ow/leakage Overfl ow occurs/Water leakage occurs
E6 Water leakage Water leakage occurs
E7 Heating element Abnormal heating
WARNING!
If overfl ow occurs, turn off the main water supply before calling a service. If
there is water in the base pan because of an overfi ll or small leak, the water should
be removed before restarting the dishwasher.

24 25
TECHNICAL PASSPORT ENGLISH ENGLISH TECHNICAL PASSPORT
Dishwasher Dishwasher
Before Calling for Service
Reviewing the charts on the following pages may make you be free of calling for service.
Problem Possible Causes What To Do
Dishwasher
doesn't run
Fuse blown, or the
circuit breaker acted
Replace fuse or reset circuit breaker. Remove any other
appliances sharing the same circuit with the dishwasher
Power supply is not
turned on
Make sure the dishwasher is turned on and the door is closed
securely. Make sure the power cord is properly plugged into the
wall socket.
Water pressure is
low
Check that the water supply is connected properly and the
water is turned on.
Drain pump
doesn't stop
Overfl ow
The system is designed to detect an overfl ow. When it does, it
shuts off the circulation pump and turns on the drain pump.
Noise
Some audible
sounds are normal
Sound from detergent cup opening.
Utensils are
not secure in
the baskets or
something small
has dropped into
the basket
To ensure everything is secured in the dishwasher
Motor hums
Dishwasher has not been used regularly. If you do not use
it often, remember to set it to fi ll and pump out every week,
which will help keep the seal moist.
Suds in the
tub
Improper detergent
Use only the special dishwasher detergent to avoid suds. If
this occurs, open the dishwasher and let suds evaporate. Add 1
gallon of cold water to the tub. Close and latch the dishwasher,
then start the "pre-rinse" wash cycle to drain out the water...
Repeat if necessary.
Spilled rinse agent Always wipe up rinse agent spills immediately.
Stained tub
interior
Detergent with
colorant was used
Make sure that the detergent is the one without colorant.
Dishes and
fl atware not
clean
Improper program
Improper basket
loading
Select a stronger programme.
Make sure that the action of the detergent dispenser and spray
arms are not blocked by large dishware.
Spots and
fi lming on
glasses and
fl atware
1. Extremely hard
water
2. Low inlet
temperature
3. Overloading the
dishwasher
4. Improper loading
5. Old or damp
powder detergent
6. Empty rinse agent
dispenser
7. Incorrect dosage
of detergent
To remove spots from glassware:
1. Take out all metal utensils out of the dishwasher.
2. Do not add detergent.
3. Choose the longest cycle.
4. Start the dishwasher and allow it to run for about 18 to 22
minutes, then it will be in the main wash.
5. Open the door to pour 2 cups of white vinegar into the
bottom of the dishwasher.
6. Close the door and let the dishwasher complete the cycle. If
the vinegar does not work: Repeat as above, except use 1/4
cup (60 ml)of citric acid crystals instead of vinegar.
Cloudiness
on glassware
Combination of soft
water and too much
detergent
Use less detergent if you have soft water and select a shortest
cycle to wash the glassware and to get them clean.
Yellow or
brown fi lm
on inside
surfaces
Tea or coffee stains
Using a solution of 1/2 cup of bleach and 3 cups of warm water
to remove the stains by hand.
WARNING
You have to wait for 20 minutes after a cycle to let the heating
elements cool down before cleaning interior; otherwise, burns
will happen.
Iron deposits in
water can cause an
overall fi lm
You have to call a water softener company for a special fi lter.
White fi lm
on inside
surface
Hard water minerals
To clean the interior; use a damp sponge with dishwasher
detergent and wear rubber gloves. Never use any other cleaner
than dishwasher detergent for the risk of foaming or suds.
The
Detergent
dispenser lid
cannot be
closed prop
-erly
Clogged detergent
re -sidue is blocking
the catch
Clean the detergent from the catch.
Detergent
left in
dispenser
cups
Dishes block
detergent Cups
Re-loading the dishes properly.
Steam
Normal
phenomenon
There is some steam coming through the vent by the door latch
during drying and water draining.
Black or gray
marks on
dishes
Aluminum utensils
have rubbed against
dishes
Use a mild abrasive cleaner to eliminate those marks.
Water
standing on
the bottom
of the tub
This is normal
A small amount of clean water around the outlet on the tub
bottom keeps the water seal lubricated.
Dishwasher
leaks
Overfi ll dispenser or
rinse aid spills
Be careful not to overfi ll the rinse aid dispenser.
Spilled rinse aid could cause oversudsing and lead to
overfl owing. Wipe away any spills with a damp cloth.
Dishwasher isn't
level
Make sure the dishwasher is level.

26 27
TECHNICAL PASSPORT ENGLISH ENGLISH TECHNICAL PASSPORT
Dishwasher Dishwasher
Technical Data Sheet
Sheet of household dishwasher according to EU Directive 1059/2010:
Manufacture KUPPERSBERG
Model GS 6020
Standard place settings 14
Energy effi ciency class
1
A +
Annual energy consumption
2
299 kWh
Energy consumption of the standard cleaning cycle 1.06 kWh
Power consumption of off-mode 0.1 W
Power consumption of left-on mode 0.9 W
Annual water consumption
3
3920 liter
Drying effi ciency class
4
A
Standard cleaning cycle
5
Eco
Program duration of the standard cleaning cycle 151 min
Noise level 52dB(A) re 1 pW
Mounting Built-in
Could be built- in Yes
Height 81.5 cm
Width 59.6 cm
Depth (with connectors) 55.8cm
Power consumption 1850 W
Rated voltage / frequency AC 220-240 V/ 50 Hz
Water pressure (fl ow pressure) 0.4-10bar=0.04-1.0MPa
Water temperature Max.62°C
NOTE:
1. A+++ (highest effi ciency) to D(lowest effi ciency).
2. Energy consumption «299» kWh per year, based on 280 standard cleaning cycles
using cold water fi ll and the consumption of the low power modes. Actual energy
consumption will depend on how the appliance is used.
3. Water consumption «3920» litres per year, based on 280 standard cleaning cycles.
Actual water consumption will depend on how the appliance is used.
4. A (highest effi ciency) to G(lowest effi ciency).
5. This program is suitable for soiled normally soiled tableware and that it is the most
effi cient programin terms of its combined energy and water consumption for that type
of tableware.
The device meets the European standards and the directives in the current
version at delivery.
- LVD 2006/95/EC
- EMC 2004/108/EC
- EUP 2010/1016
NOTE: The above values have been measured in accordance with standards
under specifi ed operating conditions. Results may vary greatly according to quantity
and pollution of the dishes , water hardness ,amount of detergent, etc.
The manual is based on the European Union’s standards and rules.
Manufacturers:
Zhongshan Galanz Consumer Electric Appliances Co.,Ltd., China
Importer:
LLC «MG Rusland», 141400
Moscow region, Khimki, Butakovo, 4
DETERMINATION OF THE PRODUCTION DATE BY SERIAL NUMBER
Year
Month
XW18071230001

28 29
ПАСПОРТ ТЕХНИЧЕСКОГО ИЗДЕЛИЯ РУССКИЙ РУССКИЙ ПАСПОРТ ТЕХНИЧЕСКОГО ИЗДЕЛИЯ
Посудомоечные машины Посудомоечные машины
1
)
ИНФОРМАЦИЯ ПО ТЕХНИКЕ БЕЗОПАСНОСТИ ..............................................................29
2
)
УТИЛИЗАЦИЯ ........................................................................................................................................32
3
)
УКАЗАНИЯ ПО ЭКСПЛУАТАЦИИ ...............................................................................................33
ПАНЕЛЬ УПРАВЛЕНИЯ ..................................................................................................................33
КОНСТРУКТИВНЫЕ ОСОБЕННОСТИ ПОСУДОМОЕЧНОЙ МАШИНЫ ..............34
4
)
ПЕРЕД ПЕРВЫМ ИСПОЛЬЗОВАНИЕМ ...................................................................................34
УСТРОЙСТВО УМЯГЧЕНИЯ ВОДЫ .........................................................................................34
ЗАГРУЗКА СОЛИ В УСТРОЙСТВО УМЯГЧЕНИЯ ВОДЫ ..............................................35
ЗАПОЛНЕНИЕ ДОЗАТОРА ОПОЛАСКИВАТЕЛЯ ..............................................................36
ТИПЫ И НАЗНАЧЕНИЕ МОЮЩИХ СРЕДСТВ ...................................................................39
5
)
ЗАГРУЗКА ПОСУДЫ В КОРЗИНЫ ПОСУДОМОЕЧНОЙ МАШИНЫ .........................41
6
)
ЗАПУСК ПРОГРАММЫ МЫТЬЯ ПОСУДЫ ..............................................................................47
ТАБЛИЦА С ОПИСАНИЕМ ПРОГРАММ ДЛЯ МЫТЬЯ ПОСУДЫ .............................. 47
ВКЛЮЧЕНИЕ ПРИБОРА ................................................................................................................48
ИЗМЕНЕНИЕ ПРОГРАММЫ .........................................................................................................48
ДОБАВЛЕНИЕ ДОПОЛНИТЕЛЬНОЙ ПОСУДЫ ................................................................49
7
)
ТЕХНИЧЕСКОЕ ОБСЛУЖИВАНИЕ И ЧИСТКА ....................................................................49
8
)
РЕКОМЕНДАЦИИ ПО ПОИСКУ УСТРАНЕНИЮ НЕИСПРАВНОСТЕЙ ...................53
КОДЫ НЕИСПРАВНОСТЕЙ/СБОЕВ .........................................................................................53
ПЕРЕД ОБРАЩЕНИЕМ В СЕРВИСНЫЙ ЦЕНТР ...............................................................54
ТЕХНИЧЕСКИЕ ДАННЫЕ .............................................................................................................57
СОДЕРЖАНИЕ
ВНИМАТЕЛЬНО
ИЗУЧИТЕ ДАННОЕ
РУКОВОДСТВО
Уважаемый покупатель!
Пожалуйста, внимательно прочи-
тайте приведенную в данном руко-
водстве информацию, сохраните его и
обращайтесь к нему по мере возник-
новения у вас вопросов.
В случае продажи оборудования
данное руководство также должно
быть передано новому владельцу обо-
рудования.
В данном руководстве содержат-
ся следующие разделы: указания по
технике безопасности, эксплуатации,
установке, поиску и устранению неис-
правностей и другие.
Приведенную здесь информацию
следует внимательно изучить до на-
чала использования посудомоечной
машины, что позволит обеспечить
правильное ее использование и под-
держание в технически исправном со-
стоянии.
ПЕРЕД ОБРАЩЕНИЕМ В
СЕРВИСНЫЙ ЦЕНТР
Ознакомьтесь с разделом «Реко-
мендации по поиску устранению не-
исправностей». Приведенная в нем
информация позволит вам самостоя-
тельно устранить некоторые наиболее
распространенные неполадки без об-
ращения к помощи квалифицирован-
ным техническим специалистам.
ПРИМЕЧАНИЕ.
В связи с непрерывно проводи-
мыми работами по разработке и усо-
вершенствованию своей продукции
компания-изготовитель оставляет за
собой право вносить в нее любые из-
менения без предварительного уве-
домления об этом.
1. ИНФОРМАЦИЯ
ПО ТЕХНИКЕ
БЕЗОПАСНОСТИ
ПРЕДУПРЕЖДЕНИЕ!
При использовании посудомоеч-
ной машины соблюдайте указанные
ниже основные меры предосторож-
ности:
ПРЕДУПРЕЖДЕНИЕ! ВОДОРОД ЯВ-
ЛЯЕТСЯ ВЗРЫВООПАСНЫМ ГАЗОМ!
При определенных условиях в си-
стемах горячего водоснабжения, ко-
торые не использовались более двух
недель, может накапливаться газоо-
бразный водород. ВОДОРОД ЯВЛЯЕТ-
СЯ ВЗРЫВООПАСНЫМ ГАЗОМ! Если
система горячего водоснабжения не
использовалась в течение указанного
выше времени, то прежде чем вклю-
чать посудомоечную машину следует
открыть все краны подачи горячей
воды на несколько минут. Данная
мера позволит удалить из системы
весь скопившийся в ней газообразный
водород. Этот газ является огнеопас-
ным, поэтому при выполнении указан-
ной выше процедуры не допускается
курить и пользоваться источниками
открытого пламени.

30 31
ПАСПОРТ ТЕХНИЧЕСКОГО ИЗДЕЛИЯ РУССКИЙ РУССКИЙ ПАСПОРТ ТЕХНИЧЕСКОГО ИЗДЕЛИЯ
Посудомоечные машины Посудомоечные машины
ПРЕДУПРЕЖДЕНИЕ! ПРАВИЛА
БЕЗОПАСНОЙ ЭКСПЛУАТАЦИИ
Бережно обращайтесь с двер-
цей посудомоечной машины и корзи-
ной для посуды, не садитесь и не ста-
новитесь на них.
Не дотрагивайтесь до нагрева-
тельных элементов во время или сра-
зу же после использования посудомо-
ечной машины.
Не включайте посудомоечную
машину до тех пор, пока все защитные
панели корпуса не будут установлены
на место. Во время работы посудо-
моечной машины открывать дверцу
следует с особой осторожностью, по-
скольку при этом существует опас-
ность выплескивания горячей воды.
Не помещайте тяжелые пред-
меты и не становитесь на открытую
дверцу. Это может привести к опроки-
дыванию прибора.
Во время загрузки посуды:
Размещайте острые предме-
ты таким образом, чтобы они не могли
случайно повредить уплотнение двер-
цы.
Чтобы предотвратить по-
резы, острые ножи всегда помещайте
ручкой вверх.
Предупреждение! Ножи
и другие столовые приборы, имею-
щие острые края, следует помещать
в корзину таким образом, чтобы эти
острые части были направлены вниз,
или укладывать в горизонтальном по-
ложении.
Во время использования по-
судомоечной машины не следует до-
пускать прикосновения пластиковых
предметов к нагревательным элемен-
там.
После окончания цикла мытья
посуды убедитесь в том, что приемный
лоток для моющего средств полно-
стью пустой.
Не допускается мыть в машине
изделия из пластмассы, если на них
отсутствует маркировка о пригодно-
сти для мытья в посудомоечной ма-
шине или аналогичная. При уходе за
посудой из пластмассы, не имеющей
подобной маркировки, следуйте ре-
комендациям компании-изготовителя.
Используйте только такие мою-
щие средства и ополаскиватели, кото-
рые предназначены для применения
в машинах для автоматического мы-
тья посуды. Запрещается использо-
вать в посудомоечной машине мыло,
стиральные порошки, а также сред-
ства для ручного мытья посуды.
Внешняя аппаратура, предна-
значенная для отключения прибора от
сети питания, должна быть встроена в
стационарную электроустановку, при
этом расстояние между контактами
должно составлять не менее 3 мм для
всех полюсов.
Храните моющие средства и
ополаскиватели в недоступном для
детей месте, не подпускайте детей к
посудомоечной машине, если откры-
та ее дверца, поскольку внутри может
еще оставаться моющее средство.
Необходимо следить за ма-
ленькими детьми, не допуская, чтобы
они играли с прибором.
Не допускается использова-
ние данного изделия детьми, а также
лицами с ограниченными физиче-
скими, сенсорными или умственными
способностями или отсутствием соот-
ветствующего опыта или знаний, за
исключением тех случаев, когда они
проинструктированы по порядку ис-
пользования прибора лицом, отвеча-
ющим за их безопасность и находятся
под его присмотром.
Все средства используемые
для мытья посуды, обладают сильны-
ми щелочными свойствами и поэтому
представляют особую опасность в слу-
чае их проглатывания.
Не допускайте попадания этих
средств в глаза или на кожу и не раз-
решайте детям подходить к посудо-
моечной машине, у которой открыта
дверца.
Не оставляйте дверцу надолго
в открытом положении, поскольку это
может приводить к опасности опроки-
дывания прибора.
В случае повреждения кабель
питания должен быть заменен специ-
алистом компании-изготовителя, ее
официального сервисного центра или
другим техническим лицом, обладаю-
щим соответствующей квалификаци-
ей. Это позволит избежать возникно-
вения опасных ситуаций.
Упаковочные материалы долж-
ны быть утилизированы в соответ-
ствии с действующими нормами и
правилами.
В процессе установки прибора
не допускается чрезмерно перегибать
или сдавливать кабель питания.
Не допускается также разби-
рать элементы управления.
Для подключения прибора к
водопроводной сети следует исполь-
зовать только новые комплекты шлан-
гов. Повторное применение шлангов
не допускается.
Следите за тем, чтобы ковро-
вые покрытия не перекрывали отвер-
стия в нижней части основания.
Используйте посудомоечную
машину только по назначению.
Посудомоечная машина пред-
назначена для эксплуатации только
внутри помещения.
Посудомоечная машина не
предназначена для применения в
коммерческих целях. Данный прибор
предназначен для бытового и анало-
гичного применения, например, для
обслуживания нужд рабочих пред-
приятия, сотрудников офиса, лиц, про-
живающих в учреждениях временно-
го размещения граждан, и т.д.
ВНИМАТЕЛЬНО ПРОЧИТАЙТЕ
ВСЕ ИНСТРУКЦИИ И СТРОГО
СЛЕДУЙТЕ УКАЗАНИЯМ ПО
ТЕХНИКЕ БЕЗОПАСНОСТИ.
СОХРАНИТЕ ДАННОЕ
РУКОВОДСТВО И
ИСПОЛЬЗУЙТЕ ЕГО В
КАЧЕСТВЕ СПРАВОЧНОГО
ПОСОБИЯ.

32 33
ПАСПОРТ ТЕХНИЧЕСКОГО ИЗДЕЛИЯ РУССКИЙ РУССКИЙ ПАСПОРТ ТЕХНИЧЕСКОГО ИЗДЕЛИЯ
Посудомоечные машины Посудомоечные машины
2. УТИЛИЗАЦИЯ
Утилизируйте упаковочные мате-
риалы посудомоечной машины в со-
ответствии с действующими нормами
и правилами.
Все применяемые упаковочные
материалы допускают переработку.
На пластиковые детали нанесены
стандартные международные обозна-
чения: (например, PS для полистиро-
ла, используемого в качестве упако-
вочного наполнителя).
На данный прибор нанесена мар-
кировка в соответствии с европей-
ской директивой 2002/96/EC по ути-
лизации отходов электрического и
электронного оборудования. В данной
директиве устанавливаются основные
требования, действующие в отноше-
нии возврата и повторного использо-
вания отработавшей срок службы тех-
ники на территории стран-членов ЕС.
ПРЕДУПРЕЖДЕНИЕ!
Упаковочный материал может
представлять опасность для детей!
По вопросам утилизации упаков-
ки и прибора следует обращаться в
специализированный центр по пере-
работке отходов. Кроме того, у отслу-
жившего срок службы прибора необ-
ходимо обязательно обрезать кабель
питания и вывести из строя (разру-
шить) механизм запирания дверцы.
Картонная упаковка производится
из переработанной бумаги и должна
передаваться в места сбора отходов
бумаги для дальнейшей переработки.
Помогая утилизировать прибор в
соответствии с нормами и правилами,
вы способствуете предотвращению
загрязнения окружающей среды отхо-
дами и последующего отрицательного
воздействия на здоровье человека.
За дополнительной информацией
по переработке данного изделия об-
ращайтесь в местные муниципальные
органы власти или в местную службу
утилизации бытовых отходов.
ВНИМАНИЕ!
Внимательно прочитайте все ин-
струкции по эксплуатации до начала
работы с посудомоечной машиной,
это позволит вам обеспечить макси-
мальную эффективность при исполь-
зовании данного прибора.
3. УКАЗАНИЯ ПО ЭКСПЛУАТАЦИИ
Панель управления
1. Индикатор программы: при выборе
программы мытья подсвечивается
соответствующий сегмент индика-
тора.
2. Кнопка выбора программы
(Program): для выбора программы
необходимо нажать кнопку. Инди-
катор «Эко-программа мытья» (Eco)
мигает при подключении к сети
электропитания. Используйте эту
кнопку для выбора необходимой
программы мытья: «Эко», «Дели-
катное мытье», «Хрусталь», «Бы-
строе мытье», «Предварительное
ополаскивание» или «Интенсивное
мытье».
3. Индикаторы контроля уровня соли
и ополаскивателя: индикатор заго-
рается, если необходимо заправить
устройство умягчения воды или
дозатор
4. Дисплей: используется для отобра-
жения времени отсрочки пуска, ко-
дов неисправностей/сбоев, а также
времени, оставшегося до окончания
выполнения программы.
5. Кнопка отсрочки пуска (Delay): эта
функция (Delay) позволяет отложить
время запуска любого цикла мытья
на время до 24 часов (зависит от
модели). Нажимая кнопку DELAY,
вы можете выбрать время отсроч-
ки пуска. Многократное нажатие
приводит к увеличению времени
задержки в часах.
6. Кнопка включения/отключения
(ВКЛ/ОТКЛ): обеспечивает включе-
ние и отключение подачи питания.
7. Индикатор контроля подачи воды:
индикатор загорается, если закры-
вается кран подачи воды, прерыва-
ется подача воды из водопровода
или пережимается шланг подачи
воды.
8. Кнопка включения функции за-
щиты от доступа детей (Child lock):
для активации функции защиты от
доступа детей необходимо нажать
эту кнопку и удерживать в течение
3 секунд, при этом светодиодный
индикатор мигнет 6 раз, а затем
продолжит гореть постоянно.
9. Программа мытья за минут (60 min):
программа ежедневного ухода за
посудой длительностью всего 1 час.
10. Функция «3 в 1»: прибор позволяет
использовать ряд дополнительных
функций. Дополнительная функция
может применять с такими програм-
мами, как «Интенсивное мытье»,
«Эко» и «Деликатное мытье».
11. После выбора необходимой про-
граммы закройте дверцу, посудомо-
ечная машина перейдет в рабочее
состояние.

34 35
ПАСПОРТ ТЕХНИЧЕСКОГО ИЗДЕЛИЯ РУССКИЙ РУССКИЙ ПАСПОРТ ТЕХНИЧЕСКОГО ИЗДЕЛИЯ
Посудомоечные машины Посудомоечные машины
Конструктивные особенности
посудомоечной машины
Вид спереди
1 Верхняя корзина
2 Распылительные коромысла
3 Нижняя корзина
4 Устройство умягчения воды
5 Дозатор моющего средства
6 Дозатор ополаскивателя
7 Лоток для столовых приборов
8 Держатель для стаканов
4. ПЕРЕД ПЕРВЫМ
ИСПОЛЬЗОВАНИЕМ
Перед первым
использованием
посудомоечной машины
необходимо:
A. Настроить устройство умягчения
воды
B. Залить 500 мл воды в контейнер для
соли и затем засыпать в посудомо-
ечную машину соль.
C. Заполнить дозатор ополаскивателя
D. Выбрать моющее средство
A. Устройство умягчения
воды
Устройство умягчения воды пред-
назначено для удаления из воды мине-
ралов и солей, наличие которых может
приводить к ухудшению эффективно-
сти работы прибора и его поврежде-
нию. Чем выше содержание этих ми-
нералов и солей, тем более жесткой
является вода. Устройство умягчения
необходимо отрегулировать в зависи-
мости от жесткости воды в месте экс-
плуатации. Получить информацию о
жесткости воды в вашем регионе вы
можете, обратившись в местную водо-
снабжающую организацию.
* Регулировка расхода соли
Посудомоечная машина обеспе-
чивает регулирование количества
потребляемой соли в зависимости от
жесткости используемой воды. Расход
соли может быть настроен с целью оп-
тимизации процесса мытья указанным
ниже образом:
1. Открутите крышку контейнера
для соли.
2. На контейнере имеется коль-
цо со стрелкой (см. рисунок слева).
Если необходимо, поверните это коль-
цо в направлении против часовой
стрелки от отметки «-» к отметке «+» в
соответствии с жесткостью используе-
мой воды.
Рекомендуется выполнить регули-
ровку согласно данным приведенной
ниже таблицы:
* Дополнительное оснащение
WATERHARDNESS
Положение ручки регулятора
Расход соли (грамм/цикл)
Количество рабочих циклов (циклы / 2 кг)
Нем.
гра-
дусы
(°dH)
Фр.
гра-
дусы
(°fH)
Англ.
градусы
(Clark)
ммоль/л
0~10 0~17 0~12.5 0~1.7 / 0 /
10~25 17~44 12.5~31.3 1.7~4.4 - 20 60
25~50 44~89 31.3~62.5 4.4~8.9 Mid 40 40
>50 >89 >62.5 >8.9 + 60 25
Для получения информации о
жесткости используемой вами водо-
проводной воды Обратитесь в мест-
ную водоснабжающую организацию.
B. Загрузка соли в
устройство умягчения воды
Допускается использовать только
специальную соль, предназначенную
для посудомоечных машин.
ПРИМЕЧАНИЕ. Если ваша модель
не оснащена устройством умягчения
воды, то этот раздел вы можете про-
пустить.
УСТРОЙСТВО УМЯГЧЕНИЯ ВОДЫ
Жесткость воды определяется кон-
кретным местом эксплуатации. В слу-
чае использования в посудомоечной
машине жесткой воды на посуде и
столовых приборах будут образовы-
ваться отложения.
Прибор оснащен специальным
устройством умягчения воды, которое
обеспечивает удаление извести и ми-
нералов из воды с помощью специ-
ально предназначенной для этой цели
соли.
Контейнер для соли располагается
под нижней корзиной. Его заполнение
производится указанным ниже обра-
зом:
Внимание!
Разрешается применять только
специальную соль, предназначенную
для использования в посудомоечных
машинах! Применение любой другой
соли, не предназначенной для ис-
пользования в посудомоечной маши-
не, в частности столовой соли, может
приводить к повреждению устройства
умягчения воды. В отношении повреж-
дений, вызванных использованием не-
подходящего вида соли, компания-из-
готовитель не предоставляет никакой
гарантии и не несет ответственности
за любые последствия таких действий.
Соль необходимо засыпать только
непосредственно перед запуском од-
ной из полных программ мытья.
Это позволит удалить со дна ма-
шины случайно просыпавшуюся соль
или пролившуюся соленую воду и та-
ким образом предотвратить коррозию,
возникающую при длительном воз-
действии соли на дно машины.

36 37
ПАСПОРТ ТЕХНИЧЕСКОГО ИЗДЕЛИЯ РУССКИЙ РУССКИЙ ПАСПОРТ ТЕХНИЧЕСКОГО ИЗДЕЛИЯ
Посудомоечные машины Посудомоечные машины
После завершения первого цикла
мытья горящие на панели управления
индикаторы гаснут.
A. Извлеките нижнюю корзину,
а затем открутите и снимите крышку с
контейнера для соли.
1
.
B. Если вы заполняете контей-
нер в первый раз, залейте его водой
на 2/3 объема (примерно 500 мл).
2
C. Вставьте конец воронки (вхо-
дит в комплект поставки) в отверстие
и засыпьте примерно 2 кг соли для
посудомоечной машины. Небольшое
количество воды может вылиться об-
ратно из контейнера для соли. Это
нормальное явление.
D. Установите на место крышку и
аккуратно закрутите ее.
E. Как правило, сигнальный ин-
дикатор контроля уровня соли гаснет
через 2–6 дней после заполнения
контейнера солью.
ПРИМЕЧАНИЯ:
1. После того как на панели управ-
ления загорится сигнальный инди-
катор контроля уровня соли, следует
произвести дозаправку соли. Сигналь-
ный индикатор контроля уровня соли
может продолжать гореть даже при
заполненном контейнере до тех пор,
пока соль не растворится полностью.
Если на панели управления отсутству-
ет сигнальный индикатор контроля
уровня соли (в некоторых моделях), то
вы можете примерно рассчитать дату
следующей заправки соли в устрой-
ство умягчения воды на основании ко-
личества циклов мытья, выполненных
посудомоечной машиной (см. схему
ниже).
2. Просыпавшуюся соль следует
удалить, запустив программу замачи-
вания.
C. Заполнение дозатора
ополаскивателя
Назначение ополаскивателя
Ополаскиватель автоматически
подается во время последнего цикла
ополаскивания, обеспечивая более
качественную очистку посуды и высу-
шивание ее без образования пятен и
подтеков.
Внимание!
Используйте только средства для
ополаскивания известных марок,
предназначенные для посудомоечных
машин. Запрещается заливать в доза-
тор ополаскивателя другие жидкости
(например, средство для чистки посу-
домоечной машины или жидкое мою-
щее средство). Это может привести к
повреждению прибора.
Когда необходимо заправлять
дозатор ополаскивателя
Если на контрольной панели отсут-
ствует сигнальный индикатор уровня
ополаскивателя, то оценить объем
ополаскивателя вы можете по цвету
оптического указателя уровня D, рас-
положенного рядом с крышкой. Если
контейнер заполнен ополаскивателем
до максимального уровня, то указа-
тель будет полностью темным. По
мере расхода ополаскивателя размер
темного круга будет уменьшаться. Не
следует допускать снижения уровня
ополаскивателя до объема менее 1/4
контейнера.
По мере расхода ополаскивателя
размер темного круга на указателе
уровня ополаскивателя изменяется,
как показано на рисунках ниже.
Полностью заполнен
Заполнен на 3/4
Заполнен на 1/2
Заполнен на 1/4 — следует произ-
вести заправку во избежание образо-
вания пятен
Пустой
D Указатель уровня
ополаскивателя
ДОЗАТОР ОПОЛАСКИВАТЕЛЯ

38 39
ПАСПОРТ ТЕХНИЧЕСКОГО ИЗДЕЛИЯ РУССКИЙ РУССКИЙ ПАСПОРТ ТЕХНИЧЕСКОГО ИЗДЕЛИЯ
Посудомоечные машины Посудомоечные машины
1
Открыть дозатор. Для этого необ-
ходимо повернуть крышку в положе-
ние «открыто / open» (против часовой
стрелки) и затем снять ее.
2
Аккуратно, не допуская перепол-
нения, залить в дозатор ополаскива-
тель.
3
Установить крышку на место, по-
местив ее сначала так, чтобы стрелка
указывала на положение «открыто /
open», а затем повернуть так, чтобы
стрелка указывала на положение «за-
крыто / closed» (по часовой стрелке)
Ополаскиватель подается на этапе
окончательного ополаскивания и слу-
жит для предотвращения образования
капель, которые могут приводить к по-
явлению пятен и подтеков на посуде.
Кроме того, он также способствует
улучшению качества сушки, позволяя
воде стекать с поверхности посуды.
Приобретенная вами посудомоеч-
ная машина рассчитана на примене-
ние жидких ополаскивателей. Дозатор
ополаскивателя располагается внутри
дверцы рядом с дозатором моющего
средства.
Для заправки дозатора следует от-
крыть крышку и затем вливать в отвер-
стие ополаскиватель до тех пор, пока
указатель уровня не станет полностью
черным. Объем контейнера для опо-
ласкивателя составляет примерно 140
мл.
Не допускайте переполнения доза-
тора, поскольку это может приводить к
излишнему пенообразованию. Пере-
лившийся через край ополаскива-
тель следует собрать влажной тканью.
Перед закрытием дверцы посудомо-
ечной машины следует обязательно
установить на место крышку дозатора.
Внимание!
Чтобы предотвратить излишнее пе-
нообразование во время последующе-
го мытья посуды, следует обязательно
собирать разлившийся в процессе за-
правки дозатора ополаскиватель, ис-
пользуя для этой цели тканевую сал-
фетку из впитывающего материала.
Настройка дозатора
ополаскивателя
Дозатор ополаскивания обеспе-
чивает четыре или шесть вариантов
настройки. Всегда следует начинать с
установки дозатора в положение «4».
Если в этом случае на посуде остаются
пятна и не обеспечивается достаточ-
ное качество ее сушки, то следует уве-
личить количество дозируемого опо-
ласкивателя, сняв крышку дозатора и
переставив переключатель в положе-
ние «5». Если надлежащее качество
сушки посуды по-прежнему не обе-
спечивается или на посуде остаются
пятна, следует переставить переклю-
чатель в следующее положение. При
необходимости указанную процедуру
следует повторить до тех пор, пока на
посуде не перестанут образовываться
пятна. Заводская настройка дозирова-
ния — положение «5».
Регулятор дозировки
(ополаскивателя)
ПРИМЕЧАНИЯ:
Если после мытья посуды на ней
остаются капли воды или следы изве-
сти, дозировку следует увеличить.
Если же на посуде остаются липкие
белесые подтеки, а на стеклянной по-
суде и лезвиях ножей — голубоватая
пленка, дозировку следует уменьшить.
D. Типы и назначение
моющих средств
Благодаря своему химическому со-
ставу моющие средства используются
для очищения посуды от загрязняю-
щих веществ, размельчения (растворе-
ния) и удаления их из посудомоечной
машины. С этой целью может приме-
няться большинство доступных в про-
даже качественных моющих средств.
Концентрированные моющие
средства
По химическому составу средства
для мытья посуды разделяются на два
основных типа:
обычные щелочные моющие
средства, содержащие едкие компо-
ненты,
слабощелочные концентриро-
ванные моющие средства с природ-
ными энзимами.
Использование программы мытья
«Эко» в сочетании с концентрирован-
ными моющими средствами снижает
объем загрязняющих отходов и бла-
гоприятно влияет на посуду; в этой
программе мытья используется ис-
ключительная способность энзимов,
содержащихся в концентрированных
моющих средствах, растворять загряз-
нения. Использование концентриро-
ванных моющих средств в программе
мытья «Эко» по результатам сопоста-
вимо с эффектом, обеспечиваемым
программами интенсивного мытья.
Моющие средства в таблетках
Таблетированные моющие сред-
ства различаются скоростью раство-
рения (зависит от конкретной марки).
Поэтому при использовании корот-
ких программ мытья некоторые мо-
ющие средства в таблетках не могут
полностью раствориться и обеспечить
максимальный моющий эффект. Таким
образом, таблетированные моющие
средства следует применять в доста-
точно длинных программах мытья, что
позволит гарантировать полное уда-
ление остатков моющего средства с
поверхности посуды.
Дозатор моющего средства
Дозатор следует заправлять перед
каждым запуском цикла мытья, руко-
водствуясь при этом указаниями, при-
веденным в таблице с описанием про-
грамм для мытья посуды. В процессе
работы приобретенная вами посудо-
моечная машина расходует меньше
моющего средства и ополаскивателя
по сравнению с посудомоечными ма-
шинами стандартной конструкции. Как
правило, при нормальном уровне за-
Page is loading ...
Page is loading ...
Page is loading ...
Page is loading ...
Page is loading ...
Page is loading ...
Page is loading ...
Page is loading ...
Page is loading ...
Page is loading ...
Page is loading ...
Page is loading ...
Page is loading ...
-
 1
1
-
 2
2
-
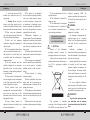 3
3
-
 4
4
-
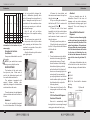 5
5
-
 6
6
-
 7
7
-
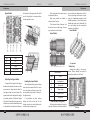 8
8
-
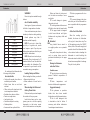 9
9
-
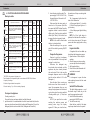 10
10
-
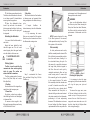 11
11
-
 12
12
-
 13
13
-
 14
14
-
 15
15
-
 16
16
-
 17
17
-
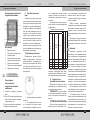 18
18
-
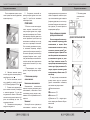 19
19
-
 20
20
-
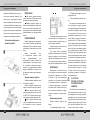 21
21
-
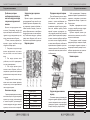 22
22
-
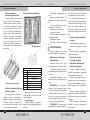 23
23
-
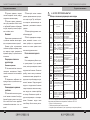 24
24
-
 25
25
-
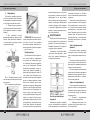 26
26
-
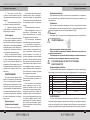 27
27
-
 28
28
-
 29
29
-
 30
30
-
 31
31
-
 32
32
-
 33
33


Kuppersberg GS 6020 User manual
- Category
- Dishwashers
- Type
- User manual
Ask a question and I''ll find the answer in the document
Finding information in a document is now easier with AI
in other languages
Related papers
-
Kuppersberg GS 4533 User manual
-
-
-
-
-
-
-
-
-
Other documents
-
Whirlpool ADPU 1004 WH User guide
-
-
Gorenje GV61212 Owner's manual
-
Korting KDI 45980 User manual
-
Samsung DW-FN320T/XTL User manual
-
-
Danby DDW1805W User manual
-
Samsung DW-FN310T/XFA User manual
-
-