Asko WMC6743PF.S Operating instructions
- Category
- Washing machines
- Type
- Operating instructions
This manual is also suitable for

USER MANUAL
Washing machine
EN
WM75.C-P
WMC67XXP
Carefully read the instructions for use before using the washing machine.

3Introduction ................................................
4Safety precautions .....................................
8Washing machine description ..................
9Detergent compartment ............................
10Before using for the first time ...................
10Packaging ....................................................
10Transport protection ....................................
11Cleaning .......................................................
11Settings before first use ...............................
12Installation and connection ......................
12Positioning the washing machine ................
14Adjusting the feet .........................................
14
Moving the washing machine and transport
after installation ............................................
15Connection to water supply .........................
16Connecting to hot/cold water supply ...........
16Installing the drain hose ...............................
18Connecting to the power mains ...................
19Coin operation .............................................
20Tips before washing ..................................
20Laundry sorting ............................................
20Clothing ........................................................
20Laundry symbols .........................................
21Dyed cotton .................................................
21Unbleached linen .........................................
22Wool .............................................................
22Viscose and synthetic fibres ........................
22Reducing allergic reactions .........................
22Saving time and energy ...............................
22Economy and efficiency ..............................
22Detergents ...................................................
22Stains ...........................................................
23Washing process step by step (1-8) .........
23STEP 1: Sort the laundry ..............................
23STEP 2: Turn on the main switch. ................
23
STEP 3: Open the washing machine door
and insert the laundry ..................................
24
STEP 4: Add the detergent and the
conditioner. ..................................................
24STEP 5: Choose the program. .....................
27STEP 6: Choosing the program settings ......
28STEP 7: Start the wash .................................
29STEP 8: End of program ..............................
30Settings .......................................................
33Cleaning and maintenance .......................
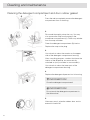
33Cleaning the filter .........................................
34
Cleaning the detergent compartment and
door rubber gasket ......................................
35Cleaning the appliance exterior ...................
35
Cleaning the washing machine interior
against odours .............................................
35
Cleaning the rinsing holes (under the agitator
in the drum) ..................................................
37Errors –what to do? ..................................
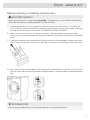
41Manual opening of washing machine door ..
42Failure display ..............................................
45Service ........................................................
45Before calling a service technician ..............
46Technical information ................................
46Technical information ...................................
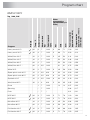
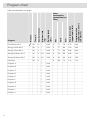
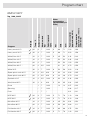
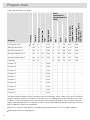
47Program chart ............................................
47WMC6743PF ................................................
49WMC6744PP ................................................
51Adjustment of the displayed washing time ...
52Removal ......................................................
52Disposal / recycling of packaging ............
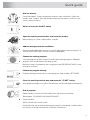
53Quick guide ................................................
53.....................................................................
Contents

Dear Customer,
We thank you for purchasing this quality ASKO product.
We hope it meets all your expectations. Scandinavian design combines pure lines, everyday
functionality, and high quality. These are the key characteristics of all our products, and the reason
why they are highly appreciated across the globe.
We kindly recommend you to read these instructions before using the appliance for the first time.
The instruction manual also includes information on how you can help protect the environment.
The following symbols are used throughout the manual and they have the following meanings:
INFORMATION!
Information, advice, tip, or recommendation
WARNING!
Warning –general danger
ELECTRIC SHOCK!
Warning –danger of electric shock
HOT SURFACE!
Warning –danger of hot surface
DANGER OF FIRE!
Warning –danger of fire
Original instructions
See Quick guide on the last page.
3
Introduction

General
Please read the instruction manual and save it for future
reference.
•Please do not use the washing machine if you have not read
and understood these instructions or use first.
•Failure to observe the instructions for use or inappropriate use of
the washing machine may result in damage to the laundry or the
appliance, or injury to the user. Keep the instruction manual handy,
near the washing machine.
•Instructions for use are available on our website at www.asko.com.
•The appliance has to be connected to the water and power supply
by a trained expert.
•Any repair and maintenance pertaining to safety or performance
should be done by trained experts.
•To avoid hazard, damaged power cord may only be replaced by
the manufacturer, authorized service technician, or other
authorized person.
•After installation, the washing machine should stand still for two
hours before it is connected to the power mains.
•The washing machine may not be connected to the power mains
using an extension cord.
•Do not connect the washing machine to an electrical outlet
intended for an electric shaver or hair dryer.
•To connect the washing machine to water supply, make sure to
use the supplied water supply hose and gaskets. Water pressure
has to be between 0.1 and 1 MPa (approximately 1–10 kp/cm2,
1-10 bar, 10–100 N/cm2).
•Always use a new water supply hose to connect the appliance to
water supply; do not reuse an old water supply hose.
•After the washing cycle, close the water tap and pull out the
washing machine plug from the power socket.
If you have a washing machinewith a 3-phase connection, do not
pull the plug out of the power outlet.
4
Safety precautions

•Only use the washing machine for washing laundry, as described
in the instruction manual. The machine is not intended for dry
cleaning.
•In case of incorrect appliance connection, incorrect use, or
servicing by an unauthorized person, the user shall bear the cost
of any damage.
•Only use detergents intended for the washing machine!
•Only use agents for machine washing and care of laundry. We
shall not be responsible for any damages or discolouration of
gaskets and plastic parts resulting from incorrect use of bleaching
or colouring agents.
•Bleaches that contain chlorine can be replaced with oxygen-based
bleaches. Otherwise, a neutralization cycle should be performed
by running the Cotton program at the highest temperature. For
best results, use hydrogen peroxide or oxygen-based detergents.
•Do not use colourants (dyes) or bleaching substances (substances
for discolouration or removal of colourants) as they contain
sulphuric compounds that could cause corrosion.
•Excessive use of products containing chlorine compounds
increases the risk of premature failure of appliance components.
This depends on the concentration of chlorine, exposure time,
and temperature.
•DANGER OF FIRE!
Do not use detergents that contain solvents as this could lead
to release of poisonous gases, damage to the machine, and
risk of fire and explosion.
•Before using the appliance for the first time, remove the transport
bolts and all other transport protection devices. See chapter
"BEFORE FIRST USE/Transport protection".
•The machine is not intended for use by persons (including
children) with physical or mental impairments, or persons with
lacking experience and knowledge. These persons should be
5
Safety precautions

instructed about the use of the appliance by a person responsible
for their safety.
•Emergency door opening tool is located on the back side of the
dispenser.
•Maximum washing capacity in kg is indicated on the rating plate
(or in the PROGRAM TABLE).
This appliance is intended to be used in household and similar
applications, such as:
•staff kitchen areas in shops, offices and other working
environments;
•farm houses;
•by clients in hotels, motels and other residential type environments;
•bed and breakfast type environments;
•areas for communal use in blocks of flats or in launderettes.
For appliances without plug, disconnection must be incorporated
in the fixed wiring in accordance with the wiring rules.
Child safety
•Do not allow small children to play with the washing machine.
•Before closing the washing machine door and running the
program, make sure there is nothing except laundry in the drum
(e.g. if a child climbed into the washing machine drum and closed
the door from the inside).
•Keep the detergent and conditioner out of reach of children.
•Activate the child lock. See chapter: SETTINGS
•Do not let children younger than three years to come near the
appliance, unless they are under constant supervision.
•The washing machine is made in compliance with all relevant
safety standards. This washing machine may be used by children
aged 8 years and above and by persons with reduced physical,
sensory or mental capabilities or lack of experience and
knowledge, but only if they are supervised during the use of the
appliance, if they have been provided relevant instructions
6
Safety precautions

regarding safe use of the washing machine, and if they understand
the hazards of inappropriate use. Make sure children do not play
with the appliance. Make sure the children do not clean the
washing machine or perform any maintenance tasks without
supervision.
Danger of hot surface
•At higher washing temperatures, the door glass will heat up. Be
careful to avoid burns. Make sure children do not play near the
door glass.
Water overflow protection
If the water level in the appliance rises above the normal level, then
the excessive water level protection will be activated.
It will shut off the water supply and start pumping out the water.
If the water level does not decrease in 60 seconds, the program will
be interrupted (see chapter "ERRORS –WHAT TO DO?").
Transporting/storage during the winter
If you transport or store the appliance in vehicles or rooms that are
not heated and where the temperature could drop to below freezing
point, please do the following:
•Clean the drain pump filter. See chapter "CLEANING AND
MAINTENANCE".
•Close the water supply to the washing machine, undo the water
supply hose from the water supply tap, and wait until the water
flows out of the tap and the hose.
•After the drain pump filter is emptied, there can still be a small
amount of water in the machine. This, however, does not affect
the quality and will not damage the appliance.
•If the washing machine is to be transported, transport protection
has to be re-installed before transport (see chapter "BEFORE
USING THE APPLIANCE FOR THE FIRST TIME").
SAVE THESE INSTRUCTIONS FOR FUTURE REFERENCE!
7
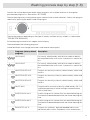
Safety precautions

1. Main switch (ON/OFF)
2. Program selector knob
3. Display unit
4. Program settings buttons
5. Button (start/pause)
6. Detergent compartment
7. QR and AUID code (on the inside of the
washing machine door)
8. Rating plate with information about the
washing machine (on the inside of the
washing machine door)
9. Washing machine door
10. Drain filter cover
11. Water release hose
12. Drain filter pump (installed behind the drain
pump filter)
8
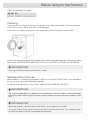
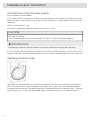
Washing machine description

Prewash compartment1
Compartment for main wash liquid
detergent.
Use the foldable barrier (3).
2
Compartment for main wash powder
detergent.
Do not use the foldable barrier (3).
2
Softener / conditioner compartment4
Tab for detergent compartment removal5
9
Detergent compartment

Packaging
Remove all packaging.
Please sort the materials in compliance with local recommendations (see chapter "DISPOSAL").
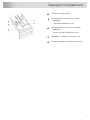
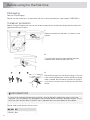
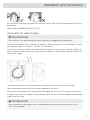
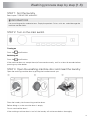
Transport protection
Before using the appliance, remove the three transport bolts and plastic plugs which protect the
appliance during transport.
1
Release and remove the bolts as shown in the
figures.
2
To remove the plastic plugs holding the bolts,
squeeze them and then pull them out.
3
Remove the caps from the plastic plugs. Push the
caps over the three holes in which the plastic plugs
were inserted. Save the bolts and plastic plugs if
you have to transport your washing machine in the
future.
INFORMATION!
If you wish to transport the washing machine, reinstall the bolts and plastic caps to lock the
machine. This will prevent any damage to the machine due to vibrations during transport. If you
have lost the transport bolts or plastic caps, replacements can be ordered at your dealer.
Please order three pieces of each item!
ID:Art. No.
Bolt270698
10
Before using for the first time

ID:Art. No.
Plastic cap (transport lock)551188
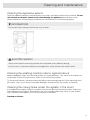
Cleaning
Disconnect the washing machine from the power mains and open the door. Clean the washing
machine drum with a damp cloth and a mild detergent.
In the case of a 3 phase connection of the appliance, switch off the main socket switch.
Connect the washing machine to the power mains and run the dedicated drum cleaning program.
See chapter "WASHING PROCESS; STEP BY STEP (1–8)" /STEP 5: CHOOSE THE PROGRAM.
INFORMATION!
No program can be started while the door is open.
Settings before first use
When the dryer is connected (see chapter "INSTALLATION AND CONECTION") and switched on
for the first time, choose the preferred language:
For further washing process, see chapter "WASHING PROCESS STEP BY STEP".
INFORMATION!
The amount of detergent also depends on the hardness of water. For details, see the detergent
packaging. Please contact your local water supply company to check the water hardness in your
area.
INFORMATION!
Before the product is dispatched from the factory, every appliance is tested.
As a result, there may be some residual water left in the drain pump filter. This, however, does
not affect the quality and will not damage the appliance.
Table continued from last page
11
Before using for the first time

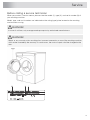
Positioning the washing machine
The washing machine can be installed as a built-in (integrated) or a free-standing unit. Place the
machine on a level surface so that the power outlet on the wall is accessible.
INFORMATION!
Before connecting the washing machine to the power mains, wait for at least 2 hours until it
reaches room temperature.
INFORMATION!
If the appliance is installed on a plinth or a similar structure, then the appliance must be fixed to
it, to avoid the risk of falling. ASKO original accessories are available for this purpose, complete
with fixing instructions.
Surface for positioning
The most suitable surface for installation is concrete. Unlike wooden floors or other floor coverings
with "soft" characteristics, concrete rarely vibrates during spinning.
*The washing machine must be installed in a vertical and stable position
*Do not place the washing machine on soft floor coverings, otherwise it will vibrate during spinning.
Built-in washing machine
The washing machine can be integrated under a worktop with a height of 900–950 mm. Leave 5 cm
of room around the entire appliance, including between the back edge of the upper cover and the
wall behind it.
12
Installation and connection

Washing machine installation clearances
Opening the washing machine door (top view)
13
Installation and connection

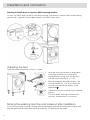
Stacking an ASKO dryer on top of an ASKO washing machine
To stack an ASKO dryer on top of a washing machine, use the extra vacuum feet and the tipping
guard (A+B), supplied in the cardboard box in the ASKO dryer drum.
Adjusting the feet
Place the washing machine so that it is stable.
1. Level the washing machine in longitudinal
and traverse direction by rotating the
adjustable feet (using a No. 32 spanner).
The feet allow levelling by +/- 1 cm.
2. When the appropriate height of feet is set,
use the wrench No. 17 to firmly fasten the
counter-nuts towards the bottom of the
appliance .
3. Tighten the jam nuts (counter nuts) to the end
position.
This will reduce washing machine noise,
vibration, movement etc. to minimum.
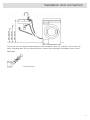
Moving the washing machine and transport after installation
If you are moving the washing machine without packaging, open the washing machine door and
pull the appliance by holding the washing assembly, as indicated in the figure.
14
Installation and connection

For any further moving of the appliance, use the transport rods (the washing machine drum has to
be blocked).
(See chapter TRANSPORT PROTECTION.)
Connection to water supply
INFORMATION!
The machine has to be connected to water supply by an adequately trained person.
Use the water supply hose to connect the appliance. Water pressure has to be between 0.1 and 1
MPa (approximately 1–10 kp/cm2, 1-10 bar, 10–100 N/cm2).
If the hoses are newly installed, we recommend rinsing them to remove any impurities. Otherwise,
these impurities could clog the filter in the water connection on the washing machine and thus cut
off the water supply.
The water intake hose has to be fastened firmly enough for the hose to have a good seal.
After connecting the hose, the seal must be checked for any leaks.
Only use the water supply hose supplied with the appliance. Do not use any used or other hoses.
A single check valve is included in the Set of documents, which must be installed to the cold water
supply hose (UK only).
INFORMATION!
If the connection on the supply hose is of different dimensions than the water tap (e.g. 3/4” →
1/2”), use an adapter.
15
Installation and connection

Connecting to hot/cold water supply
(Only available in some models)
If your appliance has connections for both hot and cold water, then connect one hose to the cold
water connection and the other hose to the hot water connection, as indicated on the back of the
appliance:
COLD = cold and HOT = hot.
Hot water is supplied for programs operating at 40 °C or more.
CAUTION!
Hot water connection:
The hot water temperature must not exceed 70°C (60°C in the UK (United Kingdom)).
INFORMATION!
Connecting to both hot and cold water will save time and electric energy when washing.
If your washing machine model has connections for both hot and cold water, and you only wish to
connect cold water, then the protective cap has to be (or remain) attached to the hot water connection.
Installing the drain hose
Upon delivery, the appliance has a drain hose attached. This drain hose must be connected to a
drain. Drain hose can also be attached to a wall drain with a trap; such trap should be properly
installed to allow cleaning. The height of the drain should be 600–900 mm above the floor. The lower
position (600 mm) is always recommended. Make sure the drain hose is not clipped or bent.
16
Installation and connection

Drain hose can also be connected directly to the washbasin drain via a siphon. In this case, the
hose, should be 600–900 mm above the floor. Internal hose diameter should be at least 18 mm.
See figure.
At least 18 mm
17
Installation and connection

Connecting to the power mains
ELECTRIC SHOCK!
After installation, the washing machine should stand still for two hours before it is connected to
the power mains.
Connect the appliance to an earthed power outlet. After installation, the wall outlet should be freely
accessible. The outlet should be fitted with an earth contact (in compliance with the relevant
regulations).
If you have a washing machine with a 3-phase connection, the connection must be carried out by
a qualified and authorized specialist.
Connection upon delivery
Information about your washing machine is indicated on the rating (type) plate.
Use the type A differential current protection switch.
ELECTRIC SHOCK!
We recommend using over-voltage protection to protect the appliance in case of a lightning
strike.
WARNING!
The washing machine may not be connected to the power mains using an extension cord.
INFORMATION!
Do not connect the washing machine to an electrical outlet intended for an electric shaver or hair
dryer.
INFORMATION!
Any repair and maintenance pertaining to safety or performance should be done by trained
experts.
18
Installation and connection

Coin operation
(Only available in some models)
The machine is prepared for coin operation.
Owner/distributor can find detailed informations in Service manual.
Such installation must be carried out by a qualified professional.
The coin meter shall be able to short circuit two signal lines for periods of up to 10 minutes.
This will allow the user to load the appliance, choose a program and start the program after inserting
the coins.
"Please pay to continue" appears on the display when the machine is started with the main power
switch (by pressing on button Start).
19
Installation and connection

This chapter includes several tips on how to prepare the laundry for washing.
Laundry sorting
Sort the laundry according to:
•how soiled it is,
•colour,
•material.
Clothing
1. Close the zips and hook-and-loop fasteners so that they do not damage the fabric.
2. New dyed items may contain excess dye; therefore, they have to be washed separately several
times.
3. Turn delicate items inside out. This will decrease the risk of tear and colour fading.
4. Place very sensitive clothes and small items in a special-purpose laundry washing bag.
5. Empty the pockets and turn them inside out.
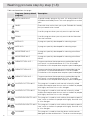
Laundry symbols
Observe the laundry symbols.
Textile maintenance symbols:
Washing
DelicateNormal
Max. washing temperature 90 °C
Max. washing temperature 60 °C
Max. washing temperature 40 °C
Max. washing temperature 30 °C
Hand wash only
Do not wash
Bleaching
Bleaching in cool water
20
Tips before washing
Page is loading ...
Page is loading ...
Page is loading ...
Page is loading ...
Page is loading ...
Page is loading ...
Page is loading ...
Page is loading ...
Page is loading ...
Page is loading ...
Page is loading ...
Page is loading ...
Page is loading ...
Page is loading ...
Page is loading ...
Page is loading ...
Page is loading ...
Page is loading ...
Page is loading ...
Page is loading ...
Page is loading ...
Page is loading ...
Page is loading ...
Page is loading ...
Page is loading ...
Page is loading ...
Page is loading ...
Page is loading ...
Page is loading ...
Page is loading ...
Page is loading ...
Page is loading ...
Page is loading ...
Page is loading ...
-
 1
1
-
 2
2
-
 3
3
-
 4
4
-
 5
5
-
 6
6
-
 7
7
-
 8
8
-
 9
9
-
 10
10
-
 11
11
-
 12
12
-
 13
13
-
 14
14
-
 15
15
-
 16
16
-
 17
17
-
 18
18
-
 19
19
-
 20
20
-
 21
21
-
 22
22
-
 23
23
-
 24
24
-
 25
25
-
 26
26
-
 27
27
-
 28
28
-
 29
29
-
 30
30
-
 31
31
-
 32
32
-
 33
33
-
 34
34
-
 35
35
-
 36
36
-
 37
37
-
 38
38
-
 39
39
-
 40
40
-
 41
41
-
 42
42
-
 43
43
-
 44
44
-
 45
45
-
 46
46
-
 47
47
-
 48
48
-
 49
49
-
 50
50
-
 51
51
-
 52
52
-
 53
53
-
 54
54


Asko WMC6743PF.S Operating instructions
- Category
- Washing machines
- Type
- Operating instructions
- This manual is also suitable for
Ask a question and I''ll find the answer in the document
Finding information in a document is now easier with AI