Halo Elite1B Countertop Griddle User manual
- Category
- Barbecues & grills
- Type
- User manual

1
ESSENTIALS GUIDE

2
08
TURN UP THE HEAT WITH DUAL COOKING ZONES
TABLE OF CONTENTS
04
MEET THE ELITE 1-BURNER 2-ZONE OUTDOOR GRIDDLE
06
FEATURES OF YOUR ELITE 1B
10
OWNER'S MANUAL
17
CONNECTING 20 LBS. TANK
23
SEASONING YOUR GRIDDLE
14
PRODUCT RECORD
11
CSA - ENGLISH
15
CONNECTING 1 LB. CYLINDER
LIGHTING INSTRUCTIONS 20
CARING FOR YOUR ELITE 1B 24
22
GREASE CUP + LEVELING
30
ASSEMBLED DIMENSIONS
TROUBLESHOOTING 27
FIVE (5) YEAR LIMITED WARRANTY 31
28
ELITE 1B PARTS LIST

3
34
MANUAL DEL PROPIETARIO
41
CONECTAR TANQUE DE 20 LBS.
47
TRATAMIENTO DE LA PLANCHA
38
REGISTRO DE PRODUCTOS
35
CSA - ESPAÑOL
39
CONEXIÓN DE UN CILINDRO DE 1 LB.
INSTRUCCIONES DE ENCENDIDO 44
EL CUIDADO DE SU ELITE 1B 48
46
DEPÓSITO DE GRASA + NIVELACIÓN
54
DIMENSIONES ENSAMBLADA
SOLUCIÓN DE PROBLEMAS 51
GARANTÍA LIMITADA DE CINCO (5) AÑOS 55
52
LISTA DE PIEZAS ELITE 1B
58
MANUEL DU PROPRIÉTAIRE
65
CONNEXION 20 LBS. RÉSERVOIR
71
APPRÊT DE VOTRE GRILL
62
ENREGISTREMENT DU PRODUIT
59
CSA - FRANCAIS
63
CONNEXION 1 LB. BOUTEILLE
INSTRUCTIONS D'ÉCLAIRAGE 68
ENTRETIEN DE VOTRE ELITE 1B 72
70
BAC À GRAISSE + NIVELLEMENT
78
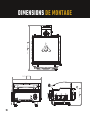
DIMENSIONS DE MONTAGE
DÉPANNAGE 75
GARANTIE LIMITÉE DE CINQ (5) ANS 79
76
LISTE DES PIÈCES ELITE 1B

4
MEET THE
Taking your outdoor cooking skills above and beyond never felt so simple.
With the Elite 1B, enjoy true wall to wall cooking with the industry’s first dual
zone single burner outdoor griddle. Simplify your cooking experience with
a unique wind proof design, rear grease management and utensil clean off.
When it comes to innovation and an Elite outdoor cooking experience, we’ve
got you covered.
We strive to Rise Above in both who we are and what we create. Our mission
is to be a catalyst for reconnecting people and enhancing the experience
of cooking outdoors—In the greatness of nature, on-the-go, and in your
backyard.
The entire team here at Halo thanks you for joining our community. We look
forward to serving you by listening and continuing to bring you authenticity,
versatility and innovation.
-

5

6
Get the most use out of your entire cooking surface. No more
cold zones!
Control 2 zones with 1 control knob.
WALL TO WALL COOKING SURFACE
Season the Elite 1B's 284 in2 total cooking surface within 30 minutes.
Attach the included handles to easily remove the griddle top.
SEASON YOUR GRIDDLE IN 30 MINUTES
EASY LIFT OFF
DUAL ZONE BURNER SYSTEM
FEATURES OF YOUR
WIND-PROOF DESIGN
Innovative wind-proof design ensures your flame stays lit!
6

7
Designed to connect a
1 lb or a 20 lb propane
tank. NEW FEATURE -
adjustable regulator
between 9.5" to 11" WC for
more temperature control.
WALL TO WALL COOKING SURFACE PROPANE FUELED
WIDE RANGE
TEMPERATURE
300°F to 600°F
QUICK WARM UP TIME
Ready to cook in 10 minutes.
BUILT IN UTENSIL CLEAN OFF
Clean utensils as you cook.
REAR GREASE MANAGEMENT
Extra large capacity grease
container included.
7

8
88
WITH DUAL COOKING ZONES
ZONE 2
8

9
9
9
The Elite 1B Outdoor Griddle has two zones within one burner, designed to give you
the benet of precise control over your cooking surface. Independently operate
each zone and control cooking temperatures for an elevated, wall to wall cooking
experience — no more cold zones!
ZONE 1 9

10
SCAN FOR
Product Registration
Online Owner’s Guide
Assembly Videos
10
OWNERS MANUAL
MODEL NO: HZ-1007-ANA
This instruction manual contains important
information necessary for the proper assembly
and safe use of the appliance.
WARNING
Do not try to light this appliance without reading the
Ignition Instructions section of this manual.
WARNING The manufacturer has made every effort to
eliminate any sharp edges. However, you should
handle all components with care to avoid
accidental injury.
WARNING
• "FOR OUTDOOR USE ONLY."
• "READ ALL INSTRUCTIONS BEFORE INSTALLING AND
USING THE APPLIANCE."
• "SAVE THESE INSTRUCTIONS."
WARNING
Halo Products Group LLC
850 West Park Rd Elizabethtown KY, 42701
Toll free: 1-833-572-1688
Minimum distance from sides and back of unit
to walls or railings 36” (914.4mm).“ Do not use
under overhead construction.
WARNING
• The use of alcohol, prescription, or non-prescription drugs
may impair the consumer's ability to properly assemble or
safely operate the appliance.
• When cooking with oil or grease, have a type BC or ABC
re extinguisher readily available.
• In the event of an oil or grease re do not attempt
to extinguish with water. Immediately call the re
department. A Type BC or ABC re extinguisher may, in
some circumstances, contain the re.
• This appliance is not intended for and should never be
used as a heater.
• This appliance will be hot during and after use. Use
insulated oven mitts or gloves for protection from hot
surfaces or splatter from cooking liquids.
• Do not store a spare LP gas cylinder under or near
this appliance.
• Never ll the cylinder beyond 80 percent full; and if
the instructions in bold above are not followed exactly, a
re causing death or serious injury may occur.
• The LP gas tank used must have a collar to protect the
tank valve.
WARNING

11
IMPORTANT SAFETY INFORMATION
If you smell gas:
• Shut off gas to the appliance.
• Extinguish any open ame.
• Open lid.
• If odor continues, keep away
from the appliance and
immediately call your re
department.
Failure to follow these
instructions could result in fire,
explosion or burn hazard which
could cause property damage,
personal injury or death.
DANGER
• Never operate this
appliance unattended.
• Never operate this
appliance within 10'
(3.0 m) of any structure,
combustible material or
other gas cylinder.
• Never operate this
appliance within 25' (7.5 m)
of any ammable liquid.
• If a re should occur, keep
away from the appliance
and immediately call your
re department. Do not
attempt to extinguish an oil
or a grease re with water.
Failure to follow these
instructions could result
in re, explosion or burn
hazard which could cause
property damage, personal
injury or death.
DANGER
Do not leave the appliance unattended. Keep children
and pets away from the appliance at all times.
WARNING
This product can expose you to chemicals,
including carbon monoxide, which are known to
the State of California to cause cancer and birth
defects or other reproductive harm. For more
information go to www.P65Warnings.ca.gov
WARNING
CALIFORNIA PROPOSITION 65 When using a match to light the appliance,
make sure to use the included matchlight stick
or a long 11” match.
WARNING
FOR OUTDOOR USE ONLY and shall not be used
in a building, garage, or any other enclosed area.
WARNING
Spiders and insects can nest inside the burner
of the appliance and disrupt gas ow. Inspect
the burner at least once a year.
WARNING
This appliance is not intended for commercial use.
WARNING
Check all gas supply ttings for leaks before
each use. Do not use the appliance until all
connections have been checked and do not leak.
WARNING
In the event of rain, snow, hail, sleet, or other
forms of precipitation while cooking with oil
or grease, cover the cooking vessel immediately
and turn off the appliance burners and gas
supply. Do not attempt to move the appliance or
cooking vessel.
WARNING
Keep any electrical supply cord and the fuel
supply hose away from any heated surfaces.
WARNING
Place dust cap on cylinder valve outlet whenever
the cylinder is not in use. Only install the type
of dust cap on the cylinder valve outlet that is
provided with the cylinder valve. Other types of
caps or plugs may result in leakage of propane.
WARNING
Please read all instructions thoroughly before
proceeding. Find a large, clean area in which
to assemble your Halo 2-Zone Countertop
Griddle. Please refer to the assembly diagram, as
necessary.
CAUTION
• "Read and follow all
warnings and instructions
before assembling and
using the appliance."
• "Follow all warnings and
instructions when using
the appliance."
• "Keep this manual for
future reference."
• "Keep the fuel supply hose
away from any heated
surface(s)."
WARNING

12
• Use your Halo 2-Zone Countertop Griddle as purchased.
• Halo 2-Zone Countertop Griddle installation must conform with local
codes, or in the absence of local codes, with either the National Fuel
Gas Code, ANSI Z223.1/ NFPA 54, Natural Gas and Propane Installation
Code, CSA B149.1, or Propane Storage and Handling Code, B149.2, or the
Standard for Recreational Vehicles, ANSI A 119.2/NFPA 1192, and CSA
Z240 RV Series, Recreational Vehicle Code, as applicable.
• Halo 2-Zone Countertop Griddle is not for use in or on recreational
vehicles and/or boats.
• Halo 2-Zone Countertop Griddle is safety certied for the United States
use only. Do not modify for use in any other countries. Alteration will
result in a safety hazard.
• The pressure regulator supplied with the appliance must be used.
Replacement pressure regulators Part #HZ-1004-28 for 1 lb. cylinder
or HZ-1007-25 for 20 lb. cylinder must be used with the appliance.
• Place dust cap on cylinder valve outlet whenever the cylinder is not in
use. Only install the type of dust cap on the cylinder valve outlet that
is provided with the cylinder valve. Other types of caps or plugs may
result in leakage of propane.
INSTALLATION SAFETY PROTECTIONS
• Keep the appliance area clear and free from combustible materials,
gasoline, and other ammable vapors and liquids.
• Do not obstruct the ow of combustion and ventilation.
• Keep the ventilation opening of the cylinder enclosure free and clear
from debris.
• Visually check burner ames.
• Clean the appliance, including special surfaces, with recommended
cleaning agents, if necessary.
• Check and clean the burner/venturi tube for insects and insect nests. A
clogged tube can lead to a re beneath the appliance.
SAFETY MAINTENANCE
Turn OFF your Halo 2-Zone Countertop Griddle when not in use.
• Never move Halo 2-Zone Countertop Griddle while it is in operation or
still hot.
• Use long-handled barbecue utensils and oven mitts to avoid burns and
grease splatters.
• Keep unit a minimum of 36” away from walls, buildings, vehicles, or
other structures while in use.
USE AND CARE
• Clean your Halo 2-Zone Countertop Griddle after each cook.
• Turn off the gas supply if you notice grease dripping onto the valve or
regulator. Determine the cause, correct it, then clean and check valve,
hose, and regulator before continuing to operate your Halo 2-Zone
Countertop Griddle.
• Keep ventilation openings in cylinder enclosure free and clear of debris.
• The regulator may make a humming or whistling noise during
operation. This will not affect safety or use of your Halo 2-Zone
Countertop Griddle .
• Turn off your Halo 2-Zone Countertop Griddle immediately if the
regulator frosts. This indicates a problem with the LP cylinder, and it
should not be used on any product. Return to supplier.
• Please call Consumer Service at 1-833-572-1688 if you have a
problem with your Halo 2-Zone Countertop Griddle and refer to the
Troubleshooting Section on page 25.
IMPORTANT:
• To check the valve, rst push in the control knob, and then release.
The control knob should spring back. If the control knob does not
spring back, replace the valve assembly before using your Halo 2-Zone
Countertop Griddle.
• Push and turn the control knob counterclockwise to LOW position, then
turn back to OFF position. The valve should rotate smoothly.
CHECK CONTROL VALVE CONDITION
Turn the control knob on Right Zone to ignite the burner. Press the
electronic ignition button for 2-3 seconds. You will hear it click, then turn
to Dual Zone to light both burner zones. Turn knob from HIGH to LOW. You
should see a smaller ame in the LOW position than seen on HIGH. Always
check the ame prior to each use. If only the LOW ame is seen, refer to
“Sudden drop or low ame” in the Troubleshooting section on page 25.
BURNER FLAME CHECK
• Plastic components: Do not use Cortisol, abrasive cleaners, degreasers,
or a concentrated oven cleaner on plastic parts that could cause
damage. Wash with warm soapy water and wipe dry.
• Painted surfaces: Wash with mild detergent or nonabrasive cleaner and
warm soapy water. Wipe dry with a soft nonabrasive cloth. Do not use
an abrasive pad on areas with graphics. The grease deposits or baked
on grease may require the use of a non-abrasive plastic cleaning pad.
Do not apply a corrosive oven cleaner to painted surfaces.
GENERAL CLEANING

13
CSA - ENGLISH
• Stainless Steel Cleaning Tips:
Step 1: Dip a soft cloth in warm water mixed with a mild dish detergent.
Wipe the surface, rinse the cloth and wipe again, then dry with a towel
to prevent water spots.
Step 2: If you still see ngerprints, spray a glass cleaner onto a soft
cloth and wipe ngerprints away.
Step 3:To remove baked-on food and grease, make a paste of baking
soda and warm water. Gently rub onto the surface using a soft cloth or
sponge. Wipe with a clean wet cloth and towel dry. For scratches and
stains, use a stainless-steel cleaner and apply to the area, following
directions. Rinse with a clean damp cloth, then dry.
• Store outdoors in a dry, well-ventilated area out of reach of children.
• Store indoors ONLY if LP cylinder is turned off and disconnected, removed
from the unit, and stored outdoors.
• Follow “Cleaning the Burner Assembly” instructions before starting your
griddle after removing it from storage.
STORING YOUR GRIDDLE
Follow the instructions below to clean and/or replace the burner, replace
the electrode assembly, or if you have trouble igniting your Halo 2-Zone
Countertop Griddle.
1. Turn control knob to the OFF position.
2. Detach burner from bracket and remove the electrode assembly.
3. Carefully lift burner up and pull away to the left from valve openings.
Suggestions: there are three ways to clean the burner tubes.
• Use a narrow nylon brush with a exible handle (a brass wire
brush is NOT recommended), run the brush through the burner
venturi through burner several times.
• Bend a rigid wire (a coat hanger will also work) into a small hook.
Run the hook through burner tube several times.
• Use an air hose to force air into the burner tube and out the
burner ports (wear eye protection). Check each port to make sure
that air comes out each hole.
4. Use a wire brush on the entire outer surface of burner to remove
food residue and dirt.
5. Clean any blocked ports with a stiff wire such as an open paper clip.
6. Check the burner for damage. Due to normal wear and corrosion,
some holes may become enlarged. If any large cracks or holes are
found, replace the burner.
7. Attach the electrode assembly to the burner and connect the
electrode wire.
8. Carefully place the burner back onto the valve spuds.
9. Attach the burner to bracket on the rebox.
CLEANING AND BURNER ASSEMBLY
Food storage safety tips:
• Understand what “high-risk” foods are.
• Always keep high-risk food at the proper temperature.
• Store raw foods, such as raw meat, seafood, and vegetables below cooked
foods in the refrigerator or freezer.
• Store food in properly covered containers made of glass or plastic.
• Avoid refreezing already thawed foods.
WHAT YOU SHOULD KNOW ABOUT
FOOD SAFETY
1. WASH YOUR HANDS-Wash your hands with hot water and soap for at
least 15-20 seconds before and after handling food.
2. SEPARATE RAW AND READY TO EAT/COOKED FOODS
• Ensure that raw food is always kept refrigerated and away from ready
to eat/cooked foods. Food that is marinating should also be kept
covered in the fridge.
• Ready to eat foods (such as salads, vegetables, sauces) and cooked
foods, should never come into contact with raw food as this causes
harmful bacteria to contaminate the cooked food.
• Always ensure that you use separate chopping boards/utensils for raw
and cooked foods, and always wash your hands after handling raw food.
3. COOK FOOD THOROUGHLY
• Food poisoning is caused by harmful bacteria, such as E-Coli and
Salmonella, which are killed by cooking. In order to ensure food
safety, it is essential to cook food thoroughly.
• Slice into the thickest part of the meat with a fork and a sharp
knife to check whether it's cooked. If the color of the meat in the
center is still pink, it needs to cook longer.
• Burgers should always be cooked thoroughly and never be served
pink.
• Food thermometers are available in most supermarkets, and they
can easily tell whether meat is cooked by probing it for 165 degrees
Fahrenheit or 74 degrees Celsius. They are a handy tool to have in
your kitchen.
4. SERVE FOOD IMMEDIATELY AFTER COOKING - Letting cooked
food sit at room temperature allows for harmful bacteria to grow.
Once food is cooked, serve immediately; otherwise, you should cool
cooked food quickly, refrigerate, and consume with 2 days.
5. ALWAYS KEEP FOOD COVERED - Always keep food covered to ensure
that ies are not contaminating your food.
GRIDDLE FOOD AND SAFETY

14
CSA - ENGLISH
• Use a meat thermometer to ensure food has reached a safe internal
temperature.
• Whole poultry should reach 165° F/ 73.8 °C for dark meat, 160°F/ 71°C for
white meat.
• Hamburgers made of any ground meat or poultry should reach
160°F/71°C and be brown in the center with no pink juices. Beef, veal and
lamb steaks, roasts and chops can be cooked to 145°F/63°C. All cuts of
pork should reach 160°F/71°C.
NEVER partially grill meat or poultry and nish cooking later. Cook food
completely to destroy harmful bacteria.
HOW TO CHECK IF MEAT IS DONE ON
THE GRIDDLE PRODUCT RECORD
IMPORTANT: FILL OUT PRODUCT
RECORD INFORMATION BELOW, OR
TO REGISTER YOUR PRODUCT, VISIT
OUR WEBSITE AT halo-pg.com.
Model Number:
Serial Number:
Purchase Date:
NOTICE: Model number and Serial
Number located on the under
bottom panel and appliance feet.

15
CONNECTING 1 LB. CYLINDER
WARNING
For your safety, when not in use remove the cylinder and the
regulator. Cap the cylinder, the insert tting and the quick
disconnect.
1. Make sure the control knob is in OFF position.
2. Remove plastic cap from top of propane cylinder.
Save cap for storage. Screw propane cylinder into
regulator. Be careful not to cross thread. Hand tighten
only.
3. The regulator is equipped with Quick Connect. Align
the insert tting on the regulator to the quick connect
body on the side of the griddle. Pull back the spring-
loaded coupling then insert into quick connect
coupling rmly and release. The regulator insert will
snap in and lock in place. Perform leak check at this
connection.
4. Never operate oven with propane cylinder
upside down.
NOTICE: To perform a leak test of your gas connections, mix a 50/50 solution of soap and water and brush around regulator and other gas
connections. If growing bubbles appear, there is a leak. Re-tighten connections. If leaks cannot be stopped, do not try to repair. Call for
replacement parts at 1-833-572-1688.
Check for leaks at these connections.
CONNECTING 1 LB. DISPOSABLE CYLINDER
Turn Clockwise

DISMANTLING DISPOSABLE PROPANE CYLINDER
1. Turn control knob to OFF position and make sure all
ames are extinguished then release the coupling at the
quick connect body to release the insert.
2. Make sure your griddle is turned OFF and cooled down.
3. Disconnect the regulator from Quick Connect tting by
pull back the spring-loaded coupling back to release
from the insert tting, then unscrew the bottle from the
regulator.
Quick Disconnect
Turn Counterclockwise
16

17
CONNECTING 20 LBS. TANK
1. Place LP tank on tank support bracket and secure
with tank retention wire or level, and stable surface.
2. Make sure burner valve is on off position.
3. LP tank should be in the OFF position. If not, turn
wheel clockwise until it stops.
4. Remove the protective cap from LP tank valve. Always
use cap and strap supplied with OPD valve.
5. DO NOT USE A POL TRANSPORT PLUG (plastic part
with internal threads)! IT WILL DEFEAT THE SAFETY
FEATURE OF THE VALVE.
6. The hose and regulator is equipped with Quick
Connect. Align the insert tting on the regulator to the
quick connect insert on the side of the griddle. Pull
back the spring-loaded coupling then push the into
insert rmly and release. The Quick Connect will snap
in and lock in place.
CONNECTING HOSE + ADJUSTABLE
REGULATOR 20 LBS. TANK
WARNING
The LP tank used with this Flat Top Griddle must meet the following requirements:
• Use appliance only with LP (propane) gas and the regulator/valve assembly supplied.
• Installation must conform with local codes, or in their absence with National Fuel Gas Code, NFPA 54/ANSI Z223.1. Handling and
storage of LP cylinders must conform to LP Gas Code NFPA/ANSI 58.
• Do not modify this appliance. Modications will result in a safety hazard.
• Apartment Dwellers: Check with management to learn the requirements and re codes for using an LP Gas appliance at an apartment.
If allowed, use outside on the ground oor with a 10-foot clearance from walls or rails.
Leak Check

18
11" Water Column 8.5" Water Column
11" Water Column
8.5" Water Column
1. Attach hose assembly to the cylinder.
2. Slowly open the cylinder valve.
3. Perform a leak check on regulator to griddle hose to regulator and hose to cylinder
connections with soapy water. Bubbles indicate a leak. Check that the connection
is not cross threaded and that it is tight.
4. Perform another leak check. Check the coupling nut for tightness. If there is still a
LEAK TEST PROCEDURE
ADDED FEATURE
Your appliance is equipped with an adjustable low-pressure regulator. The normal
operating pressure is 11" water column and the lower operating pressure available
is 9.5" water column. When operating your appliance under normal circumstances
you will want to have the regulator set at the 11" water column pressure. If you want
to cook with slightly lower temperatures, then set the regulator to the 9.5" water
column setting. Depending on what temperature setting you have the control knob
set at will determine how much lower your temperatures will be when using the
lower pressure setting. Please see the instructions on how to change from the 11"
water column setting and back again. 9.5" Water Column
11" Water Column
Leak Check
• Pull back the spring-loaded coupling to release regulator cap to achieve 9.5"
water column.
• Pull back the spring-loaded coupling then push the regulator cap rmly and
release. The regulator cap will snap in and lock in place to reset the regulator to
11" water column.
HOW TO SET REGULATOR SETTING
leak, remove the cylinder and contact the manufacturer for service and repair.
5. When appliance is not in use, turn off the control knob and LP tank valve on the supply cylinder.
6. Never use an LP tank if visibly rusted, damaged, or out of date.
7. If you notice grease or other hot material dripping from appliance onto the valve, hose or regulator, turn off gas supply at
once. Determine the cause, correct, clean and inspect valve, hose and regulator before continuing. Perform a leak test.
8. The regulator may make a humming or whistling noise during operation. This will not affect the safety or use of appliance.
9. Clean and inspect the hose before each use of the appliance. If there is evidence of abrasion, wear, cuts or leaks, the hose
must be replaced prior to the appliance being put into operation. See product tag for hose and regulator information.
10. Do not block holes in bottom or sides of appliance.

19
Tripping hazard over hose and supply cylinder.
• Make sure to attach the cylinder securely with the tank retention wire.
• Do not operate the appliance on a tabletop higher than 39.8” (101.09 cm).
• Make sure to the cylinder on a level surface and away from tripping
hazards.
WARNING
11. Never operate appliance with LP tanks out of correct position
specied in Assembly Instructions.
12. Always close LP tank valve and remove coupling nut before moving
LP tank form specied operating position.
13. NEVER store a spare LP tank under or near appliance or in an
enclosure.
14. If you see, smell, or hear escaping gas, immediately get away from the
LP tank/appliance and call your re department.
15. All spare LP tanks must have safety caps installed on the LP tank outlet. Check for leaks at
these connections.
Hose Length
27.5" (69.85 cm)
Table Height
30" (76.2 cm)

20
1. Open lid during lighting.
2. Push and turn control knob to .
Press electronic igniter and hold for 3-5
seconds then turn to .
LIGHTING THE GRIDDLE
LIGHTING INSTRUCTIONS
NOTE: On the HIGH setting, you can cook on the right zone
without turning on the left zone.
3. If ignition does not occur in 5 seconds, turn
the burner control off, wait 5 minutes, and
repeat the lighting procedure.
4. Rotate the control knob counterclockwise
to go from the HIGH setting to the LOW
setting.
SYMBOLS
Represents Burner being lit
Represents Burner already lit
Right Burner Zone on HIGH setting
Dual Zones on HIGH setting
NOTE: Lighting instructions are located under the bottom of the
control panel. Rotate out to follow the instructions. Represents Unit is in "OFF" position
Page is loading ...
Page is loading ...
Page is loading ...
Page is loading ...
Page is loading ...
Page is loading ...
Page is loading ...
Page is loading ...
Page is loading ...
Page is loading ...
Page is loading ...
Page is loading ...
Page is loading ...
Page is loading ...
Page is loading ...
Page is loading ...
Page is loading ...
Page is loading ...
Page is loading ...
Page is loading ...
Page is loading ...
Page is loading ...
Page is loading ...
Page is loading ...
Page is loading ...
Page is loading ...
Page is loading ...
Page is loading ...
Page is loading ...
Page is loading ...
Page is loading ...
Page is loading ...
Page is loading ...
Page is loading ...
Page is loading ...
Page is loading ...
Page is loading ...
Page is loading ...
Page is loading ...
Page is loading ...
Page is loading ...
Page is loading ...
Page is loading ...
Page is loading ...
Page is loading ...
Page is loading ...
Page is loading ...
Page is loading ...
Page is loading ...
Page is loading ...
Page is loading ...
Page is loading ...
Page is loading ...
Page is loading ...
Page is loading ...
Page is loading ...
Page is loading ...
Page is loading ...
Page is loading ...
Page is loading ...
Page is loading ...
Page is loading ...
-
 1
1
-
 2
2
-
 3
3
-
 4
4
-
 5
5
-
 6
6
-
 7
7
-
 8
8
-
 9
9
-
 10
10
-
 11
11
-
 12
12
-
 13
13
-
 14
14
-
 15
15
-
 16
16
-
 17
17
-
 18
18
-
 19
19
-
 20
20
-
 21
21
-
 22
22
-
 23
23
-
 24
24
-
 25
25
-
 26
26
-
 27
27
-
 28
28
-
 29
29
-
 30
30
-
 31
31
-
 32
32
-
 33
33
-
 34
34
-
 35
35
-
 36
36
-
 37
37
-
 38
38
-
 39
39
-
 40
40
-
 41
41
-
 42
42
-
 43
43
-
 44
44
-
 45
45
-
 46
46
-
 47
47
-
 48
48
-
 49
49
-
 50
50
-
 51
51
-
 52
52
-
 53
53
-
 54
54
-
 55
55
-
 56
56
-
 57
57
-
 58
58
-
 59
59
-
 60
60
-
 61
61
-
 62
62
-
 63
63
-
 64
64
-
 65
65
-
 66
66
-
 67
67
-
 68
68
-
 69
69
-
 70
70
-
 71
71
-
 72
72
-
 73
73
-
 74
74
-
 75
75
-
 76
76
-
 77
77
-
 78
78
-
 79
79
-
 80
80
-
 81
81
-
 82
82


Halo Elite1B Countertop Griddle User manual
- Category
- Barbecues & grills
- Type
- User manual
Ask a question and I''ll find the answer in the document
Finding information in a document is now easier with AI