
www.blackanddecker.ae
HM5000-B5
AR FR EN

2
ENGLISH
(Original instructions)
1
2
3
5
6
4
7
8
9
10

3
ENGLISH
(Original instructions)
Intended use
Your BLACK+DECKER HM5000-B5 Humidifier has been
designed to increase the level of humidity in rooms and
alleviate dry skin, chapped lips and other conditions that
may occur in periods of low humidity.
This product is intended for consumer use only.
Thank you for choosing BLACK+DECKER. We hope that
you will enjoy using this product for many years.
For indoor domestic household use only.
This appliance is not to be used in:
• Staff kitchen areas in shops, offices and other working
environments;
• Farm Houses;
• By clients in hotels, motels and other residential type
environments;
• Bed and breakfast type environments or any other non
household type environments.
Safety instructions
Warning! Read all safety warnings and all
instructions. Failure to follow the warnings and
instructions listed below may result in electric
shock, fire and/or serious injury.
• Read all of this manual carefully before using the
appliance.
• Always route the power supply cord carefully to avoid a
tripping hazard.
• The intended use is described in this manual. The use of
any accessory or attachment or the performance of any
operation with this appliance other than those
recommended in this instruction manual may present a
risk of personal injury.
Warning! When using mains-powered appliances, basic
safety precautions, including the following, should always be
followed to reduce the risk of fire, electric shock and
personal injury and material damage.
• Retain this manual for future reference.
Using your appliance
• Always take care when using the appliance.
• Never pull the power supply cord to disconnect the plug
from the socket.
• Keep the power supply cord away from heat, oil and
sharp edges.
• Do not place the appliance on or near heat sources or in
a heated oven.
• Do not use the appliance outdoors.
• Always protect the motor unit from water or excessive
humidity.
• If the power supply cord is damaged during use,
disconnect the appliance from the power supply
immediately. Do not touch the power supply cord before
disconnecting from the power supply.
• Disconnect the appliance from the power supply when
not in use, before fitting or removing parts and before
cleaning.
• Never let the appliance operate unattended.
• Do not let the cord hang over the edge of a table,
counter, or touch hot surfaces.
• Fully uncoil then guide the power supply cord neatly so it
cannot be caught accidentally or tripped over.
• The humidifier must not be located immediately below a
socket-outlet.
• To prevent overload and blown fuses, do not plug other
appliance into same outlet (receptacle)
• Do not place the humidifier on carpets, don’t place the
cable under carpets. Arrange cord away from track areas
so that it will not be tripped over.
• Do not use this appliance under direct sunlight or near
any heating object.
• DO NOT place the humidifier under an electrical socket
outlet or other product that maybe affected by humidity.
• NEVER use this humidifier where it may come into
contact with water i.e. bathroom, shower room, kitchen.
Do not use this heater in the immediate surroundings of a
bath, a shower or a swimming pool.
• ONLY de-mineralized or normal drinking water should be
used in this product.
• When the water tank is empty, the indicator light turns
red. However there may still be a little amount of water in
the water tank to prevent dry humidification.
Warning! In order to avoid overheating, do not cover the
humidifier.
• Always ensure that hands are dry before operating or
adjusting any switch on the product or touching the plug
and mains supply connections.
• Do not use this humidifier with a programmer, timer,
separate remote-control system or any other device that
switches the humidifier on automatically, since a fire risk
exists if the humidifier is covered or positioned
incorrectly.
• To prevent a possible fire, do not block air intakes or
exhaust in any manner. Do not use on soft surfaces, like
a bed, where openings may become blocked.
• Don’ t use extension cable.
• Always operate on a flat horizontal surface.
• Do not insert or allow foreign objects to enter any

4
ENGLISH
(Original instructions)
ventilation or exhaust opening, as this may cause an
electric shock, fire or damage to the appliance.
• Do not operate in areas where gasoline, paint or other
flammable liquids are used or stored.
• The most common cause of overheating is deposits of
dust or fluff in the appliance. Ensure these deposits are
removed regularly by unplugging the appliance and
vacuum cleaning air vents and grilles.
• Always use the humidifier in an upright position.
• To disconnect the appliance, switch it “OFF” then
remove.
Warning! To reduce the risk of water-based bacteria being
discharged into the room, regular cleaning and disinfecting is
strongly recommended.
• Always leave sufficient space around the humidifier for
ventilation.
• Do not use any additives in the water tank.
Safety of others
• This appliance is not intended for use by persons
(including children) with reduced physical, sensory or
mental capabilities, or lack of experience and
knowledge, unless they have been given supervision or
instruction concerning use of the appliance by a person
responsible for their safety.
• Children should be supervised to ensure that they do not
play with the appliance.
• Do not allow children or any person unfamiliar with these
instructions to use the appliance.
• Do not allow children or animals to come near the work
area or to touch the appliance or power supply cord.
• Close supervision is necessary when the appliance is
used near children.
• Children of less than 3 years should be kept away
unless continuously supervised.
• Children aged from 3 years and less than 8 years shall
only switch on/off the appliance provided that it has
been placed or installed in its intended normal operating
position and they have been given supervision or
instruction concerning use of the appliance in a safe way
and understand the hazards involved
• Children aged from 3 years and less than 8 years shall
not plug in, regulate and clean the appliance or perform
user maintenance
After use
• Remove the plug from the socket before leaving the
appliance unattended and before changing, cleaning or
inspecting any parts of the appliance.
• When not in use, the appliance should be stored in a dry
place. Children should not have access to stored
appliances.
Inspection and repairs
• Switch off the appliance before cleaning, changing
accessories or approaching parts which move in use.
• Before use, check the appliance for damaged or
defective parts. Check for breakage of parts, damage to
switches and any other conditions that may affect its
operation.
• Do not use the appliance if any part is damaged or
defective.
• Have any damaged or defective parts repaired or
replaced by an authorised repair agent.
• Before use, check the power supply cord for signs of
damage, ageing and wear.
• Do not use the appliance if the power supply cord or
mains plug is damaged or defective.
• If the power supply cord or mains plug is damaged or
defective it must be repaired by an authorised repair
agent in order to avoid a hazard. Do not cut the power
supply cord and do not attempt to repair it yourself.
• Never attempt to remove or replace any parts other than
those specified in this manual.
Electrical safety
Before use, check that the mains voltage corresponds to the
voltage on the rating plate.
This appliance is double insulated therefore
no earth wire is required.
• To avoid the risk of electric shock, do not immerse the
cord, plug or motor unit in water or other liquid.
• Check that the supply voltage shown on the rating plate
of the appliance matches that of your electrical system.
Any connection error will invalidate the guarantee.
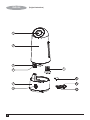
Features
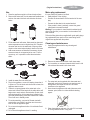
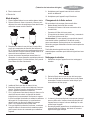
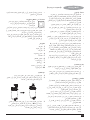
1. Nozzle
2. Water tank
3. Float
4. Float box
5. Base
6. Control knob
7. Water filter
8. Aroma tray
9. Activated carbon filter
10. Air inlet

5
ENGLISH
(Original instructions)
Use
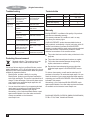
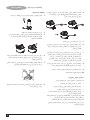
1. Place the appliance upright on flat and study surface
2. Remove the water tank, turn the water tank upside down
and turn the water inlet knob anti clockwise as shown
below
3. Fill the water tank with water. Water must be clean and
water temperature must not higher than 40
0
C. Replace
the water inlet knob to the water tank. Wipe any water
droplet on the water tank and place it back on the base
4. Add aroma essence as illustrated if necessary. Aroma
essence volume is not expected to be over 1/3 of the
aroma tray, or it is possible to effect the atomization
effect.
5 Install the water filter into water tank.
6 Plug-in the appliance, a sound of beeping shows that it
is power on. Turn the knob and choose mist volume, the
appliance starts to work.
7 If there is not enough water in the water tank or the
water tank is lifted off the base built-in safety device will
begin start to work and cut off atomization control circuit
and stop draught fan. At the same time, indication light
turns red and a beeping sound will indicate lack of water.
Then it will turn to standby mode
8 To continue working, you need to fill water tank with
water before you reinstall it, and then turn the control
knob to start the appliance again.
9 Do not move the appliance before it is switched off and
unplugged.
10 Do not move the appliance when it is working.
Mains plug replacement
If a new mains plug needs to be fitted:
• Safely dispose of the old plug.
• Connect the brown lead to the live terminal of the new
plug.
• Connect the blue lead to the neutral terminal.
• If the product is class l (earthed), connect the green /
yellow lead to the earth terminal.
Warning! If your product is class ll double insulated (only 2
wires in the cord set), no connection is to be made to the
earth terminal.
Follow the fitting instructions supplied with good quality plugs.
Any replacement fuse must be of the same rating as the
original fuse supplied with the product.
Cleaning and maintenance
1. Unplug the appliance before any cleaning and
maintenance.
2. Remove the water filter and flush it with clean water
3. For incrustation on tank and ultrasonic dish, brush it with
citric acid and then wash it with clean water.
4. The water tank can be washed with clean water and
wiped with a soft cloth. Please do not wash any part of
the appliance with metal scourer as it will cause
scratches on the appliance.
5. Never clean the appliance with methyl benzene, acid
cleanser, petrol, alcohol or other chemical cleaning
agents
6. Clean the appliance and pack it in order if it is not used
for a long time and store it in dry place.

6
ENGLISH
(Original instructions)
Protecting the environment
Separate collection. This product must not be
disposed of with normal household waste.
Should you find one day that your Black+Decker product
needs replacement, or if it is of no further use to you, do not
dispose of it with other household waste. Make this product
available for separate collection.
• Black+Decker provides a facility for recycling
Black+Decker products once they have reached the
end of their working life. This service is provided free of
charge. To take advantage of this service please return
your product to any authorised repair agent who will
collect them on our behalf.
• You can check the location of your nearest authorised
repair agent by contacting your local Black+Decker
office at the address indicated in this manual.
Alternatively, a list of authorized Black+Decker repair
agents and full details of our after-sales service and
contact are available on the Internet at:
www.2helpU.com.
Warranty
BLACK+DECKER is confident of the quality of its products
and offers an outstanding warranty.
This warranty statement is in addition to and in no way
prejudices your statutory rights.
If a BLACK+DECKER product becomes defective due to
faulty materials, workmanship or lack of conformity, within 24
months from the date of purchase, BLACK+DECKER
warranty to replace defective parts, repair products subjected
to fair wear and tear or replace such products to ensure
minimum inconvenience to the customer unless:
The product has been used for trade, professional or hire
purposes;
The product has been subjected to misuse or neglect;
The product has sustained damage through foreign
objects, substances or accidents;
Repairs have been attempted by persons other than
authorised repair agents or BLACK+DECKER service
staff.
To claim on the warranty, you will need to submit proof of
purchase to the seller or an authorised repair agent. You can
check the location of your nearest authorised repair agent by
contacting your local BLACK+DECKER office at the address
indicated in this manual.
Alternatively, a list of authorised BLACK+DECKER repair
agents and full details of our after-sales service and contacts
are available on the Internet at: www.2helpU.com.
BLACK AND DECKER (OVERSEAS) GMBH (DUBAI BRANCH)
PO Box 17164, Dubai, United Arab Emirates
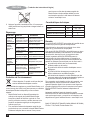
PROBLEM ANALYSIS TROUBLESHOOTING
No mist comes Power cord is not Plug in the power
out orIndicator plugged in properly. cord and turn the
light does not The knob is in knob clockwise.
work “off” position.
The indicator The water tank is Fill the water tank
Light works empty with clean water
but no mist The knob is in wrong Turn the knob to bigger
position mist volume
The float holder has Tighten the Float Holder
loosened
Water is not clean or Clean the Water tank
there is too much with clean soft cloth.
incrustation
Smelly mist Water in water tank Clean the Base and
or on the base is dirty Water Tank. Fill in
clean water
Little mist The Ultrasonic Dish is Clean the Ultrasonic
dirty or the water in the Dish and fill in clean
water tank has been water.
stored for too long.
Mist leakage Mist outlet is not in Assemble the Mist
correct position Outlet incorrect position
Troubleshooting
HM5000-B5
Voltage V
AC
220 - 240
Frequency Hz 50 - 60
Water tank capacity L 5
Power W 25
Technical data

Usage prévu
Votre humidificateur HM5000-B5 BLACK+DECKER a été
conçu pour augmenter le niveau d’humidité dans les pièces
et soulager la peau sèche, les lèvres gercées et toute autre
condition pouvant se produire durant des périodes de faible
humidité.
Ce produit est destiné à un usage domestique uniquement.
Merci d’avoir choisi BLACK+DECKER. Nous espérons que
vous profiterez de ce produit pendant de nombreuses
années.
Pour usage domestique en intérieur uniquement.
Cet appareil ne doit pas être utilisé :
• dans les cuisines pour les employés de boutiques, de
bureaux et d’autres environnements professionnels ;
• dans les fermes ;
• par les clients d’hôtels, de motels et autres
environnements de type résidentiel ;
• dans les chambres d’hôtes ou tout autre environnement
non résidentiel.
Consignes de sécurité
Avertissement ! Lisez toutes les consignes de
sécurité et toutes les instructions. Le
non-respect de ces avertissements et de ces
instructions peut provoquer un incendie, une
électrocution ou de graves blessures.
• Lisez attentivement ce manuel dans son intégralité
avant d’utiliser l’appareil.
• Acheminez toujours le cordon avec précaution pour
éviter tout risque de trébuchement.
• L’usage prévu est décrit dans le présent manuel.
L’utilisation d’un accessoire ou d’une pièce jointe ou
l’exécution de toute opération avec cet appareil autre
que celles qui sont recommandées dans ce mode
d’emploi peut présenter un risque de blessure.
Avertissement ! Lorsque vous utilisez des appareils
électriques, veuillez toujours respecter les précautions
élémentaires de sécurité, entre autres, pour réduire le risque
d’incendie, d’électrocution et de blessures corporelles et des
dommages matériels.
• Conservez ce manuel à titre de référence.
Utilisation de l’appareil
• Utilisez toujours l’appareil avec précaution.
• Ne tirez jamais sur le cordon d’alimentation pour
débrancher la fiche du secteur.
• Maintenez le cordon d’alimentation à l’écart des sources
de chaleur, de l’huile et des bords tranchants.
• Ne posez pas l’appareil sur ou à proximité de sources
de chaleur ou directement à l’intérieur d’une cuisinière
en marche.
• N’utilisez pas l’appareil à l’extérieur.
• Protégez toujours le moteur contre l’eau ou l’humidité
excessive.
• Si le cordon d’alimentation est endommagé pendant
l’utilisation, débranchez immédiatement l’appareil. Ne
touchez pas le cordon d’alimentation avant de le
débrancher.
• Débranchez l’appareil avant le montage/démontage et le
nettoyage des pièces.
• Ne laissez jamais l’appareil en marche sans surveillance.
• Ne laissez pas le cordon pendre au bord de la table, du
comptoir, ou toucher les surfaces chaudes.
• Déroulez entièrement le cordon d’alimentation et guidez-le
de manière à éviter tout risque d’accident ou de chute.
• L’humidificateur ne doit pas se trouver directement en
dessous d’une prise de courant.
• Pour éviter tout risque de surcharge et de fusible grillé,
ne branchez pas d’autre appareil sur la même prise.
• Ne placez pas l’humidificateur sur des tapis et ne placez
pas le cordon sous des tapis. Ne positionnez pas le
cordon dans le passage de sorte à éviter tout risque de
trébuchement.
• N’utilisez pas cet appareil sous la lumière directe du
soleil ou près d’un objet chauffant.
• NE PLACEZ PAS l’humidificateur sous une prise électrique
ou tout autre produit qui peut être affecté par l’humidité.
• N’utilisez JAMAIS l’humidificateur dans des endroits où il
est susceptible d’entrer en contact avec de l’eau
(toilettes, salle de bain, cuisine). N’utilisez pas
l’humidificateur à proximité directe d’une baignoire, d’une
douche ou d’une piscine.
• SEULES de l’eau déminéralisée ou de l’eau potable
doivent être utilisées dans ce produit.
• Lorsque le réservoir d’eau est vide, le témoin lumineux
devient rouge. Cependant, il peut toujours y avoir une petite
quantité d’eau dans le réservoir d’eau pour éviter une
humidification à sec.
Avertissement ! Afin d’éviter la surchauffe, ne recouvrez pas
l’humidificateur.
• Assurez-vous de toujours avoir les mains sèches avant
d’utiliser ou de régler des boutons sur l’appareil ou
encore de toucher la fiche et la prise d’alimentation.
• N’utilisez pas cet humidificateur avec un programmateur,
un minuteur, un système de télécommande distinct ou
tout autre appareil d’allumage automatique de
l’humidificateur, car il existe un risque d’incendie si
l’humidificateur est recouvert ou mal positionné.
• Pour éviter les incendies, ne bloquez pas les entrées ou
la sortie d’air de quelque manière que ce soit. N’utilisez
pas l’appareil sur des surfaces souples, comme un lit, qui
présentent une possibilité de blocage des ouvertures.
• N’utilisez pas de rallonge.
• Utilisez toujours l’appareil sur une surface plane et
horizontale.
• N’introduisez pas et ne laissez pas passer des objets
étrangers dans les entrées et sorties d’air, sous risque de
choc électrique, d’incendie ou de dommage sur
l’appareil.
• N’utilisez pas l’appareil dans des zones où de l’essence,
de la peinture et d’autres substances inflammables sont
utilisées ou rangées.
7
FRANÇAIS
(Traduction des instructions d'origine)

8
FRANÇAIS
(Traduction des instructions d'origine)
• La cause de surchauffe la plus courante est le dépôt de
poussière ou de peluches dans l’appareil. Vérifiez que
ces dépôts sont retirés régulièrement en débranchant
l’appareil et en aspirant les bouches d’air et les grilles.
• Utilisez toujours le radiateur en position verticale.
• Pour débrancher l’appareil, mettez-le hors tension, puis
retirez la fiche de la prise.
Avertissement ! Pour réduire le risque d’humidifier l’air
avec de l’eau contenant des bactéries, il est fortement
recommandé de nettoyer et de désinfecter régulièrement
l’appareil.
• Assurez-vous de toujours laisser un espace suffisant de
ventilation autour de l’humidificateur.
• N’ajoutez aucun additif dans le réservoir d’eau.
Sécurité d’autrui
• Cet appareil n’est pas prévu pour être utilisé par des
personnes (y compris les enfants) présentant des
capacités physiques, sensorielles ou mentales réduites,
ou manquant d’expérience et de connaissances, sans
surveillance ou sans avoir reçu d’instructions concernant
l’utilisation de l’appareil de la part d’une personne
responsable de leur sécurité.
• Les enfants doivent être surveillés pour s’assurer qu’ils
ne jouent pas avec l’appareil.
• Ne laissez pas les enfants et les personnes non
familiarisées avec ces instructions utiliser cet appareil.
• Ne laissez pas les enfants ou les animaux s’approcher
de la zone de travail ou toucher l’appareil ou le cordon
d’alimentation.
• Lorsque l’appareil est utilisé à proximité d’enfants, une
surveillance étroite doit être exercée.
• Surveillez les enfants de moins de 3 ans en
permanence ou tenez-les à l’écart.
• Les enfants entre trois et huit ans ne doivent
allumer/éteindre l’appareil que s’il a été placé ou installé
dans un environnement lui permettant de fonctionner de
manière optimale, à condition de les surveiller ou de leur
expliquer comment utiliser l’appareil de manière
sécurisée et les risques potentiels.
• Les enfants entre trois et huit ans ne doivent pas
brancher, régler et nettoyer l’appareil, ou encore
effectuer des opérations de maintenance.
Après utilisation
• Débranchez l’appareil avant de le laisser sans
surveillance et avant de changer, nettoyer ou inspecter
des pièces de l’appareil.
• Lorsqu’il n’est pas utilisé, l’appareil doit être rangé dans
un endroit sec. L’appareil doit être rangé hors de portée
des enfants.
Inspection et réparations
• Mettez l’appareil hors tension avant de le nettoyer, de
remplacer des accessoires ou d’approcher des pièces
mobiles en cours d’utilisation.
• Avant d’utiliser l’appareil, vérifiez qu’aucune pièce n’est
endommagée ou défectueuse. Vérifiez si des pièces ne
sont pas cassées, si des interrupteurs ne sont pas
endommagés, et toutes les autres conditions qui peuvent
affecter son fonctionnement.
• N’utilisez pas l’appareil si une pièce est endommagée ou
défectueuse.
• Faites réparer ou remplacer les pièces endommagées ou
défectueuses par un agent de service agréé.
• Avant d’utiliser l’appareil, vérifiez qu’il n’y a aucun signe
de d’endommagement, de vieillissement et d’usure au
niveau du cordon d’alimentation.
• N’utilisez pas l’appareil si la fiche ou le cordon
d’alimentation est endommagé ou défectueux.
• Si la fiche ou le cordon d’alimentation est endommagé ou
défectueux, sa réparation doit être effectuée par un agent
de réparation agréé afin d’éviter tout danger. Ne coupez
pas le cordon d’alimentation et n’essayez pas de le
réparer par vos propres moyens.
• N’essayez jamais de retirer ou de remplacer des pièces
différentes de celles qui sont indiquées dans le présent
manuel.
Sécurité électrique
Avant d’utiliser l’appareil, vérifiez que la tension secteur
correspond à celle de la plaque signalétique.
Cet appareil dispose d’une double isolation ;
ainsi, aucun fil de terre n’est nécessaire.
• Pour éviter le risque d’électrocution, ne plongez pas le
cordon, la fiche ou le groupe moteur dans l’eau ou
d’autres liquides.
• Vérifiez que la tension d’alimentation indiquée sur la
plaque signalétique correspond à celle de votre
alimentation électrique. Toute erreur de branchement
annule la garantie.
Caractéristiques
1. Buse
2. Réservoir d’eau
3. Flotteur
4. Boîte du flotteur
5. Socle
6. Bouton de commande
7. Filtre à eau
8. Bac d’arôme

9
FRANÇAIS
(Traduction des instructions d'origine)
9. Filtre à charbon actif
10. Entrée d’air
Mode d’emploi
1. Placez l’appareil debout sur une surface plate et stable.
2. Retirez le réservoir d’eau et tournez-le à l’envers, puis
dévissez le bouchon de remplissage d’eau dans le sens
antihoraire comme montré ci-dessous
3. Remplissez le réservoir avec de l’eau. L’eau doit être
propre et la température de l’eau doit être inférieure à
40 ºC. Replacez le bouchon de remplissage d’eau sur le
réservoir d’eau. Essuyez toutes les gouttes d’eau sur le
réservoir d’eau et replacez-le sur le socle.
4. Ajoutez une essence aromatique comme illustré, si
nécessaire. Le volume d’essence aromatique ne devrait
pas dépasser plus de 1/3 du bac d’arôme, car il pourrait
sinon influer sur l’effet d’atomisation.
5. Installez le filtre à eau dans le réservoir d’eau.
6. Branchez l’appareil, un bip sonore indique qu’il est sous
tension. Tournez le bouton et choisissez le volume de
brume, l’appareil commence à fonctionner.
7. S’il n’y a pas assez d’eau dans le réservoir d’eau ou si le
réservoir d’eau est soulevé, le dispositif de sécurité
intégré du socle commencera à fonctionner et coupera
le circuit contrôlant l’atomisation et arrêtera le ventilateur
de tirage d’air. En même temps, le voyant lumineux
devient rouge et un bip sonore indique un manque
d’eau. Puis, l’appareil se met en mode veille.
8. Pour que l’appareil continue de fonctionner, vous devez
remplir le réservoir d’eau avant de le remettre en place,
puis tournez le bouton de commande pour redémarrer
l’appareil.
9. Ne déplacez pas l’appareil avant de l’avoir mis hors
tension et débranché.
10. Ne déplacez pas l’appareil lorsqu’il fonctionne.
Changement de la fiche secteur
En cas de besoin de montage d’une nouvelle fiche :
• Mettez dûment l’ancienne fiche au rebut.
• Connectez le fil marron à la borne sous tension de la
nouvelle fiche.
• Connectez le fil bleu à la borne neutre.
• Si le produit est de classe l (relié à la terre), connectez le
fil vert/jaune à la borne de terre.
Avertissement ! Si votre appareil est un produit de classe ll
avec double isolation (seulement 2 fils dans le cordon),
aucun raccordement à la borne de terre n’est nécessaire.
Suivez les consignes d’installation fournies avec les prises de
bonne qualité.
Tout fusible de rechange doit avoir les mêmes
caractéristiques nominales que le fusible d’origine fourni avec
le produit.
Nettoyage et entretien
1. Débranchez toujours l’appareil avant tout nettoyage et
entretien.
2. Retirez le filtre à eau et rincez-le avec de l’eau propre.
3. En cas de dépôt dans le réservoir d’eau et sur le plateau
ultrasonique, brossez-les avec de l’acide citrique, puis
rincez-les avec de l’eau propre.
4. Le réservoir d’eau peut être lavé à l’eau propre et essuyé
avec un chiffon doux. Veuillez ne laver aucune pièce de
l’appareil avec un tampon à récurer métallique, car cela
pourrait rayer l’appareil.
5. Ne nettoyez jamais l’appareil avec du méthylbenzène, un
nettoyant acide, de l’essence, de l’alcool ou tout autre
agent de nettoyage chimique.

10
FRANÇAIS
(Traduction des instructions d'origine)
6. Nettoyez l’appareil et emballez-le bien, s’il ne sera pas
utilisé pendant une longue période et rangez-le dans un
endroit sec.
Protection de l'environnement
Collecte séparée. Ce produit ne doit pas être jeté
avec les déchets domestiques normaux.
Si vous décidez de remplacer ce produit Black+Decker, ou si
vous n'en avez plus l'utilité, ne le jetez pas avec vos déchets
domestiques Rendez-le disponible pour une collecte
séparée.
• Black+Decker fournit un dispositif permettant de
collecter et de recycler les produits Black+Decker
lorsqu'ils ont atteint la fin de leur cycle de vie. Pour
pouvoir profiter de ce service, veuillez retourner votre
produit à un réparateur agréé qui se chargera de le
collecter pour nous.
• Pour connaître l'adresse du réparateur agréé le plus
proche de chez vous, contactez le bureau Black+Decker
à l'adresse indiquée dans ce manuel. Vous pourrez
aussi trouvez un liste des réparateurs agréés de
Black+Decker et de plus amples détails sur notre
service après-vente sur le site Internet à l'adresse
suivante : www.2helpU.com
HM5000-B5
Tension V
CA
220 - 240
Fréquence Hz 50 - 60
Capacité du réservoir d’eau L 5
Puissance W 25
Caractéristiques techniques
Garantie
La société BLACK+DECKER est certaine de la qualité de ses
produits et propose une garantie exceptionnelle.
Cette déclaration de garantie vient s’ajouter à vos droits
légaux et n’y porte en aucun cas préjudice.
Si un produit BLACK+DECKER s’avère défectueux en raison
de défauts de matériaux ou de fabrication, ou d’un manque
de conformité, dans les 24 mois à compter de la date
d’achat, la garantie de BLACK+DECKER permet le
remplacement de pièces défectueuses, la réparation ou
l’échange de produits soumis à une usure normale afin de
garantir un minimum d’inconvénients pour le client, sauf si :
le produit a été utilisé à des fins commerciales,
professionnelles ou de location ;
le produit a été utilisé de manière inadéquate ou avec
négligence ;
le produit a subi des dommages provoqués par des
objets, substances ou accidents étrangers ;
des tentatives de réparation ont été effectuées par des
personnes autres que les agents de réparation agréés ou
le personnel d’entretien de BLACK+DECKER.
Pour soumettre une réclamation au titre de la garantie, vous
devrez apporter une preuve d’achat au vendeur ou à un
agent de réparation agréé. Vous pouvez trouver l’agent de
réparation agréé le plus proche en contactant votre agence
BLACK+DECKER locale à l’adresse indiquée dans ce
manuel.
Autrement, une liste d’agents de réparation agréés
BLACK+DECKER et des informations complètes concernant
notre service après-vente, y compris les coordonnées, sont
disponibles en ligne à l’adresse suivante : www.2helpU.com.
BLACK ET DECKER (ÉTRANGER) GMBH (BRANCH DE DUBAI)
PO Box 17164, Dubai, Émirats Arabes Unis
PROBLÈME ANALYSE DÉPANNAGE
Dépannage
Aucune brume
ne sort ou le
voyant ne
fonctionne pas
Le voyant
lumineux
fonctionne,
mais pas de
brume
Atomisation
dégageant
une odeur
désagréable
Trop peu de
brume
Fuite de brume
Le cordon d’alimentation
n’est pas branché
correctement. Le bouton
est en position « Arrêt ».
Le réservoir d’eau est
vide
Le bouton est dans la
mauvaise position
Le support du flotteur
s’est desserré
L’eau n’est pas propre
ou il y a trop de dépôts
L’eau dans le réservoir
d’eau ou sur le socle est
sale
Le plateau ultrasonique
est sale ou l’eau dans le
réservoir d’eau a été
stockée trop longtemps.
La sortie de brume n’est
pas dans la bonne
position
Réassemblez la sortie
de brume dans la bonne
position
Nettoyez le plateau
ultrasonique et
remplissez l’appareil
d’eau propre.
Nettoyez le socle et le
réservoir d’eau.
Remplissez d’eau propre
Nettoyez le réservoir d’eau
avec un chiffon doux et propre
Tournez le bouton pour
augmenter le volume de brume
Remplissez le réservoir
avec de l’eau propre
Serrez le support de
flotteur
Branchez le cordon
d’alimentation et tournez
le bouton dans le sens des
aiguilles d’une montre.

11
ﺔـﻴـﺑﺮـﻌـﻟﺍ
(ﺔﻴﺴﻴﺋﺮﻟﺍ ﺕﺎﻤﻴﻠﻌﺘﻟﺍ)
áÄ«ÑdG ájɪM
™e èàæŸG Gòg øe ¢ü∏îàdG ΩóY Ωõ∏j .π°üØæŸG ™ª÷G
.ájOÉ©dG á«dõæŸG áeɪ≤dG
hCG ,∂H ¢UÉÿG ôµjO ófBG ∑ÓH èàæe ∫GóÑà°SG ΩÉjC’G øe Ωƒj ‘ Ωõd GPEG
πH ,iôNC’G á«dõæŸG áeɪ≤dG ™e ¬æe ¢ü∏îàJ Óa ,¬eóîà°ùJ ó©J ⁄ GPEG
.π°üØæŸG ™ªé∏d èàæŸG Gòg áMÉJEG øe ócCÉJ
ófBG ∑ÓH äÉéàæe ôjhóJ IOÉYE’ ≥aôe ôµjO ófBG ∑ÓH ácöT ôaƒJ •
.πª©∏d É¡à«MÓ°U ΩóYh ÉgôªY ájÉ¡f ¤EG É¡dƒ°Uh Oôéà ôµjO
≈Lôj ,áeóÿG √òg øe IOÉØà°SÓd .É
k
fÉ› áeóÿG √òg Ëó≤J ºàjh
¤ƒàj ±ƒ°S …òdGh óªà©e áfÉ«°U π«ch …CG ¤EG èàæŸG IOÉYEG
.ÉæY áHÉ«f äÉéàæŸG ™ªL √QhóH
∫ÓN øe óªà©e áfÉ«°U π«ch ÜôbCG ™bƒe ≈∏Y ±ô©àdG ∂æµÁ •
í°VƒŸG ¿Gƒæ©dG ‘ »∏ëŸG ôµjO ófBG ∑ÓH Öàµe ≈∏Y ∫É°üJ’G
áfÉ«°üdG AÓcƒH áªFÉb óLƒJ ,∂dP øe
k
’óHh .π«dódG Gòg ‘
á∏eɵdG π«°UÉØàdGh ôµjO ófBG ∑ÓH ácöûd Ú©HÉàdG øjóªà©ŸG
≈∏Y ÉæH á°UÉÿG ∫É°üJ’G πFÉ°Shh ™«ÑdG ó©H Ée äÉeóÿ
.www.2helpU.com :ÊhεdE’G ™bƒŸG ≈∏Y âfÎfE’G
á«æØdG äÉfÉ«ÑdG
HM5000-B5
220 – 240 OOÎe QÉ«J âdƒa »Hô¡µdG ó¡÷G
50 - 60 õJôg OOÎdG
5 Îd √É«ŸG ¿GõN á©°S
25 äGh IQó≤dG
ﻥﺎﻤﻀﻟﺍ
É
k
fɪ°V Ωó≤Jh É¡JÉéàæe IOƒL ‘ BLACK+DECKER ≥ãJ
.πLC’G πjƒW
É¡H πîj ’h á«fƒfÉ≤dG ∂bƒ≤M ¤EG áaÉ°VEG Gòg ¿Éª°†dG ¿É«H ó©
o
j
.∫GƒMC’G øe ∫ÉM …CÉH
Ö«Y ÖÑ°ùH
BLACK+DECKER èàæe ‘ π∏N OƒLh ádÉM ‘
k
Gô¡°T
24 ∫ÓN ,ÒjÉ©ŸG ™e ≥aGƒàdG ΩóY hCG áYÉæ°üdG hCG OGƒŸG ‘
AGõLC’G ∫GóÑà°SG
BLACK+DECKER øª°†J ,AGöûdG ïjQÉJ øe
hCG »©«Ñ£dG ≈∏ÑdGh πcBÉàdG IÉYGôe ™e äÉéàæŸG ìÓ°UEGh áÑ«©ŸG
:⁄ Ée 𫪩∏d êÉYREG πbCG ¿Éª°†d äÉéàæŸG √òg ∫GóÑà°SG
¢VGôZCG hCG á«æ¡e hCG ájQÉŒ ¢VGôZCG ‘ èàæŸG ΩGóîà°SG ºàj
;ÒLCÉJ
;∫ɪgE’G hCG ΩGóîà°S’G Aƒ°ùd èàæŸG ¢Vô©J
;çOGƒM hCG áÑjôZ OGƒe hCG AÉ«°TCG ᣰSGƒH ∞∏à∏d èàæŸG ¢Vô©J
áfÉ«°üdG AÓch ÒZ ¢UÉî°TCG ᣰSGƒH èàæŸG ìÓ°UEG ádhÉfi
ácöûd ™HÉàdG áfÉ«°üdG ≥jôa hCG øjóªà©ŸG
.
BLACK+DECKER
hCG ™FÉÑ∏d AGöûdG π«dO Ëó≤J ¤EG êÉà– ±ƒ°S ,¿Éª°†dÉH áÑdÉ£ª∏d
π«ch ÜôbCG ™bƒe ≈∏Y ±ô©àdG ∂æµÁ .óªà©ŸG áfÉ«°üdG π«ch
Öàµe ≈∏Y ∫É°üJ’G ∫ÓN øe óªà©e áfÉ«°U
Gòg ‘ í°VƒŸG ¿Gƒæ©dG ‘ ∂jód »∏ëŸG
BLACK+DECKER
.π«dódG
Ú©HÉàdG øjóªà©ŸG áfÉ«°üdG AÓcƒH áªFÉb óLƒJ ,ôNBG πjóÑch
Ée äÉeóÿ á∏eɵdG π«°UÉØàdGh
BLACK+DECKER ácöûd
:≈∏Y âfÎfE’G ≈∏Y ÉæH á°UÉÿG ∫É°üJ’G πFÉ°Shh ™«ÑdG ó©H
.www.2helpU.com
GmbH (á«ŸÉ©dG) Black and Decker ácöT
IóëàŸG á«Hô©dG äGQÉeE’G ,»HO ,17164 ójôH ¥hóæ°U
É¡MÓ°UEGh ∫É£YC’G ±É°ûµà°SG
É¡MÓ°UEGh ∫É£YC’G ±É°ûµà°SG π«∏ëàdG á∏µ°ûŸG
’h PGPQ êôîj ’
öTDƒe πª©j
Aƒ°†dG
öTDƒe πª©j
óLƒj ’h Aƒ°†dG
PGPQ
¬jôc PGPQ
áëFGôdG
π«∏b PGPQ
‘ ÖjöùJ
PGPôdG
¿GõN ‘ ∞«¶f ÒZ AÉŸG
IóYÉ≤dG ‘ hCG √É«ŸG
á«Jƒ°üdG ¥ƒa äÉLƒŸG ≥ÑW
¿GõN ‘ ¿õfl AÉŸG hCG ï°ùàe
.ájɨ∏d á∏jƒW IÎØd √É«ŸG
™°Vh ‘ ¢ù«d PGPôdG êôfl
í«ë°U
¥ƒa äÉLƒŸG ≥ÑW ∞¶f
AÉŸÉH √CÓeGh á«Jƒ°üdG
.∞«¶ædG
‘ PGPôdG êôfl Ö«côJ
í«ë°U ÒZ ™°Vh
.√É«ŸG ¿GõNh IóYÉ≤dG ∞¶f
∞«¶ædG AÉŸÉH √CÓeG
π°Uƒe ÒZ AÉHô¡µdG ∂∏°S
¢†Ñ≤ŸG .áë«ë°U á≤jô£H
."o" ±É≤jE’G ™°Vh ‘
ÆQÉa √É«ŸG ¿GõN
ÅWÉN ™°Vh ‘ ¢†Ñ≤ŸG
»îJôe ¢†Ñ≤ŸG πeÉM
óLƒJ hCG ∞«¶f ÒZ AÉŸG
ÒÑc πµ°ûH áÑ°SÎe áÑ∏°U
ᣰSGƒH √É«ŸG ¿GõN ∞¶f
áªYÉfh áØ«¶f ¢Tɪb á©£b
∞«¶f AÉà AÉŸG ¿GõN CÓeG
PGPQ ºéM ¤EG ¢†Ñ≤ŸG QOCG
ÈcCG
¢†Ñ≤ŸG πeÉM §HQ ºµMCG
‘ »FÉHô¡µdG ∂∏°ùdG π°UhCG
‘ ¢†Ñ≤ŸG QOCGh QÉ«àdG
.áYÉ°ùdG ÜQÉ≤Y √ÉŒG

12
ﺔـﻴـﺑﺮـﻌـﻟﺍ
(ﺔﻴﺴﻴﺋﺮﻟﺍ ﺕﺎﻤﻴﻠﻌﺘﻟﺍ)
¿CG ô¶àæ
o
j ’ .í°Vƒe ƒg ɪc ôeC’G Ωõd GPEG …ô£Y ¢ü∏îà°ùe ∞°VCG .4
¬fC’ ,ô£©dG êQO ºéM 1/3 …ô£©dG ¢ü∏îà°ùŸG ºéM ió©àj
.¢TôdG ∫ƒ©Øe ≈∏Y ôKDƒj …CG øµÁ
.√É«ŸG ¿GõN ‘ √É«ŸG í°Tôe ÖcQ .5
¤EG IQÉ°TEG ‘ IôaÉ°U 䃰U Qó°ü
o
j ±ƒ°Sh ,QÉ«àdÉH RÉ¡÷G π°UhCG .6
CGóÑ«°Sh ,PGPôdG ºéM QÉàNGh ¢†Ñ≤ŸG QOCG .𫨰ûàdG ™°Vh ‘ ¬fCG
.πª©dG ‘ RÉ¡÷G
¿GõN ádGREG ” hCG √É«ŸG ¿GõN ‘ á«aÉc √É«e OƒLh ΩóY ádÉM ‘ .7
™£≤H Ωƒ≤«°Sh IóYÉ≤dG ‘ èeóŸG ¿ÉeC’G RÉ¡L 𪩫°ùa ,√É«ŸG
¢ùØf ‘h .Öë°ùdG áMhôe ±É≤jEGh Ö«WÎdG ‘ ºµëàdG IôFGO
‘ G
k
ÒØ°U Qó°ü
o
jh ôªMC’G ¿ƒ∏dÉH öTDƒŸG A»°†j ±ƒ°S ,âbƒdG
OGó©à°S’G ™°Vh ¤EG π≤àæj ºK .√É«ŸG ¢ü≤f ¤EG IQÉ°TEG
IOÉYEG πÑb AÉŸÉH √É«ŸG ¿GõN Aπe ¤EG êÉà– ,πª©dG ∫ɪµà°S’ .8
.G
k
Oó› RÉ¡÷G 𫨰ûJ AóÑd ºµëàdG ¢†Ñ≤e QOCG ºK ,¬Ñ«côJ
.QÉ«àdG øe ¬∏°üah ¬∏«¨°ûJ ±É≤jEG ó©H ’EG RÉ¡÷G ∑
q
p
ô
o
– ’ .9
.¬∏«¨°ûJ AÉæKCG RÉ¡÷G ∑
q
p
ô
o
– ’ .10
AÉHô¡µdG ¢ùÑ≤e ∫GóÑà°SG
:¢ù«FôdG πHɵ∏d ójóL ¢ùHÉb Ö«cÎd IQhö†dG âYO GPEG
.áæeBG á≤jô£H Ëó≤dG ¢ùHÉ≤dG øe ¢ü∏îJ •
.ójó÷G ¢ùHÉ≤dG ‘ »◊G ±ô£dÉH »æÑdG ∂∏°ùdG π°UhCG •
.ójÉëŸG ±ô£dÉH ¥QRC’G π«°UƒàdG ∂∏°S π°UhCG •
/ö†NC’G ∂∏°ùdG π°UhCÉa ,(¢VQDƒe) l áÄØdG øe èàæŸG ¿Éc GPEG •
.»°VQC’G ±ô£dÉH ôØ°UC’G
§≤a ¿Éµ∏°S)
k
ÉLhOõe
k
’õY ádhõ©ŸG 2 áÄØdG øe èàæŸG ¿Éc GPEG !ôjò–
.»°VQC’G ±ô£dÉH π«°Uƒà∏d òFóæY áLÉM Óa ,(πHɵdG ‘
.á«dÉ©dG IOƒ÷G äGP ¢ùHGƒ≤dÉH á≤aôŸG Ö«cÎdG äɪ«∏©J ™ÑJG
»∏°UC’G ô¡°üŸG ∞«æ°üJ ¢ùØf ≈∏Y ∫óÑà°ùŸG ô¡°üŸG ¿ƒµj ¿CG Öéj
.èàæŸG ™e ≥aôŸG
áfÉ«°üdGh ∞«¶æàdG
.áfÉ«°U hCG ∞«¶æJ …CG AGôLEG πÑb AÉHô¡µdG øY RÉ¡÷G π°üaG .1
∞«¶f AÉà ¬∏°ùZG ºK √É«ŸG í°Tôe ∫
p
RCG .2
¥ƒa äÉLƒŸG ≥ÑWh ¿GõÿG ‘ áÑ°SΟG áÑ∏°üdG á≤Ñ£dG ádGRE’ .3
ºK ,∂jΫ°ùdG ¢†ªM áaÉ°VEG ™e IÉ°TôØdÉH ɪ¡Ø
q
p
¶f ,á«Jƒ°üdG
.∞«¶f AÉà ɪ¡Ø£°TG
.áaÉL ¢Tɪb á©£≤H ¬ë°ùe ºK ∞«¶f AÉà √É«ŸG ¿GõN π°ùZ øµÁ .4
∑Îà°S É¡fC’ á«fó©e ácG
q
ôØH RÉ¡÷G øe AõL …CG π°ùZ ΩóY ≈Lô
o
j
.RÉ¡÷G ≈∏Y É
k
°ThóN
»°†ªM ∞¶æe hCG øjõæÑdG π«ã«e ΩGóîà°SÉH É
k
≤∏£e RÉ¡÷G ∞¶æJ ’ .5
iôNCG á«FÉ«ª«c ∞«¶æJ πeGƒY …CG hCG ∫ƒëc hCG Oƒbh hCG
á∏jƒW IóŸ ¬eGóîà°SG ΩóY ádÉM ‘ áÑ∏©dG ‘ ¬©°Vh RÉ¡÷G ∞¶f .6
.±ÉL ¿Éµe ‘ ¬fõNh

ﺔـﻴـﺑﺮـﻌـﻟﺍ
(ﺔﻴﺴﻴﺋﺮﻟﺍ ﺕﺎﻤﻴﻠﻌﺘﻟﺍ)
øjôNB’G áeÓ°S
äGQó≤dG hhP ¢UÉî°TC’G ¬eóîà°ù«d ºª°üe ÒZ RÉ¡÷G Gòg •
áaô©ŸGh IÈÿGh áæjóàŸG á«∏≤©dGh á«°ù◊Gh á«ægòdGh ájó°ù÷G
hCG º¡«∏Y ±GöTE’G πX ‘ ’EG ,(∫ÉØWC’G ∂dP ‘ ÉÃ) Úà∏«∏≤dG
¢üî°ûdG πÑb øe RÉ¡÷G ΩGóîà°SÉH á≤∏©àŸG äɪ«∏©àdG º¡FÉ£YEG
.º¡àeÓ°S øY ∫hDƒ°ùŸG
.RÉ¡÷ÉH º¡ãÑY ΩóY ¿Éª°†d ∫ÉØWC’G ≈∏Y ±GöTE’G Öéj •
√òg ≈∏Y ™∏£e ÒZ ¢üî°T …CG hCG ∫ÉØWCÓd ìɪ°ùdG ΩóY Öéj •
.RÉ¡÷G ΩGóîà°SÉH äGOÉ°TQE’G
RÉ¡÷G ¿Éµe øe ÜGÎb’ÉH äÉfGƒ«◊G hCG ∫ÉØWCÓd íª°ùJ ’ •
.¬H ¢UÉÿG AÉHô¡µdG πHÉc ¢ùŸ hCG ¬°ùŸh
.∫ÉØWC’G øe Üô≤dÉH RÉ¡÷G ΩGóîà°SG óæY Üôb øY ±GöTE’G Ωõ∏j •
øY G
k
ó«©H äGƒæ°S 3 øe πbCG ôª©H ºg ø‡ ∫ÉØWC’G AÉ≤HEG Öéj •
.QGôªà°SÉH º¡«∏Y ±GöTE’G ºàj ⁄ Ée RÉ¡÷G
8h äGƒæ°S 3 ÚH ºgQɪYCG ìhGÎJ øjòdG ∫ÉØWCÓd áÑ°ùædÉH •
•öûH RÉ¡÷G 𫨰ûJ ±É≤jEG/𫨰ûJ §≤a º¡«∏Y Öéj ,äGƒæ°S
¿CGh ,¬d ¢ü°üîŸG …OÉ©dG 𫨰ûàdG ¿Éµe ‘ ¬à«ÑãJ hCG ¬©°Vh
á≤∏©àŸG äÉeƒ∏©ŸÉH ºgójhõJ ºàj ¿CG hCG ±GöTEÓd Gƒ©°†îj
ôWÉîŸÉH º∏Y ≈∏Y Gƒfƒµj ¿CGh áæeBG á≤jô£H RÉ¡÷G ΩGóîà°SÉH
.É¡«∏Y …ƒ£æj »àdG
8h äGƒæ°S 3 ÚH ºgQɪYCG ìhGÎJ øjòdG ∫ÉØWC’G ≈∏Y Öéj •
hCG ,¬Ø«¶æJ hCG ,¬£Ñ°V hCG ,AÉHô¡µdÉH RÉ¡÷G π«°UƒJ ΩóY äGƒæ°S
.¬d áfÉ«°U …CG AGôLEG
ΩGóîà°S’G ó©H
RÉ¡÷G ∑ôJ πÑb AÉHô¡µdG áëàa øe ¢ùHÉ≤dG ´õfGh RÉ¡÷G ÅØWCG •
.¬FGõLCG øe AõL …CG ¢üëa hCG RÉ¡÷G ∞«¶æJ πÑbh
.±ÉL ¿Éµe ‘ ¬æjõîJ Öéj ,RÉ¡÷G ΩGóîà°SG ΩóY ádÉM ‘ •
.∫ÉØWC’G ∫hÉæàe øY G
k
ó«©H áf
q
õîŸG Iõ¡LC’G ™«ªL ßØM Öéj
ìÓ°UE’Gh ¢üëØdG
hCG äÉ≤ë∏ŸG Ò«¨J hCG ∞«¶æàdG πÑb RÉ¡÷G 𫨰ûJ ±É≤jEÉH ºb •
.ΩGóîà°S’G AÉæKCG ∑ôëàJ »àdG AGõLC’G øe ÜGÎb’G
hCG áØdÉJ AGõLCG ájCG øY ∞°ûµ∏d RÉ¡÷G ¢üëaG ,ΩGóîà°S’G πÑb •
,QGQRC’G ‘ ∞∏J hCG ,AGõLC’G ‘ Qƒ°ùc OƒLh ΩóY øe ≥≤– .áÑ«©e
.RÉ¡÷G 𫨰ûJ ≈∏Y ôKDƒJ ób ádÉM …CG hCG
.Ö«Y hCG ∞∏J ¬H AõL …CG OƒLh ádÉM ‘ RÉ¡÷G Ωóîà°ùJ ’ •
.áØdÉàdG hCG IQƒ°ùµŸG AGõLC’G ìÓ°UEÉH á°üNôe á¡L Ωƒ≤J ¿CG Öéj •
hCG AGÎgG hCG ∞∏J äÉeÓY OƒLh ΩóY øe ≥≤– ,ΩGóîà°S’G πÑb •
.»FÉHô¡µdG QÉ«àdG ∂∏°S ‘ πcBÉJ
hCG ¢ùHÉ≤dG ‘ ∞∏J hCG Ö«Y OƒLh ádÉM ‘ RÉ¡÷G Ωóîà°ùJ ’ •
.»FÉHô¡µdG ∂∏°ùdG
OƒLh hCG »°ù«FôdG ¢ùHÉ≤dG hCG »FÉHô¡µdG QÉ«àdG ∂∏°S ∞∏J ádÉM ‘ •
Öæéàd óªà©e áfÉ«°U π«ch áaô©Ã ɪ¡MÓ°UEG Öéj ,ɪ¡H Ö«Y
¬MÓ°UEG ∫hÉ– ’h »FÉHô¡µdG QÉ«àdG ∂∏°S ™£≤J ’ .ôWÉîŸG
.∂°ùØæH
AGõLC’G ∂∏J ±ÓîH RÉ¡÷G AGõLCG øe …CG ∫GóÑà°SG hCG ádGREG ∫hÉ– ’ •
.π«dódG Gòg ‘ IOóëŸG
AÉHô¡µdG ôWÉfl øe áeÓ°ùdG
Qó°üe ó¡L ≥aGƒJ øe ócCÉàdG ΩGóîà°S’G πÑb »¨Ñæj
áMƒd ≈∏Y í°VƒŸG ó¡÷G ™e »FÉHô¡µdG QÉ«àdG
.äÉØ°UGƒŸG
.»°VQCG ∂∏°S π«°UƒJ ¤EG áLÉM ’ ∂dòdh ;É
k
LhOõe
k
’õY ∫hõ©e RÉ¡÷G Gòg
hCG ¢ùHÉ≤dG hCG ∂∏°ùdG ôª¨J ’ ,á«FÉHô¡c áeó°üd ¢Vô©àdG ô£N Öæéàd •
.ôNBG πFÉ°S …CG hCG AÉŸG ‘ ∑ôëŸG IóMh
áMƒd ≈∏Y í°VƒŸG »FÉHô¡µdG QÉ«àdG ó¡L ≥aGƒJ øe ócCÉàdG »¨Ñæj •
CÉ£N …CG .∂jód Ωóîà°ùŸG »FÉHô¡µdG ΩɶædG ™e RÉ¡é∏d ∞«æ°üàdG
.¿Éª°†dG »¨∏j π«°UƒàdG ‘
¢UGƒÿG
ágƒØdG .1
√É«ŸG ¿GõN .2
áeGƒ©dG .3
áeGƒ©dG ¥hóæ°U .4
IóYÉ≤dG .5
ºµëàdG ¢†Ñ≤e .6
√É«ŸG í°Tôe .7
ô£©dG êQO .8
§°ûæe ¿ƒHôc í°Tôe .9
AGƒ¡dG πNóe .10
ΩGóîà°S’G
âHÉKh ƒà°ùe í£°S ≈∏Y ∫óà©e ™°Vh ‘ RÉ¡÷G ™°V .1
¢†Ñ≤e QOCGh Ö≤Y ≈∏Y É
k
°SCGQ √É«ŸG ¿GõN Ö∏bG ºK ,√É«ŸG ¿GõN ∫RCG .2
.áYÉ°ùdG ÜQÉ≤Y √ÉŒG ¢ùµY AÉŸG πNóe
ió©àJ ’h ,É
k
Ø«¶f AÉŸG ¿ƒµj ¿CG Öéj .AÉŸÉH √É«ŸG ¿GõN CÓeG .3
¤EG AÉŸG πNóe ¢†Ñ≤e óYCG .ájƒÄe áLQO 40 ¬JQGôM áLQO
√É«ŸG ¿GõN ≈∏Y √É«e äGô£b …CG í°ùeG .√É«ŸG ¿GõN ‘ ¬©°Vƒe
IóYÉ≤dG ≈∏Y iôNCG Iôe ¬©LQCGh
13

ΩGóîà°S’G øe ¢Vô¨dG
BLACK+DECKER HM5000-B5 øe Ö«WÎdG RÉ¡L º
q
p
ª
o
°U
áaÉ÷G IöûÑdG ∞«£∏Jh ±ô¨dG ‘ áHƒWôdG iƒà°ùe IOÉjR ¢Vô¨H
»àdG äGÎØdG ‘ çó– ób »àdG ä’É◊G øe ÉgÒZh á≤≤°ûàŸG √ÉØ°ûdGh
.áHƒWôdG É¡«a ¢†ØîæJ
.§≤a ∂
p
∏¡à°ùŸG ΩGóîà°S’
l
ó©
o
e èàæŸG Gòg
™àªà°ùJ ¿CG ∂d ≈æªàfh .
BLACK+DECKER èàæe ∑QÉ«àN’
k
Gôµ°T
.IóY äGƒæ°ùd èàæŸG Gòg ΩGóîà°SÉH
:‘ RÉ¡÷G Gòg Ωóîà°ù
o
j ’ .§≤a »∏NGódG ‹õæŸG ∫ɪ©à°SÓd ¢ü°üfl
πª©dG äÉÄ«Hh ÖJɵŸGh ôLÉàŸG ‘ ∫ɪ©dG ïHÉ£e ≥WÉæe •
;iôNC’G
;á«ØjôdG ∫RÉæŸG •
áeÉbE’G øcÉeCGh IÒ¨°üdG ¥OÉæØdGh ¥OÉæØdG ‘ AÓª©dG πÑ
p
b øe •
;iôNC’G
.iôNCG á«dõæe ÒZ øcÉeCG …CG hCG ,QÉ£aE’Gh ΩƒædG øcÉeCG •
áeÓ°ùdG äɪ«∏©J
Qƒ°üb …CG .äɪ«∏©àdG πch ¿ÉeC’G äGôjò– πc CGôbG !ôjò–
¿CG øµÁ πØ°SC’ÉH áæ«ÑŸG äɪ«∏©àdGh äGôjòëàdG ´ÉÑJG ‘
hCG/h ≥jôM ܃°ûf hCG á«FÉHô¡c áeó°U çhóM ¤EG …ODƒj
.á¨dÉH äÉHÉ°UEG ´ƒbh
.RÉ¡÷G 𫨰ûJ πÑb ájÉæ©H πeɵdÉH π«dódG Gòg CGôbG •
.¬H πbô©àdG ô£N …OÉØàd ájÉæ©H QÉ«àdG ∂∏°S QÉ°ùe §Ñ°VG •
…CG ∫ɪ©à°SG ¿EG .π«dódG Gòg ‘ í°Vƒe ΩGóîà°S’G øe ¢Vô¨dG ¿EG •
»àdG ÒZ RÉ¡÷G Gò¡H á«∏ªY ájCG AGôLEG hCG äÉ≤aôe hCG äÉ≤ë∏e
.á«°üî°ûdG áHÉ°UE’G ô£N ÖÑ°ùj ób π«dódG Gòg ‘ É¡H ≈°Uƒ
o
j
IÉYGôe
k
ɪFGO Ú©àj ,á«FÉHô¡µdG Iõ¡LC’G ΩGóîà°SG óæY !ôjò–
ô£N øe óë∏d ∂dPh ;»∏j Ée ∂dP ‘ Éà ᫰SÉ°SC’G áeÓ°ùdG äÉWÉ«àMG
.…OÉŸG Qö†dG hCG ájó°ù÷G áHÉ°UE’G hCG á«FÉHô¡c áeó°üdG hCG ≥jô◊G
.áLÉ◊G óæY ¬«dEG ´ƒLô∏d π«dódG Gò¡H ßØàMG •
∂H ¢UÉÿG RÉ¡÷G ΩGóîà°SG
RÉ¡÷G ΩGóîà°SG óæY É
k
ªFGO Qò◊G
n
ñƒJ •
øY ¢ùHÉ≤dG π°üØd »FÉHô¡µdG QÉ«àdG ∂∏°S ó°T
k
É≤∏£e ∫hÉ– ’ •
.¢ùÑ≤ŸG
âjõdGh IQGô◊G øY
k
Gó«©H AÉHô¡µdG ∂∏°S ™°Vh ≈∏Y ¢UôMGh •
.IOÉ◊G ±Gƒ◊Gh
‘ hCG É¡æe Üô≤dÉH hCG IQGô◊G QOÉ°üe ¥ƒa RÉ¡÷G ™°Vh ÖæŒ •
.øNÉ°S ¿ôa
.≥∏£dG AGƒ¡dG ‘ RÉ¡÷G Ωóîà°ùJ ’ •
IóFGõdG áHƒWôdG hCG √É«ŸG øe ∑ôëŸG ájɪM ≈∏Y ɪFGO ¢UôMG •
π°üaG ,ΩGóîà°S’G AÉæKCG »FÉHô¡µdG QÉ«àdG ∂∏°ùd ∞∏J çóM GPEG •
QÉ«àdG ∂∏°S ¢ùª∏J ’ .QƒØdG ≈∏Y AÉHô¡µdG Qó°üe øY RÉ¡÷G
.AÉHô¡µdG Qó°üe øY ¬∏°üa πÑb »FÉHô¡µdG
ΩGóîà°S’G ΩóY AÉæKCG AÉHô¡µdG òØæà RÉ¡÷G π«°UƒJ ΩóY øe ócCÉJ •
.∞«¶æàdG πÑbh ¬FGõLCG ádGREG hCG Ö«côJ πÑbh
.áÑbGôe ¿hO •ÓÿG π¨°ûJ ’ •
.áæNÉ°S
k
É룰SCG ¢ùeÓj hCG Ió°†æŸG áaÉM ¥ƒa ¤óàj ∂∏°ùdG ´óJ ’ •
‘ ÖÑ°ùàj ’ å«ëH ,ábóH ¬¡«LƒJh É
k
eÉ“ AÉHô¡µdG ∂∏°S πëH ºb •
.∂à∏bôY hCG CÉ£ÿG ≥jôW øY ∂Wƒ≤°S
.IöTÉÑe ¢ùÑ≤ŸG ¿Éµe πØ°SCG Ö«WÎdG RÉ¡L ™°Vh ΩóY Öéj •
º≤J ’ ,ôgÉ°üŸG ¥GÎMGh ¢ùÑ≤ŸG ≈∏Y π«ªëàdG IOÉjR …OÉØàd •
(¢ùÑ≤ŸG) QÉ«àdG òNCÉe ¢ùØf ‘ iôNCG Iõ¡LCG π«°UƒàH
øe Üô≤dÉH hCG IöTÉÑŸG ¢ùª°ûdG á©°TCG â– RÉ¡÷G Gòg Ωóîà°ùJ ’ •
.øNÉ°S º°ùL …CG
≈àM ôNBG èàæe …CG hCG AÉHô¡µdG ¢ùÑ≤e πØ°SCG Ö«WÎdG RÉ¡L ™°†J ’ •
.áHƒWôdÉH ôKCÉàj ’
.OÉé°ùdG πØ°SCG πHɵdG ™°†J ’h ,OÉé°ùdG ≈∏Y Ö«WÎdG RÉ¡L ™°†J ’ •
.∑Ì©J ‘ ÖÑ°ùàj ’ å«ëH Ò°ùdG ≥WÉæe øY G
k
ó«©H ∂∏°ùdG ™°V
,√É«ŸG ¬«a ¢ùeÓJ ób ¿Éµe ‘ É
k
≤∏£e Ö«WÎdG RÉ¡L Ωóîà°ùJ ’ •
‘ ICÉaóŸG Ωóîà°ùJ ’ .ïÑ£ŸG hCG ,Ωɪëà°S’G áaôZ hCG ,Ωɪ◊G πãe
.áMÉÑ°ùdG ΩɪM hCG ,Ωɪëà°S’G áaôZ hCG ,Ωɪ◊ÉH ᣫëŸG øcÉeC’G
.èàæŸG Gòg ™e §≤a ÜöT √É«e hCG á«fó©e √É«e ΩGóîà°SG Öéj •
ájCG ≈∏Y .ôªMC’G ¿ƒ∏dÉH öTDƒŸG A»°†«°S ,√É«ŸG ¿GõN ÆôØj ÉeóæY •
çhóM …OÉØàd √É«ŸG ¿GõN ‘ AÉŸG øe IÒ¨°U ᫪c ≈≤Ñàà°S ∫ÉM
.±ÉL Ö«WôJ
.Ö«WÎdG RÉ¡L á«£¨àH º≤J ’ ,IóFGõdG áfƒî°ùdG …OÉØàd !ôjò–
hCG ,èàæŸG í«JÉØe §Ñ°V hCG 𫨰ûJ πÑb ∂jój ±ÉØL øe É
k
ªFGO ócCÉJ •
.á«°ù«FôdG OGóeE’G äÓ°Uhh ¢ùHÉ≤dG á°ùeÓe πÑb
ºµëà∏d Ωɶf hCG ,âbDƒe hCG ,èeÈe ™e Ö«WÎdG RÉ¡L Ωóîà°ùJ ’ •
ÖÑ°ùH ;É
k
«FÉ≤∏J ICÉaóŸG 𫨰ûJ ≈∏Y πª©j ôNBG RÉ¡L …CG hCG ó©H øY
≈∏Y É
k
Yƒ°Vƒe hCG ,É
k
£¨
o
e RÉ¡÷G ¿Éc GPEG ≥jôM ܃°ûf ô£N OƒLh
.ºFÓe ÒZ ƒëf
¬LQÉflh AGƒ¡dG πNGóe Öé– ’ ,≥jôM ܃°ûf á«dɪàMG …OÉØàd •
πª©j ¿CG øµÁ å«M ,ôjöùdÉc ,áªYÉf É
k
룰SCG Ωóîà°ùJ ’ .É
k
≤∏£e
.äÉëàØdG ó°S ≈∏Y ∂dP
.á«aÉ°VEG πHÉc á∏°Uh ΩGóîà°SG ô¶ë
o
j •
.
m
ƒà°ùe »≤aCG í£°S ≈∏Y Ö«WÎdG RÉ¡L 𫨰ûJ ≈∏Y É
k
ehO ¢UôMG •
∫ƒNO äÉëàa øe áëàa …CG ‘ áÑjôZ ΩÉ°ùLCG …CG ∫ÉNOEG ÖæŒ •
hCG ,á«FÉHô¡c áeó°U çhóM ‘ ∂dP ÖÑ°ùàj ó≤a ;¬LhôNh AGƒ¡dG
.RÉ¡÷G ∞∏J hCG ,≥jôM ܃°ûf
øjõîJ hCG ΩGóîà°SG ºàj »àdG ≥WÉæŸG ‘ RÉ¡÷G 𫨰ûàH º≤J ’ •
.É¡H ∫É©à°TÓd á∏HÉb iôNCG πFGƒ°S …CG hCG ,AÓ£dG OGƒe hCG ,øjõæÑdG
ÌcC’G ÖÑ°ùdG ó©j RÉ¡÷G ‘ ôHƒdG hCG QÉѨdG øe Ö°SGhQ øjƒµJ ¿EG •
Ö°SGhôdG √òg ádGREG øe ócCÉJ Gòd .IQGô◊G áLQO IOÉjõd É
k
Yƒ«°T
ájƒ¡àdG äɵѰTh äÉëàa ∞«¶æJh RÉ¡÷G π°üa ∫ÓN øe ΩɶàfÉH
.á«FÉHô¡µdG á°ù浟ÉH
.…OƒªY
m
™°Vh ‘ Ö«WÎdG RÉ¡L É
k
ªFGO Ωóîà°SG •
ÉÃQ ôNBG èàæe …CG hCG AÉHô¡µdG ¢ùÑ≤e πØ°SCG Ö«WÎdG RÉ¡L ™°†J ’ •
.áHƒWôdÉH ôKCÉàj
´õfG ºK ,"𫨰ûàdG ±É≤jEG" QõdG ≈∏Y §¨°†dÉH ºb ,RÉ¡÷G π°üØd •
.»FÉHô¡µdG QÉ«àdG òNCÉe øe ¢ùHÉ≤dG
øe óë∏d ;ÚjQhódG º«≤©àdGh ∞«¶æàdG ≈∏Y áeGhóŸÉH Ió°ûH ≈°Uƒj !ôjò–
.áaô¨dG ‘ á«FÉŸG ÉjÒàµÑdG QÉ°ûàfG ∫ɪàMG
.ájƒ¡à∏d Ö«WÎdG RÉ¡L ∫ƒM É
k
«aÉc É
k
ZGôa É
k
ehO ∑ôJG •
.√É«ŸG ¿GõN ‘ äÉaÉ°VEG …CG Ωóîà°ùJ ’ •
14
ﺔـﻴـﺑﺮـﻌـﻟﺍ
(ﺔﻴﺴﻴﺋﺮﻟﺍ ﺕﺎﻤﻴﻠﻌﺘﻟﺍ)


BAHRAIN Alfouz Services Co. WLL P.O. Box 26562, Tubli, Manama +973-17783562 / 17879987 [email protected]
BAHRAIN Kewalram & Sons Co. WLL P.O. Box 84, Manama, +973-17213110 / 17210617 [email protected]
EGYPT Anasia Egypt for Trading P.O. Box 2443, 9, Mostafa Refaat Street, +202-22684159 [email protected]
JORDAN Mega Hardware - 93 King Abdullah II St., +9626-5349098 [email protected]
(Sami Bashiti & Partners Co.) P.O. Box 3005, Amman 11953 www.mega-hardware.com
KSA Fawaz Ebrahim Al Zayani P.O. Box 76026, Al Raka: 31952 +966-38140914 [email protected]
Trading Est. Near Saudi Post, Al Janubiyah Al Khobar,
Dammam
KSA Fawaz Ebrahim Al Zayani Trading Est. 9019, Al Qndeel St., +966-128140914 / 581121778 [email protected]
Behind Emad Petrol Station, Aziziah, Jeddah
KUWAIT Al Omar Technical Co. P.O. Box 4062, Safat 13041, Kuwait +965-24848595 / 24840039 [email protected]
LEBANON Aces Service Centre P.O. Box 90-102, Nahr El Mot, +9611-898989 / 262626 [email protected]
LIBYA Homeworld Co. Senidal St. Amr Ibn Elaas Road, +218-619094183 ext. 103 [email protected]
Benghazi, Libya, P.O. Box 18182, Salmany
LIBYA Byuth Al Hadatha General Customer Service +218-916611663 / [email protected]
Znata Al Jadida Road, Tripoli +218-916260006 elghol@technpower.com
LIBYA Byuth Al Hadatha Al Fuwayhat Road, Benghazi +218-913752701 [email protected]
elghol@technpower.com
MAURITIUS The Brandhouse Ltd. Rogers Industrial Park 1, +230-2069450 / 2071700 [email protected]
OMAN Oman Marketing & Service Co. (Omasco) P.O. Box 2734, +968-24560232 / 24560255 [email protected]
OMAN Oman Marketing & Service Co. (Omasco) Al Ohi, Sohar, Oman +968-26846379 [email protected]
OMAN Oman Marketing & Service Co. (Omasco) Sanaya, Salalah, Oman +968-23212290 [email protected]
PAKISTAN Ammar Service & Spares Office No. 6068, 6th Floor, +9221-32775252 [email protected]
Central Plaza Behind Gul Plaza Marston
Road, Karachi
QATAR Al Muftah Service Centre Al Wakrah Road, P.O. Box 875, +974-44650880 / 44650110 [email protected]
TUNISIA Societe Tunisienne De Maintenance (STM) Rue De La Physique +216-79389687 [email protected]
Nouvelle Zone Industrielle Ben Arous,
2013 Ben Arous, Tunisia
UAE Black+Decker Light Industrial Unit Phase 4 Unit C9, +9714-8127400 / 8127406 [email protected]
Regional Service Center Nad Hessa Dubai Silicon Oasis, Dubai, UAE
UAE Light House Electrical Sheikh Khalid Bin Ahmad Al Hamad +9712-6726131 [email protected]
Bldg. No: 20, Opp. Salam Etisalat,
P.O. Box 120, Abu Dhabi
UAE Light House Electrical Corridor Property Management Bldg. +9712-5548315 [email protected]
Sanaiya Industrial Area, M10 Mussafah
P.O. Box 120, Abu Dhabi
UAE Zillion Equipment and P.O. Box 10584, Ras Al Khaimah +9717-2277095 [email protected]
Spare Parts Trading LLC
UAE Zillion Equipment and P.O. Box 19740, Opp. Bin Sadal / +9713-7216690 [email protected]
Spare Parts Trading LLC Trimix Redymix Sanaiya, Al Ain
UAE Zillion Equipment and P.O. Box 65076, Industrial Area 13 / +9716-5423131 [email protected]
Spare Parts Trading LLC Near to Tasheel, Sharjah, UAE
COUNTRY NAME ADDRESS TELEPHONE NO. EMAIL
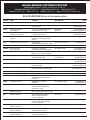
BLACK+DECKER Service Concessionaries
BLACK+DECKER CUSTOMER SUPPORT
Working Hours: Sunday to Thursday from 09:00 a.m. to 6:00 p.m.
•
United Arab Emirates: 800 032 0723
•
Saudi Arabia: 800 8500 800
•
Qatar: 00 800 100 557
•
Kuwait: 965 220 691 00
•
Oman: 800 744 67
•
Bahrain: 8000 44 35
•
Egypt: 0 800 000 9537 (landline only)


PRODUCT MODEL NO. HM5000-B5
02.2020
WARRANTY REGISTRATION CARD
YOUR NAME/ VOTRE NOM/
YOUR ADDRESS/ VOTRE ADRESSE/
POSTCODE/ CODE POSTAL/
DATE OF PURCHASE/ JOUR D’ACHAT/
DEALER'S NAME & ADDRESS/ NOM ET ADRESSE DU VENDEUR/
«ùßr
«∞FMu«Ê
«∞d±e «∞∂d¥bÍ
¢U¸¥a «∞Ad«¡
≈ßr Ë ´Mu«Ê «∞∂Uzl
-
 1
1
-
 2
2
-
 3
3
-
 4
4
-
 5
5
-
 6
6
-
 7
7
-
 8
8
-
 9
9
-
 10
10
-
 11
11
-
 12
12
-
 13
13
-
 14
14
-
 15
15
-
 16
16
-
 17
17
-
 18
18
-
 19
19
-
 20
20


Black & Decker HM5000-B5 User manual
- Type
- User manual
- This manual is also suitable for
Ask a question and I''ll find the answer in the document
Finding information in a document is now easier with AI
in other languages
Related papers
-
Black & Decker OR13FD User manual
-
-
-
-
-
-
-
-
-
Other documents
-
Samsung HM5000 User manual
-
Ivation 2.6 Liter User manual
-
Danby DBHR13211BDD1 Owner's manual
-
LG PH-U459KN Owner's manual
-
Vornado EVHUM Owner's manual
-
SwitchBot Smart Air Humidifier User manual
-
-
Geek Heat HH02 User manual
-
AYA LG04-11C User guide
-
 Artistry Hydra-V User manual
