Page is loading ...

INSTALLATION GUIDE
BISON HEADLAMP
FILLER PANELS
FOR CHEVY COLORADO
AEV30367AA
Last Updated: 09/30/19

ii
PLEASE READ BEFORE YOU START
To guarantee a quality installation, we recommend reading these instructions thoroughly
before beginning any work. These instructions assume a certain amount of mechanical
ability and are not written nor intended for someone not familiar with auto repair.
INCLUDED PARTS QTY REQUIRED TOOLS
Headlamp Filler RH 1 Common Hand Tools
Headlamp Filler LH 1 Drill and 3/8” Drill Bit
Grill Gap Filler 1 Masking Tape
Hardware Pack 1

1
AMERICAN EXPEDITION VEHICLES
PRIOR TO INSTALLATION
If your are NOT installing AEV’s Bison Fender Flares, have a body shop fill in the hole in the Headlamp Filler
Panel prior to painting. We recommend using a proper plastic tab repair product.
Have the Headlamp Filler Panels painted professionally to match your Colorado’s color. It is important to ac-
curately tape o the lower step portion of the headlamp fillers.
INSTALLATION
1. Use AEV template (AEV30316) applied to the bottom of the grill supports to mark and drill a hole on
each side (fig. 1).
2. Install supplied M4 U-nuts onto the grill supports (fig. 2).
Figure 1 Figure 2
3. Install rubber Gap Filler by inserting tabs into the bottom of the grill working from the center outward (fig. 3).
Figure 3

2
AMERICAN EXPEDITION VEHICLES
4. Install Headlamp Filler Panels.
A. Engage the pins on the Headlamp Filler Panel into the fender (fig. 4).
B. Snap the inboard side of the Headlamp Filler Panel into the grill (fig. 5).
Figure 4 Figure 5
C. Install three 7mm hex screws (per side) into the filler panel under the fender (figure 6).
D. Install supplied flathead screws into the grill through the filler panel (figure 7).
Figure 6 Figure 7

3
AMERICAN EXPEDITION VEHICLES
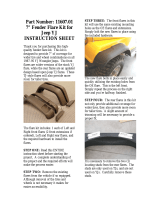
5. Trim Fender Flares( if not installing AEV Bison Fender Flares).
A. Cut o the W Base Clip from the existing fender flare as needed so the flares will sit flush against the
headlamp filler (fig. 8).
B. Trim the front edge of the fender flares to sit flush (fig. 9).
REMOVE
REMOVE
REMOVE
REMOVE
Figure 8 Figure 9
C. Trim the bottom edge of the fender flares to sit flush with the paint ditch on the headlamp filler. This
will allow an aftermarket bumper to flex without interference (fig. 10).
REMOVE
PAINT DITCH
Figure 10
6. Install Aftermarket Bumper. NOTE: It is advised that you tape o the headlamp filler panels to avoid dam-
age during bumper installation.
/