Page is loading ...

ENGLISH ESPAÑOL FRANÇAIS
Installation and Owner’s Manual
Manual de Instalación y del Propietario
Manuel d’Installation et d’Utilisation
TL970DD
WIDESPREAD LAVATORY FAUCET, 8” CENTER
GRIFO DE LAVABO ANCHO, 8 PULGADAS CENTRO
ROBINET DE LAVABO, 8” CENTRE
GUINEVERE
TM
TL970DD1
DISCONTINUED

2
ENGLISH
TABLE OF CONTENTS
THANKS FOR CHOOSING TOTO
®
!
CARE AND CLEANING
CAUTION
THANKS FOR CHOOSING TOTO
®
! .............................................................................2
CARE AND CLEANING .................................................................................................2
CAUTION .........................................................................................................................2
BEFORE INSTALLATION ..............................................................................................3
TOOLS YOU WILL NEED ..............................................................................................3
INSTALLATION PROCEDURE .....................................................................................4
ROUGH-IN.......................................................................................................................6
TROUBLESHOOTING....................................................................................................7
REPLACEMENT PARTS8
WARRANTY9
TOTO
®
’s mission is to provide the world with healthy, hygienic and
more comfortable lifestyles. We design every product with the balance
of form and function as a guiding principle. Congratulations on your
choice.
Your new faucet is designed for years of trouble-free performance.
Keep it looking new by cleaning it periodically with mild soap, rinse
thoroughly with warm water and dry with a clean, soft cloth. Do not
use abrasive cleaners, steel wool or harsh chemicals, as these will dull
the nish. Failure to follow these instructions may void your warranty.
For safe operation of the faucet, please observe the following:
Operating pressure:
Minimum Pressure……………7psi (owing pressure)
Maximum Pressure…………...108psi (non-owing pressure)
Hot water supply temperature should not exceed 85º C (185º F).
Do not use steam for hot water supply.
Do not use the product at ambient temperature below 32º F (0º C).
DISCONTINUED

3
ENGLISH
BEFORE INSTALLATION
TOOLS YOU WILL NEED
Observe all local plumbing codes
Make sure water supply is shut off
Read these instructions carefully to ensure proper installation.
For new lavatory installation, install the faucet before installing the lavatory.
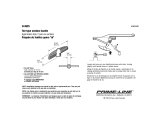
Check to make sure you have the following parts indicated below.
Pipe Tape Adjustable
Wrench
ScrewdriversAdjustable
Pliers
Spout
Assembly
Valve Body Assembly
(HOT)
Valve Body Assembly
(COLD)
Handle
(HOT)
Handle
(COLD)
Flex Hoses
Lift Assembly
Pivot Rod
Connecting
Block
Drain Assembly
Hex Wrench
Spout Key
TL970DD1
TL970DD
TL970DD
TL970DD1
DISCONTINUED

4
ENGLISH
INSTALLATION PROCEDURE
1. Spout Installation
Make sure water supply is turned
off.
After applying the top nish,
remove the plug from the spout
shank.
Loosen setscrew on the back of the
spout.
Remove the spout adapter.
Thread the spout adapter onto the
spout shank.
Take care not to damage the O-ring.
Carefully insert the spout onto the
spout adapter. Take care not to
damage the O-rings.
Secure the spout with setscrew.
Lift Rod
Spout
Gasket
Gasket
Washer
Gasket
Nut
T-Connecctor
O-Ring
Lock Nut
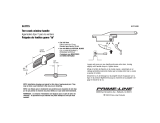
2. Valve Body InstallationInstallation
Insert the valve body from underside
of the sink. make sure the COLD
side is on the right and the Hot side
is on the left.
Place rubber gasket underneath the
deck adapter onto the valve body
until it bottoms out. Make sure
rubber washer lays at in the groove
of the deck adapter.
Position the valve body as shown
below then tighten the locknut.
Screw in handle-adapter and push in
stem adapter from the top.
Repeat procedure for the other
Valve Body
T-Connecctor
O-Ring
Stem Adapter
Handle Adapter
Deck Adapter
Rubber Gasket
Rubber
Washer
Rubber
Connector
Washer
Brass
Washer
Lock Nut
Valve body position
(Bottom View)
DISCONTINUED

5
ENGLISH
4. Hose InstallationInstallation
Connect the ex hoses to the T-
connector as shown.
Make adjustment according to
installation situation.
Secure connections with adjustable
wrench.
T-connector
Flex Hose
INSTALLATION PROCEDURE
3. Handle InstallationInstallation
Position escutcheon on handle
adapter and secure with set screw.
Align the handle and then tighten it
with screw. Adjust if necessary.
Push in label cap
Repeat procedure for the other
handle. Make sure the handles are
labeled correctly.
Handle
Setscrew
Screw
Handle
Adapter
Escutcheon
Hex Wrench
Label Cap
DISCONTINUED

6
ENGLISH
ROUGH IN
1 1/4"
[3.2cm]
1/2"NPSM
5 1/8"
[13.1cm]
1 7/8"
[4.9cm]
1 7/8"
[4.7cm]
3"
[7.7cm]
6 1/2"
[16.6cm]
DECK: 1 1/2" [3.8cm] MAX
2"
[5.2cm]
1 5/8"
[4.1cm]
1 1/4"
[3.2cm]
5 1/8"
[13.1cm]
4"
[10.3cm]
8"
(20.3cm)
DECK THICKNESS
1-1/2” (3.8 cm)MAX
6-1/2”
(16.6 cm)
4”
(10.3 cm)
2”
(5.2 cm)
1-1/4” dia
(3.2cm)
6-1/8”
(15.4 cm)
5-1/8”
(13.1 cm)
2-3/4”
(7.1 cm)
1-7/8”
(4.7 cm)
1-5/8”
(4.1 cm)
1-7/8”
(4.9 cm)
1-1/4”
(3.2 cm)
1/2” NPSM
TL970DD
TL970DD1
DISCONTINUED

7
ENGLISH
TROUBLESHOOTING
DISCONTINUED

8
ENGLISH
REPLACEMENT PARTS
2
3
5
6
8
17
20
21
12
13
18
15
14
4
1
9
10
11
19
TL970DD1
TL970DD
7
16
Widespread Lavatory Faucet
(TL970DD* / TL970DD1*)
*=Please specify nish
Item Part No. Description
1 THP4090$ Handle Cap* (HOT)
2 THP4140 Screw & Washer
3 THP4141$
THP4326$
Handle & Canopy* (TL970DD)
Lever & Canopy* (TL970DD1)
4 THP4014 Set Screw
5 THP4142 Bushing
6 THP4143 Valve Unit
7 THP4021
THP4040
Ceramic Cartridge (CCW)
Ceramic Cartridge (CW)
8 THP4136$ Aerator Kit*
9 THP4137 Gasket
10 THP4138 Aerator
Item Part No. Description
11 THP4144 Foam Gasket
12 THP4146 Shank Assembly
13 THP4023 Gasket Set
14 THP4102$ Handle Cap* (COLD)
15 THP4145$ Lift Rod*
16 THP4296$ Spout Assembly*
17 THP4010$ Drain Assembly*
18 THP4026 Flex Hose
19 THP4011$ Drain Plunger*
20 THP4012 Lift Rod Connector
21 THP4101 Spout Key
DISCONTINUED

9
ENGLISH
WARRANTY
LIFETIME LIMITED WARRANTY
Warranty applies to selected residential faucets only.
1. TOTO
®
warrants its faucets (“Product”) to be free from defects in materials and workmanship
during normal residential use for as long as the original consumer end-user purchaser owns their home. This
limited lifetime warranty is extended only to the original consumer end-user purchaser and only so long as
the Product remains in use by the original consumer end-user purchaser in its original place of installation in
the purchaser’s residence. This warranty applies only to Product purchased and installed in North America.
2. TOTO
®
obligations under this warranty are limited to repair or replacement, at TOTO
®
’s
option, of Product or parts found to be defective in normal residential use, provided that such Product was
properly installed and used in accordance with the owner’s manual. TOTO
®
reserves the right to make such
inspections as may be necessary in order to determine the cause of the defect.
3. This warranty does not apply to the following items:
Damage or loss sustained in a natural calamity such as re, earthquake, ood, thunder, electrical storm,
etc.
Damage or loss resulting from any accident, unreasonable use, misuse, abuse, negligence, or improper
care, cleaning or maintenance of the Product.
Damage or loss resulting from sediments or foreign matter contained in a water system.
Damage or loss resulting from improper installation or from installation of the Product in a harsh and/or
hazardous environment, or improper removal, repair or modication of the Product.
Damage or loss resulting from the use of an abrasive cleanser.
4. If the Product is used commercially, TOTO
®
warrants the Product to be free from defects in
materials and workmanship for one (1) year from the date the Product is installed, with all other terms of this
warranty applicable except the duration of the warranty.
5. THIS WARRANTY GIVES YOU SPECIFIC LEGAL RIGHTS. YOU MAY HAVE OTHER
RIGHTS, WHICH VARY FROM STATE TO STATE OR PROVINCE TO PROVINCE.
6. To obtain warranty repair service under this warranty, you must take the Product or deliver it prepaid to
a TOTO
®
service facility with proof of purchase (original sales receipt) together with a letter stating the
problem, or contact a TOTO
®
distributor or products service contractor, or write directly to TOTO
®
U.S.A.,
INC., 1155 Southern road, Morrow, Georgia 30260, (888) 295-8134. If, because of the size of the Product
or nature of the defect, the Product cannot be returned to TOTO
®
, receipt by TOTO
®
of written notice of the
defect together with proof of purchase (original sales receipt) shall constitute delivery. In such case, TOTO
®
may choose to repair the Product at the purchaser’s location or pay to transport the Product to a service
facility.
THIS WRITTEN WARRANTY IS THE ONLY WARRANTY MADE BY TOTO
®
. REPAIR,
REPLACEMENT OR OTHER APPROPRIATE ADJUSTMENT AS PROVIDED UNDER THIS
WARRANTY SHALL BE THE EXCLUSIVE REMEDY AVAILABLE TO THE ORIGINAL
PURCHASER. TOTO
®
SHALL NOT BE RESPONSIBLE FOR LOSS OF THE PRODUCT OR FOR
OTHER INCIDENTAL, SPECIAL OR CONSEQUENTIAL DAMAGES OR EXPENSES INCURRED
BY THE ORIGINAL PURCHASER, OR FOR LABOR OR OTHER COSTS DUE TO INSTALLATION
OR REMOVAL, OR COSTS OF REPAIRS BY OTHERS, OR FOR ANY OTHER EXPENSE NOT
SPECIFICALLY STATED. IN NO EVENT WILL TOTO
®
’S RESPONSIBILITY EXCEED THE
PURCHASE PRICE OF THE PRODUCT. EXCEPT TO THE EXTENT PROHIBITED BY APPLICABLE
LAW, ANY IMPLIED WARRANTIES, INCLUDING THAT OF MERCHANTABILITY OR FITNESS
FOR USE OR FOR A PARTICULAR PURPOSE, ARE EXPRESSLY LIMITED TO THE DURATION OF
THIS WARRANTY. SOME STATES AND PROVINCES DO NOT ALLOW LIMITATIONS ON HOW
LONG AN IMPLIED WARRANTY LASTS, OR THE EXCLUSION OR LIMITATION OF INCIDENTAL
OR CONSEQUENTIAL DAMAGES, SO THE ABOVE LIMITATION AND EXCLUSION MAY NOT
APPLY TO YOU.
DISCONTINUED

10
ESPAÑOL
ÍNDICE
¡GRACIAS POR ELEGIR TOTO
®
!
CUIDADO Y LIMPIEZA
PRECAUCIÓN
¡GRACIAS POR ELEGIR TOTO
®
! ............................................................................10
CUIDADO Y LIMPIEZA ............................................................................................10
PRECAUCIÓN ............................................................................................................10
ANTES DE INSTALAR ..............................................................................................11
HERRAMIENTAS QUE NECESITA..........................................................................11
PROCEDIMIENTO DE INSTALACIÓN ...................................................................12
BOSQUEJO .................................................................................................................14
RESOLUCIÓN DE PROBLEMAS .............................................................................15
PIEZAS DE REPUESTO ............................................................................................16
GARANTÍA .................................................................................................................17
La misión de TOTO
®
es dar al mundo estilos de vida más saludables,
higiénicos y cómodos. Diseñamos cada producto guiándonos por el
principio del equilibrio entre forma y función. Felicitaciones por su
elección.
Su nueva grifería está diseñada para años de funcionamiento sin
problemas. Manténgala luciendo como nueva mediante una limpieza
periódica con jabón suave, enjuague minuciosamente con agua tibia y
séquela con un paño limpio y suave. No use limpiadores abrasivos, lana
de acero ni productos químicos fuertes ya que éstos opacarán el acabado.
El no cumplir con estas instrucciones podría anular su garantía.
Para un funcionamiento seguro de la grifería, tenga en cuenta lo
siguiente:
Presión de funcionamiento:
Presión mínima……………7 psi (presión de ujo).
Presión máxima……………108 psi (presión sin ujo).
La temperatura de suministro de agua caliente no debe superar los 185°F
(85°C).
No use vapor para suministro de agua caliente.
No use el producto a una temperatura ambiente menor a 32°F (0°C).
DISCONTINUED

11
ESPAÑOL
ANTES DE INSTALAR
HERRAMIENTAS QUE NECESITA
Cumpla con todos los códigos locales de plomería
Asegúrese de que el suministro de agua esté cerrado
Lea estas instrucciones con atención para asegurar una instalación correcta.
Para instalaciones nuevas de lavabos, instale la grifería antes de instalar el
lavabo.
Verique para asegurarse de tener las piezas que se indican a continuación.
Cinta para
tubería
Llave
ajustable
DestornilladoresTenazas
ajustables
Spout
Assembly
Valve Body Assembly
(HOT)
Valve Body Assembly
(COLD)
Handle
(HOT)
Handle
(COLD)
Flex Hoses
Lift Assembly
Pivot Rod
Connecting
Block
Drain Assembly
Hex Wrench
Spout Key
TL970DD1
TL970DD
TL970DD
TL970DD1
Manija
(CALIENTE)
Ensamble
del surtidor
Manija
(FRÍA)
Ensamble de elevación
Ensamble del
cuerpo de la válvula
(CALIENTE)
Bloque de
conexión
Ensamble del cuerpo de la válvula
(FRÍA)
Varilla de
pivote
Mangueras exibles
Ensamble de drenaje
Llave hexagonal
Llave grifo
DISCONTINUED

12
ESPAÑOL
PROCEDIMIENTO DE INSTALACIÓN
1. Instalación del surtidor
Asegúrese de que el suministro de
agua esté cerrado.
Después de aplicar la terminación
superior, quite el tapón de la espiga
del surtidor.
Aoje el tornillo de jación en la
parte trasera del surtidor.
Quite el adaptador del surtidor.
Enrosque el adaptador del surtidor en
la espiga del surtidor.
Tenga cuidado de no dañar el anillo
en O.
Introduzca con cuidado el surtidor
en el adaptador del surtidor. Tenga
cuidado de no dañar los anillos en O.
Asegure el surtidor con el tornillo de
jación.
Varilla de elevación
Surtidor
Junta
Junta
Arandela
Junta
Tuerca
Conector en T
Anillos en O
Contratuerca
2. Instalación del cuerpo de la válvula
Introduzca el cuerpo de la válvula por
la parte inferior del lavabo. Asegúrese
de que el lado FRÍO esté a la derecha y
el caliente a la izquierda.
Coloque la junta de caucho debajo del
adaptador de la plataforma sobre el
cuerpo de la válvula hasta que llegue
a la parte inferior. Asegúrese de que
la arandela de caucho quede plana
sobre la ranura del adaptador de la
plataforma.
Coloque el cuerpo de la válvula como
se muestra a continuación y apriete la
contratuerca.
Atornille el adaptador del mango y
empuje el adaptador del vástago desde
la parte superior.
Repita el procedimiento para la otra.
Cuerpo de
la válvula
Conector en T
Anillos en O
Adaptador del
vástago
Adaptador del
Manija
Adaptador de la
plataforma
Junta de caucho
Arandela
de caucho
Conector
de caucho
Arandela
Arandela
de bronce
Contratuerca
Posición del cuerpo
de la válvula
(vista inferior)
DISCONTINUED

13
ESPAÑOL
Conecte las mangueras exibles en
el conector T como se muestra.
Haga los ajustes necesarios de
acuerdo a la situación de instalación.
Asegure las conexiones con una
llave ajustable.
Conector en T
Manguera exible
PROCEDIMIENTO DE INSTALACIÓN
4. Instalación de la manguera
3. Instalación de la manija
Coloque el escudo sobre el adaptador
del mango y ajuste con el tornillo de
jación
Alinee el mango y luego ajústelo con
el tornillo
Empuje la tapa de la etiquetta
Repita el procedimiento para el otro
mango. Asegúrese de que la tapa de la
etiquetta marcado con C o COLD esté
del lado del AGUA FRÍA (derecha)
y el tapa marcado con H o HOT esté
del lado del AGUA CALIENTE
(izquierda)
Manija o palanca
Tornillo
Tornillo de jación
de la manija
Llave hexagonal
Adaptador
de la manija
Tapa de la
etiqueta
Placa
protectora
DISCONTINUED

14
ESPAÑOL
BOSQUEJO
1 1/4"
[3.2cm]
1/2"NPSM
5 1/8"
[13.1cm]
1 7/8"
[4.9cm]
1 7/8"
[4.7cm]
3"
[7.7cm]
6 1/2"
[16.6cm]
DECK: 1 1/2" [3.8cm] MAX
2"
[5.2cm]
1 5/8"
[4.1cm]
1 1/4"
[3.2cm]
5 1/8"
[13.1cm]
4"
[10.3cm]
8"
(20.3cm)
DECK THICKNESS
1-1/2” (3.8 cm)MAX
6-1/2”
(16.6 cm)
4”
(10.3 cm)
2”
(5.2 cm)
1-1/4” dia
(3.2cm)
6-1/8”
(15.4 cm)
5-1/8”
(13.1 cm)
2-3/4”
(7.1 cm)
1-7/8”
(4.7 cm)
1-5/8”
(4.1 cm)
1-7/8”
(4.9 cm)
1-1/4”
(3.2 cm)
1/2” NPSM
TL970DD
TL970DD1
6-1/2 pulg.
(16,6 cm)
1-5/8 pulg.
(4,1 cm)
4 pulg.
(10,3 cm)
2 pulg.
(5,2 cm)
GROSOR DE LA PLATAFORMA
1-1/2 pulg. (3,8 cm)MAX
1-1/4 pulg. diám.
(3,2 cm)
6-1/8 pulg.
(15,4 cm)
2-3/4 pulg.
(7,1 cm)
1-7/8 pulg.
(4,7 cm)
1-7/8 pulg.
(4,7 cm)
1-1/4 pulg.
(3,2 cm)
5-1/8 pulg.
(13,1 cm)
1/2 pulg. NPSM
8 pulg.
(20,3 cm)
8 pulg.
[20,3 cm]
4 pulg.
[10,3 cm]
1 5/8 pulg.
[4,1 cm]
3 pulg.
[7,7 cm]
1 7/8 pulg.
[4,7 cm]
1 7/8 pulg.
[4,9 cm]
2 pulg.
[5,2 cm]
5 1/8 pulg.
[13,1 cm]
1 1/4 pulg.
[3,2 cm]
1 1/4 pulg.
[3,2 cm]
1/2 pulg. NPSM
5 1/8 pulg.
[13,1 cm]
PLATAFORMA: 1 1/2 pulg. [3,8 cm] MÁX
DISCONTINUED

15
ESPAÑOL
RESOLUCIÓN DE PROBLEMAS
3. Adaptador de la
plataforma:
¿Está bien apretado?
9. Junta:
¿Está sucia o dañada?
4. Junta:
¿Está plana y apoyada?
5. Contratuerca:
¿Está bien apretada?
10. Junta:
¿Está sucia o dañada?
11. Contratuerca:
¿Está bien apretada?
Manguera exible
12. ¿Está bien apretada?
13. ¿La junta está sucia o
1. Tornillo:
¿Está bien apretado?
2. Tornillo de jación:
¿Está bien apretado?
Válvula de cerámica
7. ¿El anillo en O está sucio o
dañado?
8. ¿Está bien apretado?
14. Junta:
¿Está sucia o dañada?
16. Aireador:
¿El anillo en O está sucio o dañado?
6. Tornillo:
¿Está bien apretado?
15. Tuerca:
¿Está bien apretada?
Problema
Si siguió las instrucciones con atención y aun así su grifo no funciona correctamente,
tome estas medidas correctivas
Área a inspeccionar
Poco caudal
Manija suelta
Pérdidas
Surtidor suelto
DISCONTINUED

16
ESPAÑOL
PIEZAS DE REPUESTO
2
3
5
6
8
17
20
21
12
13
18
15
14
4
1
9
10
11
19
TL970DD1
TL970DD
7
16
Grifo de Lavabo Ancho
(TL970DD* / TL970DD1*)
*=Sírvase especicar la terminación
Elemento Nº de
pieza
Descripción
1 THP4090$ Tapa de la manija* (CALIENTE)
2 THP4140 Tornillo y arandela
3 THP4141$
THP4326$
Manija y soporte* (TL970DD)
Palanca y soporte* (TL970DD1)
4 THP4014 Tornillo de jación
5 THP4142 Casquillo
6 THP4143 Unidad de la válvula
7 THP4021
THP4040
Cartucho de cerámica (IZQ.)
Cartucho de cerámica (DER.)
8 THP4136$ Kit del aireador*
9 THP4137 Junta
10 THP4138 Aireador
Elemento Nº de
pieza
Descripción
11 THP4144 Junta de espuma
12 THP4146 Ensamble de la espiga
13 THP4023 Juego de junta
14 THP4102$ Tapa de la manija* (FRÍA)
15 THP4145$ Varilla de elevación*
16 THP4296$ Ensamble del surtidor*
17 THP4010$ Ensamblaje de drenaje*
18 THP4026 Manguera exible
19 THP4011$ Tapón del drenaje*
20 THP4012
Conector de la varilla de
elevación
21 THP4101 Llave del surtidor
DISCONTINUED

17
ESPAÑOL
GARANTÍA
GARANTÍA LIMITADA DURANTE LA VIDA ÚTIL DEL PRODUCTO
La garantía se aplica a grifos y accesorios residenciales seleccionados solamente.
1. TOTO
®
garantiza que sus grifos (“Producto”) carecen de defectos de materiales y fabricación
durante el uso residencial normal siempre que el comprador, usuario nal y consumidor original sea dueño
de su casa. Esta garantía limitada durante la vida útil del producto se extiende solamente al comprador
usuario nal consumidor original y únicamente si el Producto sigue siendo utilizando por el comprador,
usuario nal y consumidor original en su lugar de instalación original en la residencia del comprador. Esta
garantía se aplica solamente al Producto comprado e instalado en Norteamérica.
2. Las obligaciones de TOTO
®
según esta garantía se limitan a la reparación o al reemplazo a
opción de TOTO
®
, del Producto o piezas que se compruebe que son defectuosas en uso residencial normal,
siempre que el Producto se haya instalado bien y se haya usado según el manual del propietario. TOTO
®
se reserva el derecho de efectuar dichas inspecciones según sea necesario a n de determinar la causa del
defecto.
3. Esta garantía no se aplica a los artículos siguientes:
Daños o pérdidas debidas a una calamidad natural tal como un incendio, terremoto, inundación, tormenta
eléctrica, etc.
Daños o pérdidas debidas a un accidente, uso no razonable, uso indebido, abuso, negligencia o cuidados
indebidos, limpieza o mantenimiento del producto.
Daños o pérdidas debidas a sedimentos o materias extrañas contenidas en un sistema de agua.
Daños o pérdidas debidas a la instalación indebida o a la instalación del Producto en un entorno riguroso
o peligroso, o desmontaje, reparación o modicación indebida del Producto.
Daños o pérdidas debidas al uso de un limpiador abrasivo.
4. Si el Producto se usa comercialmente, TOTO
®
garantiza que el Producto no tenga defectos de
materiales y fabricación durante un (1) año a partir de la fecha en que se instaló el Producto, con los demás
términos de esta garantía aplicables excepto la duración de la misma.
5. ESTA GARANTÍA LE DA DERECHOS LEGALES ESPECÍFICOS. USTED PUEDE TENER
OTROS DERECHOS QUE VARÍAN DE UN ESTADO A OTRO O DE UNA PROVINCIA A OTRA.
6. Para obtener un servicio de reparación de garantía, debe llevar el Producto o entregarlo previo pago del
franqueo a una instalación de servicio de TOTO
®
con la prueba de compra (recibo de venta original) junto
con una carta indicando el problema, o ponerse en contacto con un distribuidor de TOTO
®
o contratista de
servicio de productos. También puede escribir directamente a TOTO
®
U.SA. INC., 1155 Southern Road,
Morrow, Georgia 30260, (888) 295-8134. Si debido al tamaño del Producto o a la naturaleza del defecto,
el Producto no puede devolverse a TOTO
®
, el recibo de TOTO
®
del aviso escrito del defecto junto con la
prueba de compra (recibo de ventas original) debe constituir entrega. En dicho caso, TOTO
®
puede decidir
entre reparar el Producto en el lugar del comprador o pagar para transportar el Producto a una instalación de
servicio.
ESTA GARANTÍA POR ESCRITO ES LA ÚNICA GARANTÍA DADA POR TOTO
®
. LA REPARACIÓN, EL REEMPLAZO U OTRO
AJUSTE APROPIADO SEGÚN ESTA GARANTÍA DEBE SER EL REMEDIO EXCLUSIVO DISPONIBLE PARA EL COMPRADOR
ORIGINAL. TOTO
®
NO DEBE SER RESPONSABLE DE LA PÉRDIDA DEL PRODUCTO O DE OTROS DAÑOS ESPECIALES,
EMERGENTES O CONCOMITANTES INCURRIDOS POR EL COMPRADOR ORIGINAL, O POR MANO DE OBRA U OTROS
COSTOS DEBIDOS A LA INSTALACIÓN O AL DESMONTAJE, O COSTOS O REPARACIONES POR OTROS, O POR CUALQUIER
OTRO GASTO QUE NO SE INDIQUE ESPECÍFICAMENTE. LA RESPONSABILIDAD DE TOTO
®
NO EXCEDERÁ EN NINGÚN
CASO EL PRECIO DE COMPRA DEL PRODUCTO. EXCEPTO EN LA MEDIDA QUE LO PROHÍBA LA LEY CORRESPONDIENTE,
CUALQUIER GARANTÍA IMPLÍCITA, INCLUIDA LA DE COMERCIALIZACIÓN O IDONEIDAD PARA UN USO O UN FIN
PARTICULAR, SE LIMITA EXPRESAMENTE A LA DURACIÓN DE ESTA GARANTÍA. ALGUNOS ESTADOS Y PROVINCIAS NO
PERMITEN LIMITACIONES SOBRE LA DURACIÓN DE UNA GARANTÍA IMPLÍCITA, O LA EXCLUSIÓN O LIMITACIÓN DE
DAÑOS EMERGENTES O CONCOMITANTES, DE MODO QUE ES POSIBLE QUE LA LIMITACIÓN Y LA EXCLUSIÓN ANTERIORES
NO SE LIMITEN A USTED.
DISCONTINUED

18
FRANÇAIS
TABLE DES MATIÈRES
MERCI D’AVOIR CHOISI TOTO
®
!
ENTRETIEN ET NETTOYAGE
PRUDENCE
La mission de TOTO
®
est d’offrir au monde entier un style de vie
sain, hygiénique et plus confortable. Comme principe de base, nous
concevons chaque produit avec un équilibre entre la forme et la fonction.
Félicitations pour votre choix.
Votre nouveau robinet est conçu pour un rendement sans problèmes et ce, pour de
nombreuses années. Maintenez son aspect de neuf en le nettoyant régulièrement
avec un savon doux, rincez-le à fond avec de l’eau chaude et essuyez-le avec
un chiffon doux et propre. N’utilisez pas de nettoyants abrasifs, laine d’acier ou
produits chimiques corrosifs car ils terniront la nition. Le non-respect de ces
directives peut annuler votre garantie.
Pour un fonctionnement sécuritaire du robinet, veuillez suivre les consignes suivantes :
Pression de fonctionnement :
Pression minimum……………7psi (pression d’écoulement)
Pression maximum…………...108psi (pression sans écoulement)
La température de l’alimentation en eau chaude ne devrait pas excéder
85°C (185°F).
N’utilisez pas la vapeur pour l’alimentation en eau chaude
Ne vous servez pas du produit à une température ambiante sous 32°F (0°C).
MERCI D’AVOIR CHOISI TOTO
®
! ................................................................... .......18
ENTRETIEN ET NETTOYAGE ......................................................................... .......18
PRUDENCE ........................................................................................................ .......18
AVANT DE COMMENCER................................................................................ .......19
OUTILS NÉCESSAIRES .................................................................................... .......19
PROCÉDURE D’INSTALLATION .................................................................... .......20
ROBINETTERIE BRUTE ................................................................................... .......22
DÉPANNAGE .................................................................................................... .......23
PIÈCES DE RECHANGE ................................................................................... .......24
GARANTIE ......................................................................................................... .......25
DISCONTINUED

19
FRANÇAIS
AVANT DE COMMENCER
OUTILS NÉCESSAIRES
Observez tous les codes locaux en matière de plomberie;
Assurez-vous que l’alimentation en eau est coupée;
Lisez soigneusement ces instructions an de vous assurez d’une
installation adéquate;
Pour l’installation d’une nouvelle cuvette, installez le robinet avant
d’installer la cuvette;
Vériez pour vous assurer que vous ayez bien toutes les pièces indiquées
ci-dessous :
Ruban
d’étanchéité
Clé à
ouverture
variable
Tournevis
Pince
réglable
Spout
Assembly
Valve Body Assembly
(HOT)
Valve Body Assembly
(COLD)
Handle
(HOT)
Handle
(COLD)
Flex Hoses
Lift Assembly
Pivot Rod
Connecting
Block
Drain Assembly
Hex Wrench
Spout Key
TL970DD1
TL970DD
TL970DD
TL970DD1
Poignée
(CHAUD)
Poignée
(FROID)
Assemblage
du bec verseur
Assemblage
du levier
Assemblage
du corps de la valve
(CHAUD)
Block raccord
Assemblage
du corps de la valve
(FROID)
Boyaux exibles
Tige pivot
Assemblage
du drain
Clé hexagonale
Clef du bec
DISCONTINUED

20
FRANÇAIS
INSTALLATION PROCEDURE
1. Spout Installation
Lift Rod
Spout
Gasket
Gasket
Washer
Gasket
Nut
T-Connecctor
O-Ring
Lock Nut
Make sure water supply is turned
off.
After applying the top nish,
remove the plug from the spout
shank.
Loosen setscrew on the back of the
spout.
Remove the spout adapter.
Thread the spout adapter onto the
spout shank.
Take care not to damage the O-ring.
Carefully insert the spout onto the
spout adapter. Take care not to
damage the O-rings.
Secure the spout with setscrew.
3. Valve Body InstallationInstallation
Insert the valve body from underside
of the sink. make sure the COLD
side is on the right and the Hot side
is on the left.
Place rubber gasket underneath the
deck adapter onto the valve body
until it bottoms out. Make sure
rubber washer lays at in the groove
of the deck adapter.
Position the valve body as shown
below then tighten the locknut.
Screw in handle-adapter and push in
stem adapter from the top.
Repeat procedure for the other
Valve Body
T-Connecctor
Lock Nut
Valve body position
(Bottom View)
PROCÉDURE D’INSTALLATION
Bec
Tige de levage
Joint statique
Joint statique
Contre-écrou
Joint torique
Connecteur en T
Joint statique
Rondelle
Écrou
Joint torique
Adapteur de
tige
Adapteur de
Poignée
Adapteur de
plate-forme
Joint statique
en caoutchouc
Rondelle en
caoutchouc
Raccord en
caoutchouc
Rondelle
Rondelle
en laiton
Corps de la valve
Contre-écrou
Position du corps de la valve
(vue du dessous)
1. Installation du bec
Assurez-vous que l’alimentation en eau est
coupée;
Après avoir appliqué la nition supérieure,
retirez le bouchon de la tige du bec;
Dévissez la vis de réglage au dos du bec;
Retirez l’adapteur du bec;
Vissez l’adapteur du bec sur la tige du bec;
Prenez garde de ne pas abîmer le joint torique;
Insérez soigneusement le bec sur l’adapteur.
Prenez garde de pas abîmer les joints
toriques;
Fixez le bec avec la vis de réglage.
•
•
•
•
•
•
•
•
2. Installation du corps de la valve
Insérez le corps de la valve du dessous de
l’évier. Assurez-vous que le côté FROID
est du côté droit et le côté CHAUD du côté
gauche.
Placez le joint statique en caoutchouc
sous l’adapteur de plate-forme sur le
corps de valve jusqu’à ce qu’il touche
le fond. Assurez-vous que les rondelles
de caoutchouc sont bien à plat dans la
cannelure de l’adapteur de plate-forme.
Positionnez le corps de la valve comme
illustré ci-dessous puis serrez le contre-
écrou;
Vissez l’adapteur de poignée et insérez
l’adapteur de tige à partir du dessus;
•
•
•
•
DISCONTINUED
/