Page is loading ...
Page is loading ...
Page is loading ...
Page is loading ...

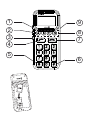
1
{
UP volume/navigation
2
}
DOWN volume/
navigation
3 Menu/OK
w
4 Call/answer
5
*
and Keylock
6
#
and ring setup/
vibrator
7 Disconnect (ON/OFF)
8 One-touch keys
9 Charging/headset
socket
English
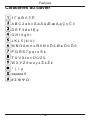
1
{
Augmentation du
volume/navigation
2
}
Diminution du
volume/navigation
3 Touche de défilement
du menu/OK
w
4 Touche de décroché
5 Touche
*
et de
verrouillage du clavier
6 Touche
#
et de réglage
de sonnerie/vibreur
7 Touche de raccroché et
de mise en/hors service
8 Touches de
mémoires directes
9 Prise du chargeur
et du casque
Français
Español
1
{
Volumen +/
Navegación
2
}
Volumen -
/Navegación
3 Tecla de menú/Aceptar
w
4 Tecla llamar/Responder
5
*
y bloqueo del teclado
6
#
y Configuración de
señal de llamada/vibrador
7 Tecla de desconexión
(encendido/apagado)
8 Teclas de marcación
directa
9 Conector de carga/
auriculares

1
English
Disclaimer and limitation of liability
Doro AB and its affiliates or licensees assume no responsibility for any
damage or loss resulting from the use of this guide. Doro AB and its
affiliates or licensees assume no responsibility for any loss or claims
by third parties that may arise through the use of this software. Doro
AB and its affiliates or licensees assume no responsibility for any
damage or loss caused by deletion of data as a result of malfunction,
dead battery, or repairs. Be sure to make backup copies of all
important data on other media to protect against data loss.
TO THE MAXIMUM EXTENT PERMITTED BY APPLICABLE LAW,
UNDER NO CIRCUMSTANCES SHALL DORO AB OR ANY OF
ITS AFFILIATES OR LICENSEES BE RESPONSIBLE FOR ANY
LOSS OF DATA OR INCOME OR ANY SPECIAL, INCIDENTAL,
CONSEQUENTIAL OR INDIRECT DAMAGES HOWSOEVER
CAUSED. THE CONTENTS OF THIS DOCUMENT ARE PROVIDED
“AS IS.” EXCEPT AS REQUIRED BY APPLICABLE LAW, NO
WARRANTIES OF ANY KIND, EITHER EXPRESS OR IMPLIED,
INCLUDING, BUT NOT LIMITED TO, THE IMPLIED WARRANTIES
OF MERCHANTABILITY AND FITNESS FOR A PARTICULAR
PURPOSE, ARE MADE IN RELATION TO THE ACCURACY,
RELIABILITY, OR CONTENTS OF THIS DOCUMENT. DORO
AB RESERVES THE RIGHT TO REVISE THIS DOCUMENT OR
WITHDRAW IT AT ANY TIME WITHOUT PRIOR NOTICE.

2
English
FCC Notice
Your unit may cause TV or radio interference (for example, when
using a telephone in close proximity to receiving equipment). The
Federal Communications Commission (FCC) of the United States
can require you to stop using your phone if such interference cannot
be eliminated. If you require assistance, contact your local service
facility. This device complies with part 15 of the FCC rules. Operation
is subject to the following two conditions: (1) this device may not cause
harmful interference, and (2) this device must accept any interference
received, including interference that may cause undesired operation.
Any changes or modifications not expressly approved by Doro AB
could void the user’s authority to operate this device.
© 2008 Doro AB. All rights reserved.
Battery Disposal and Recycling Information
When the battery in this unit has reached the end of its useful life,
please dispose of it according to your local environmental laws and
regulations. For information about recycling cell phone batteries, go
to: http://www.rbrc.org/
The symbol above means that according to local laws and regulations
your product should be disposed of separately from household waste.
When the battery in this unit has reached the end of its useful life, take
it to a collection point designated by local authorities. Some collection
points accept products for free. The separate collection and recycling
of your unit will help conserve natural resources and ensure that it is
recycled in a manner that protects human health and the environment.

3
English
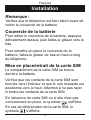
Installation
Note!
Always turn off the telephone before removing
the battery cover.
Battery cover
To remove the battery cover, carefully press the
cover and slide it downwards.
To replace the battery cover, slide it from below
and up along the telephone.
Installation/removal of SIM card
The SIM card holder is located behind the
battery.
Make sure that the SIM card’s contacts are
facing inwards and that the cut-off corner is
pointing upwards. Take care not to scratch or
bend the contacts on the SIM card.
If the SIM card is missing or incorrectly inserted,
is shown in the display.
If the SIM card is damaged, is shown in the
display.

4
English
Installation/removal of battery
Place the top of the battery in the battery slot
with the battery contacts facing the contacts in
the slot. Then carefully press the bottom of the
battery until it locks into place.
To remove the battery, carefully press and lift
the bottom of the battery in the “finger-shaped”
groove.
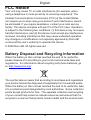
Charging
Insert the power adapter into the wall socket
and into the socket on the telephone. Charge
the telephone for 24 hours the first time. After
that, it takes approximately 5 hours to fully
charge the battery.
!"#
'()
0123 456 89:
*+,
-./
$%&
AC 110/240 V

5
English
Battery
Full battery capacity will not be reached until
the batteries have been charged 4–5 times.
Batteries degrade over time, which means that
call time and standby time will normally decrease
with regular use.
The automatic charging mechanism prevents the
batteries from being overcharged or damaged
due to prolonged charging.
When the battery is running low, is displayed
and a warning signal is heard.
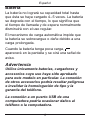
Warning!
Only use batteries, charger and accessories
that have been approved for use with
this particular model. Connecting other
accessories may be dangerous and may
invalidate the telephone’s type approval and
guarantee.
Connecting this telephone to a USB port on
a computer may damage the telephone or the
computer.

6
English
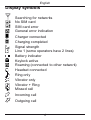
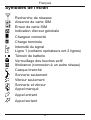
Display symbols
Searching for networks
No SIM card
SIM card error
General error indication
Charger connected
Charging completed
Signal strength
Line 1 (some operators have 2 lines)
Battery indicator
Keylock active
Roaming (connected to other network)
Headset connected
Ring only
Vibrator only
Vibrator + Ring
Missed call
Incoming call
Outgoing call

7
English
Operation
Activating the telephone
Press
L
/
1
4–5 seconds until the ON signal is
heard and the display lights up.
If the SIM card is locked with a PIN code
(Personal Identification Number), enter your PIN
code now and confirm with
w
.
The SIM card will only accept a certain number
of incorrect PIN code attempts. The display
shows how many attempts you have left with
“Remain: #”, where # is the number of attempts
left.
When no attempts remain, you need the PUK
code (Personal Unblocking Key) that came with
your SIM card to unlock the card and enter a
new PIN code.
Enter the PUK code, confirm with
w
, then enter
a new PIN code and confirm it.
If PIN and PUK codes did not come with the SIM
card, contact your network operator.
To turn off the telephone, press
L
/
1
until the
OFF signal is heard.

8
English
Making a call
1. Enter the telephone number using the
keypad. Skip backwards with
L
.
2. Press
q
to dial. A signal will be heard as
the number is dialed.
3. Press
L
to end the call.
Note!
When making international calls, press
*
twice
for the international prefix "+".
Dialing with the one-touch keys
1. Press one of the one-touch keys A–D
followed by
q
. A signal will be heard as the
number is dialed.
Or, press and hold the one-touch key until
the signal is heard.
2. Press
L
to end the call.

9
English
Dialing from the phonebook
1. Press
w
, then scroll through the list of
entries with
}
/
{
or press a keypad key
to jump to the entries beginning with that
character.
2. Press
q
to view the details for the selected
entry. Press
L
briefly to go back to the list,
or press and hold
L
then
w
to delete the
entry.
3. Press
q
to dial the number shown on the
display. A signal will be heard as the number
is dialed.
4. Press
L
to end the call.
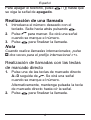
Receiving a call
1. Press
q
to answer, or
L
to reject the call
without answering.
2. Press
L
to end the call.
Caller ID
The telephone number of an incoming call
is shown on the display. If no information is
available, ????? is displayed.

10
English
Call memory
The 15 most recent calls are saved in the call
memory. For multiple calls related to the same
number, only the most recent of call is saved.
Retrieving and dialing
1. Press
q
.
2. Scroll through the call list using
{
/
}
.
= Incoming call
= Outgoing call
= Missed call
3. Press
q
to view the details for the selected
call.
4. Press
q
to dial the number, or press
L
briefly to go back to the call list. To
delete the call, press and hold
L
then
acknowledge with
w
.
5. Press
L
to end the call.

11
English
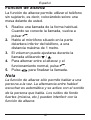
Missed calls
When an incoming call is unanswered, is
shown on the display. The most recent missed
call(s) can then be retrieved by immediately
pressing
w
.
1. Press
w
.
2. Scroll through the missed calls list using
{
/
}
.
3. Press
q
to view the details for the selected
call.
4. Press
q
to dial the number, or press
L
briefly to go back to the call list. To
delete the call, press and hold
L
then
acknowledge with
w
.
5. Press
L
to end the call.
Note!
This only works immediately after the call has
been received. After that, missed calls can be
retrieved from the call list (see page 10).

12
English
Speakerphone function
The speakerphone function allows you to use the
telephone without holding it, for instance, placed
on a table in front of you.
1. Place a call in the usual way. When the call
is connected, press
q
again.
2. Speak into the microphone on the lower front
edge of the telephone (max. 1 yard away).
3. The volume can be adjusted during a call
using
}
/
{
.
4. To change between speakerphone and
normal function, press
q
.
5. Press
L
to end the call.
Note!
The speakerphone function allows only one
person at a time to talk. Switching between
talk/listen is automatic and triggered by the
sound of the person talking. Loud noises (music,
etc.) in the background may interfere with the
speakerphone function.

13
English
Volume control
The volume can be adjusted during a call using
the
}
/
{
buttons on the side of the telephone.
Redial
Press
q
and scroll between the 15 most
recently dialed/incoming numbers using
}
/
{
.
Press
q
to review the details. Then press
q
to
dial the number or
L
to end.
Press and hold
L
then
w
to delete the entry.
Emergency calls
When the telephone is switched on, it is possible
to place an emergency call by entering 911 / 112
followed by
q
.
Most mobile networks accept emergency calls
even when the SIM card is not in the telephone.

14
English
Keylock
Press and hold
*
/L for 2 seconds to lock/
unlock the keypad. is shown in the display
when the keylock is active.
Headset
When a headset is connected, the internal
microphone in the telephone is automatically
disconnected.
When receiving a call, you can use the answer
key on the headset cable instead of
q
.
Warning!
Using a headset at high volume can damage
your hearing. Adjust the sound volume
carefully when using a headset.

15
English
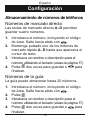
Settings
Saving telephone numbers
One-touch numbers
Four numbers can be stored under the one-touch
keys A–D.
1. Enter the number, including the area code.
Skip backwards with
L
.
2. Press and hold one of the one-touch buttons
A–D until the text cursor appears.
3. Enter a name or description for the number
using the keypad (see page 17).
4. Press
w
twice to save or
L
to end.
Phone book numbers
20 numbers can be stored in the phone book.
1. Enter the number, including the area code.
Skip backwards with
L
.
2. Press
w
.
3. Enter a name or description for the number
using the keypad (see page 17).
4. Press
w
twice to save or
L
to end.

16
English
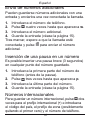
Sending additional numbers
Additional numbers can be saved with an entry
and sent after the call is connected.
1. Enter the telephone number.
2. Press
*
4 times until w is shown.
3. Enter the additional number.
4. Save the entry (see page 15).
After dialing, wait until the call is connected, and
then press
w
to send the additional number.
Inserting a pause in a number
A short pause (3 seconds) can be inserted
anywhere in the saved number.
1. Enter the first part of the telephone number
(before the pause).
2. Press
*
3 times until p is shown.
3. Enter the last part of the number.
4. Save the entry (see page 15).
International numbers
To save an international number, press
*
twice
for the international prefix (+), then enter the
country code, area code (possibly leaving out the
first digit) and telephone number.

17
English
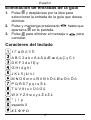
Deleting phonebook entries
1. Press
w
and scroll through the list to select
the phonebook entry to be deleted.
2. Press
q
to show the details for the selected
entry.
3. Press and hold
L
until
w
is shown on the
display.
4. Press
w
to delete the entry or
L
to cancel.
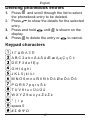
Keypad characters
1 Γ Δ Θ Λ Ξ Π
A B C 2 a b c Å å Ä ä Æ æ Ą ą Ç ç Ć ć
D E F 3 d e f Ę ę
G H I 4 g h i
J K L 5 j k l Ł ł
M N O 6 m n o Ñ ñ Ń ń Ö ö Ø ø Ó ó Ô ô
P Q R S 7 p q r s Ś ś
T U V 8 t u v Ü ü Ű ű
W X Y Z 9 w x y z Ź ź Ż ż
* | / µ
space 0
# Σ Φ Ψ Ω

18
English
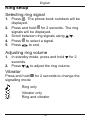
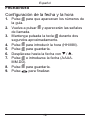
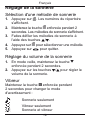
Ring setup
Selecting ring signal
1. Press
w
. The phone book numbers will be
displayed.
2. Press and hold
w
for 2 seconds. The ring
signals will be displayed.
3. Scroll between ring signals using
{
/
}
.
4. Press
w
to select a signal.
5. Press
L
to end.
Adjusting ring volume
1. In standby mode, press and hold
}
for 2
seconds.
2. Press
}
/
{
to adjust the ring volume.
Vibrator
Press and hold
#
for 2 seconds to change the
signalling mode:
Ring only
Vibrator only
Ring and vibrator

19
English
Time/date
Setting the time and date
1. Press
w
The phone book numbers will be
displayed.
2. Press
w
again. The ring signals will be
displayed.
3. Press and hold
w
for approx. 2 seconds.
4. Press
w
to enter time (HH:MM).
5. Press
w
to save.
6. Scroll to the date using
}
/
{
.
7. Press
w
and enter the date (YYYY.MM.DD).
8. Press
w
to save.
9. Press
L
to end.
Page is loading ...
Page is loading ...
Page is loading ...
Page is loading ...
Page is loading ...
Page is loading ...
Page is loading ...
Page is loading ...
Page is loading ...
Page is loading ...
Page is loading ...
Page is loading ...
Page is loading ...
Page is loading ...
Page is loading ...
Page is loading ...
Page is loading ...
Page is loading ...
Page is loading ...
Page is loading ...
Page is loading ...
Page is loading ...
Page is loading ...
Page is loading ...
Page is loading ...
Page is loading ...
Page is loading ...
Page is loading ...
Page is loading ...
Page is loading ...
Page is loading ...
Page is loading ...
Page is loading ...
Page is loading ...
Page is loading ...
Page is loading ...
Page is loading ...
Page is loading ...
Page is loading ...
Page is loading ...
Page is loading ...
Page is loading ...
Page is loading ...
Page is loading ...
Page is loading ...
Page is loading ...
Page is loading ...
Page is loading ...
Page is loading ...
Page is loading ...
Page is loading ...
Page is loading ...
Page is loading ...
Page is loading ...
Page is loading ...
Page is loading ...
Page is loading ...
Page is loading ...
Page is loading ...
Page is loading ...
Page is loading ...
Page is loading ...
Page is loading ...
Page is loading ...
Page is loading ...
Page is loading ...
Page is loading ...
Page is loading ...
-
 1
1
-
 2
2
-
 3
3
-
 4
4
-
 5
5
-
 6
6
-
 7
7
-
 8
8
-
 9
9
-
 10
10
-
 11
11
-
 12
12
-
 13
13
-
 14
14
-
 15
15
-
 16
16
-
 17
17
-
 18
18
-
 19
19
-
 20
20
-
 21
21
-
 22
22
-
 23
23
-
 24
24
-
 25
25
-
 26
26
-
 27
27
-
 28
28
-
 29
29
-
 30
30
-
 31
31
-
 32
32
-
 33
33
-
 34
34
-
 35
35
-
 36
36
-
 37
37
-
 38
38
-
 39
39
-
 40
40
-
 41
41
-
 42
42
-
 43
43
-
 44
44
-
 45
45
-
 46
46
-
 47
47
-
 48
48
-
 49
49
-
 50
50
-
 51
51
-
 52
52
-
 53
53
-
 54
54
-
 55
55
-
 56
56
-
 57
57
-
 58
58
-
 59
59
-
 60
60
-
 61
61
-
 62
62
-
 63
63
-
 64
64
-
 65
65
-
 66
66
-
 67
67
-
 68
68
-
 69
69
-
 70
70
-
 71
71
-
 72
72
-
 73
73
-
 74
74
-
 75
75
-
 76
76
-
 77
77
-
 78
78
-
 79
79
-
 80
80
-
 81
81
-
 82
82
-
 83
83
-
 84
84
-
 85
85
-
 86
86
-
 87
87
-
 88
88
-
 89
89
-
 90
90
-
 91
91
-
 92
92


Ask a question and I''ll find the answer in the document
Finding information in a document is now easier with AI
in other languages
- français: Doro 326i gsm Manuel utilisateur
- español: Doro 326i gsm Manual de usuario


