
CARE AND USE MANUAL
For Thermador Professional
®
PRO-HARMONY™ Dual Fuel Ranges
GUIDE D'UTILISATION ET
D'ENTRETIEN
Pour cuisinière à combustion jumelée
Professional
®
PRO-HARMONY™ de
Thermador
Models/
Modèles /
PRD30
PRD36
PRD48

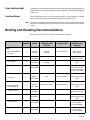
Table of Contents
About This Manual . . . . . . . . . . . . . . . . . . . . . . . . . . . .1
Safety . . . . . . . . . . . . . . . . . . . . . . . . . . . . . . . . . . . . . .2
Before You Begin . . . . . . . . . . . . . . . . . . . . . . . . . . . . .9
Description . . . . . . . . . . . . . . . . . . . . . . . . . . . . . . . . .10
Model and Parts Identification - 48” Range . . . . . . . . . . . . . . . . . . . . . . . . . . . . 10
Model and Parts Identification - 36” Range . . . . . . . . . . . . . . . . . . . . . . . . . . . . 12
Model and Parts Identification - 30” Range . . . . . . . . . . . . . . . . . . . . . . . . . . . . 13
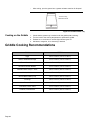
Using The Cooktop . . . . . . . . . . . . . . . . . . . . . . . . . .14
Cookware Recommendations . . . . . . . . . . . . . . . . . . . . . . . . . . . . . . . . . . . . . . 18
Specialty Cookware . . . . . . . . . . . . . . . . . . . . . . . . . . . . . . . . . . . . . . . . . . . . . 20
Cooking Recommendations . . . . . . . . . . . . . . . . . . . . . . . . . . . . . . . . . . . . . . . 21
Surface Burner Cooking Recommendations . . . . . . . . . . . . . . . . . . . . . . . . . . . 21
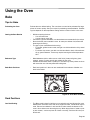
Using the Gas Grill . . . . . . . . . . . . . . . . . . . . . . . . . . . . . . . . . . . . . . . . . . . . . . 23
About the Gas Grill . . . . . . . . . . . . . . . . . . . . . . . . . . . . . . . . . . . . . . . . . . . . . . 25
About the 12” and 24” Electric Griddle . . . . . . . . . . . . . . . . . . . . . . . . . . . . . . . 27
Griddle Cooking Recommendations . . . . . . . . . . . . . . . . . . . . . . . . . . . . . . . . . 28
Using the Oven . . . . . . . . . . . . . . . . . . . . . . . . . . . . . .29
Bake . . . . . . . . . . . . . . . . . . . . . . . . . . . . . . . . . . . . . . . . . . . . . . . . . . . . . . . . . 29
Convection . . . . . . . . . . . . . . . . . . . . . . . . . . . . . . . . . . . . . . . . . . . . . . . . . . . . 30
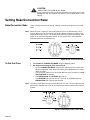
Setting Bake/Convection Bake . . . . . . . . . . . . . . . . . . . . . . . . . . . . . . . . . . . . . 32
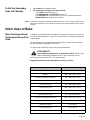
Other Uses of Bake . . . . . . . . . . . . . . . . . . . . . . . . . . . . . . . . . . . . . . . . . . . . . . 33
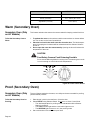
Warm (Secondary Oven) . . . . . . . . . . . . . . . . . . . . . . . . . . . . . . . . . . . . . . . . . 34
Proof (Secondary Oven) . . . . . . . . . . . . . . . . . . . . . . . . . . . . . . . . . . . . . . . . . . 34
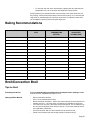
Baking Recommendations . . . . . . . . . . . . . . . . . . . . . . . . . . . . . . . . . . . . . . . . 35
Broil/Convection Broil . . . . . . . . . . . . . . . . . . . . . . . . . . . . . . . . . . . . . . . . . . . . 35
Setting Broil or Convection Broil . . . . . . . . . . . . . . . . . . . . . . . . . . . . . . . . . . . . 36

Table of Contents Cont.
Questions?
1-800-735-4328
www.thermador.com
We look forward to hearing from you
!
This Thermador Appliance is made by
BSH Home Appliances Corporation
5551 McFadden Ave.
Huntington Beach, CA 92649
Broiling and Roasting Recommendations . . . . . . . . . . . . . . . . . . . . . . . . . . . . . 37
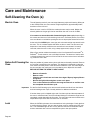
Care and Maintenance . . . . . . . . . . . . . . . . . . . . . . . .38
Self-Cleaning the Oven (s) . . . . . . . . . . . . . . . . . . . . . . . . . . . . . . . . . . . . . . . . 38
Range Cleaning . . . . . . . . . . . . . . . . . . . . . . . . . . . . . . . . . . . . . . . . . . . . . . . . 39
Cleaning Recommendations . . . . . . . . . . . . . . . . . . . . . . . . . . . . . . . . . . . . . . 40
Do-It-Yourself Maintenance . . . . . . . . . . . . . . . . . . . . . . . . . . . . . . . . . . . . . . . 44
Before Calling For Service . . . . . . . . . . . . . . . . . . . .45
Statement of Limited Product Warranty . . . . . . . . . . . . . . . . . . . . . . . . . . . . . . 46

Page 1
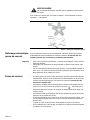
About This Manual
How This Manual Is Organized
This manual contains several sections:
• The “Safety” section describes important safety precautions. Please read this
section before using your new appliance.
• “Using The Cooktop” and “Using the Oven” sections describe how to operate
the appliance and how to ensure a long life for your appliance.
• The “Care and Maintenance” section describes how to clean and maintain your
appliance.
• The “Before Calling For Service” section includes troubleshooting tips and your
Warranty.
Before using your appliance, be sure to read this manual. Pay special attention to
the Important Safety Instructions located at the beginning of the manual.
Introduction
The Thermador Professional® Ranges are freestanding units available in a number
of configurations. All models feature a gas cooking surface with a professional size,
electric
convection, self-cleaning oven with convection broil capability. The 48”
model has an electric self-cleaning auxiliary oven with broil capability.
Gas Type Verification
Verify the type of gas supplied to the location. Ensure that the appliance is con-
nected to the type of gas for which it is certified. All models are certified for use with
natural gas. Field conversion of the appliance for use with propane gas supply will
Introduction
- Do not store or use gasoline or other flammable vapors and liq-
uids in the vicinity of this or any other appliance.
- WHAT TO DO IF YOU SMELL GAS
• Do not try to light any appliance.
• Do not touch any electrical switch.
• Do not use any phone in your building.
• Immediately call your gas supplier from a neighbor’s phone.
Follow the gas supplier’s instructions.
• If you cannot reach your gas supplier, call the fire depart-
ment.
- Installation and service must be performed by a qualified
installer, service agency or the gas supplier.
WARNING
If the information in this manual is not followed exactly, a fire or
explosion may result causing property damage, personal injury or
death.

Page 2
require a conversion kit. Make certain your range and gas type are the same. Refer
to the product rating label which can be located as indicated on Page 45.
Important: All ranges must be installed with a backguard. The 30" model comes with a low
back. For all other models, one of three available backguards must be ordered
separately and installed at the back of the range. The three backguard choices
include a Low Back, Pot and Pan Shelf, or Island Trim. Before using the range,
insure that it is equipped with a proper backguard. DO NOT attempt to use a
backguard that is not designed to fit your particular model range. Refer to the
Installation Instructions accompanying this appliance for more information.
This manual contains important Care and Use information for all Thermador Profes-
sional® Ranges. When using this manual, it is critical that you know the model num-
ber of your range, as some information will be unique to each range. The model
number may be found on the rating plate located on the range as identified on
Page 45 of this manual. The charts on the following pages summarize the various
range models and identify the features of each range.
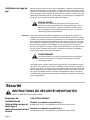
IMPORTANT SAFETY INSTRUCTIONS
READ AND SAVE THESE INSTRUCTIONS
Gas and Electrical
Requirements and
Grounding Instructions
PLEASE READ CAREFULLY
30" Dual-Fuel Models:
240/208 volts, 60 Hz., 35 Amp electrical circuit required for each line.
36" Dual-Fuel Models:
240/208 volts, 60 Hz., 35 Amp electrical circuit required for each line.
48" Dual-Fuel Models:
240/208 volts, 60 Hz., 50 Amp electrical circuit required for each line.
CAUTION
When connecting the unit to propane gas, make certain the pro-
pane gas tank is equipped with its own high-pressure regulator in
addition to the pressure regulator supplied with the range. The
maximum gas pressure to this appliance must not exceed 14.0
inches water column (34.9 mb) from the propane gas tank to
the pressure regulator.
WARNING
To avoid possible burn or fire hazard, a backguard designed specif-
ically for this range must be installed whenever the range is used.
Safety

Page 3
It is recommended that a dedicated circuit servicing this appliance be provided.
The use of gas cooking appliances results in the production of heat and moisture.
CAUTION
FOR PERSONAL SAFETY, THIS APPLIANCE MUST BE CONNECTED
TO A PROPERLY GROUNDED AND POLARIZED ELECTRICAL
POWER SUPPLY.
CAUTION
Accessible parts may become hot when the grill is in use. Young children
must be kept away.
See Installation Instructions for electrical requirements and grounding instructions.
It is the personal responsibility and obligation of you, the user, to have this appliance
connected to the electrical power supply in accordance with the National Electrical
Code and/or applicable local codes and ordinances by a qualified electrician.
CAUTION - ALL MODELS
IN CASE OF AN ELECTRICAL FAILURE
If for any reason a gas control knob is turned ON and there is no
electrical power to operate the electronic igniters on the range's cooktop
burners, turn OFF the gas control knob and wait 5 minutes for the gas to
dissipate before lighting the burner manually.
To light the burners manually, carefully hold a lighted match to the burner ports and
turn the gas control knob to
.
During a power failure, you can use the standard
cooktop burners, but each must be lit with a match.
DO NOT attempt to light the two left burners manually. These burners are equipped
with the ExtraLow
®
feature and cannot be lit manually.
TESTED IN ACCORDANCE WITH:
• ANSI Z21.1 for Household Gas Appliances
• UL858 for Household Electric Ranges
• CAN/CSA-22.2 No. 61-M89 for Household Cooking Ranges
• CAN/CGA 1.1-M81 Domestic Gas Ranges
Check your local building codes for the proper method of installation. In the absence
of local codes, this unit should be installed in accordance with the National Fuel Gas
Code No. Z223.1 current issue and the National Electrical Code ANSI/NFPA No. 70
current issue or the Can - B149 Installation Codes for Gas Burning Appliances and
C22.1 Canadian Electrical Code Part 1.
WARNING
ALWAYS DISCONNECT THE ELECTRICAL PLUG FROM THE
WALL RECEPTACLE BEFORE SERVICING THIS UNIT.

Page 4
Safety Practices to
Avoid Personal Injury
When properly cared for, your new Thermador Professional
®
Range has been
designed to be a safe, reliable appliance. However, use extreme care when using
this restaurant caliber range as this type of appliance provides intense heat. When
using kitchen appliances, basic safety precautions must be followed, including the
following:
Read this Care and Use Manual carefully before using your new range to reduce the
risk of fire, electrical shock, or injury to persons.
Insure proper installation and servicing. Follow the installation instructions provided
with this product. Have the range installed and electrically grounded by a qualified
technician.
Have the installer show you where the gas supply shut-off valve is located so that
you know how and where to turn off the gas to the range.
Have the installer show you the location of the circuit breaker or fuse. Mark it for
easy reference.
Do not repair or replace any part of the appliance unless specifically recommended
in this manual. All other servicing should be referred to a qualified technician.
Children should not be left alone or unattended in an area where appliances are in
use. They should never be allowed to sit or stand on any part of the appliance. If
children are allowed to use the appliance, they must be closely supervised.
CAUTION
Do not store items of interest to children above or at the back of the
range. If children should climb onto the appliance to reach these items,
they could be seriously injured.
When children become old enough to operate the appliance, it is the legal responsi-
bility of the parents or legal guardians to ensure that they are instructed in safe prac-
tices by qualified persons.
Never use any part of the range or oven for storage. Flammable materials can catch
fire and plastic items may melt or ignite.
Do not hang articles from any part of the appliance or place anything against the
oven. Some fabrics are quite flammable and may catch on fire.
If the range is near a window, be certain the curtains do not blow over or near the
range burners; they could catch on fire.
Have an appropriate fire extinguisher available, nearby, highly visible and easily
accessible near the appliance. DO NOT USE WATER ON GREASE FIRES.
Turn appliance off and smother fire with baking soda or use a dry chemical or foam-
type extinguisher.
Never let clothing, potholders, or other flammable materials come in contact
with or too close to any infrared burner, top burner or burner grate until it has
cooled. Fabric may ignite and result in personal injury.
Use only dry potholders: moist or damp potholders on hot surfaces may cause
burns from steam. Do not use a towel or other bulky cloth in place of potholders. Do
not let potholders touch hot elements, hot burners, or burner grates.

Page 5
For personal safety, wear proper apparel. Loose fitting garments or hanging sleeves
should never be worn while using this appliance. Some synthetic fabrics are highly
flammable and should not be worn while cooking.
Do not use aluminum foil to line any part of the oven or range. Use of a foil liner
could result in a shock or fire hazard, or the obstruction of the flow of combustion
and ventilation air. Foil is an excellent heat insulator and heat will be trapped
beneath it. This will upset the cooking performance and can damage the finish of the
oven or the range.
WARNING RANGE TIPPING HAZARD
• All ranges can tip and injury can result. To prevent accidental tip-
ping of the range, attach it to the floor, wall or cabinet by installing
the Anti-Tip Device supplied.
• A risk of tip-over may exist if the appliance is not installed in accor-
dance with these instructions.
• If the range is pulled away from the wall for cleaning, service or any
other reason, ensure that the Anti-Tip Device is properly reengaged
when the range is pushed back against the wall. In the event of
abnormal usage (such as a person standing, sitting, or leaning on
an open door), failure to take this precaution can result in tipping of
the range. Personal injury might result from spilled hot liquids or
from the range itself.
Safety Precautions
WARNING
The appliance is for cooking. Based on safety considerations, never
use the oven or cooktop to warm or heat a room. Also, such use can
damage the cooktop or oven parts.
When using the cooktop: DO NOT TOUCH THE BURNER GRATES OR THE
IMMEDIATE SURROUNDING AREA. Areas adjacent to the burners may become
hot enough to cause burns.
Never leave the range unattended when using high flame settings. Boil overs
cause smoking and greasy spillovers that may ignite. More importantly, if the burner
flames are smothered, unburned gas will escape into the room. See front of this
manual, page 1 regarding gas leaks.
Only certain types of glass, heatproof glass-ceramic, ceramic, earthenware, or
other glazed utensils are suitable for cooking on the range burners. This type
of utensil may break with sudden temperature changes. Use only on low or medium
heat settings according to the utensil manufacturer’s directions.
Do not heat unopened food containers; a buildup of pressure may cause the con-
tainer to burst.
During cooking, set the burner control so that the flame heats only the bottom of the
pan and does not extend beyond the bottom of the pan. Proper relationship of cook-
ware to burner flame reduces safety risks.
WARNING
NEVER use this appliance as a space heater to heat or warm the
room. Doing so may result in carbon monoxide poisoning and over-
heating of the oven.

Page 6
Avoid using high flame setting with a pan larger than the grate or with one that
spans more than one burner, such as a griddle, for prolonged periods of time. This
can result in poor combustion that generates harmful by-products.
Use caution to insure that drafts like those from forced air vents or fans do not blow
flammable material toward the flames or push the flames so that they extend
beyond the edges of the pot.
Always use utensils that have flat bottoms large enough to cover the burner. The
use of undersized utensils could expose a portion of the flame and may result in
ignition of clothing.
Do not use flammable cleaners to clean the range.
To minimize the risk of burns, ignition of flammable materials and unintentional spill-
age, position handles of utensils inward so they do not extend over adjacent work
areas, cooking areas, or the edge of the range's cooktop.
Hold the handle of the pan to prevent movement of the utensil when stirring or turn-
ing food.
DO NOT use pots or pans on the grill section.
Do not use the grill for cooking excessively fatty meats or products which promote
flare-ups.
The optional cutting board accessory must be removed before operating the
griddle beneath or burners adjacent to it.
GREASE IS FLAMMABLE. Let hot grease cool before attempting to handle it.
Avoid letting grease deposits collect. Clean after each use.
For proper lighting and performance of the burners, keep the igniter ports clean. It is
necessary to clean these when there is a boil over or when the burner does not light
even though the electronic igniters activate. See “Cleaning Recommendations ” on
Page 40.
Clean the range with caution. Avoid steam burns; do not use a wet sponge or
cloth to clean the range while it is hot. Some cleaners produce noxious fumes if
applied to a hot surface. Follow directions provided by the cleaner manufacturer.
Be sure all cooktop controls are turned off and the cooktop is cool before using any
type of aerosol cleaner on or around the cooktop. The chemical that produces the
spraying action could, in the presence of heat, ignite or cause metal parts to cor-
rode.
When using the oven: DO NOT TOUCH THE BROILER ELEMENT, THE INTE-
RIOR SURFACES OF THE OVEN OR THE EXTERIOR AREA IMMEDIATELY
SURROUNDING THE DOOR. Interior oven surfaces become hot enough to cause
burns. The heat deflector, which deflects heat away from the cooktop and the trim
on the top and sides of the oven door, will also be hot when the oven is in use.
WARNING
After a spill or boil over, turn off the burner and clean around the
burner and burner ports. After cleaning, check for proper operation.

Page 7
Place oven racks in desired position while oven is cool. If a rack must be
moved while the oven is hot, do not let the potholders contact the broiler element.
Use care when opening the oven door; let hot air or steam escape before remov-
ing or replacing foods.
Do not clean, rub, damage, move or remove the door gasket. It is essential for a
good seal during baking. If the gasket becomes worn or excessively soiled with food
particles, replace gasket to assure a tight seal.
Protect the self-cleaning feature. Clean only those parts indicated in this booklet.
Do not use commercial oven cleaners or oven liner protective coatings of any kind in
or around the self-cleaning oven.
DO NOT obstruct the flow of combustion or ventilation air.
For safety reasons and to avoid equipment damage, never sit, stand, or lean on the
oven door.
Service should only be done by authorized technicians. Technicians must dis-
connect the power supply before servicing this unit.
Listen to be sure the cooling blower runs whenever the oven controls are set in broil
or bake modes. If the fan does not operate, do not use the oven. Call an authorized
service center for service.
To avoid a fire hazard, grease accumulation must be prevented by frequently clean-
ing the ventilation hood and filters.
• In case of fire or when intentionally “flaming” liquor or other spirits on the
range's cooktop, follow hood manufacturer’s instructions.
Use caution when cooking foods with high alcohol content (e.g. rum, brandy,
bourbon) in the oven. Alcohol evaporates at high temperatures. There is a risk
of burning as the alcohol vapors may catch fire in the oven. Use only small
quantities of alcohol in foods, and open the oven door carefully.
WARNING
To avoid possible burn or fire hazard, a backguard designed specifically
for this range must be installed whenever the range is used.
California Proposition 65
WARNING
The California Safe Drinking and Toxic Enforcement Act requires the
Governor of California to publish a list of substances known to the state
to cause cancer, birth defects or other reproductive harm, and requires
businesses to warn customers of potential exposure to such substances.
The burning of gas cooking fuel and the elimination of soil during self-cleaning can
generate small amounts of Carbon Monoxide.
The fiberglass insulation in self-clean ovens gives off very small amounts of formal-
dehyde during the first several cleaning cycles.
California lists formaldehyde as a potential cause of cancer. Carbon Monoxide is a
potential cause of reproductive toxicity.
Exposure to these substances can be minimized by:

Page 8
1. Providing good ventilation when cooking with gas.
2. Providing good ventilation during and immediately after self cleaning the oven.
3. Operating the unit according to the instructions in this manual.
Do not store or use corrosive chemicals, vapors, flammables or nonfood products in
or near this appliance. It is specifically designed for use when heating or cooking
food. The use of corrosive chemicals while heating or cleaning will damage the
appliance and could result in injury.
Before using your range for the first time, check that you have these items:
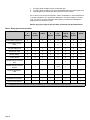
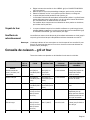
Table 1: Range Accessories and Parts
DESCRIPTION 30"
4
Burner
36"
w/12"
Griddle
36"
w/Grill
36"
6
Burner
48" w/
24"
Griddle
48" w/
Grill &
12"
Griddle
48"
w/12"
Griddle
48"
w/Grill
Oven Racks Large Oven 3 3 3 3 3 3 3 3
Oven Racks 12-inch
Oven
2 2 2 2
Two-Piece Broil Pan 1 1 1 1 2 2 2 2
Star Burner Caps 4 4 4 6 4 4 6 6
Burner Grates 2 2 2 3 2 2 3 3
Control Knobs 5 6 6 7 8 8 9 9
Coated Titanium-Surface
Grill
1 1 1
Coated Titanium-Surface
Griddle
1 1 (24") 1 1
Product Registration
Card
1 1 1 1 1 1 1 1
Backguard 1 * * * * * * *
Installation Instructions 1 1 1 1 1 1 1 1
Use and Care Manual 1 1 1 1 1 1 1 1
* Backguard must be ordered and shipped separately. It is not included with the range shipment.

Page 9
Before You Begin
Before Using Your Range for the First Time
Remove all packaging materials and temporary labels from oven and cooktop.
1. Check that you have the items listed on Page 8.
2. Record the Model and Serial number on Page 45. See "Data Rating Plate."
These may be used for any future contacts with Customer Service. Enter this
information on the Product Registration Card included with this product then
mail it to the indicated address.
3. Optional Accessories. Grill Plate, Black Knob Kit, Chopping Board, Griddle
Cover, Wok Support Ring and other accessories are available from your Ther-
mador Dealer.
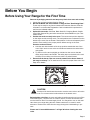
4. Position the racks correctly in the oven. The correct rack position depends
on the recipe and the cooking mode. The rack positions are numbered from the
bottom of the oven, like an elevator. Rack position 3 is the most frequently used
position. Place rack(s) in the proper position before turning on the oven.
Insert the racks as follows:
a. Hold the rack with the back rail in the up position towards the rear of the
oven. Slip it into the oven so the rack slides are between the rack and the
rack guides.
b. Tip the front of the rack up slightly as it slides into the oven so that the
safety stops clear the rack slides. The safety stops on the back of the rack
will keep it from sliding out of the oven when it is pulled forward.
5. Ensure that the burner caps are correctly seated on the burner bases of
the range's cooktop. Turn on each burner to check for proper flame color. See
Page 18 for details.
CAUTION
Aluminum foil should never be used to cover the oven racks or to line the
oven. Do not remove the broiler element in the electric oven.
Before baking or broiling, the oven and broiler should be turned on to burn off the
manufacturing oils. Turn the oven on to 450°F (230°C) for 20 to 30 minutes; then
turn the broiler to "Broil" for same length of time. You may wish to turn on the venti-
lator above your range during this time. Please note that it is normal for small
amounts of smoke to be visible from the range, during this initial breaking-in pro-
cess.
Please read “Care and Maintenance” on Page 38 before cleaning the oven
racks.
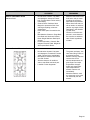
Figure 1: Oven Rack Positions
5
4
3
2
1

Page 10
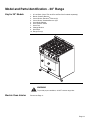
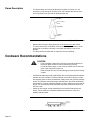
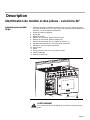
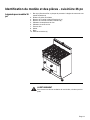
Description
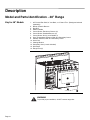
Model and Parts Identification - 48” Range
Key for 48" Models
1. 22" Pot and Pan Shelf, 9" Low Back, or 3” Island Trim - (Backguard ordered
separately)
2. Burner Grates & Burners
3. Gas Grill
4. Electric Griddle
5. Control Knobs, ExtraLow
®
Burners (2)
6. Control Knobs, Standard Burners (2)
7. Control Knobs, Grill (1) and Griddle (1)
8. Oven Temperature Selectors, Main and Secondary Ovens
9. Selector Switches, Main and Secondary Ovens
10. Oven Door
11. Viewing Window
12. Secondary Oven (2 racks included)
13. Kick Panel
14. Range Feet (4)
WARNING
To provide proper ventilation, do NOT remove range feet.
1
2
2
3
4
6
5
11
9
10
12
13
14
8
9
8
7
7

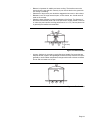
Page 11
Electric Oven Interior
15. Oven Interior Light
16. Broil Element
17. Oven Thermostat
18. Rack Guides
19. Oven Rack (3 included, not shown)
20. Bake Element (hidden)
21. Convection Fan Cover
15
16
17
18
18
16
21
20

Page 12
Model and Parts Identification - 36” Range
Key for 36" Models
1. 22" Pot and Pan Shelf, 9" Low Back or 3" Island Trim (Backguard ordered sepa-
rately)
2. Burner Grates & Burners
3. Control Knobs, ExtraLow
®
Burners (2)
4. Control Knobs, Standard Burners (4)
5. Oven Temperature Selector
6. Oven Mode Selector
7. Oven Door
8. Viewing Window
9. Kick Panel
10. Range Feet (4)
WARNING
To provide proper ventilation, do NOT remove range feet.
3
10
10
1
2
4
2
2
3
4
5
6
7
8
9

Page 13
Model and Parts Identification - 30” Range
Key for 30" Models
1. 6" Low Back (Island Trim and Pot and Pan Shelf ordered separately)
2. Burner Grates & Burners
3. Control Knobs, ExtraLow
®
Burners (2)
4. Control Knobs, Standard Burners (2)3
5. Oven Mode Selector
6. Oven Selector Switch
7. Oven Door
8. Viewing Window
9. Kick Panel
10. Range Feet (4)
WARNING
To provide proper ventilation, do NOT remove range feet.
Electric Oven Interior
Please see Page 11.
10
10
9
7
8
2
2
1
3
5
6
4

Page 14
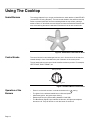
Using The Cooktop
Sealed Burners
The cooktop features four or six gas surface burners; each rated at 15,000 BTU/HR
(13,000 BTU/ HR using Propane). The burners are sealed to the stainless steel top
frame to prevent liquid spills from accumulating below the top surface, making it
easier to clean. On all models, the two left burners have the exclusive ExtraLow fea-
ture, the remaining burners are standard. Each burner has its own control knob.
Control Knobs
The control knobs for two sealed gas burners, one in front and one in the rear, are
located directly in front of and below the pair of burners on the control panel.
The two words above each control knob identifies the burner position. For example,
LEFT FRONT, RIGHT FRONT, etc.
Operation of the
Burners
• Press in on the knob and turn it counter-clockwise to the setting.
• The igniter for the selected sealed burner clicks and sparks.
• After flame ignition, the igniter stops clicking.
• Rotate the knob to any flame setting between HI and SIM.
• The Blue Burner Signal Light, between the burners, will light when adjacent
burners are lit. They will remain on until the burner is turned off.
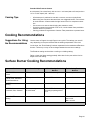
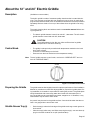
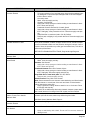
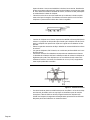
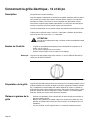
Figure 2: Sealed Star
®
Brass Burner Base
Figure 3: Standard Burner Control Knob
Bezel
Knob
Setting Indicator

Page 15
BTU for Standard Burners
• HI is equivalent to 15,000 BTU / HR (13,000 BTU/HR using Propane).
• SIM is equivalent to 2,100 BTU / HR.
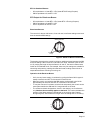
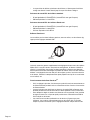
BTU Output for ExtraLow
®
Burner
• HI is equivalent to 15,000 BTU / HR (13,000 BTU / HR using Propane).
• SIM is equivalent to 3,000 BTU / HR.
• XLO is equivalent to 370 BTU / HR.
ExtraLow
®
Burners
The controls for the two left burners, front and rear, have flame settings even lower
than the standard SIM settings.
The drawing shows that the control knob has an additional range between the SIM
and XLO settings. When the knob is set within this range, the flame cycles off and
on. By varying the length of time the flame is off and on, the heat is reduced even
further to cook delicate foods. For example, these very low settings are suitable for
simmering and poaching, melting chocolate and butter, holding cooked foods at
temperatures without scorching or burning, etc.
Operation of the ExtraLow Burner
• XLO, the very lowest setting, is achieved by cycling the flame ON for approxi-
mately 8 seconds and OFF for 52 seconds of each minute.
• When the knob is set just below the SIM setting, the flame will cycle ON for
approximately 52 seconds and OFF for 8 seconds of each minute.
• To vary the amount of low heat to suit the food and quantity, the control can be
set anywhere within the SIM and XLO range marked on the knob.
• The number and dash designations, shown in the drawing, are for reference
only. Numbers do not actually appear on the knob. The number indicates the
position of the flame setting as represented on the cooking chart, Page 21
through Page 23, with the flame on longer at the #4 setting than on #1 setting.
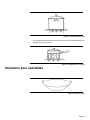
Figure 4: ExtraLow Burner Control Knob
Figure 5: ExtraLow Settings
Setting Indicator
ExtraLow
®
Range
1
2
3
4

Page 16
ExtraLow Techniques
• The type and quantity of food affects which setting to use.
• The pan selected affects the setting. Its size, type, material, and whether a lid is
used, all affect the consistency of the cooking temperature.
• To maintain a low or simmer heat, bring food to a rolling boil. Stir well, then
cover the pan and lower the heat to a setting just below SIM.
• Check periodically to see if the control knob should be turned to another setting.
• If an over-size pan is used, the simmer action may occur mainly in the center of
the pan. To equalize the temperature throughout the food, stir the food around
the outer edges of the pan into the food in the center.
• It is normal to stir food occasionally while simmering. This is especially impor-
tant when simmering for several hours, such as for a homemade spaghetti
sauce or beans.
• When lowering the flame setting, adjust it in small steps.
• If the setting is too low to hold a simmer, bring the food back to a boil before re-
setting to a higher heat.
• It is normal not to see simmer bubbles immediately after the food has been
stirred.
• There may be bubbling when the flame cycles ON and no bubbles when the
flame is OFF. Even when the flame is OFF, there will be steam and a slight
quiver on the liquid’s surface.
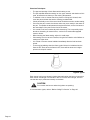
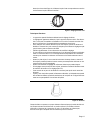
Each burner has its own electronic igniter that sparks when the burner is turned on.
Each burner should light in 4 seconds or less. If a burner does not light, check to
see that the cap is positioned correctly on the base.
CAUTION
Do not touch the burners when the igniters are sparking.
If a burner fails to ignite, refer to “Before Calling For Service” on Page 45.
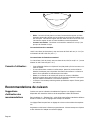
Figure 6: Igniter

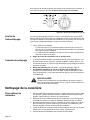
Page 17
Automatic Re-Ignition
If any one or more burners or grill blow out, the electronic igniter automatically acti-
vates to re-light the flame. Do not touch the burners when the igniters are
active.
Important: • For proper combustion do not use the cooktop without the burner grates in
place.
• There is a slight sound associated with gas combustion and ignition. This is a
normal condition.
• On cooktops using propane gas (LP), a slight “pop” sound may be heard at the
burner ports a few seconds after the burner has been turned off.
Power Failure
•
I
n the event of a power failure, only the standard burners can
be manually lit. It
is necessary to light each one individually. If the cooktop is being used when the
power failure occurs, turn all knobs to the OFF position.
• The standard burners can be lit by holding a match at the ports and turning the
control knob to the position. Wait until the flame is burning all around the
burner cap before adjusting the flame to the desired height.
• The ExtraLow burners cannot be used during a power failure. Be sure to turn
them off.
• If the ExtraLow burner is on when a power failure occurs, it cannot be turned
back on until the knob is first turned off.
• The griddle or grill cannot be used during a power failure.
• If you smell gas, refer to safety precautions in the front of this manual.
WARNING
In the event of a power failure, all knobs are to be turned to the OFF
Position. Only the standard burners can be lit manually.
Flame Height
• The correct flame height depends on 1) size and material of pan being used; 2)
food being cooked; and 3) amount of liquid in the pan.
• Never extend the flame beyond the base of the pan.
• Use a low or medium flame for pan materials that conduct the heat slowly, such
as porcelain coated steel or glass-ceramic.
Figure 7: Star
®
Burner Components
Burner
Cap
Brass
Burner
Base
Ports
Page is loading ...
Page is loading ...
Page is loading ...
Page is loading ...
Page is loading ...
Page is loading ...
Page is loading ...
Page is loading ...
Page is loading ...
Page is loading ...
Page is loading ...
Page is loading ...
Page is loading ...
Page is loading ...
Page is loading ...
Page is loading ...
Page is loading ...
Page is loading ...
Page is loading ...
Page is loading ...
Page is loading ...
Page is loading ...
Page is loading ...
Page is loading ...
Page is loading ...
Page is loading ...
Page is loading ...
Page is loading ...
Page is loading ...
Page is loading ...
Page is loading ...
Page is loading ...
Page is loading ...
Page is loading ...
Page is loading ...
Page is loading ...
Page is loading ...
Page is loading ...
Page is loading ...
Page is loading ...
Page is loading ...
Page is loading ...
Page is loading ...
Page is loading ...
Page is loading ...
Page is loading ...
Page is loading ...
Page is loading ...
Page is loading ...
Page is loading ...
Page is loading ...
Page is loading ...
Page is loading ...
Page is loading ...
Page is loading ...
Page is loading ...
Page is loading ...
Page is loading ...
Page is loading ...
Page is loading ...
Page is loading ...
Page is loading ...
Page is loading ...
Page is loading ...
Page is loading ...
Page is loading ...
Page is loading ...
Page is loading ...
Page is loading ...
Page is loading ...
Page is loading ...
Page is loading ...
Page is loading ...
Page is loading ...
Page is loading ...
Page is loading ...
Page is loading ...
Page is loading ...
Page is loading ...
Page is loading ...
Page is loading ...
Page is loading ...
Page is loading ...
Page is loading ...
Page is loading ...
Page is loading ...
-
 1
1
-
 2
2
-
 3
3
-
 4
4
-
 5
5
-
 6
6
-
 7
7
-
 8
8
-
 9
9
-
 10
10
-
 11
11
-
 12
12
-
 13
13
-
 14
14
-
 15
15
-
 16
16
-
 17
17
-
 18
18
-
 19
19
-
 20
20
-
 21
21
-
 22
22
-
 23
23
-
 24
24
-
 25
25
-
 26
26
-
 27
27
-
 28
28
-
 29
29
-
 30
30
-
 31
31
-
 32
32
-
 33
33
-
 34
34
-
 35
35
-
 36
36
-
 37
37
-
 38
38
-
 39
39
-
 40
40
-
 41
41
-
 42
42
-
 43
43
-
 44
44
-
 45
45
-
 46
46
-
 47
47
-
 48
48
-
 49
49
-
 50
50
-
 51
51
-
 52
52
-
 53
53
-
 54
54
-
 55
55
-
 56
56
-
 57
57
-
 58
58
-
 59
59
-
 60
60
-
 61
61
-
 62
62
-
 63
63
-
 64
64
-
 65
65
-
 66
66
-
 67
67
-
 68
68
-
 69
69
-
 70
70
-
 71
71
-
 72
72
-
 73
73
-
 74
74
-
 75
75
-
 76
76
-
 77
77
-
 78
78
-
 79
79
-
 80
80
-
 81
81
-
 82
82
-
 83
83
-
 84
84
-
 85
85
-
 86
86
-
 87
87
-
 88
88
-
 89
89
-
 90
90
-
 91
91
-
 92
92
-
 93
93
-
 94
94
-
 95
95
-
 96
96
-
 97
97
-
 98
98
-
 99
99
-
 100
100
-
 101
101
-
 102
102
-
 103
103
-
 104
104
-
 105
105
-
 106
106


Thermador PRO-HARMONYTM PRD48 User manual
- Category
- Barbecues & grills
- Type
- User manual
Ask a question and I''ll find the answer in the document
Finding information in a document is now easier with AI
in other languages
Related papers
-
Thermador PRG30 User manual
-
Thermador PRL304EH Manual and User Guide EN
-
-
-
-
-
-
-
-
Other documents
-
Haier HCR6250ADS Owner's manual
-
KitchenAid 9762892B User manual
-
Cosmo COS-965AGFC User guide
-
GE JBS08PIC User manual
-
GE JBS08PICWW User manual
-
-
Electrolux E36GC76PPS User manual
-
Electrolux E36GC76PRS User manual
-
-