Sony VPL-VW12HT User manual

Category
Projectors
Type
User manual
© 2002 Sony Corporation
4-090-461-11(1)
VPL-VW12HT
Video Projector
Operating Instructions for ImageDirector
Mode d’emploi pour ImageDirector
Bedienungsanleitung für ImageDirector
Instrucciones de funcionamiento de ImageDirector
Istruzioni per l’uso di ImageDirector
ImageDirector
GB
FR
DE
ES
IT
CS
VPL-VW12HT
Operating Instructions for ImageDirector
Video Projector
GB
2 (GB)
Table of Contents
Overview
Getting Started.......................................................... 3 (GB)
Preparations.............................................................. 3 (GB)
Connecting the Projector and Your Computer ........ 3 (GB)
Installing ImageDirector .......................................... 4 (GB)
Adjusting the Gamma Value
Starting and Closing ImageDirector ....................... 5 (GB)
Starting ImageDirector ............................................ 5 (GB)
Closing ImageDirector............................................. 5 (GB)
Adjusting the Gamma Value .................................... 6 (GB)
Saving the Adjusted Gamma Value in a File........... 7 (GB)
Calling Up the Saved Gamma Value File................ 7 (GB)
Returning the Projector’s Gamma Value to
the Factory Setting (Reset) ................................. 8 (GB)
Backing Up the File Containing the Factory
Gamma Value ..................................................... 8 (GB)
Other
Troubleshooting ....................................................... 9 (GB)
English
3 (GB)
Getting Started
About ImageDirector
Using ImageDirector you can adjust the projector’s
gamma value to your satisfaction from a computer
connected to the projector.
You can then save this adjusted value in a file on your
computer.
Operating system environment
The ImageDirector application can be used in any of
the following operating system environments.
Operating systems: Microsoft Windows 95,
Windows 98, Windows 98SE, Windows NT,
Windows 2000 Professional, Windows Me,
Windows XP Home Edition/Professional
CPU: MMX Pentium 166 MHz or above (Pentium II
300 MHz recommended)
Hard disk: 1 MB or above of free space
Memory: 32 MB or above
Other hardware requirements: RS-232C serial port,
CD-ROM drive, D-sub 9-pin cross (reverse) cable
Screen resolution: 640 × 480 or above, 65535 colors
or above
Applicable projector: Sony VPL-VW12HT Video
Projector
Notes
ImageDirector will not work on some computers
even though they satisfy the above requirements.
ImageDirector will not work on Macintosh systems.
The factory setting of the projector’s
gamma value
When you first start ImageDirector it automatically
reads in the factory settings of the projector’s gamma
value. A data file containing the factory pre-set
gamma value that was read in is automatically
generated and is stored in the “ImageDirector” folder
with the name “VPL-VW12_serial number.ldt.” (For
example, for a model VPL-VW12HT projector with
the serial number 0017416, the file name would be
[VPL-VW12_0017416.ldt].) This file is necessary to
Getting Started / Preparations
Overview
return the projector’s gamma value to the factory
setting (Reset). Do not change the file name, delete
the file, compress it, or modify it. If you do, you will
not be able to return the projector’s gamma value to
the factory setting.
Preparations
Connecting the Projector and Your
Computer
Note
Connect the computer and the projector only when the
power to both has been turned off. If you connect the
two with the power of either turned on, it may cause
damage to one or both.
1 Connect the projector and the computer.
Use a commercially available RS-232C cable (D-
sub 9-pin cross (reverse) cable), connecting the
projector’s REMOTE (RS-232C) connector and
the computer’s COM port.
CONTROL S IN VIDEO IN
TRIGGER
REMOTE
INPUT A
INPUT B
PLUG IN POWER
RS-232C
(FOR SERVICE USE)
S VIDEO
G/Y B/C
B
/P
B
R/C
R/
P
R
SYNC/HD VD
VIDEO
G/Y B/C
B
/P
B
R/C
R/
P
R
SYNC/HD VD
Left side of the projector
RS-232C cable
(not supplied)
(cross cable)
to the COM port
Computer
(Continued)
.........................................................................................................................................................................................................
Microsoft and Windows are registered trademarks of Microsoft Corporation (U.S.A. and other countries).
Other company names and trade names are the trademarks or registered trademarks of their respective companies.
This set of Operating Instructions uses screen shots from Windows 98 in its explanations. The screens appearing in other
operating systems may differ in some respects.
4 (GB)
Preparations
Pin assignment for D-sub 9-pin and D-sub 25-pin
connectors are as follows.
18DCD
Data Channel Signal Carrier Detect
23RxD Received Data
32TxD Transmitted data
420DTR Data Terminal Ready
57SG Signal Ground (GND)
66DSR Data Set Ready
74RTS Request to Send
85CTS Clear to Send
922RI
Ring Indicator (Ringing or no ringing)
Shell = FG
1FGFrame Ground or cable shielding
Notes
On the D-sub 25-pin connector, all pins not assigned
are reserved for future use.
Longest guaranteed cable length: 15 meters (49 feet
2 inches) (However, even under 15 meters (49 feet 2
inches), depending on the cable used, operation
cannot be guaranteed.)
2 After turning the projector on, turn on the
computer.
Installing ImageDirector
Complete the following procedure to install
ImageDirector.
1 Insert the ImgD_100 CD-ROM in the computer’s
CD-ROM drive.
2 Double click “My Computer,” select the CD-
ROM icon, then select [Open] from the Right
click menu.
The contents of the CD-ROM are displayed.
D-sub
9-pin
D-sub
25-pin
3 Copy the “ImageDirector” folder to the directory
of your choice on your computer.
To uninstall ImageDirector
Delete the “ImageDirector” folder you copied from the
CD-ROM to your computer.
Note
If you intend to uninstall ImageDirector after using it
to adjust the projector’s gamma value, be sure to
return the projector’s gamma value to the factory
setting before uninstalling the software (Reset). If you
uninstall the software without resetting the gamma
value, you won’t be able to reset the value afterwards.
For more details on resetting the gamma value, see
“Returning the Projector’s Gamma Value to the Factory
Setting (Reset),” on page 8 (GB).
(The display may differ, depending on your computer and its
OS.)
Designation
5 (GB)
Starting and Closing
ImageDirector
Starting ImageDirector
1 Double click the ImageDirector icon
[ImageDirector.exe] created when you installed
ImageDirector.
The dialog box shown below appears.
2 From the drop down list, select the COM port to
which the projector is connected, then click [OK].
The projector’s gamma value is read in and saved
in a data file in the “ImageDirector” folder.
Notes
Reading in the gamma value may take a little
time. While the value is being read in, do not
disconnect the cable, or shut off either the
projector or the computer. This may cause the
data stored in the projector to be corrupted.
The data file ([VPL-VW12_serial number.ldt]
(For example, for a model VPL-VW12HT
projector with the serial number 0017416, the file
name would be [VPL-VW12_0017416.ldt].))
containing the factory set value read from the data
saved in the projector is necessary to reset the
projector’s gamma value to the factory value later
(Reset). Do not change the file name, or delete,
compress, or modify the file itself. If you do so,
you will not be able to return the projector’s
gamma value to the factory setting.
Starting and Closing ImageDirector
Adjusting the Gamma Value
If the following message appears
while the data is being read
If so, the data containing the projector’s gamma
value was not read in properly. After clicking the
[OK] button, close ImageDirector, check the
connection between the computer and the
projector, then restart ImageDirector.exe.
Closing ImageDirector
From the [FILE] menu, select [Exit]. Or, click the
Close button in the top right-hand corner of the
window.
Note
After closing ImageDirector disconnect the cable.
To consult the Help file
Select [Help] from the [HELP] menu and you can
read detailed explanations of the functions of
ImageDirector’s menus and buttons.
6 (GB)
Adjusting the Gamma Value
Adjusting the Gamma
Value
You can use your mouse to adjust the gamma value
that is displayed in the ImageDirector window on the
computer screen. The ImageDirector window is
displayed below.
Note
Buttons that are dimmed are not enabled.
1
56 71 8
42332
1 [FILE] menu
Used to save or call up the gamma value, and to close
ImageDirector.
2 [HELP] menu
Used to open Help.
3 Gamma value graph
Used to adjust the gamma value by dragging the
adjustment point 1 with your mouse.
Note
The gray area 3 on the right side of the gamma value
graph, is outside the range of the adjustment. Adjust
only the area inside the range 2.
4 Setting
R/G/B buttons: Select the colors you want to
adjust.
SMOOTH button: Smooths the curve of the
gamma value.
UNDO/REDO button: Clicking the [UNDO]
button cancels the just-completed adjustment,
and the button label switches to [REDO].
Clicking the [REDO] button retries the just-
cancelled adjustment, and the button label
switches back to [UNDO].
Note
After the adjustment data is sent to the projector by
clicking the [SEND] button 8, you cannot use the
[UNDO] button to return to the previous setting.
5 Port name
Displays the name of the COM port to which the
projector is connected.
6 Status bar
Displays the current position of the adjustment point
as a numerical value.
7 RESET button
Resets the projector’s gamma value to the factory
setting.
8 SEND button
Sends the adjusted gamma value data to the projector.
Follow the procedures described below to make your
adjustments.
Notes
Make your adjustment by inputting a signal with a
gray scale in discernable stages from black (0 %) to
white (80 %), while the projector’s CONTRAST
setting in the PICTURE CTRL menu is set to
maximum, and the BRIGHT setting in the PICTURE
CTRL menu is set to 50.
While the gamma value is being adjusted, do not
disconnect the cable, or shut off either the projector
or the computer. This may cause the data stored in
the projector to be corrupted.
1 Using the R/G/B buttons, select the color you
want to adjust.
7 (GB)
2 Drag the adjustment point displayed on the
gamma value graph with your mouse to adjust the
gamma value.
To cancel the just-completed adjustment
Click the [UNDO] button. The just-completed
adjustment is cancelled, and the button label
switches to [REDO]. (Clicking the [REDO] button
retries the just-cancelled adjustment, and the
button label switches back to [UNDO].)
Note
After the adjustment data is sent to the projector
by clicking the [SEND] button, you cannot use the
[UNDO] button to return to the previous setting.
To smooth the curve
Click the [SMOOTH] button. The curve is
smoothed.
3 Send the adjusted gamma value to the projector.
When you click the [SEND] button, the adjusted
gamma value is sent to the projector. After the
data transmission is complete, use the projector to
confirm the adjustment with a real image.
Note
Do not disconnect the cable while the data is
being transferred.
Saving the Adjusted Gamma Value
in a File
You can save the adjusted gamma value data in a file,
and assign a name to the file. Follow the procedure
below.
1 Select [Save] from the [FILE] menu.
The following dialog box appears.
2 Enter the file name and select the location where
the file will be saved, then click the [Save] button.
The adjusted gamma value data is saved in a file.
Calling Up the Saved Gamma Value
File
You can call up the saved gamma value file using
ImageDirector. Follow the procedure below.
1 Select [Load] from the [FILE] menu.
The following dialog box appears.
Adjusting the Gamma Value
(Continued)
8 (GB)
2 Select the file to be read in, and click the [Open]
button.
The gamma value file data is read in, and
displayed on the gamma value graph.
Note
When the gamma value data is read from the file, the
gamma value set in the projector is not changed. To
change projector’s value to the gamma value read in,
click the [SEND] button after you read in the saved
gamma value file data.
Returning the Projector’s Gamma
Value to the Factory Setting (Reset)
Return the projector’s gamma value to the factory
setting. Follow the procedure below.
1 Click the [RESET] button.
The following dialog box appears.
2 If you want to reset the projector’s gamma value,
click the [Yes] button.
The gamma value is reset.
Backing Up the File Containing the
Factory Gamma Value
When you first start ImageDirector it automatically
reads in the factory settings of the projector’s gamma
value. A data file containing the factory pre-set
gamma value that was read in is automatically
generated and is stored in the “ImageDirector” folder
with the name “VPL-VW12_serial number.ldt.” (For
example, for a model VPL-VW12HT projector with
the serial number 0017416, the file name would be
[VPL-VW12_0017416.ldt].) This file is necessary to
return the projector’s gamma value to the factory
setting (Reset). Do not change the file name, delete
the file, compress it, or modify it. If you do, you will
not be able to return the projector’s gamma value to
the factory setting.
If, by some chance, the computer where this file is
stored is damaged, to avoid losing the data, we
recommend preparing a floppy disk to backup the
saved data file.
To do so, follow the procedure outlined below.
1 Select [Backup] from the [FILE] menu.
The following dialog box appears.
2 If you are going to save the file on a floppy disk in
the floppy disk drive (A:\), insert a disk into the
drive and click the [Save] button.
A backup file is saved on the floppy disk.
If the following message appears
Insert a floppy disk into the drive and click the
[Retry] button.
If you are saving the file somewhere other
than on a floppy disk
Specify the location in step 2, and click the [Save]
button.
Note
Even if you enter another file name in step 2, the file
name will still be set to [VPL-VW12_serial number.
ldt]. Do not change this file name.
If the copy of the file containing the factory setting of
the projector’s gamma value is lost or deleted from
the “ImageDirector” folder, copy the backup file made
in the preceding process to the “ImageDirector”
folder.
Adjusting the Gamma Value
9 (GB)
Troubleshooting
Troubleshooting
If you experience problems with the computer or any other devices connected to the projector, please consult the
operating instructions of the device with the problem.
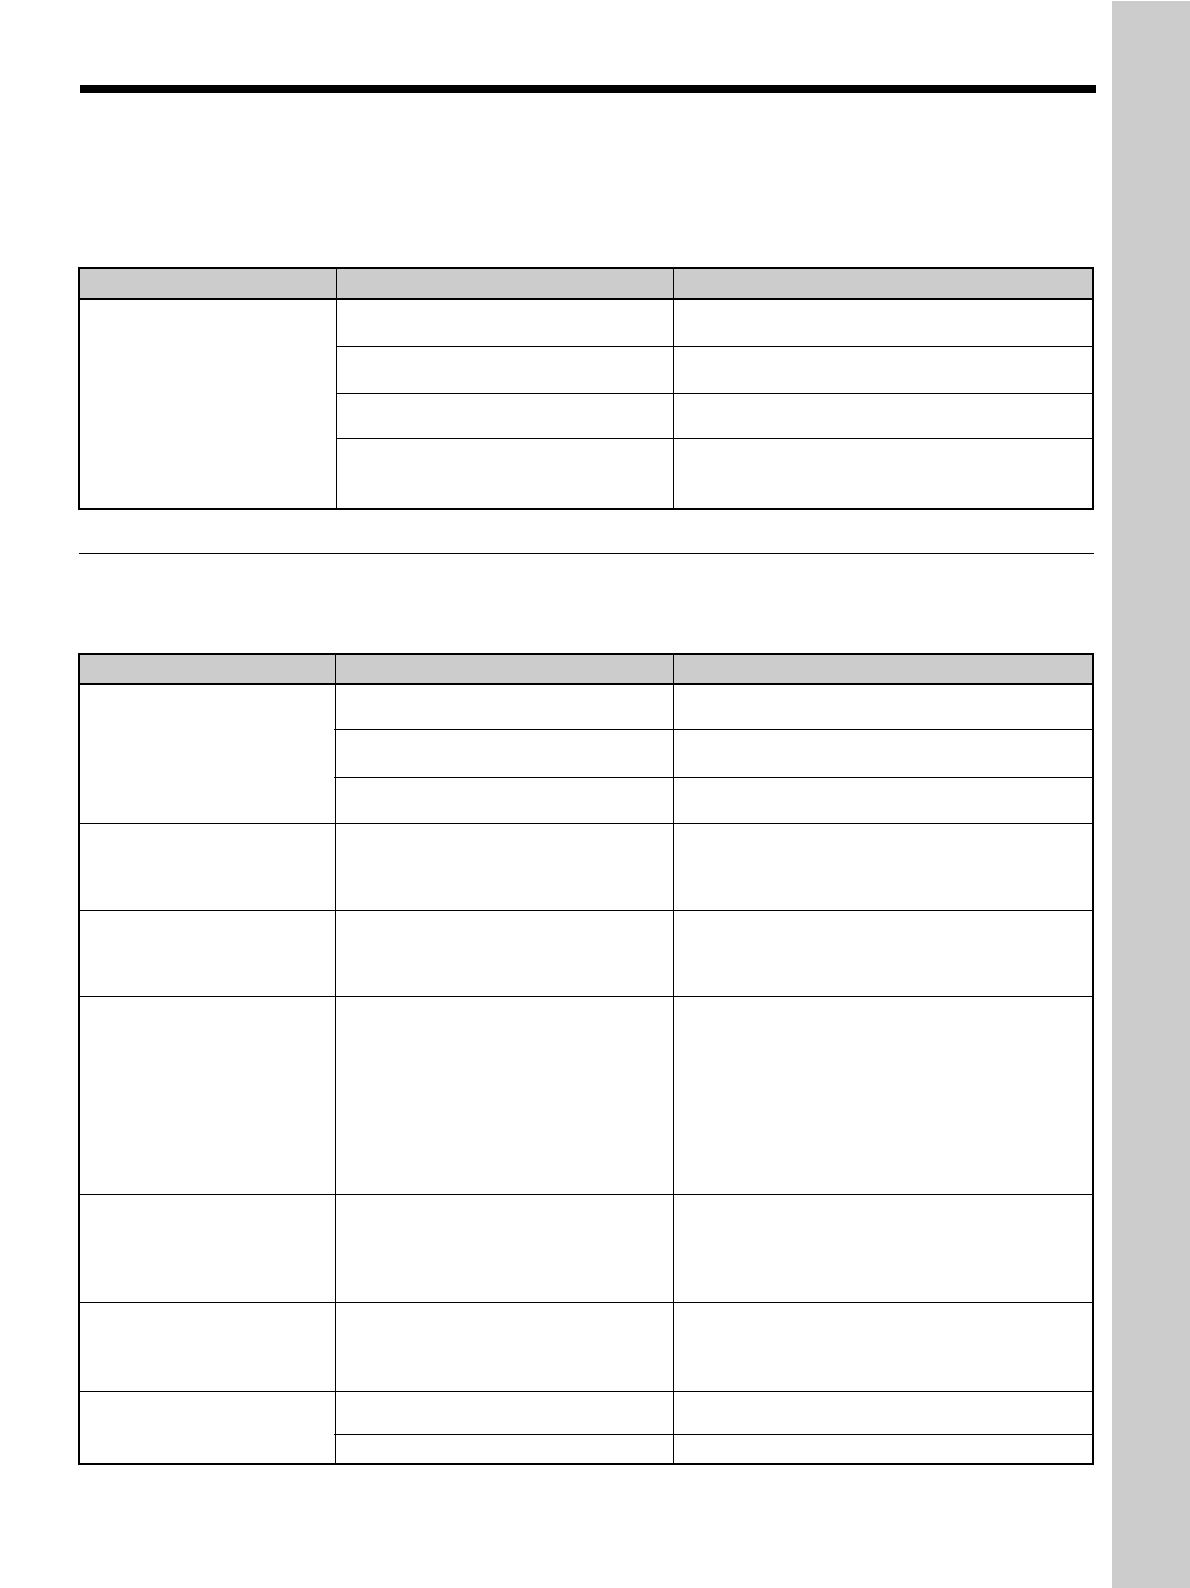
Error messages
If an error message appears, check the contents of the message in the table below.
Symptom
Cause
Remedy
Other
The projector is not turned on.
The projector and the computer are not
properly connected.
The COM port selection is incorrect.
A point that is not reflected in the
adjustment data (in the gray area) is
being adjusted.
Cannot set the data.
Close ImageDirector, turn the projector on, then
start ImageDirector again.
Close ImageDirector, check the connections, then
start ImageDirector again.
Close ImageDirector, start it again. Then select the
correct COM port.
Adjust only points within the adjustable range
(see
page 6 (GB))
.
Message
Meaning
Remedy
The projector is not turned on.
The cable is disconnected, or is not
connected properly.
The COM port selection is incorrect.
The cable was disconnected while data
was being transferred, and the data
cannot be read in.
The cable was disconnected while data
was being transferred, and the data
cannot be sent to the projector.
The model name or the serial number of
the projector is different from the
information contained in the file name.
The drive where ImageDirector is
installed does not have enough free
space, so the factory setting data read
from the projector cannot be saved in a
file.
The destination device or disk is not
operating correctly, and the adjusted
gamma value cannot be saved in a file.
The data file designated is not the
correct file.
The data file is corrupted.
The power supply of a
projector is not on. But,
application is not terminated.
Factory data from a projector
was not be able to be read.
But, application is not
terminated.
Data transmission to a
projector was not completed.
But, application is not
terminated.
It is not the user file of the
projector connected.
Load File
FILE NAME = ******
MODEL NAME = *****
SERIAL NAME = *****
Projector
MODEL NAME = *****
SERIAL NAME = *****
It has not been written in to
factory file.
It has not been written in to
user file.
User file was not able to be
read.
Close ImageDirector, turn the projector on, then
start ImageDirector again.
Close ImageDirector, check the connections, then
start ImageDirector again.
Close ImageDirector, start it again. Then select the
correct COM port
(see page 5 (GB))
.
Check the cable connection.
A file with a model name or serial number different
from that of the projector cannot be read in.
Reinstall ImageDirector on a drive with sufficient
space.
Confirm whether or not the destination device or
disk is operating correctly. Or, confirm whether or
not the destination device or disk is set to read-
only.
Designate the correct data file.
A corrupted file cannot be read in.
2 (CS)
×
1
CONTROL S IN VIDEO IN
TRIGGER
REMOTE
INPUT A
INPUT B
PLUG IN POWER
RS-232C
(FOR SERVICE USE)
S VIDEO
G/Y B/C
B/PB R/CR/PR SYNC/HD VD
VIDEO
G/Y B/CB/PB R/CR/PR SYNC/HD VD
Sony Corporation
  • Page 1 1
  • Page 2 2
  • Page 3 3
  • Page 4 4
  • Page 5 5
  • Page 6 6
  • Page 7 7
  • Page 8 8
  • Page 9 9
  • Page 10 10
  • Page 11 11
  • Page 12 12
  • Page 13 13
  • Page 14 14
  • Page 15 15
  • Page 16 16
  • Page 17 17
  • Page 18 18
  • Page 19 19
  • Page 20 20
  • Page 21 21
  • Page 22 22
  • Page 23 23
  • Page 24 24
  • Page 25 25
  • Page 26 26
  • Page 27 27
  • Page 28 28
  • Page 29 29
  • Page 30 30
  • Page 31 31
  • Page 32 32
  • Page 33 33
  • Page 34 34
  • Page 35 35
  • Page 36 36
  • Page 37 37
  • Page 38 38
  • Page 39 39
  • Page 40 40
  • Page 41 41
  • Page 42 42
  • Page 43 43
  • Page 44 44
  • Page 45 45
  • Page 46 46
  • Page 47 47
  • Page 48 48
  • Page 49 49
  • Page 50 50
  • Page 51 51
  • Page 52 52
  • Page 53 53
  • Page 54 54
  • Page 55 55
  • Page 56 56
  • Page 57 57
  • Page 58 58

Sony VPL-VW12HT User manual

Category
Projectors
Type
User manual

Ask a question and I''ll find the answer in the document

Finding information in a document is now easier with AI