CUIDADOS Y SERVICIO A LAS CUCHILLAS ANDIS
Debe lubricar las cuchillas antes, durante y después
de cada uso. Si las cuchillas de su maquinilla dejan
líneas o reducen su velocidad, significa que
requieren de lubricación. Debe sostener la
maquinilla en la posición que se muestra en el
Diagrama C para evitar que el aceite entre al motor.
Al lubricar las cuchillas, ponga unas cuantas gotas
de aceite para maquinillas marca Andis en la parte
de enfrente y lateral de las cuchillas (Diagrama A).
Limpie el exceso de aceite en las cuchillas con una tela
seca y suave. Los lubricantes en aerosol no contienen suficiente aceite para
lubricar correctamente, pero son excelentes para enfriar la maquinilla. Siempre
reemplace cuchillas rotas o melladas para evitar lesiones. Puede limpiar el
exceso de pelo en las cuchillas con un cepillo pequeño o un cepillo de dientes
viejo. Para limpiar las cuchillas le sugerimos sumergir sólo las cuchillas en
un poco de aceite para maquinillas marca Andis, mientras la maquinilla esté
funcionando. Así debe poder eliminar cualquier exceso de pelo o de polvo que
se haya acumulado entre las cuchillas. Después de limpiar las cuchillas,
apague la maquinilla y seque las cuchillas con una tela seca.
CAMBIO DE CUCHILLAS
Para desmontar las hojas, primero desenchufe la
recortadora del tomacorriente eléctrico. Coloque la
recortadora boca abajo, de modo que los dientes de las
hojas estén orientados hacia abajo. Tal vez prefiera colocar
la recortadora sobre una superficie plana para hacer esto.
Destornille los tornillos de las hojas (Diagrama D).
Desmonte las hojas. Para reemplazar las hojas, coloque la
hoja superior más pequeña nuevamente en posición
(Diagrama E). Alinee los orificios de los tornillos en la hoja
inferior con los dos orificios en el soporte de la hoja, y
vuelva a colocar los tornillos. No apriete los tornillos
completamente. Voltee la recortadora y alinee la hoja
inferior de modo que los dientes en ambas hojas queden
paralelos, pero con los dientes de la hoja inferior
ligeramente por arriba de los dientes de la hoja superior.
Si no hace esto, puede pellizcar la piel al cortar el pelo.
COLOCACIÓN DE LOS PEINES EN LA MAQUINILLA DE CORTAR
EL PELO
Los peines de la maquinilla de cortar el pelo se colocan fácilmente. Sólo hay
que presionarlos en su lugar, y desprenderlos para quitarlos. Puede obtener
un corte más grueso al colocar a presión cualquiera de los accesorios de
cuchilla fabricados para su maquinilla Andis de cortar el pelo. Para usar un
accesorio de cuchilla, introduzca los dientes de la cuchilla de la cortadora en el
accesorio. Presione el accesorio de cuchilla en su lugar; se colocan fácilmente.
IMPORTANT SAFEGUARDS
When using an electrical appliance, basic precautions should always
be followed, including the following: Read all instructions before
using the Andis Clipper.
DANGER: To reduce the risk of electric shock:
1. Do not reach for an appliance that has fallen into water. Unplug
immediately.
2. Do not use while bathing or in a shower.
3. Do not place or store appliance where it can fall or be pulled into
a tub or sink. Do not place in or drop into water or other liquid.
4. Always unplug this appliance from the electrical outlet
immediately after using.
5. Unplug this appliance before cleaning, removing, or assembling parts.
WARNING: To reduce the risk of burns, fire, electric
shock, or injury to persons:
1. An appliance should never be left unattended when plugged in.
2. Close supervision is necessary when this appliance is used by, on
or near children or individuals with certain disabilities.
3. Use this appliance only for its intended use as described in this
manual. Do not use attachments not recommended by Andis.
4. Never operate this appliance if it has a damaged cord or plug, if it
is not working properly, if it has been dropped or damaged, or
dropped into water. Return the appliance to an Andis Authorized
Repair Station for examination or repair.
5. Keep the cord away from heated surfaces.
6. Never drop or insert any object into any opening.
7. Do not use outdoors or operate where aerosol (spray) products
are being used or where oxygen is being administered.
8. Do not use this appliance with a damaged or broken blade or
comb, as injury to the skin may occur.
9. To disconnect turn control to “off” then remove plug from outlet.
10. If used as an animal clipper or shear: during use, do not place or
leave appliance where it may be (1) damaged by an animal or
(2) exposed to the weather.
SAVE THESE INSTRUCTIONS
THIS PRODUCT INTENDED FOR HOUSEHOLD USE
To reduce the risk of electric shock, this appliance has a polarized plug (one
blade is wider than the other). This plug will fit in a polarized outlet only one
way. If the plug does not fit fully in the outlet, reverse the plug. If it still does
not fit, contact a qualified electrician to install the proper outlet. Do not change
the plug in any way.
OPERATING INSTRUCTIONS
Please read the following instructions before using your new Andis Clipper.
Give it the care that a fine precision built instrument deserves and it will give
you years of service. Before starting clipper remove blade guard. Plug cord
into electrical outlet, operate at 120 volt, 60 cycle AC electrical current or as
noted on the unit. To start clipper move switch button forward, to stop, move
switch button back to original position. After using your Andis Clipper, rewrap
cord and store in a safe place.
USER MAINTENANCE
Other than the recommended maintenance described in this manual, no other
maintenance should be performed, except by Andis Company or an Andis
Authorized Repair Station.
POWER ADJUSTMENT
Your Andis Clipper has been adjusted to line voltage at the factory. However,
because of voltage variations it may be necessary to adjust the power setting
for your area. If the power adjustment is off, you will usually notice a “clatter”,
when the clipper is “on” or introduced into the hair. (It is normal for your
clipper to “clatter” for an instant when initially turned on).
TO ADJUST YOUR CLIPPER
1. Oil the blades (Diagram A).
2. The power screw is located in the lower part of
the housing opposite the switch (Diagram B).
3. Turn your clipper “on”.
4. Using a standard screwdriver that fits the slot,
turn the power screw clockwise until the clipper
clatters continuously. Then turn the screw
counter clockwise carefully until the clatter
ceases.
5. Your clipper is now adjusted to its optimum power setting.
CARE AND SERVICING OF YOUR ANDIS CLIPPER BLADES
Blades should be oiled before, during, and after
each use. If your clipper blades leave streaks or
slow down, it’s a sure sign blades need oil. The
clipper should be held in the position shown in
Diagram C to prevent oil from getting into the motor.
Place a few drops of Andis Clipper Blade Oil on the
front and side of the cutter blades (Diagram A). Wipe
excess oil off blades with a soft dry cloth. Spray
lubricants contain insufficient oil for good
lubrication, but are an excellent clipper coolant.
Always replace broken or nicked blades to prevent injury. You can clean the
excess hair from your blades by using a small brush or worn out toothbrush.
To clean the blades we suggest to immerse the blades only into a shallow pan
of Andis Clipper Blade Oil, while the clipper is running. Any excess hair and dirt
that has accumulated between the blades should come out. After cleaning, turn
your clipper off and dry blades with a dry cloth and start clipping again. Before
storing the clipper, spread one or two drops of oil over the blades to prevent
the blades from rusting.
REPLACEMENT (REMOVAL) OF BLADE SET
To remove the blades, first unplug the clipper from the
electrical outlet. Turn the clipper upside down so that the
blade teeth are pointing down. You may want to place the
clipper on a flat surface to do this. Unscrew the screws on
the blades (Diagram D). Remove the blades. To replace
the blades, put the smaller, upper blade back into position
(Diagram E). Line up the screw holes in the bottom blade
with the two holes in the blade bracket, and replace the
screws. Do not tighten down the screws completely. Turn
the clipper over and align the lower blade so the teeth on
both blades are parallel, but with the lower blade’s teeth
slightly above the upper blade’s teeth. Failure to do this
may result in nipping the skin when cutting the hair.
ATTACHING THE CLIPPER COMBS
The clipper comb blade attachments mount easily. Just snap them on.
Snap them off. You can always set the blades for a coarser cut by attaching
any of the snap-on blade attachments made for your Andis Clipper. To use
blade attachment, slip the cutter blade teeth into blade attachment. Snap the
blade attachment down; they snap on and off easily. These attachments guide
hair into the clipper blades and give you precise control of hair lengths. The
length of trim is indicated on the blade attachment: 1/16", 1/8", 1/4", 1/2", 3/4"
& 1". Use the chart to find the approximate lengths of cut. Different blade
angles in relation to the skin, thickness and texture of the hair will vary the
cutting length.
Attachment comb sizes may vary in each kit.
CLIPPER BLADE ADJUSTMENT
Your Andis Adjustable Clipper Blade set is easy to adjust.
From coarse to fine cuts, all that’s needed is a flick of the
adjustment lever with your thumb. In the upright position,
blades are set for the finest, or shortest cuts.
PRECAUCIONES IMPORTANTES
Al usar un aparato eléctrico deben de seguirse determinadas
precauciones básicas, incluyendo las siguientes: lea atentamente
todas las instrucciones antes de usar este aparato Andis.
PELIGRO: Para reducir el riesgo de una descarga eléctrica:
1. No coja el aparato cuando caiga dentro del agua. Desconéctelo
inmediatamente.
2. No lo use mientras se esté bañando o en la ducha.
3. No lo coloque o almacene donde pueda caerse o ser empujado
dentro de una bañera o lavabo. No lo coloque o lo deje caer
dentro del agua o de cualquier otro líquido.
4. Desenchufe siempre el aparato de la toma eléctrica inmediatamente
después de su uso.
5. Desenchufe el aparato antes de limpiar, sustituir o colocar sus partes.
PRECAUCIÓN: Para reducir el riesgo de
quemaduras, fuego, descargas eléctricas o daño a personas:
1.
Un aparato eléctrico no debe dejarse desatendido una vez enchufado.
2. Es necesaria una supervisión muy de cerca cuando este artefacto
sea usado por, en o cerca de niños o personas con ciertas
discapacidades.
3. Utilice este aparato únicamente para el uso para el que fue
pensado del modo descrito en este documento. No use accesorios
no autorizados por Andis.
4. No utilice nunca este aparato si tiene un cordón o enchufe en mal
estado, si no funciona correctamente, ha sufrido una caída o se
ha dañado o se ha caído dentro del agua. Envíe el aparato a un
servicio técnico de Andis para su examen y reparación.
5. Mantenga el cordón alejado de superficies calientes.
6. Nunca inserte o deje caer ningún objeto en cualquiera de los orificios.
7. No lo use en el exterior o cuando se estén utilizando aerosoles o
se esté administrando oxígeno.
8. No utilice este aparato con una cuchilla dañada o rota ya que
podría ser perjudicial para la piel.
9. Para desconectar gire el control a “off” y retire entonces el
enchufe de la toma eléctrica.
10. Si se utiliza como recortadora o cizalla para animales: durante
el uso, no coloque ni deje el dispositivo donde: 1. pueda ser
dañado por un animal o 2. pueda quedar expuesto a la intemperie.
GUARDE ESTAS INSTRUCCIONES
ESTE APARATO ESTÁ DISEÑADO PARA USO DOMÉSTICO
Para reducir el riesgo de descargas eléctricas, este artefacto tiene un enchufe
polarizado (una patilla es más ancha que la otra). Este enchufe encajará en un
tomacorriente polarizado de una sola manera. Si el enchufe no puede
insertarse completamente en el tomacorriente, invierta el enchufe. Si aún no
puede insertarse, póngase en contacto con un electricista calificado para
instalar el tomacorriente apropiado. No cambie el enchufe de manera alguna.
INSTRUCCIONES DE OPERACIÓN
Por favor lea las instrucciones siguientes antes de utilizar su nueva maquinilla
Andis. Dele el cuidado que un instrumento de gran precisión merece y a
cambio obtendrá años de servicio en su hogar. Antes de ponerla en marcha
retire la cubierta de las cuchillas, conecte el cordón en el enchufe eléctrico,
hágala funcionar con corriente alterna de 60 ciclos y 120 voltios o el voltaje
indicado en la unidad. Para conectarla mueva el interruptor a la posición “On”.
Para detenerla, mueva el mismo a su posición original. Una vez haya terminado
de usar su maquinilla Andis, enrolle el cordón y guárdela en un lugar seguro.
MANTENIMIENTO
El mecanismo interno de su maquinilla ha sido lubricado en forma permanente
en la fábrica. Además del mantenimiento recomendado que se describe en este
manual, sólo la compañía Andis o una estación de servicio autorizada por Andis
puede llevar a cabo cualquier otro trabajo de mantenimiento en la unidad.
AJUSTE DE LA ALIMENTACIÓN
La maquinilla Andis viene con la tensión de voltaje ajustada de fábrica. Sin
embargo, debido a las variaciones en alimentación eléctrica, puede que sea
necesario regular el ajuste según su localidad. Si el ajuste de alimentación
está desactivado, normalmente se oirá un ruido cuando la maquinilla esté
encendida o introducida en el pelo. (Es normal que la maquinilla emita este
ruido por un instante al encenderse por primera vez).
PARA AJUSTAR LA MAQUINILLA
1. Lubrique las cuchillas (tal como se muestra en el
Diagrama A).
2. El tornillo de alimentación se encuentra en la
parte inferior de la cubierta, en el lado opuesto
al interruptor (vea el Diagrama B).
3. Encienda la maquinilla.
4. Utilice un destornillador estándar que encaje en la
ranura y gírelo en sentido horario hasta que la
maquinilla emita un ruido continuo. Luego gírelo cuidadosamente en
sentido antihorario hasta que la unidad deje de sonar.
5. Cuando ya no se oye ruido es porque el ajuste de alimentación de la
maquinilla es el óptimo.
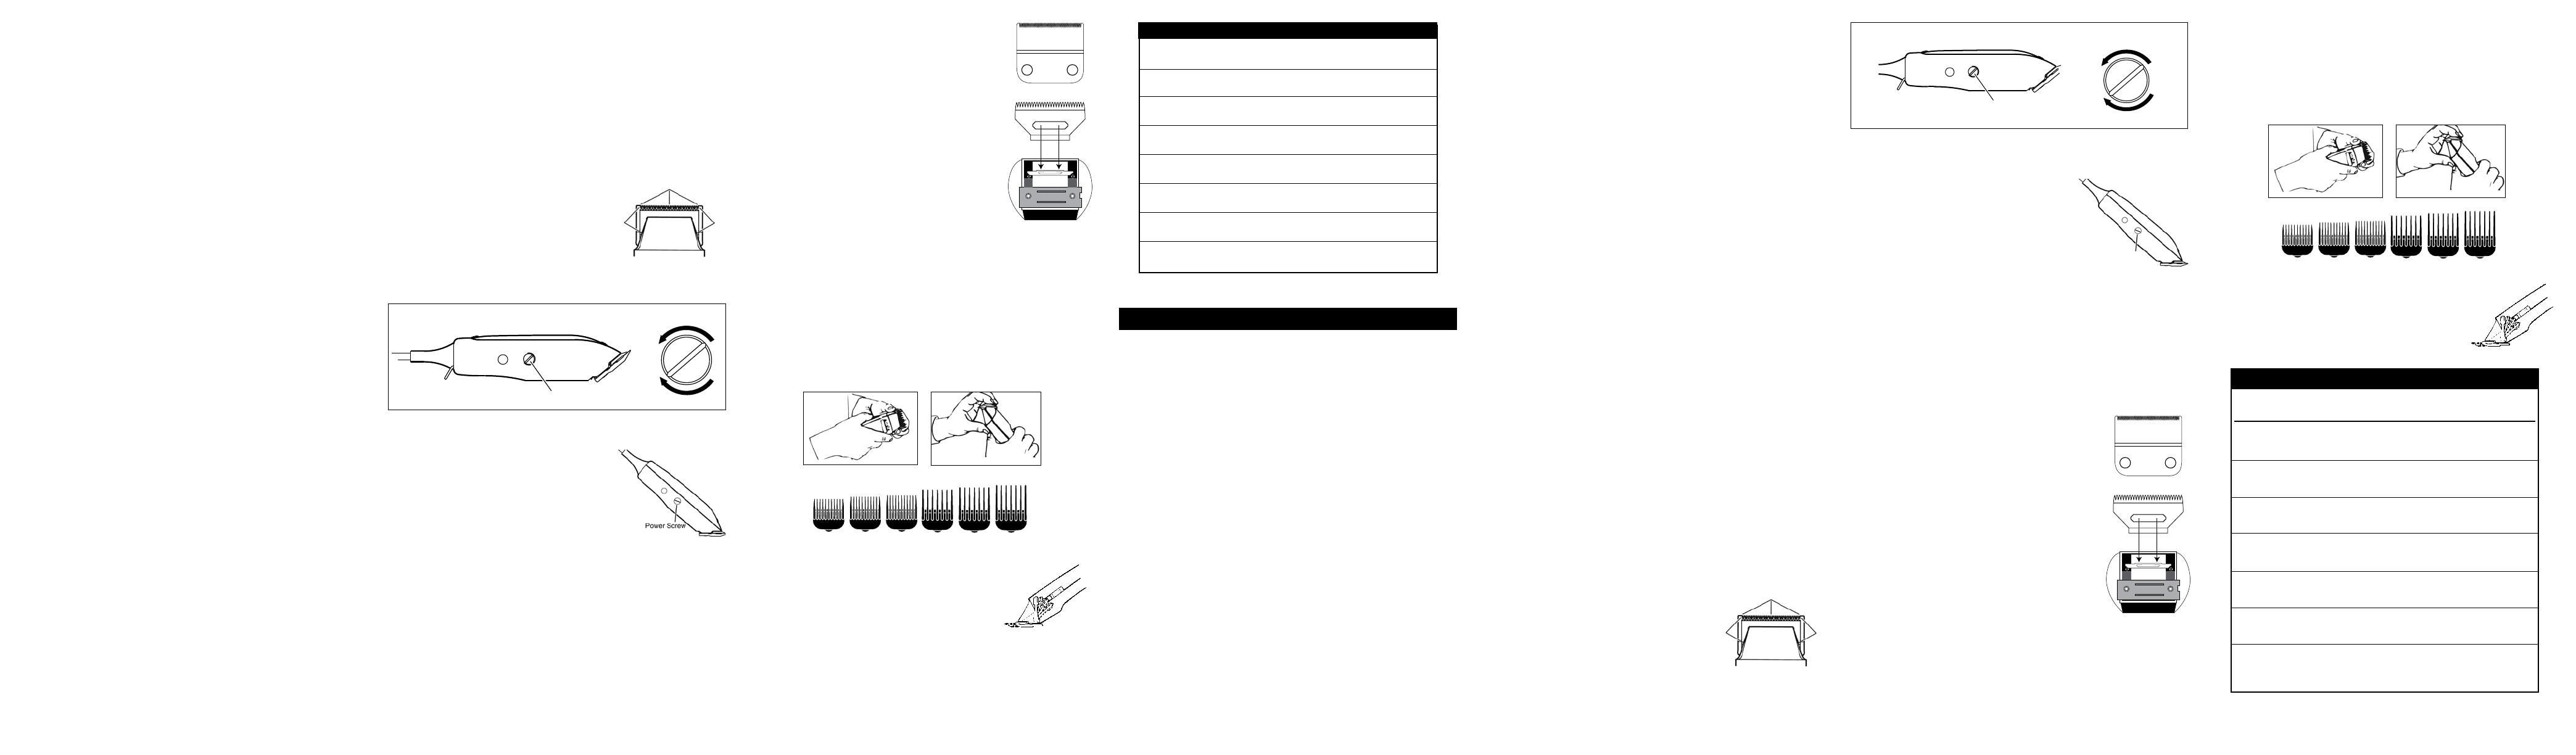
CLIPPING GUIDE
Description
Clipping Direction
Approx. Length of Cut
Fine Coarse
Standard Andis Blade With hair grain 1/16" - 3/16"
Against hair grain 1/32" - 1/8"
1/16" Blade Attachment With hair grain 3/16" - 5/16"
Against hair grain 3/32" - 5/32"
1/8" Blade Attachment With hair grain 1/4" - 3/8"
Against hair grain 1/8" - 1/4"
1/4" Blade Attachment With hair grain 3/8" - 1/2"
Against hair grain 1/4" - 3/8"
1/2" Blade Attachment With hair grain 5/8" - 7/8"
Against hair grain 1/2" - 5/8"
3/4" Blade Attachment With hair grain 7/8" - 1-1/8"
Against hair grain 3/4" - 1"
1" Blade Attachment With hair grain 1-1/8" - 1-3/8"
Against hair grain 1" - 1-1/4"
Diagram C
POWER SCREW
C
L
O
C
K
W
I
S
E
C
L
O
C
K
W
I
S
E
C
O
U
N
T
E
R
Diagram B
Power Adjustment
H
A
C
I
A
L
A
I
Z
Q
U
I
E
R
D
A
H
A
C
I
A
L
A
D
E
R
E
C
H
A
TORNILLO DE ENCENDIDO
Diagrama B
Ajuste de alimentación
Diagrama A
LUBRICAR
LUBRICAR
LUBRICAR
Diagrama C
TORNILLO DE
ALIMENTACIÓN
GUIA DE CORTE
Descripción Dirección de corte Largo aprox. de corte
Fino Grueso
Cuchilla Andis estándar
En el sentido del
1/16" (1.6 mm) - 3/16" (5 mm)
crecimiento del pelo
A contrapelo 1/32" (0.8 mm) - 1/8" (3 mm)
Accesorio de cuchilla
En el sentido del
3/16" (5 mm) - 5/16" (8 mm)
de 1/16"
crecimiento del pelo
A contrapelo 3/32" (2.5 mm) - 5/32" (4 mm)
Accesorio de cuchilla
En el sentido del
1/4" (5 mm) - 3/8" (9.5mm)
de 1/8"
crecimiento del pelo
A contrapelo 1/8" (3mm) - 1/4" (5 mm)
Accesorio de cuchilla
En el sentido del
3/8" (9.5 mm) - 1/2" (13 mm)
de 1/4"
crecimiento del pelo
A contrapelo 1/4" (5 mm) - 3/8" (9.5 mm)
Accesorio de cuchilla
En el sentido del
5/8" (16 mm) - 7/8" (22 mm)
de 1/2"
crecimiento del pelo
A contrapelo 1/2" (13 mm) - 5/8" (16 mm)
Accesorio de cuchilla
En el sentido del
7/8" (22 mm) - 1-1/8" (28.5 mm)
de 3/4"
crecimiento del pelo
A contrapelo 3/4" (19 mm) - 1" (25.4 mm)
Accesorio de cuchilla
En el sentido del
1-1/8" (28.5 mm) - 1-3/8" (34.9 mm)
de 1"
crecimiento del pelo
A contrapelo 1" (25.4 mm) - 1-1/4" (31.7 mm)
SPANISH
Diagram A
OIL
OIL OIL
Estos accesorios ayudan a guiar el pelo hacia la cuchilla cortadora dándole un
control preciso del largo de pelo. El largo de corte es indicado en los
accesorios de cuchilla: 1/16" (1.6 mm), 1/8" (3.2 mm), 1/4" (6.4 mm),
1/2" (12.7 mm), 3/4" (19 mm) y 1" (25.4 mm). Use la tabla siguiente para
encontrar el largo de corte aproximado. Los diferentes ángulos de la cuchilla
en relación con la piel, el grosor y la textura del pelo afectan el largo de corte.
Cada maquina tiene diferentes peines, y varian su cantidad.
Diagram D
Diagram E
Diagrama D
Diagrama E
AJUSTE DE LAS CUCHILLAS EN LA MAQUINILLA
Las cuchillas de la maquinilla Andis se ajustan fácilmente.
Ya sea para realizar un corte grueso o fino, simplemente
mueva la palanca de ajuste con el dedo pulgar. En la
posición vertical, las cuchillas quedan ajustadas para
realizar los cortes más finos y cortos.
