Solución de problemas
Problema
El sonido no se
grabó.
El agua se filtra
en el portacámara
deportivo.
Las funciones de
grabación y
reproducción no
trabajan.
No se enciende la
unidad.
Especificaciones
Material
Plástico (PC, ABS), vidrio
Impermeabilidad
Junta tórica, hebillas
Micrófono incorporado
Estéreo
Dimensiones
Aprox. 159 × 148 × 203 mm (an/al/prf)
Peso
Aprox. 930 g (portacámara deportivo solamente)
Elementos incluidos
Portacámara deportivo (1)
Correa para el hombro (1)
Zapata de montaje de la videocámara (A (1)/B (1)/C (1))
Placa roscada para trípode (1)
Anillo de prevención de reflejos (Ø 25 (1)/M30 × Ø 62 (1)/M30 × Ø 43 (1))
Grasa (1)
Separador (1)
Solución antiniebla para objetivos (1)
Desecador (1)
Juego de documentación impresa
El diseño y las especificaciones están sujetos a cambio sin previo aviso.
Utilización del portacámara deportivo
G Selección del modo
1 Conecte la alimentación del portacámara deportivo.
Presione el botón POWER para conectar la alimentación. El indicador de modo se
ilumina cuando el portacámara deportivo está activado. El modo estará ajustado en
modo CAMERA.
Nota
Si deja la videocámara en el modo de espera durante cinco minutos o más, la
alimentación se desconectará automáticamente a fin de conservar la energía de la
batería.
Es posible cambiar el ajuste “A.SHUT OFF” de esta función a [Never] mediante la
videocámara. Para obtener más información, consulte el manual de instrucciones de
la videocámara.
Para volver al modo de espera, vuelva a ajustar el botón POWER en “ON”.
2 Seleccione el modo deseado.
Presione el botón de cambio de modo para alternar entre los modos en el orden
siguiente.
CAMERA MEMORY VCR
Compruebe el modo seleccionado con el indicador de modo del portacámara
deportivo.
Para tomar imágenes en movimiento, seleccione el modo CAMERA.
Algunos modelos no sólo admiten el modo CAMERA sino también el modo
MEMORY. Las funciones son las mismas que las de su videocámara, así que consulte
el manual de instrucciones suministrado con la misma.
Para grabar imágenes fijas, seleccione el modo MEMORY.
Algunos modelos no sólo admiten el modo MEMORY sino también el modo
CAMERA. En cambio, otros modelos sólo admiten el modo CAMERA.
Las funciones son las mismas que las de su videocámara, así que consulte el manual de
instrucciones suministrado con la misma.
Para reproducir imágenes grabadas, seleccione el modo VCR.
Notas
• Si utiliza una videocámara que no sea compatible con “Memory Stick Duo”, la
videocámara funcionará en modo CAMERA incluso si el portacámara SPK-HCB está
en modo MEMORY.
• El botón POWER del portacámara deportivo tiene prioridad sobre el selector
POWER de la videocámara.
H Apertura del espejo retráctil
Es posible filmar y ver al mismo tiempo el reflejo de dicha filmación en el espejo
retráctil.
1 Abra el espejo retráctil.
2 Abra las aletas e inserte las partes salientes en los orificios
correspondientes.
Cierre del espejo retráctil
Suelte las partes salientes de ambas aletas, y cierre en primer lugar la aleta inferior.
I Grabación
Grabación de imágenes en movimiento
En el modo CAMERA, las imágenes en movimiento se grabarán en un videocasete, en
un disco o bien en un disco duro, mientras que en el modo MEMORY, se grabarán en
un “Memory Stick Duo”.
Presione el botón START/STOP.
Se iniciará la grabación.
Para detener la grabación
Presione el botón START/STOP.
Si vuelve a presionar el botón START/STOP, la grabación se reanudará.
Para apagar la videocámara
Detenga la grabación antes de poner el selector POWER en “OFF”.
Utilización del zoom (consulte la ilustración I)
• Presione el botón de gran angular para alejarse del motivo.
• Presione el botón de telefoto para acercarse al motivo.
Presione suavemente para obtener un zoom más lento.
Grabación de imágenes fijas
Modo MEMORY
Las imágenes fijas se grabarán en un “Memory Stick Duo”, en un disco o bien en un
disco duro.
1 Drücken Sie leicht auf die PHOTO-Taste.
Presione ligeramente el botón PHOTO.
La marca verde de la parte superior de la pantalla de cristal líquido dejará de
parpadear y permanecerá encendida. Esto indica que ya puede grabarse una
imagen fija.
* No se grabará todavía ninguna imagen.
2 Presione a fondo el botón PHOTO.
La imagen mostrada en la pantalla se grabará.
Modo CAMERA
Las imágenes fijas se grabarán en un “Memory Stick Duo”.
1 Presione ligeramente el botón PHOTO.
La palabra “Capture” aparecerá en la parte superior derecha de la pantalla de cristal
líquido, y la imagen de la pantalla se detendrá.
* No se grabará todavía ninguna imagen.
2 Presione a fondo el botón PHOTO.
La imagen mostrada en la pantalla se grabará.
En el caso de los modelos HDR-HC3 y DCR-DVD905/DVD505, puede utilizarse la
función Dual Rec. Para obtener más información, consulte el manual de
instrucciones de la videocámara.
Nota
1 No es posible utilizar la función Nightshot ni ninguna otra función para filmar en la
oscuridad junto con el portacámara deportivo.
2 No es posible utilizar el flash de la videocámara ni las funciones de tele-macro junto
con el portacámara deportivo.
3 Algunos modelos permiten seleccionar el soporte de grabación (“Memory Stick
Duo” o disco). Para obtener más información, consulte el manual de instrucciones de
la videocámara.
J Reproducción
Podrá reproducir la imagen apuntando con el mando a distancia hacia el sensor de
control remoto (situado en el centro de la parte frontal del portacámara deportivo). Sin
embargo, no podrá escuchar el sonido.
Utilice el mando a distancia para todas las demás funciones. Para obtener más
información, consulte el manual de instrucciones suministrado con la videocámara.
Nota
Si “Remote Commander” del menú de la videocámara está ajustado en “OFF”,
cámbielo a “ON”.
No podrá utilizar esta función con una videocámara que no tenga un mando a
distancia suministrado con la misma.
K Extracción de la videocámara
1 Presione el botón POWER para apagar la videocámara. (Consulte la
ilustración K-1)
2 Suelte las hebillas y abra la parte posterior del cuerpo.
Para obtener más información, consulte el paso 2 de “Instalación de la
videocámara” de la Guía de preparación del portacámara deportivo.
Nota
Antes de abrir el portacámara deportivo, elimine la humedad del mismo y séquese
las manos. Evite que se filtre agua en la videocámara.
3 Extraiga la zapata de montaje de la videocámara. (Consulte la ilustración
K-3)
Sujetando la zapata de montaje de la videocámara por las perillas de un lado de la
misma, presiónelas y extraiga lentamente la videocámara.
4 Extraiga la videocámara hasta que las clavijas conectadas a la misma
justo salgan del portacámara deportivo y, a continuación, desconecte las
clavijas de la videocámara.
Nota
Cerciórese de desconectar la clavija de control remoto y audio correctamente
sujetando la parte de la clavija.
No desconecte la clavija sujetándola por la parte del cable, ni extraiga la zapata de
montaje de la videocámara mientras la clavija esté conectada. De lo contrario, las
clavijas o bien la videocámara podrían dañarse.
5 Desmonte la zapata de montaje de la videocámara.
O-Ring
Junta tórica
C
D
B
Richtig
Buen ejemplo
E
Falsch
Mal ejemplo
Deutsch
• Das Sports Pack SPK-HCB ist ausschließlich für die Sony Digital-Camcorder HDR-
HC3, DCR-DVD905/DVD805/DVD803/DVD755/DVD705/DVD703/DVD653/
DVD605/DVD602/DVD505/DVD405/DVD404/DVD403/DVD305/DVD304/
DVD205/DVD203/DVD202/DVD105/DVD103/DVD92/SR100/SR90/HC96/
HC94/HC90/HC46/HC44/HC43/HC42/HC39/HC36/HC35/HC33/HC32/
HC26/HC24/HC23/HC22/HC21/HC19/HC17 bestimmt.
• Das Sports Pack SPK-HCB schützt den eingesetzten Sony Digital-Camcorder vor
Spritzwasser und Feuchtigkeit (im Folgenden als „Videokamera“ bezeichnet)
• Verwendbar bis zu einer Wassertiefe von 5 m.
• Zur Bedienung der Videokamera siehe die bei ihr mitgelieferte
Bedienungsanleitung.
• Vergewissern Sie sich vor dem Aufnehmen, dass die Videokamera einwandfrei
funktioniert und kein Wasser eindringt.
• Sony übernimmt keine Haftung für Beschädigungen der im Sports Pack
eingesetzten Videokamera, des Akkus usw. und erstattet keine Kosten für
Verlust von Aufnahmen, wenn aufgrund einer falscher Verwendung ein
Wasserleck aufgetreten ist.
Vorsichtsmaßnahmen
• Stoßen Sie mit dem Frontglas nirgends an, da es sonst beschädigt werden kann.
• Öffnen Sie das Sports Pack nicht im Meer und nicht am Strand. Alle vorbereitenden
Schritte wie Einlegen und Wechseln der Cassette, des „Memory Stick Duo“ und der
Disc sollten an einem Ort ausgeführt werden, der keiner Feuchtigkeit und keiner
salzhaltigen Luft ausgesetzt ist.
• Werfen Sie das Sports Pack nicht ins Wasser.
• Verwenden Sie das Sports Pack nicht bei starkem Wellengang.
• Meiden Sie Folgendes:
– Heiße und feuchte Plätze.
– Wassertemperaturen über 40 °C.
– Wassertemperaturen unter 0 °C.
Ansonsten kann sich Kondenswasser bilden, Wasser eindringen und das Gerät
beschädigt werden.
• Setzen Sie die Videokamera nicht an feuchten Plätzen in das Sports Pack ein.
Ansonsten kann sich Kondenswasser bilden.
• Verwenden Sie das Sports Pack nicht länger als eine Stunde bei Temperaturen über
35 °C.
• Lassen Sie das Sports Pack nicht längere Zeit in prallem Sonnenlicht liegen. Schützen
Sie es gegebenenfalls mit einem Handtuch vor direktem Sonnenlicht.
Wenn Sonnenöl auf das Sports Pack gelangt ist, waschen Sie es mit lauwarmem
Wasser ab. Sonnenöl kann dazu führen, dass sich das Gehäuse verfärbt oder
beschädigt wird (beispielsweise durch Risse).
Bei einem Wasserleck
Wenn Wasser eingedrungen ist, nehmen Sie das Sports Pack sofort aus dem Wasser.
Wenn die Videokamera nass geworden ist, bringen Sie sie zur nächsten Sony-
Kundendienststelle.
Reparaturen sind kostenpflichtig.
Handhabung des O-Rings
Was ist ein O-Ring?
Ein O-Ring stellt den wasserdichten Abschluss von Sports Packs und anderen
Gehäusen sicher. (Siehe Abbildung A.)
Der O-Ring muss richtig gewartet werden. Wird der O-Ring nicht
entsprechend den Anweisungen gewartet, kann Wasser eindringen und das
Sports Pack sinken.
Handhabung des O-Rings
Einpassen des O-Rings
Setzen Sie den O-Ring nicht an Orten ein, die Staub und Sand ausgesetzt sind.
1 Nehmen Sie den O-Ring heraus. (Siehe Abbildung B.)
• Zum Herausnehmen des O-Rings drücken Sie auf den Ring und schieben Sie ihn
in Pfeilrichtung, wie in der Abbildung gezeigt. Der O-Ring hat dann genug Spiel
und kann leicht herausgenommen werden.
Achten Sie sorgfältig darauf, den O-Ring nicht mit den Fingernägeln zu
verkratzen.
• Verwenden Sie zum Herausnehmen des O-Rings keine spitzen Gegenstände und
keine Metallgegenstände. Ansonsten kann die Nut des Sports Pack oder der O-
Ring verkratzt und beschädigt werden.
2 Überprüfen Sie den O-Ring.
• Überprüfen Sie den Ring sorgfältig. Falls Fremdkörper vorhanden sind, wischen
Sie sie mit einem weichen Tuch oder Papier ab.
– Sind Schmutzpartikel, Sand, Haare, Staub, Salz, Fäden usw. am O-Ring?
– Befindet sich altes Fett auf dem O-Ring?
• Ziehen Sie den O-Ring vorsichtig durch Ihre Fingerspitzen, um ihn auf
unsichtbare Schmutzpartikel zu überprüfen.
• Vergewissern Sie sich nach dem Reinigen, dass keine Fasern vom Tuch oder
Papier auf dem O-Ring haften.
• Vergewissern Sie sich, dass der O-Ring keine Risse, keine Absplitterungen, keine
Abschabungen und keine Sandeinschlüsse usw. enthält und nicht verdreht oder
verzogen ist. Falls erforderlich, wechseln Sie den O-Ring aus.
3 Überprüfen Sie die O-Ring-Nut.
Manchmal können Sandkörner oder Salzkristalle in die Nut gelangen. Entfernen Sie
solche Fremdkörper mit einem Luftspray oder wischen Sie sie mit einem
Wattestäbchen ab. Achten Sie sorgfältig darauf, dass keine Fasern vom
Wattestäbchen zurückbleiben.
4 Überprüfen Sie auf gleiche Weise die Kontaktfläche gegenüber dem O-
Ring.
5 Fetten Sie den O-Ring ein.
• Fetten Sie die ganze Oberfläche des O-Rings dünn ein, indem Sie einen Tropfen
Fett mit den Fingerspitzen verteilen. (Siehe Abbildung C.)
• Verwenden Sie zum Einfetten kein Papier und kein Tuch, da sonst Fasern auf
dem O-Ring hängenbleiben können.
• Achten Sie sorgfältig darauf, dass die Oberfläche des O-Rings stets dünn
eingefettet ist. Das Fett schützt den O-Ring und verhindert eine vorzeitige
Abnutzung.
• Setzen Sie den O-Ring nach dem Einfetten direkt ein. Legen Sie den eingefetteten
O-Ring nicht auf einen Tisch usw.
6 Setzen Sie den O-Ring in die Nut des Sports Pack ein.
Setzen Sie den O-Ring gleichmäßig unter Beachtung der folgenden Punkte in die
Nut ein:
– Der O-Ring darf nicht verschmutzt sein.
– Der O-Ring darf nicht verdreht sein. (Siehe Abbildung D.)
Überprüfen auf Wasserlecks
Nachdem Sie den O-Ring eingesetzt haben, schließen Sie das Sports Pack, ohne den
Camcorder einzusetzen. Tauchen Sie das Sports Pack dann etwa 3 Minuten lang ca. 15
cm in Wasser ein und überprüfen Sie, ob Wasser eindringt.
Wartung
Wenn sich Meereswasser in der O-Ring-Nut befindet, können sich beim Trocknen des
Sports Pack Salzkristalle bilden und die Funktion des O-Rings beeinträchtigen.
Lebensdauer des O-Rings
Die Lebensdauer des O-Rings hängt von der Verwendungshäufigkeit und den
Einsatzbedingungen des Sports Pack ab. Im allgemeinen hält er etwa ein Jahr.
Auch wenn der O-Ring keine Risse und Kratzer aufweist, kann der wasserdichte
Abschluss nach längerem Betrieb beeinträchtigt sein, da der O-Ring sich verformt hat
oder abgenutzt ist. Wenn der O-Ring Risse, Abschürfungen, Kratzer, Sandeinschlüsse
usw. aufweist oder wenn er verdreht oder verzogen ist, muss er ausgewechselt
werden.
Überprüfen Sie nach dem Auswechseln, dass kein Wasser eindringt.
Einfetten
Verwenden Sie das mitgelieferte Fett. Durch Fette anderer Hersteller kann der O-Ring
beschädigt werden und Wasser eindringen.
Antigeschlagflüssigkeit
Behandeln Sie das Frontglas mit der mitgelieferten Antibeschlagflüssigkeit. Die
Flüssigkeit verhindert ein Beschlagen des Frontglases.
So wird die Antibeschlagflüssigkeit verwendet
Bringen Sie 2 bis 3 Tropfen der Flüssigkeit auf das Frontglas auf und verteilen Sie die
Flüssigkeit dann mit einem Wattestäbchen, weichen Tuch oder Papier.
Trockenmittel
Zum Verstärken des Antibeschlageffekts verwenden Sie bitte nicht nur die
Antibeschlagflüssigkeit, sondern auch das mitgelieferte Trockenmittel. Legen Sie 1 bis
2 Stunden vor dem Aufnehmen ein neues Trockenmittel in das Sports Pack. Legen Sie
das Trockenmittel in die Schiene am Montageschuh im vorderen Gehäuseteil. (Siehe
Abbildung E.) Achten Sie darauf, dass das Trockenmittel nicht am
Kameramontageschuh eingeklemmt wird. Bewahren Sie das restliche Trockenmittel in
der Originaltasche auf und halten Sie diese gut verschlossen. Legen Sie gebrauchtes
Trockenmittel nicht zurück in die Tasche. Andernfalls verringert sich der Effekt des
nicht gebrauchten Trockenmittels. Mit neuem Trockenmittel verstärken Sie den
Antibeschlageffekt. Lassen Sie das Trockenmittel nicht im Sports Pack.
O-Ring, Fett, Antibeschlagflüssigkeit und Trockenmittel
Sie erhalten O-Ring, Fett, Antibeschlagflüssigkeit und Trockenmittel bei Ihrem Sony-
Händler.
O-Ring (Modell-Nr. 2-668-985-01)
Fett (Modell-Nr. 2-582-620-01)
Antibeschlagflüssigkeit (Modell-Nr. 3-072-039-01)
Trockenmittel (Modell-Nr. 2-672-372-01)
Wartung
• Nachdem Sie in Meeresluft aufgenommen haben, waschen Sie das Sports Pack
sorgfältig mit geschlossenen Schnallen mit Süßwasser ab, um Salz und Sand zu
entfernen. Trocknen Sie anschließend das Sports Pack mit einem weichen Tuch ab.
Wir empfehlen, das Sports Pack etwa 30 Minuten im Süßwasser einzutauchen.
Salzrückstände können Beschädigungen der Metallteile und Rosten verursachen, so
dass kein wasserdichter Abschluss mehr gewährleistet ist. Achten Sie darauf, das
Sports Pack nicht gegen andere Ausrüstung zu stoßen, wenn Sie es in Süßwasser
eintauchen. Bei geringem Wasserdruck und geringer Biegung des O-Rings kann bei
einem starken Stoß Wasser eindringen.
• Wenn Sonnenöl auf das Sports Pack gelangt ist, waschen Sie es sorgfältig mit
lauwarmem Wasser ab.
• Reinigen Sie das Innere des Sports Pack mit einem weichen, trocknen Tuch.
Verwenden Sie hierbei kein Wasser.
Die obigen Wartungsarbeiten müssen nach jedem Einsatz des Sports Pack ausgeführt
werden. Verwenden Sie zum Reinigen keine Lösungsmittel wie Alkohol, Benzin oder
Verdünner, da diese Materialien die Oberfläche des Sports Pack angreifen.
Aufbewahren des Sports Pack
• Bringen Sie das mitgelieferte Distanzstück am
Sports
Pack an, um eine Abnutzung
des O-Rings zu verhindern. (Siehe Abbildung
F
.)
• Klappen Sie das Sports Pack zu. Lassen Sie jedoch die Schnallen offen, um eine
Abnutzung des O-Rings zu verhindern.
• Sorgen Sie dafür, dass der O-Ring nicht verstaubt.
• Bewahren Sie das Sports Pack nicht an sehr kalten, sehr warmen oder feuchten
Plätzen und auch nicht an Plätzen auf, die Naphthalin oder Kamphor ausgesetzt
sind, da sonst das Gehäuse angegriffen werden.
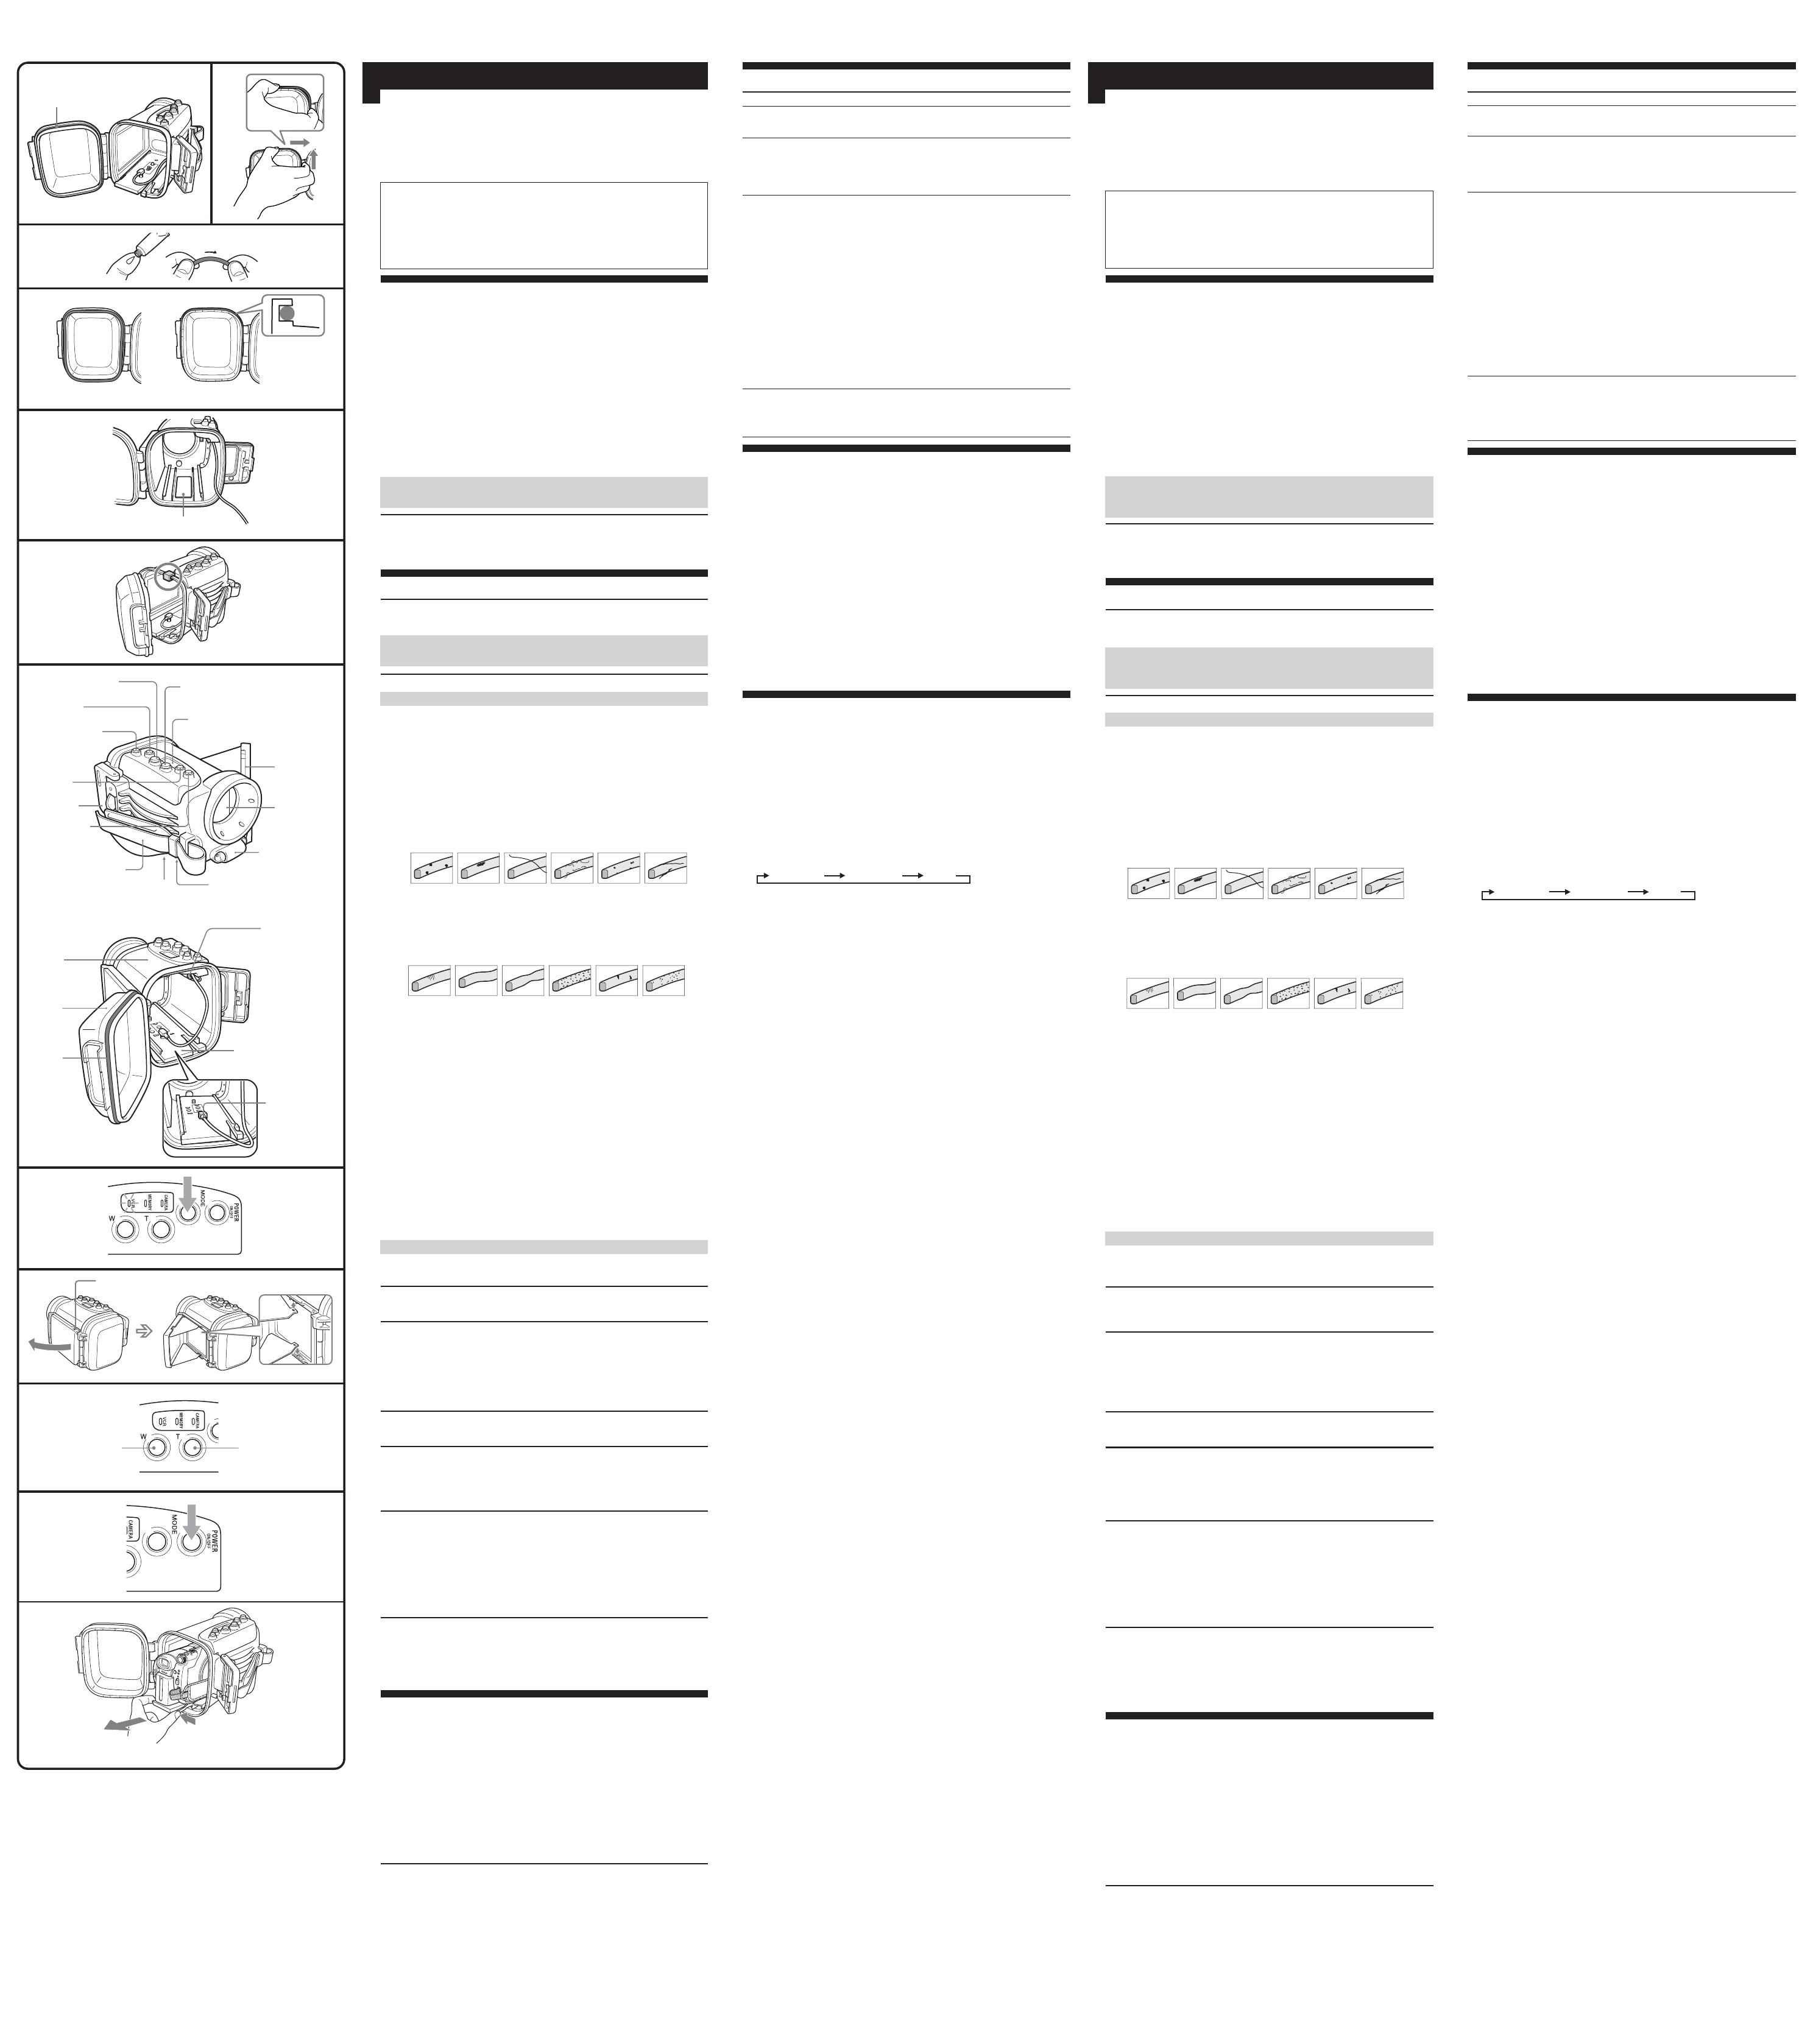
v Schmutz v Sand v Haar v Staub v Salz
v Fäden
v
Risse v verdreht v
verzogen v
feine
Absplitterungen
v
Kratzer
v
Sandeinschlüsse
Fehlersuche
Symptom
Der Ton wird
nicht
aufgenommen.
Wasser dringt in
das Sports Pack
ein.
Es kann nicht
aufgenommen
und nicht
wiedergegeben
werden.
Das Gerät schaltet
sich nicht ein.
Technische Daten
Material
Plastik (PC, ABS), Glas
Wasserdichtigkeit durch
O-Ring, Schnallen
Eingebautes Mikrofon
Stereo
Abmessungen
Ca. 159 × 148 × 203 mm (B/H/T)
Gewicht
Ca. 930 g (nur Sports Pack)
Mitgeliefertes Zubehör
Sports Pack (1)
Schulterriemen (1)
Kameramontageschuh (A (1)/B (1)/C (1))
Stativschraubenplatte (1)
Reflexionsschutzring (Ø 25 (1)/M30 × Ø 62 (1)/M30 × Ø 43 (1))
Fett (1)
Distanzstück (1)
Antigeschlagflüssigkeit (1)
Trockenmittel (1)
Anleitungen
Änderungen, die dem technischen Fortschritt dienen, bleiben vorbehalten.
Verwenden des Sports Pack
G Auswählen des Betriebsmodus
1 Schalten Sie das Sports Pack ein.
Schalten Sie das Gerät mit dem POWER-Schalter ein. Die Modus-Lampe leuchtet
auf, wenn das Sports Pack eingeschaltet ist. Als Modus ist der CAMERA-Modus
eingestellt.
Hinweis
Wenn die Videokamera länger als fünf Minuten auf Standby geschaltet bleibt,
schaltet sie sich automatisch aus, um den Akku zu schonen.
Sie können diese Funktion deaktivieren, indem Sie die Einstellung „A.SHUT OFF“
an der Videokamera auf [Never] setzen. Einzelheiten dazu schlagen Sie bitte in der
Bedienungsanleitung zur Videokamera nach.
Um auf Standby zurückzuschalten, drehen Sie den POWER-Schalter erneut auf
„ON“.
2 Wählen Sie den gewünschten Modus aus.
Wechseln Sie mit der Modustaste in folgender Reihenfolge zwischen den Modi.
CAMERA MEMORY VCR
Die Modus-Lampe am Sports Pack zeigt den ausgewählten Modus an.
Zum Aufnehmen von Bewegtbildern wählen Sie den CAMERA-Modus.
Einige Modelle unterstützen nicht nur den CAMERA-, sondern auch den MEMORY-
Modus. Die Funktionen entsprechen denen der Videokamera. Schlagen Sie also in der
mit der Videokamera gelieferten Bedienungsanleitung nach.
Zum Aufnehmen von Standbildern wählen Sie den MEMORY-Modus.
Einige Modelle unterstützen nicht nur den MEMORY-, sondern auch den CAMERA-
Modus. Einige Modelle unterstützen nur den CAMERA-Modus.
Die Funktionen entsprechen denen der Videokamera. Schlagen Sie also in der mit der
Videokamera gelieferten Bedienungsanleitung nach.
Zum Wiedergeben aufgezeichneter Bilder wählen Sie den VCR-Modus.
Hinweise
• Eine Videokamera, die nicht mit dem „Memory Stick Duo“ kompatibel ist, arbeitet
im CAMERA-Modus, auch wenn sich das SPK-HCB im MEMORY-Modus befindet.
• Der POWER-Schalter am Sports Pack hat Priorität vor dem POWER-Schalter an der
Videokamera.
H Öffnen des Klappspiegels
Sie können im Klappspiegel die Aufnahme kontrollieren.
1 Öffnen Sie den Klappspiegel.
2 Klappen Sie die Flügel auf und stecken Sie die Vorsprünge in die
Öffnungen.
So schließen Sie den Klappspiegel
Lösen Sie die Vorsprünge an beiden Flügeln und schließen Sie zuerst den unteren
Flügel.
I Aufnahme
Aufnehmen von Bewegtbildern
Im CAMERA-Modus werden Bewegtbilder auf eine Cassette, Disc oder Festplatte und
im MEMORY-Modus auf einen „Memory Stick Duo“ aufgenommen.
Drücken Sie die START/STOP-Taste.
Die Aufnahme beginnt.
So stoppen Sie die Aufnahme
Drücken Sie die START/STOP-Taste.
Durch erneutes Drücken der START/STOP-Taste kann die Aufnahme fortgesetzt
werden.
So schalten Sie die Videokamera aus
Stoppen Sie die Aufnahme und drehen Sie den POWER-Schalter dann auf „OFF“.
Zoomen (siehe Abbildung I)
• Drücken Sie zum Verkleinern die Weitwinkeltaste.
• Drücken Sie zum Vergrößern die Teletaste.
Wenn Sie die Taste leicht drücken, wird langsamer gezoomt.
Aufnehmen von Standbildern
MEMORY-Modus
Standbilder werden auf einen „Memory Stick Duo“, eine Disc oder eine Festplatte
aufgenommen.
1 Drücken Sie leicht auf die PHOTO-Taste.
Die grüne Markierung oben am LCD-Bildschirm hört auf zu blinken und leuchtet
stetig. Sie können nun eine Standbildaufnahme machen.
* Noch wird kein Bild aufgenommen.
2 Drücken Sie fest auf die PHOTO-Taste.
Das Bild auf dem Bildschirm wird aufgenommen.
CAMERA-Modus
Standbilder werden auf einen „Memory Stick Duo“ aufgenommen.
1 Drücken Sie leicht auf die PHOTO-Taste.
„Capture“ erscheint oben rechts am LCD-Bildschirm und das Bild auf dem
Bildschirm wird angehalten.
* Noch wird kein Bild aufgenommen.
2 Drücken Sie fest auf die PHOTO-Taste.
Das Bild auf dem Bildschirm wird aufgenommen.
Bei den Modellen HDR-HC3, DCR-DVD905/DVD505 steht die Dual Rec-Funktion
zur Verfügung. Einzelheiten dazu schlagen Sie bitte in der Bedienungsanleitung
zur Videokamera nach.
Hinweise
1 Mit dem Sports Pack stehen die Nightshot-Funktion und andere
Nachtaufnahmefunktionen nicht zur Verfügung.
2 Der Blitz der Videokamera und die Telemakrofunktion können nicht zusammen mit
dem Sports Pack verwendet werden.
3 Bei einigen Modellen können Sie das Aufnahmemedium („Memory Stick Duo“ oder
Disc) auswählen. Einzelheiten dazu schlagen Sie bitte in der Bedienungsanleitung
zur Videokamera nach.
J Wiedergabe
Mit der Fernbedienung können Sie die Wiedergabe starten. Richten Sie sie dazu auf
den Fernbedienungssensor (vorne in der Mitte des Sports Pack). Der Ton ist dabei
jedoch nicht zu hören.
Auch alle anderen Funktionen können mit der Fernbedienung gesteuert werden.
Erläuterungen entnehmen Sie bitte der mit der Videokamera gelieferten
Bedienungsanleitung.
Hinweis
Wenn „Remote Commander“ im Menü der Videokamera auf „OFF“ gesetzt ist, ändern
Sie die Einstellung in „ON“.
Bei einer Videokamera, zu der keine Fernbedienung mitgeliefert wurde, steht diese
Funktion nicht zur Verfügung.
K Herausnehmen der Videokamera
1 PSchalten Sie die Videokamera mit dem POWER-Schalter aus (siehe
Abbildung K-1).
2 Lösen Sie die Schnallen und öffnen Sie den hinteren Gehäuseteil.
Einzelheiten dazu finden Sie in Schritt 2 des Abschnitts „Installieren der
Videokamera“ in der Anleitung „Vorbereitungen des Sports Pack“.
Hinweis
Vor dem Öffnen des Sports Pack trocknen Sie das Sports Pack und sich selbst ab.
Achten Sie darauf, dass kein Wasser auf die Videokamera gelangt.
3 Ziehen Sie den Kameramontageschuh heraus (siehe Abbildung K-3).
Halten Sie den Kameramontageschuh an den seitlichen Knöpfen, drücken Sie die
Knöpfe und ziehen Sie die Videokamera langsam heraus.
4 Ziehen Sie die Videokamera so weit heraus, bis die angeschlossenen
Stecker sich gerade außerhalb des Sports Pack befinden, und trennen Sie
dann die Stecker von der Videokamera.
Hinweis
Ziehen Sie beim Herausziehen des Audio-/Fernsteuersteckers am Stecker und nicht
am Kabel.
Ziehen Sie außerdem den Kameramontageschuh nicht heraus, solange der Stecker
angeschlossen ist. Andernfalls kann der Stecker bzw. die Buchse an der
Videokamera beschädigt werden.
5 Nehmen Sie den Kameramontageschuh ab.
Ursache
Der Audio-/
Fernsteuerstecker ist nicht
angeschlossen.
• Die Schnallen sind nicht
geschlossen.
• Der O-Ring ist nicht richtig
eingesetzt.
• Der O-Ring ist verkratzt
oder spröde.
• Der Akku ist leer.
• Der Fernsteuerstecker ist
nicht eingesteckt.
• Das Band hat das Ende
erreicht.
• Der „Memory Stick Duo“
ist voll.
• Die Schutzlasche an der
Cassette oder „Memory
Stick Duo“ ist aktiviert.
• Die Disc ist voll.
• Die Disc ist finalisiert.
• Die Festplatte ist voll.
• Unmittelbar nach dem
Ausschalten lässt sich das
Gerät nicht einschalten.
Abhilfe
Stecken Sie den Audio-/
Fernsteuerstecker in die Buchse A/V
oder A/V OUT an der Videokamera.
• Schließen Sie die Schnallen, so dass
sie einrasten.
• Ersetzen Sie den O-Ring
gleichförmig in die Nut ein.
• Ersetzen Sie den O-Ring durch
einen neuen.
• Laden Sie den Akku auf.
• Stecken Sie den Audio-/
Fernsteuerstecker in die Buchse A/
V oder A/V OUT an der
Videokamera.
• Spulen Sie das Band zurück oder
verwenden Sie eine andere
Cassette.
• Setzen Sie einen anderen „Memory
Stick Duo“ ein oder löschen Sie
nicht verwendete Daten.
• Deaktivieren Sie die Lasche oder
setzen Sie eine andere Cassette
bzw. einen anderen „Memory Stick
Duo“ ein.
• Verwenden Sie eine andere Disc
oder formatieren Sie die Disc
(außer DVD-R).
• Entfinalisieren Sie die Disc (außer
DVD-R).
• Löschen Sie nicht benötigte Daten
von der Festplatte.
• Warten Sie mindestens 1 Sekunde,
nachdem die Modus-Lampe am
Sports Pack erloschen ist.
• Schalten Sie das Sports Pack erneut
ein.
Español
• Este portacámara deportivo SPK-HCB ha sido diseñado para utilizarse
exclusivamente con las videocámaras digitales HDR-HC3, DCR-DVD905/DVD805/
DVD803/DVD755/DVD705/DVD703/DVD653/DVD605/DVD602/DVD505/
DVD405/DVD404/DVD403/DVD305/DVD304/DVD205/DVD203/DVD202/
DVD105/DVD103/DVD92/SR100/SR90/HC96/HC94/HC90/HC46/HC44/
HC43/HC42/HC39/HC36/HC35/HC33/HC32/HC26/HC24/HC23/HC22/
HC21/HC19/HC17 Sony.
• El SPK-HCB es portacámara deportivo es resistente al agua y a la humedad para
videocámaras digitales Sony (en adelante “videocámara”).
• Utilizable hasta una profundidad de 5 metros bajo el agua.
• Para utilizar la videocámara con este portacámara, consulte el manual de
instrucciones de dicha videocámara.
• Antes de iniciar la grabación, cerciórese de que la videocámara funcione
correctamente y de que no haya filtraciones de agua.
• Sony no se hará responsable por ningún daño de la videocámara, batería, etc.,
que se produzca al utilizar el portacámara deportivo, ni por el coste de una
grabación, si se filtra agua debido a un uso inadecuado.
Precauciones en la utilización
• No someta el vidrio frontal a golpes fuertes, ya que podría rajarse.
• Evite abrir el portacámara deportivo en el mar o en una playa. Los preparativos,
tales como la inserción o el cambio de videocasete, el “Memory Stick Duo”, y el
disco, deberán realizarse en un lugar con poca humedad y sin aire salado.
• No arroje el portacámara deportivo al agua.
• Evite utilizar el portacámara deportivo en lugares con mucho oleaje.
• Evite utilizar el portacámara deportivo en las situaciones siguientes:
– en lugares muy cálidos y húmedos
– en agua con temperatura superior a 40 °C.
– en lugares con temperaturas inferiores a 0 °C.
En estas situaciones podría condensarse humedad o infiltrarse agua, y el equipo
podría dañarse.
• Evite instalar la videocámara en un lugar húmedo. Su instalación en un lugar
húmedo podría provocar condensaciones.
• Utilice el portacámara deportivo durante menos de una hora cada vez a
temperaturas superiores a 35 °C.
• No deje el portacámara deportivo bajo la luz solar directa durante mucho tiempo. Si
no puede evitar el dejarlo al solo, cerciórese de cubrirlo con una toalla u otro tipo de
material protector.
Si el portacámara deportivo entra en contacto con aceite bronceador, lávelo a bien
con agua cálida. Si dejase el portacámara deportivo con aceite bronceador en su
cuerpo, la superficie del mismo podría decolorar o dañarse (podrían producirse
rajas, etc., en la superficie).
Infiltración de agua
Si se infiltra agua, deje inmediatamente de exponer el portacámara deportivo al agua.
Si la videocámara se moja, llévela inmediatamente al servicio técnico de Sony más
próximo.
El coste de las reparaciones tendrá que abonarlo el usuario.
Manejo de la junta tórica
¿Qué es la junta tórica?
La junta tórica asegura las propiedades de impermeabilidad del portacámara
deportivo y otros equipos. (Consulte la ilustración A)
El mantenimiento de la junta tórica es muy importante. Si no realizase el
mantenimiento de la junta tórica de acuerdo con las instrucciones, podría
producirse la infiltración de agua y hacer que el portacámara deportivo se
hundiese.
Manejo de la junta tórica
Fijación de la junta tórica
Evite fijar la junta tórica en lugares polvorientos o arenosos.
1 Quite la junta tórica. (Consulte la ilustración B)
• Para quitar la junta tórica, presione y deslícela en el sentido de la flecha, como se
muestra en la ilustración. La junta tórica tiene holgura suficiente como para poder
quitarse con facilidad.
Tenga cuidado de no rayar la junta tórica con sus dedos.
• No utilice objetos puntiagudos ni metálicos para quitar la junta tórica. Este tipo de
objetos podría rayar o dañar la ranura del portacámara deportivo o la junta tórica.
2 Inspeccione la junta tórica.
• Compruebe cuidadosamente lo siguiente. Si encuentra algo, limpie la junta tórica
con un paño suave o un pañuelo de papel.
– ¿Hay suciedad, arena, pelos, polvo, sal, rebabas de las roscas, etc., en la junta
tórica?
– ¿Hay grasa vieja en la junta tórica?
• Pase ligeramente la punta de sus dedos por la junta tórica para poder detectar
suciedad invisible.
• Tenga cuidado de no dejar ninguna hilacha ni fibras de papel en la junta tórica
después de haberla limpiado.
• Compruebe que la junta tórica no esté rajada, sesgada, distorsionada, con cortes
finos, rayada, con arena incrustada, etc. Si estás rajada o rayada, reemplácela.
3 Inspeccione la ranura de la junta tórica.
Es posible que en la ranura entren granos de arena o que se solidifique sal. Elimine
estas materias soplando con un aerosol o frotando con un palillo de cabeza de
algodón. Tenga cuidado de no dejar fibras del palillo de cabeza de algodón en el
interior de la ranura.
4 Inspeccione, de la misma forma, la superficie de contacto de la otra parte
de la junta tórica.
5 Aplique grasa a la junta tórica.
• Utilice la punta de sus dedos para engrasar suavemente toda la superficie de la
junta tórica con una gota de grasa. (Consulte la ilustración C)
• No utilice papel ni un paño ya que podrían quedar fibras en la junta tórica.
• Cerciórese de que haya siempre una ligera capa de grasa en la junta tórica. La
grasa protegerá la junta tórica contra el desgaste.
• Fije la junta tórica inmediatamente después de haberla engrasado. No deje la junta
tórica engrasado sobre una mesa ni otra superficie.
6 Fije la junta tórica en la ranura del portacámara deportivo.
Fije uniformemente la junta tórica en la ranura prestando atención a los puntos
siguientes
– Compruebe que no haya suciedad en la junta tórica.
– Compruebe que la junta tórica no esté retorcida. (Consulte la ilustración D)
Cómo comprobar la infiltración de agua
Después de haber reemplazado la junta tórica, cierre el portacámara deportivo sin
insertarle el equipo que vaya a utilizar. Sumerja el portacámara deportivo en agua
hasta una profundidad de unos 15 cm durante aproximadamente tres minutos, y
compruebe si se infiltra agua.
Mantenimiento
Si dejase que el portacámara deportivo se seque con agua en salada en la ranura de la
junta tórica, los cristales de sal formados podría desvirtuar las funciones de dicha
junta tórica.
Duración útil de la junta tórica
La duración útil de la junta tórica variará con la frecuencia de utilización del
portacámara deportivo y las condiciones. En general, durará aproximadamente un
año.
Aunque la junta tórica no esté rajada ni rayada, la deformación o el desgaste reducirá
las características de impermeabilidad. Reemplace la junta tórica por otra nueva si
encuentra en ella rajas, sesgamiento, distorsión, cortes finos, incrustación de arena, etc.
Después de haberla reemplazado, compruebe que no haya infiltración de agua.
Grasa
Utilice la grasa suministrada. La utilización de grasa de otros fabricantes podría dañar
la junta tórica y causar la infiltración de agua.
Solución antiniebla para objetivos
Recubra la superficie del vidrio frontal con la solución antiniebla para objetivos
suministrada. Esto será muy efectivo para evitar que se empañe el vidrio.
Forma de utilizar la solución antiniebla para objetivos
Aplique 2 o 3 gotas de la solución antiniebla para objetivos suministrada en el vidrio
frontal y espárzalas uniformemente utilizando palillos de cabeza de algodón, un paño
suave, o un pañuelo de papel.
Desecador
Para aumentar el efecto antiniebla, además de utilizar la solución antiniebla para
objetivos, utilice el desecador suministrado. Inserte un nuevo desecador en el
portacámara deportivo 1 ó 2 horas antes de realizar una grabación. Coloque el
desecador en el espacio de la barra de la zapata de montaje de la cámara en la parte
frontal del cuerpo. (Consulte la ilustración E.) Procure no atrapar el desecador con la
zapata de montaje de la cámara. Guarde el desecador restante en su bolsa original, y
mantenga la bolsa bien cerrada. No vuelva a introducir el desecador en la bolsa
después de utilizarlo o reducirá el efecto del desecador que no haya utilizado. Utilice
un nuevo desecador para aumentar el efecto antiniebla. Asimismo, no deje el
desecador en el portacámara deportivo.
Junta tórica, grasa, solución antiniebla para objetivos y
desecador
Puede obtener juntas tóricas, grasa, la solución antiniebla para objetivos y el desecador
en el distribuidor Sony más cercano.
Junta tórica (Núm. de modelo 2-668-985-01)
Grasa (Núm. de modelo 2-582-620-01)
Solución antiniebla para objetivos (Núm. de modelo 3-072-039-01)
Desecador (núm. de modelo 2-672-372-01)
Mantenimiento
• Después de haber videofilmado en un lugar con brisa del mar, lave bien el
portacámara deportivo con agua corriente, con las hebillas cerradas para eliminar la
sal y la arena, y después frótelo con un paño suave y seco. Se le recomienda que
sumerja el portacámara deportivo en agua durante 30 minutos. Si lo dejase con sal,
las partes metálicas podrían dañar u oxidarse y provocar la infiltración de agua.
Tenga cuidado de no golpear el portacámara deportivo con otro equipo al
sumergirlo en agua dulce. Si la presión del agua es baja y el alabeo de la junta tórica
es pequeño, un impacto fuerte podría provocar filtraciones de agua.
• Si el portacámara deportivo está manchado con aceite bronceador, lávelo bien con
agua cálida.
• Limpie el interior del portacámara deportivo con un paño suave y seco. No lave el
interior del portacámara deportivo.
Cerciórese de realizar el mantenimiento indicado arriba cada vez que utilice el
portacámara deportivo. No utilice ningún tipo de disolvente, como alcohol, bencina, ni
diluyente de pintura para la limpieza, ya que podría dañar el acabado de la superficie
del portacámara deportivo.
Para almacenar el portacámara deportivo
• Fije el separador suministrado con su portacámara deportivo para evitar el desgaste
de la junta tórica. (Consulte la ilustración F)
• Cierre el portacámara deportivo sin abrochar las hebillas para evitar el desgaste de la
junta tórica.
• Evite que se acumule polvo en la junta tórica.
• Evite almacenar el portacámara deportivo en un lugar frío, muy cálido o húmedo, o
junto con naftalina o alcanfor, ya que en estas condiciones podría dañarse.
v
Suciedad
v Arena v Pelos v Polvo v Sal
v
Rebabas de las
roscas
v
Rajas v
Sesgamiento
v
Distorsión
v Cortes
finos
v
Rayazos
v Arena
incrustada
Causa
La clavija de control remoto y
audio no está conectada.
• Las hebillas no están
cerradas.
• La junta tórica no está
correctamente colocada.
• La junta tórica está rayada
o rajada.
• La batería está agotada.
• La clavija de control remoto
no está conectada.
• La cinta se ha acabado.
• El “Memory Stick Duo”
está lleno.
• La lengüeta de seguridad
del videocasete y del
“Memory Stick Duo” están
en posición de prohibición
de grabación.
• El disco ya no tiene espacio
libre.
• El disco está finalizado.
• El disco duro está lleno.
• Inmediatamente después
de desconectar la
alimentación, ésta no se
conecta de nuevo.
Soluciones
Conecte la clavija de control remoto
y audio a la toma A/V o bien a la
toma A/V OUT de la videocámara.
• Apriete las hebillas hasta que
chasqueen.
• Coloque uniformemente la junta
tórica en la ranura.
• Reemplace la junta tórica por otra
nueva.
• Cargue completamente la batería.
• Conecte la clavija de control
remoto y audio a la toma A/V o
bien a la toma A/V OUT de la
videocámara.
• Rebobine la cinta o utilice un
videocasete nuevo.
• Inserte otro “Memory Stick Duo” o
borre los datos innecesarios del
mismo.
• Deslice la lengüeta de seguridad o
instale un nuevo videocasete y un
nuevo “Memory Stick Duo”.
• Utilice un disco nuevo o bien
formatee el disco (excepto DVD-R).
• Anule la finalización del disco
(excepto DVD-R).
• Borre los datos innecesarios de la
unidad de disco duro.
• Deje apagado el portacámara
deportivo durante un segundo o
más después de que el indicador
de modo del portacámara
deportivo se apague.
• Vuelva a encender el portacámara
deportivo.
Trockenmittel
Desecador
G
Klappspiegel
Espejo
retráctil
Haken für
Schulterriemen
Gancho para la correa
para el hombro
Kameramontageschuh
Zapata de montaje de la
videocámara
POWER-Schalter
Selector POWER
Griffband
Correa de la empuñadura
Stativmontagebohrung
Orificio de montaje en
trípode
PHOTO-Taste
Botón PHOTO
Vorderes
Gehäuseteil
Parte frontal
del cuerpo
Frontglas
Vidrio frontal
Stereomikrofon
Micrófono estéreo
2
H
F
Weitwinkeltaste
Botón de gran angular
START/STOP-Taste
Botón START/STOP
Teletaste
Botón de telefoto
Modus-Lampe
Lámpara de
modo
Hinteres
Gehäuseteil
Parte
posterior
del cuerpo
O-Ring
Junta
tórica
Kabelhalter
Soporte del
cable
Audio-/
Fernsteuerstecker
Clavija de control
remoto y audio
OPEN
Schnalle
Hebilla
Modustaste
Botón de
cambio de
modo
1
K
3
I
Teletaste
Botón de telefoto
Weitwinkeltaste
Botón de gran
angular


