Empava EMPV36RH02 User manual

Type
User manual

This manual is also suitable for

QTY:4
M4*12
Explode screws
QTY:2
Mounting bracket
4
Aluminum Flex Duct
PREPARE THE HOOD
Unpack hood and check contents.
You should receive:
1 - Hood
2 - Installation Instructions
3 -
- Parts Bag containing:
QTY:4
QTY:1
Hose clamp
elbows.
location and roof cap . For the results, use a minimum unmber of transitions and
The hoods feature 1(8" top round) is opening .Run ducwork between the hood
STEP 1: PROTECT THE COOK TOP
Put a thick, protective covering over counter top, cook top or range to protect from damage or dirt.
STEP 2: CREATE WORK STATION (OPTIONAL)
Have 2 pieces of wood about 2” x 4” x 20” on
both sides of stove & a plywood on top of
them to protect cook top or stove from
damage or dirt. This plywood will also
create a comfortable work station for easy to
installing.
DUCT(for horizontal discharge)
STEP 3: PREPARE DUCTWORK & SINGLE OUTLET
Make sure you have a 15amp, 120V, 60Hz, single outlet on the left or right of the duct pipe
(usually is on ¼ of cabinet width).
Mak
diameter duct, and roof or wall cap, depending on where you will be venting your hood)
STEP 5: CREATE ACCESS
Create or cut access opening for electrical wire and hood exhaust under the cabinet
STEP 4: ATTACH 2-INCH WIDE WOOD FILLER STRIPS
For installing under the cabinet with recessed bottom, attach 2-
8' aluminum flex duct can the hood directly
Note : The quality of the duct should meet the local law and fire prevention standards
and tight .
Connect the aluminum flex duct to ductwork, wrap with aluminum tape to make all joints secure
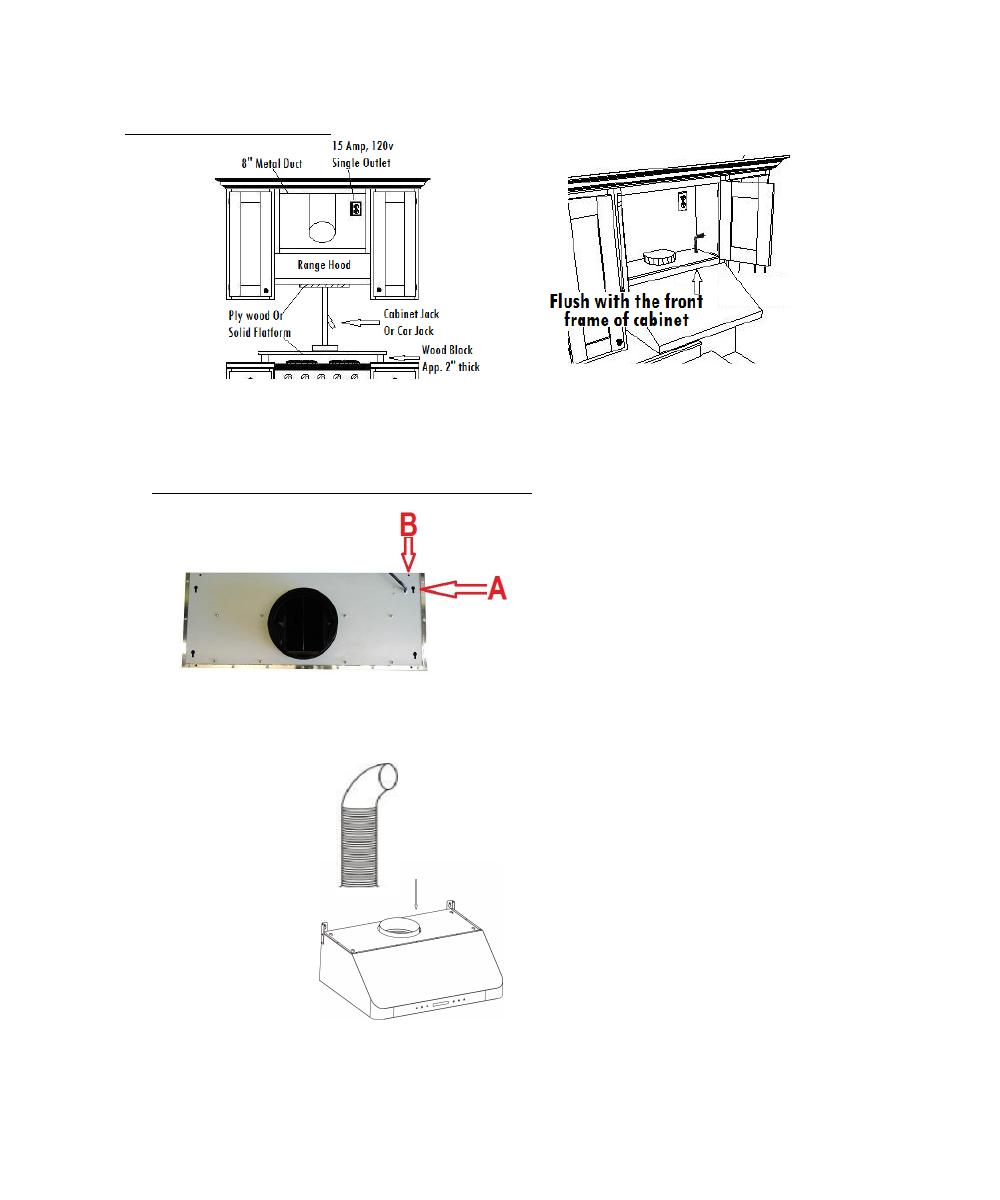
STEP 8 : CONNECT ALUMINUM FLEX DUCT AND DUCTWORK
8'aluminum flex duct
TIP (optional):
beneath the cabinet and flush with the front of the cabinet.
since the hood is heavy, a cabinet or a car jack is highly recommended.
Lift the hood up and have it placed below the cabinet. Make sure to center the hood
STEP 6: ATTACH THE HOOD
From inside of the hood, use “hex bit extension”
place 1 ¼” provided screw into each key hole (A) OR
predrilled-holes (B) and secure to cabinet bottom.
There are 8 holes (4 keyholes & 4 predrilled-holes)
available. You can use either key or predrilled-hole
as long as a minimum of 1 screw at each corner of
hood body.
STEP 7A: SECURE THE HOOD TO BOTTOM CABINETSTEP 7A: SECURE THE HOOD TO BOTTOM CABINET
!
11.
11.
Baffle Installation Side View
Step 10: Install baffle filters
Install baffle filters; refer to picture at left for the following three steps:
1.Angle baffle filter toward back of hood.
2.Lift a baffle filter up above horizontal level.
3.Slide forward into slot behind the front of hood.
4.Slide the installed baffle filter to either left or right until it stops.
5.Repeat step 1 to 4 to install the next ones, make sure you slide to opposite direction from
the previous installed filter.
To remove the baffle, please reverse the process.
NOTE: The middle filter has to be installed last where it should be taken out first when you
want to remove other filters.
STEP 9: INSTALL OIL TUNNEL OR OIL CONTAINER (NOT AVAILABLE FOR ALL MODELS)
Drop oil tunnel into recess support near rear of hood. Refer to the left picture
Oil Tunnel
Side View
1.Push stop button, and the motor will stop.
2.Push the Low button, the buzzer will buzz once and the motor will run at low speed.
3.Push the Mid button, the buzzer will buzz once and the motor will run at mid speed.
4.Push the High button, the buzzer will buzz once and the motor will run at high speed.
5.Push the light button and two lights will on. Push it again and the light will turn off.
EMPAVA APPLIANCES INC.
15253 DON JULIAN RD CITY OF INDUSTRY,CA 91745
TEL:888-682-8882
WWW.EMPAVA.COM
  • Page 1 1
  • Page 2 2
  • Page 3 3
  • Page 4 4
  • Page 5 5
  • Page 6 6
  • Page 7 7
  • Page 8 8
  • Page 9 9
  • Page 10 10
  • Page 11 11
  • Page 12 12
  • Page 13 13

Empava EMPV36RH02 User manual

Type
User manual
This manual is also suitable for

Ask a question and I''ll find the answer in the document

Finding information in a document is now easier with AI