
Remark
Please follow the user manual for correct installation and testing, if
there is any doubt please call our tech-supporting and customer
center.
Our company applies ourselves to reformation and innovation of our
products. No extra informing for any change. The illustration shown
here only used for reference, if there is any difference please take the
actual product as standard product.
Commercial in Confidence
WWW.ACTIVEONLINE.COM.AU
+
61 (0)7 5551 0306

CATALOG
Pictures. .....................................................................1
Basic Function ...........................................................3
Technology Parameters .............................................3
Basic Settings ............................................................3
Web Settings ............................................................12
Basic Operation .......................................................18
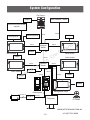
System Configuration ..............................................19
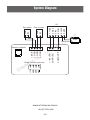
System Diagram.......................................................20
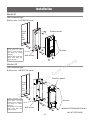
Installation................................................................21
Notes..... ...................................................................23
Commercial in Confidence
WWW.ACTIVEONLINE.COM.AU
+
61 (0)7 5551 0306

- 1 -
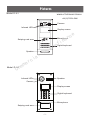
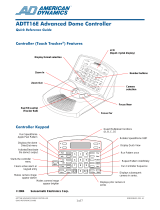
Model: D-A1
Infrared LEDs
Swiping card area
Speaker
Camera
Display screen
Microphone
Digital keyboard
Model: D-A3
Infrared LEDs
Camera
Speaker
Display screen
Digital keyboard
Swiping card area
Microphone
Pictures
Commercial in Confidence
WWW.ACTIVEONLINE.COM.AU
+61 (0)7 5551 0306

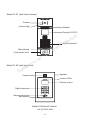
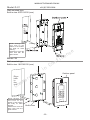
Model: D-X1 (with touch screen)
6 5
4
3
2
#
0
9
8
7
Model: D-X5 (with keyboard)
Camera
Digital keyboard
Swiping card area
Microphone
Infrared LEDs
Display screen
- 2 -
Speaker
Camera
Display(3.5"LCD)
Digital keyboard
Card reader area
Infrared light
Microphone
Speaker
Commercial in Confidence
WWW.ACTIVEONLINE.COM.AU
+61 (0)7 5551 0306

1. Working voltage:DC12V
2. Standby power: without heating film: 3W;
with heating film: 9W
3. Rated power: without heating film: 6W;
with heating film: 12W
4. Working temperature: without heating film: -10℃~+55℃;
with heating film: -40℃~+55℃
5. Relative humidity: 20%~93%
6. Storage temperature: -20℃~+70℃
- 3 -
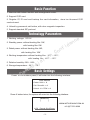
Basic Function
Technology Parameters
1. Intercom with indoor monitor and management center.
2. Support IC/ID card.
3. Register IC/ ID card and backup the card information, store ten thousand IC/ID
cards at most.
4. Unlock by password, exit button, with door magnetic inspection.
5. Support standard SIP protocol.
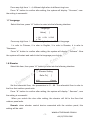
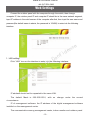
Power on the outdoor panel, it will enter into the following interface:
Basic Settings
User Manual
Center: 0000 + #
Call: RoomNo + #
Unlock : #+ PSW + #
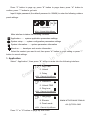
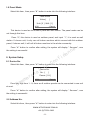
Press # button twice, the system will enter into the following interface:
Password:
[ ]
#OK *Cancel 2Up 8Down
Commercial in Confidence
WWW.ACTIVEONLINE.COM.AU
+61 (0)7 5551 0306

#OK *Cancel 2Up 8Down
1. Application
- 4 -
Press “2” button to page up, press “8” button to page down; press “#” button to
confirm; press “*” button to go back.
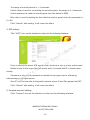
Input 6 digits password (the default password is 123456) to enter the following outdoor
panel settings:
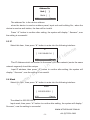
Main interface includes the following contents:
Application—— system application parameters settings
System setup—— system configuration parameters settings
System information—— system parameters information
About us—— developer and version information
Select the content you want to set, then press “#” button to enter setting or press “*”
button to cancel settings.
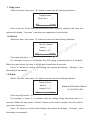
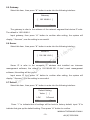
1. Application
Select “ Application”, then press “#” button to enter into the following interface:
1. Reg. card
2. Unlock
3. Delay
#OK *Cancel 2Up 8Down
4. Password
5. Unlock PSW
6. Ring tone
#OK *Cancel 2Up 8Down
7. Language
8. Elevator
9. Panel mode
#OK *Cancel 2Up 8Down
Press “2” or “8” button to page up and down.
Commercial in Confidence
WWW.ACTIVEONLINE.COM.AU
+61 (0)7 5551 0306

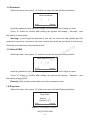
1.1 Reg. card
Select this item, then press “#” button to enter into the following interface:
Register card
#OK *Cancel
Room No.-[ ]
Press room
No. firstly, then get the access card closed to swiping card area, the
system will display “ Success”, now this card registration is successful.
1.2 Unlock
Select this item, then press “#” button to enter into the following interface:
Unlock Timeout
#OK *Cancel
Value-[ ]
Param-[ 1-9 ]
Press any digit from 1~9.
For example, if press 8, it indicates that the setting unlocking time is 8 seconds.
When the user unlock the door, it will be auto-closed after 8 seconds.
Press “#” button to confirm after setting, the system will display “ Success”, now
the setting is successful.
1.3 Delay
Delay Unlock
#OK *Cancel
Value-[ ]
P
aram-[ 0-9 ]
Select this item, then press “#” button to enter into the following interface:
Press any digit from 0~9.
For example, if press 5, it indicates that the setting delay unlocking time is 5
seconds. When the user press “Unlock” button on the indoor monitor, the door will be
open after 5 seconds.
Press “#” button to confirm after setting, the system will display “ Success”, now
the setting is successful.
- 5 -
Commercial in Confidence
WWW.ACTIVEONLINE.COM.AU
+61 (0)7 5551 0306

- 6 -
1.4 Password
Select this item, then press “#” button to enter into the following interface:
New Password
#OK *Cancel
[ ]
Input the password you want to change, the password has 6 digits at most.
Press
“#” button to confirm after setting, the system will display “ Success”, now
the setting is successful.
Warning: If you forget the password, you will not enter into the system and the
password cannot be recovered, now the outdoor panel will be sent back to the factory.
So kindly note that keep the password well.
1.5 Unlock PSW
Select this item, then press “#” button to enter into the following interface:
New Unlock PSW
#OK *Cancel
[ ]
Input the password you want to change, the password has 6 digits at most.
Press “#”
button to confirm after setting, the system will display “ Success”, now
the setting is successful.
Remark: every outdoor panel has one unlock password only.
1.6 Ring tone
Select this item, then press “#” button to enter into the following interface:
Ring Tone
#OK *Cancel
Value-[ ]
Param-[1-4 ]
Commercial in Confidence
WWW.ACTIVEONLINE.COM.AU
+61 (0)7 5551 0306

- 7 -
Press any digit from 1~4, different digit refers to different ring tone.
Press “#” button to confirm after setting, the system will display “ Success”, now
the setting is successful.
Language
1: CN 2: EN 3: RUS
4. TW
Value-[ ]
Select this item, press “#” button to enter into the following interface:
Press any digit from 1~4, different digit refers to different language.
1 is refer to Chinese, 2 is refer to English, 3 is refer to Russian, 4 is refer to
Taiwanese.
Press “#” button to confirm after setting, the system will display “ Success”. Now
the system will restart and switch into the language you change.
1.7 Language
1.8 Elevator
Select this item, then press “#” button to enter into the following interface:
Elevator Setting
#OK *Cancel
Refer To:[ ]
Set the referential floor, the parameters is 01~99. The referential floor is refer to
the floor that outdoor panel exits.
Press “#” button to confirm after setting, the system will display “ Success”, now
the setting is successful.
When you unlock the door after setting, the elevator will fall to the floor that
outdoor panel exits.
Remark: when elevator control device connected with the outdoor panel, this
setting will be valid.
Commercial in Confidence
WWW.ACTIVEONLINE.COM.AU
+61 (0)7 5551 0306

- 8 -
Panel Mode
#OK *Cancel
Value-[ ]
Unit-[ 0 ] Wall-[ 1 ]
1.9 Panel Mode
Select this item, then press “#” button to enter into the following interface:
This device is used as the outdoor panel and wall station. The panel mode can be
set through this item.
Press “0", this device is used as outdoor panel, and input “1”, it is used as wall
station. If choose unit, it only can call indoor monitors which connect with this outdoor
panel; if choose wall, it will call all indoor monitors in the whole community.
Press “#” button to confirm after setting, the system will display “ Success”, now
the setting is successful.
2. System Setup
2.1 Device No.
Select this item, then press “#” button to enter into the following interface:
Device No.
#OK *Cancel
No. -[ ]
Param-[ 1-9 ]
Press any digit from 1~9, there are 9 outdoor panels can be connected in one unit
at most.
Press “#” button to confirm after setting, the system will display “ Success”, now
the setting is successful.
2.2 Address No.
Select this item, then press “#” button to enter into the following interface:
Commercial in Confidence
WWW.ACTIVEONLINE.COM.AU
+61 (0)7 5551 0306
WWW.ACTIVEONLINE.COM.AU
+61 (0)7 5551 0306

Address No.
#OK *Cancel
Unit: [ ]
Build: [ ]
The address No. is the device address.
when the device is used as outdoor panel, input unit and building No.; when the
device is used as wall station, the item will be invalid.
Press “#” button to confirm after setting, the system will display “ Success”, now
the setting is successful.
2.3 IP
Address No.
#OK *Cancel
Unit: [ ]
IP
#OK *Cancel
[ 192.168.68.214 ]
Select this item, then press “#” button to enter into the following interface:
The IP Address which connected in the same local area network (under the same
network segment) should be unique.
Input IP address, then press “#” button to confirm after setting, the system will
display “ Success”, now the setting is successful.
2.4 Mask
Select this item, then press “#” button to enter into the following interface:
Mask
#OK *Cancel
[ 255.255.255.0 ]
The default is 255.255.255.0.
Input mask, then press “#” button to confirm after setting, the system will display “
Success”, now the setting is successful.
- 9 -
Commercial in Confidence
WWW.ACTIVEONLINE.COM.AU
+61 (0)7 5551 0306

2.5 Gateway
Gateway
#OK *Cancel
[ 192.168.68.1 ]
Select this item, then press “#” button to enter into the following interface:
The gateway is refer to the address of the network segment that device IP exits.
The default is 192.168.68.1.
Input gateway, then press “#” button to confirm after setting, the system will
display “ Success”, now the setting is successful.
2.6 Server
Select this item, then press “#” button to enter into the following interface:
Server IP
#OK *Cancel
[ 192.168.12.40 ]
Server IP is refer to the computer IP address that installed our intercom
management software, the default is 192.168.68.180. If don’t need management
software, this setting will be invalid.
Input server IP, then press “#” button to confirm after setting, the system will
display “ Success”, now the setting is successful.
2.7 Default
Default Setting
#OK *
Cancel
Value- [ ]
#OK *
Cancel
1-OK 0-Cancel
Select this item, then press “#” button to enter into the following interface:
Press “1” to indicate that all settings will be back to factory default; input “0" to
indicate that give up the default setting. Then press “#” button to confirm.
-10-
Commercial in Confidence
WWW.ACTIVEONLINE.COM.AU
+61 (0)7 5551 0306

Reboot
#OK *Cancel
Value- [ ]
#OK *Cancel
1-OK 0-Cancel
2.8 Reboot
Select this item, then press “#” button to enter into the following interface:
Press “1” to indicate that system restart, input “0" to indicate that give up the
system restart. Then press “#” button to confirm.
NET: ERR.
SIP: ERR.
3. System Information
Select this item, then press “#” button to enter into the following interface:
Press 2/up or 8/down button to check the relevant information of system.
NET: network connectivity status. When the system display “ERR”, the network is
disconnected; when it display “Ok”, the network is connected.
SIP: registration status of SIP server. When the system displays “ERR”, the SIP
server is unregistered; when it displays “Ok”, the SIP server is registered.
UI:
1.0.0 20121205(std)
RES:
1.0.0 20120918(std)
4. About Us
Select this item, then press “#” button to enter into the following interface:
You can see the relevant information of system software version.
UI is refer to the interface, RES is refer to the interface release.
-11-
Commercial in Confidence
WWW.ACTIVEONLINE.COM.AU
+61 (0)7 5551 0306
WWW.ACTIVEONLINE.COM.AU
+61 (0)7 5551 0306

Web Settings
Connect the outdoor panel with the computer through the switch, then change
computer IP, the outdoor panel IP and computer IP should be in the same network segment,
input IP address in the web browser of the computer after that, then input the user name and
password(the default name is admin, the password is 123456) to enter into the following
interface:
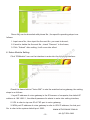
1. LAN setting:
Click “LAN” icon on the interface to enter into the following interface:
IP address should not be repeated in the same LAN.
The default Mask is 255.255.255.0, with no change under the normal
circumstance.
IP of management software: the IP address of the digital management software
installed on the management center.
The communication among management center, indoor monitor and outdoor panel
-
12-
Commercial in Confidence
WWW.ACTIVEONLINE.COM.AU
+61 (0)7 5551 0306

should be made in the same LAN usually; if they are not in the same LAN, the call will
be made on the internet, now SIP server should be set.
Click“Submit” after setting, it will come into effect.
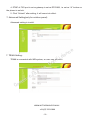
2. Device setting:
Click “Device” icon on the interface to enter into the following interface:
Build and Unit No. is the build and unit No. that the outdoor panel exits.
The device No. of outdoor panel is used for distinguishing that different outdoor
panel in the same unit. When monitor the outdoor panel, choose the device No. to
monitor corresponding outdoor panel.
The password is used for logging outdoor panel setting (the default is 123456).
Three choice of panel mode for option: Unit Panel, Wall Panel and Person Panel.
To choose the ring back and language.
Click “Submit” after setting, it will come into effect.
3. Access setting:
Click “Access” icon on the interface to enter into the following interface:
-13-
Commercial in Confidence
WWW.ACTIVEONLINE.COM.AU
+61 (0)7 5551 0306

The range of unlock timeout is 1~9 seconds.
Unlock delay is used for controlling the unlocking time, the range is 0~9 seconds.
Unlock password is used for unlocking the door, the default is 0000.
Elev refer is used for setting the floor that the outdoor panel exits, the parameter is
01~99.
Click “Submit” after setting, it will come into effect.
4. SIP setting:
Click “VOIP” icon on the interface to enter into the following interface:
Proxy is refer to the server URL agent by sip, the form is: sip: ip or sip: realm name.
Realm is refer to the scope that the device exits, it is same with IP or realm name
usually.
Password is refer to the password accessed into sip agent server, offered by
administrator of sip agent server.
Stun IP and Port are refer to the public network server IP and Port passed by NAT.
Click “Submit” after setting, it will come into effect.
5. Forward account setting:
Click “Forward” icon on the interface to enter into the following interface:
-14-
Commercial in Confidence
WWW.ACTIVEONLINE.COM.AU
+61 (0)7 5551 0306

Room No. can be bounded with phone No., the specific operating steps is as
follows:
1. Input room No., then input the Account No. you want to bound;
2. If want to delete the Account No., check “Remove” in the frame;
3. Click “Submit” after setting, it will come into effect.
6. Extern Module Setting:
Click “EXModule” icon on the interface to enter into the following interface:
Check the frame behind “Voice GW” to star the matched voice gateway, the setting
steps is as follows:
1. Input IP address of voice gateway in the IE browser of computer, the default IP
address is 192.168.2.1, the default password is admin to enter into setting interface;
2. URL is refer to sip user ID of FXO port in voice gateway;
3. WAN port IP address of voice gateway is refer to URL IP address, the last port
No. is refer to the system default port: 5062;
-15-
Commercial in Confidence
WWW.ACTIVEONLINE.COM.AU
+61 (0)7 5551 0306
WWW.ACTIVEONLINE.COM.AU
+61 (0)7 5551 0306

4. DTMF of FXO port in voice gateway is set as RFC2833, i.e. set as “#” button on
the phone to unlock.
5. Click “Submit” after setting, it will come into effect.
7. Advanced Setting :(only for outdoor panel)
Advanced setting is invalid.
7. TR069 Setting:
TR069 is connected with IMS system, so user may not set it.
-16-
Commercial in Confidence
WWW.ACTIVEONLINE.COM.AU
+61 (0)7 5551 0306

8. User Logout:
Click “Logout” icon on the interface to enter into the following interface:
Click “Submit” to logout the system.
-
17-
Commercial in Confidence
WWW.ACTIVEONLINE.COM.AU
+61 (0)7 5551 0306

1. Unit outdoor panel/ Wall station calls management center
-
18-
Basic Operation
Press “0000” or button to call management center directly.
#OK *Cancel ------------Call User-------------
Calling
2. Calling indoor monitor (the digit of indoor monitor is 1~4)
Press the floor and room No. of indoor monitor (the digit is 3 at least). For
example: if the floor and room No. are all 1, the user can press “101", then press “#”
button to call.
2.1 Unit outdoor panel
2.2 Wall station
Press Building No. +“#”+Unit No. +“#”+room No.+“#” button to call.
3. Unlock
3.1 Unlock with password
Press “#” button on the outdoor panel to enter into the following interface:
Unlock:
[ ]
#OK *Cancel 2Up 8Down
Input 4 digits password (the factory default password is 0000), then press “#”
button. Now the door is open.
3.2 Unlock with swiping card
Get the registered ID/ IC card closed to the swiping card area on the outdoor panel.
If IC/ IC card has been authorized, the door will be open after swiping card, if not,
the system will display “Failure”.
Commercial in Confidence
WWW.ACTIVEONLINE.COM.AU
+61 (0)7 5551 0306
Page is loading ...
Page is loading ...
Page is loading ...
Page is loading ...
Page is loading ...
-
 1
1
-
 2
2
-
 3
3
-
 4
4
-
 5
5
-
 6
6
-
 7
7
-
 8
8
-
 9
9
-
 10
10
-
 11
11
-
 12
12
-
 13
13
-
 14
14
-
 15
15
-
 16
16
-
 17
17
-
 18
18
-
 19
19
-
 20
20
-
 21
21
-
 22
22
-
 23
23
-
 24
24
-
 25
25


Active Online D-X1 User manual
- Type
- User manual
Ask a question and I''ll find the answer in the document
Finding information in a document is now easier with AI
Other documents
-
 DNAKE S213K User manual
-
 Vip-Vision INTIPRKIT Quick Installation Manual
-
MicroNet SP5211-5/10 User manual
-
Symmetricom TimeSource 3600 User manual
-
-
 American Dynamics ADTT16E Touch Tracker User manual
-
Acer LX.PUS02.012 Datasheet
-
ACTi TCM-6630 User manual
-
Geovision LPR-DL Camera User manual
-
Fanvil i33VF User manual


