Page is loading ...

INSTRUCTIONS FOR THE ENTREEAIR® DOOR FRAME FAN™
READ AND SAVE THESE INSTRUCTIONS
MODEL:
RR100 & RR100-B
WARNING - TO REDUCE THE RISK OF FIRE, ELECTRIC SHOCK OR INJURY TO PERSONS, OBSERVE THE FOLLOWING:
1. Installation work and electrical wiring must be done by qualified person(s) in accordance with all applicable codes and standards, including fire-rated
construction.
2. Sufficient air is needed for proper combustion and exhausting of gases through the flue (chimney) of fuel burning equipment to prevent back drafting. Follow
the heating equipment manufacturer’s guideline and safety standards such as those published by the National Fire Protection Association (NFPA), and the
American Society for Heating, Refrigeration and Air Conditioning Engineers (ASHRAE), and local code authorities.
3. When cutting or drilling into wall or ceiling, do not damage electrical wiring or other hidden utilities.
4. WARNING: To reduce the risk of fire or electric shock do not use with an extension cord.
Please read and understand this entire manual before attempting to operate or install the product.
When using electrical appliances, basic precautions should always be followed to reduce the risk of fire, electric shock and injury to persons, including the
following:
1) Use fan only for intended use, as described in instruction manual. Other use may cause fire, electrical shock, damage to the unit, or injury to persons and
will void any warranty by the manufacturer.
2) To protect against electric shock, do not immerse unit, plug, or cord in water or spray with liquids.
3) Close supervision is necessary when any appliance is used by or near children.
4) Unplug from outlet when not in use, when moving fan from one location to another and before cleaning. Turn the unit off before unplugging.
5) Never insert any object or allow any object to enter the EntreeAir® through the grills, as this may damage the unit or cause it to malfunction.
6) Pressure on the grills of the EntreeAir® may cause the fan impeller to contact these grills and damage the unit.
7) Disconnect fan before cleaning. Do not use strong detergents or flammable liquids to clean the EntreeAir®.
8) The motor of the EntreeAir® is equipped with a thermal fuse. Blocking rotation of the fan or airflow may cause the motor to overheat. Should the motor
overheat and the fuse open, replacement of the motor is required.
9) Do not in any way block the air grills of the EntreeAir®
10) Do not use fan in a window. Rain may cause an electrical hazard. The EntreeAir® should never be exposed to moisture. Do not use the unit in a bathroom
or laundry area where it may come in contact with water.
11) Do not operate in the presence of explosive and/or flammable fumes.
12) Do not place fan or any parts near an open flame, cooking or other heating appliances.
13) Do not operate any appliance with a damaged cord or plug, after the appliance malfunctions or has been dropped or damaged in any manner.
14) To disconnect, grip plug and pull from wall outlet. Never yank on cord.
15) The housing of your EntreeAir® is sealed at the factory. THERE ARE NO SERVICEABLE PARTS INSIDE. Attempting to open the housing will expose
you to dangerous electricity, may cause fire, and will void any and all warranty.
16) The EntreeAir® is designed for indoor use only.
17) This product is intended for household use only and not for commercial or industrial use.
18) Do not use fan near curtains, plants, windows treatments, etc.
19) Do not operate any fan with a damaged cord or plug. Discard fan or return to an authorized service facility for examination and/or repair.
20) Do not run cord under carpeting. Do not cover cord with throw rugs, runners, or similar coverings. Do not route cord under furniture or appliances. Arrange
cord away from traffic area and where it will not be tripped over.
21) WARNING: To reduce the risk of electric shock and injury to persons, do not use this fan near a door or window.
22) WARNING: To reduce the risk of fire or electric shock, do not use this fan with any solid-state speed control device.
SAFETY INFORMATION
POLARIZED PLUG
NOTE: This appliance has a polarized plug (one blade is wider than the other).
The polarized plug is not intended to be used in non-polarized outlets (having both slots the same size). To reduce the risk
of electric shock, this plug is intended to fit in a polarized outlet only one way. If the plug does not fit fully in the outlet,
reverse the plug. If it still does not fit, contact a qualified electrician to install the proper outlet. Do not attempt to modify this
plug or override this safety feature in any way.
POWER CORD SAFETY TIPS
1. Never pull or yank on the cord or the appliance.
2. To insert plug, grasp it firmly and guide it into outlet.
3. To disconnect appliance, grasp plug and remove it from outlet.
4. Before each use, inspect the line cord for cuts and/or abrasion marks. If any are found, this indicates that the appliance should be serviced and the line cord
replaced. Please return it to an authorized service representative.
5. Never wrap the cord tightly around the appliance, as this could place undue stress on the cord where it enters the appliance and cause it to fray and break.
CLEANING AND MAINTENANCE
Before cleaning the EntreeAir
®
always disconnect the power cord from the outlet. Dust may be removed from the exterior surfaces using a soft cloth, the round
brush attachment of your vacuum cleaner, or using a cloth that has been lightly moistened with water and a mild non-abrasive detergent. Dust accumulation in
the interior of the EntreeAir
®
may be removed by using the round brush attachment of your vacuum cleaner.
ONE YEAR LIMITED WARRANTY
Subject to the following limitations, the manufacturer warrants to the original purchaser that each new product is free from defects in material and workmanship
and agrees to repair or replace under this warranty any defective product or part as follows from the original date of purchase for a period of one (1) year.
THIS WARRANTY IS NOT TRANSFERABLE AND DOES NOT COVER:
1. Products sold damaged or incomplete, sold “as is”, sold reconditioned or used as rental equipment.
2. Delivery, installation or normal adjustments explained in the owner’s manual.
3. Damage or liability caused by shipping, improper handling, improper installation, incorrect voltage or improper wiring, improper maintenance, improper
modification, or the use of accessories and/or attachments not specifically recommended by the manufacturer.
4. Repairs necessary because of operator abuse or negligence, or the failure to install, operate, maintain and store the product according to the instructions in
the owner’s manual.
5. Damage caused by cold, heat, rain, excessive humidity, corrosive environments and materials, or other contaminants.
6. Expendable items that become worn during normal use.
7. Freight costs from customer to vender.
8. Repair and transportation costs of products or parts determined not to be defective.
9. Any incidental, indirect or consequential loss, damage, or expense that may result from any defect, failure or malfunction of the product. Some states do not
allow the exclusion or limitation of consequential damages so the above exclusions or limitations may not apply to you. Some states do not allow the exclusion
or limitations on how long an implied warranty lasts, so the above limitations may not apply to you. You may have other rights which vary from state to state.
A defective unit must be returned, prepaid, with proof of purchase, well packaged to avoid damage in transit. Ship unit to Suncourt Inc. only after obtaining a
Return Goods Authorization (RGA) number. Returns without this RGA number will not be accepted.
Actual product appearance may differ from illustrations.
Suncourt reserves the right to modify any or all of its products' features, designs, components and specifications without notice.
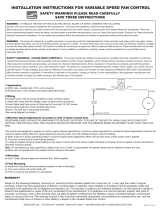
Fuse
Fuse cover
Metal ends
PLUG AND POWER CORD INSTRUCTIONS
This product employs overload protection (fuse). A blown fuse indicates an overload or short-circuit situation. If the fuse blows, unplug the product from the
outlet. Replace the fuse as per the user servicing instructions (follow product marking for proper fuse rating) and check the product. If the replacement fuse
blows, a short circuit may be present and the product should be discarded or returned to an authorized service facility for examination and/or repair.
DO NOT OPERATE APPLIANCE IF THE LINE CORD SHOWS ANY DAMAGE OR IF APPLIANCE WORKS INTERMITTENTLY OR STOPS WORKING ENTIRELY.
IMPORTANT: During the first few minutes of initial use, you may notice a slight odor. This is normal and will quickly disappear.
REPLACEABLE FUSE
User Servicing Instructions
1. Unplug your fan. Grasp plug and remove from the receptacle or other outlet device. Do not unplug by pulling on cord.
2. Open fuse cover, located on the top of the plug, by using your thumb or a flat head screwdriver to slide the cover down toward the
prongs.
NOTE: Ensure the fuse cover is completely open before attempting to remove fuse.
3. Remove fuse carefully by using a small screwdriver to pry the fuse out of the compartment by the metal ends of the fuse.
4. Place plug on a solid, flat surface. Insert new 5 Amp, 125 volt fuse into fuse compartment and use a small screwdriver to secure the metal ends
of the fuse into the compartment.
CAUTION: Risk of fire. Replace fuse only with 5 Amp, 125 volt fuse.
5. Slide fuse cover closed. If fuse cover is difficult to close, make sure fuse is secured in place by pressing down on metal ends of the fuse.
6. Risk of fire. Do not replace attachment plug. Contains a safety device (fuse) that should not be removed. Discard product if the attachment plug is
damaged.
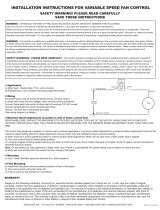
0.9"
22.86 mm
EntreeAir
®
Side View
Vista Lateral
Vue De Côté
Keyhole slots
Ojo de la
cerradura ranuras
Encoche en trou de
serrure
Allow screw to project 1/4” then check
for tight fit and screw in further as
required.
Deje que el tornillo sobresalga 1/4” y
después contole que esté bien
ajustado y atorníllelo lo que resulte
necesario.
Laissez dépasser la vis 6 mm.
Vérifiez l’ajustement serré et vissez
plus loin comme requis.
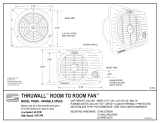
PLACE THIS EDGE AGAINST DOOR STOP
COLOQUE ESTE BORDE CONTRA EL TOPE DE LA PUERTA
METTEZ CE CÔTÉ CONTRE LE BORD DE LA PORTE
TEMPLATE
PLANTILLA
GABARIT
TEMPLATE
PLANTILLA
GABARIT
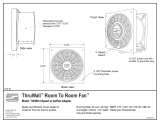
INSTALLATION INSTRUCTIONS
The EntreeAir
®
can be installed on the frame of any interior doorway in either of the top corners. The unit must be installed on the opposite side of the
doorstop that the door shuts against to permit closing the door.
Follow instructions to permanently install two screws in door frame (screws provided).
1) Cut out template. Retain instructions for future reference.
2) Place either narrow end of template against the top edge of the door frame with the long edge against the doorstop.
3) Install one screw at each center point. Allow screw to project 1/4”. Position the unit securely on the screws.
4) The EntreeAir
®
is installed over the screws by placing two keyhole slots over the screw heads. Make sure the unit slips down over the screws and locks into place.
Multiple keyhole slots in the EntreeAir
®
Door Frame Fan™ are provided to allow installation in the left or right corners of the doorway and to allow for choice of direction of
airflow. (As shown below) Observe the airflow direction marked on the outside of the unit when installing.
5) Securely attach electrical cord to door frame with cord clips (clips provided).
INSTRUCTIONS FOR THE ENTREEAIR
®
DOOR FRAME FAN
™

INSTRUCTIONS FOR THE ENTREEAIR® DOOR FRAME FAN™
READ AND SAVE THESE INSTRUCTIONS
MODEL:
RR100 & RR100-B
WARNING - TO REDUCE THE RISK OF FIRE, ELECTRIC SHOCK OR INJURY TO PERSONS, OBSERVE THE FOLLOWING:
1. Installation work and electrical wiring must be done by qualified person(s) in accordance with all applicable codes and standards, including fire-rated
construction.
2. Sufficient air is needed for proper combustion and exhausting of gases through the flue (chimney) of fuel burning equipment to prevent back drafting. Follow
the heating equipment manufacturer’s guideline and safety standards such as those published by the National Fire Protection Association (NFPA), and the
American Society for Heating, Refrigeration and Air Conditioning Engineers (ASHRAE), and local code authorities.
3. When cutting or drilling into wall or ceiling, do not damage electrical wiring or other hidden utilities.
4. WARNING: To reduce the risk of fire or electric shock do not use with an extension cord.
Please read and understand this entire manual before attempting to operate or install the product.
When using electrical appliances, basic precautions should always be followed to reduce the risk of fire, electric shock and injury to persons, including the
following:
1) Use fan only for intended use, as described in instruction manual. Other use may cause fire, electrical shock, damage to the unit, or injury to persons and
will void any warranty by the manufacturer.
2) To protect against electric shock, do not immerse unit, plug, or cord in water or spray with liquids.
3) Close supervision is necessary when any appliance is used by or near children.
4) Unplug from outlet when not in use, when moving fan from one location to another and before cleaning. Turn the unit off before unplugging.
5) Never insert any object or allow any object to enter the EntreeAir® through the grills, as this may damage the unit or cause it to malfunction.
6) Pressure on the grills of the EntreeAir® may cause the fan impeller to contact these grills and damage the unit.
7) Disconnect fan before cleaning. Do not use strong detergents or flammable liquids to clean the EntreeAir®.
8) The motor of the EntreeAir® is equipped with a thermal fuse. Blocking rotation of the fan or airflow may cause the motor to overheat. Should the motor
overheat and the fuse open, replacement of the motor is required.
9) Do not in any way block the air grills of the EntreeAir®
10) Do not use fan in a window. Rain may cause an electrical hazard. The EntreeAir® should never be exposed to moisture. Do not use the unit in a bathroom
or laundry area where it may come in contact with water.
11) Do not operate in the presence of explosive and/or flammable fumes.
12) Do not place fan or any parts near an open flame, cooking or other heating appliances.
13) Do not operate any appliance with a damaged cord or plug, after the appliance malfunctions or has been dropped or damaged in any manner.
14) To disconnect, grip plug and pull from wall outlet. Never yank on cord.
15) The housing of your EntreeAir® is sealed at the factory. THERE ARE NO SERVICEABLE PARTS INSIDE. Attempting to open the housing will expose
you to dangerous electricity, may cause fire, and will void any and all warranty.
16) The EntreeAir® is designed for indoor use only.
17) This product is intended for household use only and not for commercial or industrial use.
18) Do not use fan near curtains, plants, windows treatments, etc.
19) Do not operate any fan with a damaged cord or plug. Discard fan or return to an authorized service facility for examination and/or repair.
20) Do not run cord under carpeting. Do not cover cord with throw rugs, runners, or similar coverings. Do not route cord under furniture or appliances. Arrange
cord away from traffic area and where it will not be tripped over.
21) WARNING: To reduce the risk of electric shock and injury to persons, do not use this fan near a door or window.
22) WARNING: To reduce the risk of fire or electric shock, do not use this fan with any solid-state speed control device.
SAFETY INFORMATION
POLARIZED PLUG
NOTE: This appliance has a polarized plug (one blade is wider than the other).
The polarized plug is not intended to be used in non-polarized outlets (having both slots the same size). To reduce the risk
of electric shock, this plug is intended to fit in a polarized outlet only one way. If the plug does not fit fully in the outlet,
reverse the plug. If it still does not fit, contact a qualified electrician to install the proper outlet. Do not attempt to modify this
plug or override this safety feature in any way.
POWER CORD SAFETY TIPS
1. Never pull or yank on the cord or the appliance.
2. To insert plug, grasp it firmly and guide it into outlet.
3. To disconnect appliance, grasp plug and remove it from outlet.
4. Before each use, inspect the line cord for cuts and/or abrasion marks. If any are found, this indicates that the appliance should be serviced and the line cord
replaced. Please return it to an authorized service representative.
5. Never wrap the cord tightly around the appliance, as this could place undue stress on the cord where it enters the appliance and cause it to fray and break.
CLEANING AND MAINTENANCE
Before cleaning the EntreeAir
®
always disconnect the power cord from the outlet. Dust may be removed from the exterior surfaces using a soft cloth, the round
brush attachment of your vacuum cleaner, or using a cloth that has been lightly moistened with water and a mild non-abrasive detergent. Dust accumulation in
the interior of the EntreeAir
®
may be removed by using the round brush attachment of your vacuum cleaner.
ONE YEAR LIMITED WARRANTY
Subject to the following limitations, the manufacturer warrants to the original purchaser that each new product is free from defects in material and workmanship
and agrees to repair or replace under this warranty any defective product or part as follows from the original date of purchase for a period of one (1) year.
THIS WARRANTY IS NOT TRANSFERABLE AND DOES NOT COVER:
1. Products sold damaged or incomplete, sold “as is”, sold reconditioned or used as rental equipment.
2. Delivery, installation or normal adjustments explained in the owner’s manual.
3. Damage or liability caused by shipping, improper handling, improper installation, incorrect voltage or improper wiring, improper maintenance, improper
modification, or the use of accessories and/or attachments not specifically recommended by the manufacturer.
4. Repairs necessary because of operator abuse or negligence, or the failure to install, operate, maintain and store the product according to the instructions in
the owner’s manual.
5. Damage caused by cold, heat, rain, excessive humidity, corrosive environments and materials, or other contaminants.
6. Expendable items that become worn during normal use.
7. Freight costs from customer to vender.
8. Repair and transportation costs of products or parts determined not to be defective.
9. Any incidental, indirect or consequential loss, damage, or expense that may result from any defect, failure or malfunction of the product. Some states do not
allow the exclusion or limitation of consequential damages so the above exclusions or limitations may not apply to you. Some states do not allow the exclusion
or limitations on how long an implied warranty lasts, so the above limitations may not apply to you. You may have other rights which vary from state to state.
A defective unit must be returned, prepaid, with proof of purchase, well packaged to avoid damage in transit. Ship unit to Suncourt Inc. only after obtaining a
Return Goods Authorization (RGA) number. Returns without this RGA number will not be accepted.
Actual product appearance may differ from illustrations.
Suncourt reserves the right to modify any or all of its products' features, designs, components and specifications without notice.
Fuse
Fuse cover
Metal ends
PLUG AND POWER CORD INSTRUCTIONS
This product employs overload protection (fuse). A blown fuse indicates an overload or short-circuit situation. If the fuse blows, unplug the product from the
outlet. Replace the fuse as per the user servicing instructions (follow product marking for proper fuse rating) and check the product. If the replacement fuse
blows, a short circuit may be present and the product should be discarded or returned to an authorized service facility for examination and/or repair.
DO NOT OPERATE APPLIANCE IF THE LINE CORD SHOWS ANY DAMAGE OR IF APPLIANCE WORKS INTERMITTENTLY OR STOPS WORKING ENTIRELY.
IMPORTANT: During the first few minutes of initial use, you may notice a slight odor. This is normal and will quickly disappear.
REPLACEABLE FUSE
User Servicing Instructions
1. Unplug your fan. Grasp plug and remove from the receptacle or other outlet device. Do not unplug by pulling on cord.
2. Open fuse cover, located on the top of the plug, by using your thumb or a flat head screwdriver to slide the cover down toward the
prongs.
NOTE: Ensure the fuse cover is completely open before attempting to remove fuse.
3. Remove fuse carefully by using a small screwdriver to pry the fuse out of the compartment by the metal ends of the fuse.
4. Place plug on a solid, flat surface. Insert new 5 Amp, 125 volt fuse into fuse compartment and use a small screwdriver to secure the metal ends
of the fuse into the compartment.
CAUTION: Risk of fire. Replace fuse only with 5 Amp, 125 volt fuse.
5. Slide fuse cover closed. If fuse cover is difficult to close, make sure fuse is secured in place by pressing down on metal ends of the fuse.
6. Risk of fire. Do not replace attachment plug. Contains a safety device (fuse) that should not be removed. Discard product if the attachment plug is
damaged.
0.9"
22.86 mm
EntreeAir
®
Side View
Vista Lateral
Vue De Côté
Keyhole slots
Ojo de la
cerradura ranuras
Encoche en trou de
serrure
Allow screw to project 1/4” then check
for tight fit and screw in further as
required.
Deje que el tornillo sobresalga 1/4” y
después contole que esté bien
ajustado y atorníllelo lo que resulte
necesario.
Laissez dépasser la vis 6 mm.
Vérifiez l’ajustement serré et vissez
plus loin comme requis.
PLACE THIS EDGE AGAINST DOOR STOP
COLOQUE ESTE BORDE CONTRA EL TOPE DE LA PUERTA
METTEZ CE CÔTÉ CONTRE LE BORD DE LA PORTE
TEMPLATE
PLANTILLA
GABARIT
TEMPLATE
PLANTILLA
GABARIT
INSTALLATION INSTRUCTIONS
The EntreeAir
®
can be installed on the frame of any interior doorway in either of the top corners. The unit must be installed on the opposite side of the
doorstop that the door shuts against to permit closing the door.
Follow instructions to permanently install two screws in door frame (screws provided).
1) Cut out template. Retain instructions for future reference.
2) Place either narrow end of template against the top edge of the door frame with the long edge against the doorstop.
3) Install one screw at each center point. Allow screw to project 1/4”. Position the unit securely on the screws.
4) The EntreeAir
®
is installed over the screws by placing two keyhole slots over the screw heads. Make sure the unit slips down over the screws and locks into place.
Multiple keyhole slots in the EntreeAir
®
Door Frame Fan™ are provided to allow installation in the left or right corners of the doorway and to allow for choice of direction of
airflow. (As shown below) Observe the airflow direction marked on the outside of the unit when installing.
5) Securely attach electrical cord to door frame with cord clips (clips provided).
INSTRUCTIONS FOR THE ENTREEAIR
®
DOOR FRAME FAN
™
/