PRESONUS Studio 24 Owner's manual
- Category
- Operating systems
- Type
- Owner's manual


Table of Contents
1 Overview — 1
1.1 Introduction — 1
1.2 What is in the Box — 1
1.3 Companion PreSonus Products — 2
2 Hookup — 3
2.1 Front-Panel Connections — 3
2.2 Back Panel Connections — 4
2.3 Connection Diagram — 5
3 Connecting to a Computer — 6
3.1 Installation for Windows — 6
3.1.1 Universal Control (Windows) — 6
3.1.2 Loopback Recording (Windows only) — 8
3.2 Installation for macOS — 9
3.3 Using the Studio 2|4 with Popular
Audio Applications — 9
4 Studio One Artist Quick Start — 11
4.1 Installation and Authorization — 11
4.2 Setting Up Studio One — 12
4.2.1 Configuring Audio Devices — 13
4.2.2 Configuring MIDI Devices — 13
4.3 Creating a New Song — 17
4.3.1 Configuring Your I/O — 18
4.3.2 Creating Audio and Instrument
Tracks — 19
4.3.3 Recording an Audio Track — 20
4.3.4 Adding Virtual Instruments
and Effects — 21
5 Technical Information — 23
5.1 Specifications — 23
6 Warranty Information — 24
6.1 How Consumer Law Relates
To This Warranty — 24

1
1 Overview
1.1 Introduction
Studio 2|4
Owner’s Manual
1 Overview
1.1 Introduction
Thank you for purchasing a PreSonus® Studio 2|4 audio interface. PreSonus
Audio Electronics, Inc., has designed the Studio 2|4 utilizing high-grade
components to ensure optimum performance that will last a lifetime. Loaded
with high-headroom, Class A microphone preamplifiers; robust metering,
high-definition 24-bit, 192 kHz conversion; and more, the Studio 2|4 breaks
new boundaries for music performance and production. All you need is a
computer with a USB C, 2.0, or 3.0 connection, a few microphones and cables,
powered speakers, and your instruments, and you are ready to record!
We suggest that you use this manual to familiarize yourself with the
features, applications, and correct connection procedures for your
Studio 2|4 audio interface before trying to connect it to your computer.
This will help you avoid problems during installation and setup.
Throughout this manual you will find Power User Tips that
can quickly make you a Studio 2|4 interface expert.
1.2 What is in the Box
Your Studio 2|4 package contains:
• Studio 2|4 24-bit, 192 kHz audio interface
• Quick Start Guide
• 1M USB C to C Cable
• 1M USB A to C Cable
• PreSonus Health Safety and Compliance Guide
Power User Tip: All companion software and drivers for your PreSonus Studio 2|4 are
available for download from your My PreSonus user account. Please visit http://my.
presonus.com and register your Studio 2|4 to receive downloads and licenses.
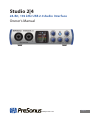
Main Level control
Nivel de salida principal
Lautstärkeregler Main-Ausgang
Niveau de sortie générale
Headphone level control
Control para nivel de audífonos
Regler für Kopfhörerpegel
Commande de niveau casque
Headphone Output
Salidas de auriculares
Kopfhörerausgänge
Sorties casque
Front panel mic/instrument/line inputs
Entradas de micrófono/instrumento/línea en el
panel frontal
Frontseitige Mikrofon-/Instrumentene-/Line-ingänge
Entrées micro/instrument/ligne
Input trim control
Control de ajuste de entrada
Trimmregler
Commande de réglage de gain d'entrée
Monitor Mixer Blend Control
Control de mezcla de monitoreo
Monitor-Mixer-Regler
Commande de mixage d’écoute
—
Main Left/Right Level display
Medidores de salida principal Izquierda/Derecha
Ausgangspegelanzeige Main Left/Right
Indicateurs de niveau de sortie générale gauche/droite
4-LED input Level display
4 medidores LED del nivel de entrada
Anzeige mit 4 LEDs für Eingangspegel
Indicateurs de niveau d’entrée à 4 LED
USB-C
Main Outputs
Salidas principales
Main-Ausgänge
Sorties générales
MIDI I/O
E/S MIDI
MIDI I/O
Entrée/sortie MIDI
+48V phantom power switch
Interruptor para poder
phantom +48V
+48 V Phantomspannung,
schaltbar
Interrupteur d’alimentation
fantôme +48 V
Part# 70-12000096-A
18011 Grand Bay Ct. • Baton Rouge,
Louisiana 70809 USA• 1-225-216-7887
www.presonus.com
©2018 PreSonus Audio Electronics, Inc. All Rights Reserved. The PreSonus logo is a registered trademark of PreSonus Audio Electronics, Inc.
Studio One is a registered trademark of PreSonus Software, Ltd. All other trademarks are the property of their respective holders.
Studio 2|4 24-Bit 192 kHz
USB-C Audio Interface
Congratulations on choosing PreSonus. You now own a
state-of-the-art, USB-C interface featuring our renowned
microphone preamplifiers — and Studio One Artist creative
music environment.
Getting Started
Package Contents
• Studio 2|4 Audio Interface
• USB A-C cable
• USB-C cable
• This Hook-Up Guide
• Safety Instructions
Downloads
• Studio 2|4 software drivers for Windows
• Studio One Artist DAW and resources (approximately 2 GB)
• Studio 2|4 Owner’s Manual PDF
Before operating your Studio
2|4, you must register online
for software downloads,
Owner’s Manual, and
instructional video.
1 Go online to my.presonus.com and create
— or log into — your MyPreSonus user account.
2 Click to register.
3 Enter your Studio 2|4 serial number.
4 Download your Windows driver (no driver necessary for
Mac), software and Owner’s Manual.
5 Connect your equipment to the Studio 2|4. Please refer
to the hook-up diagram in this Getting Started guide
and additional instructions in your Owner’s Manual.
6 Install your Windows driver (if necessary) and
Studio One Artist DAW software.
7 Watch the Studio 2|4 Instruction video and consult
your Owner’s Manual for further instructions.
Studio 2|4 USB - Interfaz de
Audio USB-C a 24 Bits / 192 kHz
Felicitaciones por y gracias por elegir PreSonus. Ahora usted
posee su propia interfaz USB-C de última generación portando
nuestros renombrados y afamados preamplificadores de
micrófono — y el entorno creativo musical que proporciona
Studio One Artist.
Comenzando
Contenido del paquete
• Studio 2|4 Interfaz de audio
• Cable USB A-C
• Cable USB-C
• Esta guía de conexiones
• Instrucciones de seguridad
Descargas
• Drivers de Studio 2|4 para Windows
• Daw Studio One Artist y recursos (aproximadamente 2 GB)
• Manual de usuario en formato PDF para su Studio 2|4
Antes de operar su Studio 2|4,
primero debe registrarse
online para descargar el
software, Manual de usuario y
video instructivo.
1 Vaya online a my.presonus.com y cree — o ingrese —
a su cuenta de usuario MyPreSonus.
2 Haga clic en Register (Registrar).
3 Ingrese el número de serie de su Studio 2|4.
4 Descargue el driver para Windows (No se requieren drivers
para macOS), software y Manual de usuario.
5 Conecte su hardware a la interfaz Studio 2|4.
Por favor utilice como referencia el diagrama de
conexiones en esta Guía de inicio y las instrucciones
adicionales en su Manual de usuario.
6 Instale su driver Windows (si se requiere) y el software
DAW Studio One Artist.
7 Observe el video instructivo de Studio 2|4 y consulte el
Manual de usuario para obtener más instrucciones.

2
1 Overview
1.3 Companion PreSonus Products
Studio 2|4
Owner’s Manual
1.3 Companion PreSonus Products
Thanks for choosing PreSonus! As a solutions company, we believe the best way to
take care of our customers (that’s you) is to ensure that you have the best possible
experience from the beginning of your signal chain to the end. To achieve this goal,
we’ve prioritized seamless integration throughout every design phase of these
products from day one. The result is systems that communicate with each other
as intended—straight out of the box—without excessive configuration hassles.
We’re here for you. Find out more at www.presonus.com.

3
2 Hookup
2.1 Front-Panel Connections
Studio 2|4
Owner’s Manual
2 Hookup
2.1 Front-Panel Connections
Microphone Inputs. Your Studio 2|4 interface is equipped with high-quality
microphone preamplifiers for use with all types of microphones. The Studio
2|4 features XMAX-L solid-state microphone preamps that are optimized for
bus powering.
Both input channels on your Studio 2|4 interface are
equipped with combo jacks. This convenient connector
accepts either a ¼-inch phone plug or an XLR plug.
Instrument / Line-Level Inputs. The ¼-inch connectors on Channels
1 and 2 can be used with passive instruments (guitar, bass, etc.)
or line-level devices (synthesizers, signal processors, etc.).
Please note: As with any audio input device, plugging in a microphone or an instrument,
or turning phantom power on or off, will create a momentary spike in the audio output.
Because of this, we highly recommend that you turn down the channel trim before
changing connections or turning phantom power on or off. This simple step will add
years to life of your audio equipment.
48 Volt Phantom Power. The Studio 2|4 provides 48V phantom power for the
microphone inputs. Pressing the 48V button switches phantom power on and off for
all microphone inputs; the button will illuminate in blue when phantom power is
available on the microphone preamplifiers.
WARNING: Phantom power is only required for condenser microphones and
can severely damage some dynamic mics, especially ribbon mics. Therefore,
switch phantom power off when it is not required. Consult the user documentation
that came with your microphone before engaging phantom power.
XLR connector wiring for phantom power:
Pin 1 = GND Pin 2 = +48V Pin 3 = +48V
Input Meters. These LED meters show the input level of the analog inputs on your
Studio 2|4. The red Clip LED will illuminate when your input signal reaches -0.5 dBFS.
At this level, the signal will begin to overload the analog-to-digital converters and
exhibit signs of clipping. Use the gain controls to keep the signal below this level.
Output Meters. These meters display the signal level received from the first two
driver returns (Main Left/Right). These meters have the same range as the input
meters and display the signal level before the main output level control.
Sync LED. This light indicates if your Studio 2|4 is in sync with your computer. When
no sync is available, this light will flash red.

4
2 Hookup
2.2 Back Panel Connections
Studio 2|4
Owner’s Manual
Input Gain Control. These knobs provide 50 dB of variable gain (0 to +50 dB for
microphones, -15 to 35 dB for line/instrument).
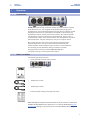
Mixer. The Mixer knob allows you to blend your input signals with the playback
streams from your computer so that you can monitor your input signals without any
latency (delay). If the knob is positioned at 12 o’clock, the input signal and the
playback stream will be equally balanced. Turning the knob to the left will increase
the level of the input signal relative to the playback stream; turning to the right will
increase the level of the playback stream relative to the input signal as illustrated
below:
Mixer
PlaybackInputs
Inputs
Playback
Playback InputsPlaybackInputs
Headphone Level. This knob controls the level of the rear panel headphone output.
Main. The main knob controls the output level for the main left/right outputs on the
back of your Studio 2|4 and has a range of -80 dB to 0 dB. This control provides
attenuation only.
2.2 Back Panel Connections
Headphone Output. The rear-panel headphone output mirrors the same streams as
the Main left/right outputs.
Main Outs. These are the Main outputs for the Studio 2|4. The output
level of the Main outputs is controlled by the Main level control on the
front of the unit. Playback streams 1 and 2 are routed to these outputs.

5
2 Hookup
2.3 Connection Diagram
Studio 2|4
Owner’s Manual
MIDI I/O. This is the MIDI input and output connections.
MIDI stands for “Musical Instrument Digital Interface.” However, MIDI
can be used for many things other than instruments and sequencing.
The MIDI inputs and outputs allow connection to a variety of MIDI-
equipped hardware, such as keyboard controllers, and can be used
to send and receive MIDI Machine Control and MIDI Time Code.
Note: MIDI does not carry audio signals but is frequently used to trigger or control an
audio source, such as a virtual instrument or hardware synthesizer. You should
ensure that MIDI data is correctly sent and received by the appropriate hardware or
software. You may also need to route hardware sound sources’ audio to the inputs of
your Studio-series interface. Please consult the User’s Manual of your MIDI devices for
help with MIDI setup and usage.
USB C Port. Use this port to connect your Studio 2|4 to your computer. While the
Studio 2|4 connects using USB C, it is fully compatible with USB 2.0 and 3.0
connections. Use the USB C to A cable that came with your Studio 2|4 if your
computer has a USB 2.0 or 3.0 connection rather than a USB C connection. Do not
connect your Studio 2|4 to a USB 1.1 or lower connection on your computer.
2.3 Connection Diagram

6
3 Connecting to a Computer
3.1 Installation for Windows
Studio 2|4
Owner’s Manual
3 Connecting to a Computer
Before connecting your Studio 2|4 to a computer, please visit www.
presonus.com to verify the latest system requirements.
Note: The speed of your processor, amount of RAM, and capacity, size, and speed of your
hard drives will greatly affect the overall performance of your recording system. A faster
processor and more RAM can reduce signal latency (delay) and improve overall
performance.
The Windows ASIO driver, and Universal Control installer for macOS and
Windows are available for download from your My PreSonus user account.
To begin, you must first visit http://my.presonus.com, create or log into your
user account, and register your Studio 2|4. Once registered, all software
downloads will be available from within your My PreSonus user account.
3.1 Installation for Windows
Download the Universal Control installer from your My PreSonus account.
Connect your Studio 2|4 to an available USB C, 2.0, or 3.0 port and
launch the installer. The installer will take you through each step of the
installation process. This application will install the ASIO and WDM drivers,
as well as Universal Control. Please read each message carefully.
It is recommended that you quit all applications before you start the installation.
The Universal Control installer will take you through each step
of the installation process. Please read each message carefully
so that you do not connect your Studio 2|4 too soon.
Power User Tip: It is recommended that you temporarily disable or turn off any anti-virus
programs you have running to prevent installation issues.
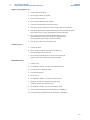
3.1.1 Universal Control (Windows)
Universal Control is a powerful hardware-management application for all PreSonus
interface products. It allows you to view any PreSonus interface product connected
to your computer or your computer’s network.
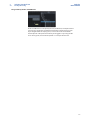
When Universal Control is launched, you will see the Launch window.
From this window, you can manage all the ASIO driver settings.

7
3 Connecting to a Computer
3.1 Installation for Windows
Studio 2|4
Owner’s Manual
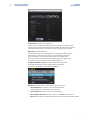
Sample Rate. Changes the sample rate.
You can set the sample rate to 44.1, 48, 88.2, 96, 176.4, or 192 kHz. A higher
sample rate will increase the fidelity of the recording but will increase the file
size and the amount of system resources necessary to process the audio.
Block Size. Sets the buffer size.
From this menu, you can set the buffer size. Lowering the buffer size will
lower latency; however, this will also increase performance demands
on your computer. In general, you will want to set the buffer size as
low as your system can safely support. If you begin to hear pops, clicks,
or distortion in your audio path, try raising the buffer size.
Loopback (Windows only). The Studio 2|4 ASIO driver provides
two loopback streams to record audio from one application
to another. See Section 3.1.2 for more information.
File Menu. Manages devices connected to Universal Control.
• Show All Devices. Launches all control windows for all
supported devices connected to your computer.
• Close All Devices. Closes all open control windows.
• About Universal Control. Displays version and build date information.
• Quit. Quits the Universal Control application and all hardware control windows.

8
3 Connecting to a Computer
3.1 Installation for Windows
Studio 2|4
Owner’s Manual
Settings Menu. Provide customization options to
personalize your Universal Control experience.
• Always on Top. Keeps the Universal Control Launch window on
top whether it is the currently active application or not.
• Run at Startup. Launches Universal Control
automatically when your computer boots.
• Preferences. Sets language and appearance options (see below).
• Rescan Network. Scans the network and local transport bus
(USB or FireWire) for all supported PreSonus products.
• Language. Sets the language (English, French, German,
Korean, Simplified Chinese, or Spanish).
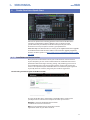
3.1.2 Loopback Recording (Windows only)
The Windows drivers for the Studio 2|4 provides two virtual streams
that allow you to record the output of one audio application in another
application. Loopback can be useful in a variety of situations:
• Recording the audio from a video game or YouTube
video for a podcast or livestream.
• Recording a vocal in real time over a karaoke track
played from a web browser or media player.
Power User Tip: Because the Studio 2|4 is a class compliant Core Audio device, these
virtual streams are not available in macOS. However, there are several third-party
applications that provide this functionality in macOS.
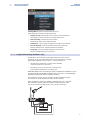
From Universal Control, you can enable or disable Loopback and pick
the streams on which the loopback audio will be recorded.
When Loopback is enabled and “Merge Loopback with 1/2” is selected,
the audio from another application will be recorded with the audio
source connected to analog inputs 1 and 2 on your Studio 2|4.
Media Player
Web Browser
Etc.

9
3 Connecting to a Computer
3.2 Installation for macOS
Studio 2|4
Owner’s Manual
When Loopback is enabled and “Dedicated Loopback Inputs” is selected, the audio
from another application will be recorded on the last pair of driver inputs (3/4).
Media Player
Web Browser
Etc.
Power User Tip: When using either option, you will need to select Outputs 1 and 2 in the
audio application your want to record. Make sure to select Outputs 3 and 4 in the audio
application in which your recording to avoid a feedback loop.
3.2 Installation for macOS
Your Studio 2|4 is a class-compliant Core Audio device in macOS. No driver
installation is necessary. Installing Universal Control for your Studio 2|4 is optional.
3.3 Using the Studio 2|4 with Popular Audio Applications
Complete setup instructions for Studio One Artist and a brief tutorial on its features
can be found in Section 4 of this manual. However, you can use your Studio 2|4 with
any audio-recording application that supports Core Audio or ASIO. Please consult
the documentation that came with your audio application for specific instructions
on how to select the Studio 2|4 driver as the audio-device driver for your software.
Below are basic driver-setup instructions for a few popular audio applications.
Steinberg Cubase 4+
1. Launch Cubase.
2. Go to Devices | Device Setup.
3. Select “VST Audio System” from the Devices column in the Device Setup.
4. Select your Studio 2|4 from the ASIO Driver dropdown list.
5. Click “Switch” to begin using the Studio-series Driver.
6. Once you have successfully changed the driver, go to Devices |
VST Connections to enable your input and output buses.
Ableton Live 5+
1. Launch Ableton Live.
2. Go to Options | Preferences | Audio.
3. Choose Driver Type: ASIO | Audio Device: ASIO Studio 2|4
4. Go to Input Config : Enable and select the desired Input channels.
5. Go to Output Config : Enable and select the desired Output channels.
6. You may now select your Studio 2|4 inputs and
outputs for each track created in Live.

10
3 Connecting to a Computer
3.3 Using the Studio 2|4 with Popular Audio Applications
Studio 2|4
Owner’s Manual
Apple Logic Pro/Express 7+:
1. Launch Logic Pro/Express.
2. Go to Logic | Preferences | Audio.
3. Click on the Devices Tab.
4. On the Core Audio tab, check Enabled.
5. Select your Studio 2|4 from the device menu.
6. You will be asked if you’d like to relaunch Logic. Click “try (re)launch.”
7. Your Studio 2|4 features custom I/O labels for faster work flow. To enable
these labels for use in Logic, go to Options | Audio | I/O Labels.
8. The second column in the pop-up window will be named
“Provided by Driver.” Activate each of these labels for your
Studio 2|4. When you are done, close this window.
9. You are now ready to use your Studio 2|4.
Avid Pro Tools 9+
1. Launch Pro Tools.
2. Got to Setup | Hardware and select your Studio 2|4
from the Peripherals list. Click OK.
3. Go to Setup | Playback Engine and select your Studio 2|4
from the menu at the top of the window. Click OK.
Cakewalk Sonar 6+
1. Launch Sonar.
2. Go to Options | Audio... and click on the Advanced tab.
3. Change the Driver Mode to “ASIO.”
4. Click the “OK” button.
5. Restart Sonar.
6. Go to Options | Audio... and click on the Drivers tab.
7. Highlight all input and output drivers beginning
with your Studio-series product name.
8. Go to Options | Audio... and click on the General tab.
9. Set the Playback Timing Master to “Studio 2|4 ... DAW Out 1.”
10. Set the Recording Timing Master to “Studio 2|4 ... DAW Out 2.”

11
4 Studio One Artist Quick Start
4.1 Installation and Authorization
Studio 2|4
Owner’s Manual
4 Studio One Artist Quick Start
All PreSonus professional recording products come with Studio One Artist
recording and production software. Whether you are about to record
your first album or your fiftieth, Studio One Artist provides you with all
of the tools necessary to capture and mix a great performance.
Power User Tip: As a valued PreSonus customer, you are eligible for a discount upgrade
to Studio One Professional. For more details on the Studio One upgrade program for
PreSonus customers, please visit https://shop.presonus.com/products/software/studio-
one-prods.
4.1 Installation and Authorization
Once you have installed the drivers for your audio interface and connected it
to your computer, you can use the included PreSonus Studio One Artist music-
production software to begin recording, mixing, and producing your music. To
install Studio One Artist, log into your My PreSonus account and register your
interface. Your product key for Studio One Artist will automatically be registered
to your My PreSonus account, along with your hardware registration.
Downloading and Running the Studio One Installer
To install Studio One Artist, download the Studio One Artist installer from
your My PreSonus account to the computer on which you will use it.
Windows: Launch the Studio One Artist installer
and follow the onscreen instructions.
Mac: Drag the Studio One Artist application into the
Applications folder on your Mac hard drive.

12
4 Studio One Artist Quick Start
4.2 Setting Up Studio One
Studio 2|4
Owner’s Manual
Authorizing Studio One
When Studio One is launched for the first time on your computer, it will
communicate with your My PreSonus account and verify your registration. To
ensure a seamless authorization process, make sure to download your installer
to the computer on which you will be using it, and be sure that your computer is
connected to the Internet when you launch the application for the first time.
Power User Tip: You may be prompted to enter your My PreSonus user account
information. Clicking “Remember Credentials” will allow you to have immediate access to
any content you purchase from the PreSonus Marketplace.
Installing Bundled Content for Studio One Artist
Studio One Artist comes bundled with an array of demo and tutorial
materials, instruments, loops, and samples. The Studio One Artist
bundle includes all that you need to begin producing music.
The first time you launch Studio One Artist, you will be prompted
to install its companion content. Select the content you wish to
add and click “Install.” The content will automatically begin to
download and install from your My PreSonus user account.
Power User Tip: To select only a portion of the available content, click on “Show
Packages”. From here you can customize your content installation.
4.2 Setting Up Studio One
Studio One Artist was designed to work with PreSonus interfaces and provides
unique interoperability and simplified setup. When Studio One Artist is
launched, by default you will be taken to the Start page. On this page, you
will find document-management and device-configuration controls, as well
as a customizable artist profile, a news feed, and links to demos and tutorials
from PreSonus. If your computer is connected to the Internet, these links will
be updated as new tutorials become available on the PreSonus Web site.
Complete information on all aspects of Studio One Artist is available in
the Reference Manual PDF located within Studio One. The information
in this tutorial covers only the basic aspects of Studio One Artist and is
intended to get you set up and recording as quickly as possible.

13
4 Studio One Artist Quick Start
4.2 Setting Up Studio One
Studio 2|4
Owner’s Manual
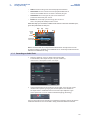
4.2.1 Configuring Audio Devices
In the middle of the Start page, you will see the Setup area. Studio One
Artist automatically scans your system for all available drivers and selects
a driver. By default, it will choose a PreSonus driver if one is available.
If you do not see your device listed on the Start page when
you launch Studio One, click on the Configure Audio Devices
link in the Setup area to open the Options window.
In the Options window, click on the Audio Setup tab and
select your device driver from the pull-down.
4.2.2 Configuring MIDI Devices
From the External Devices window in Studio One Artist, you can configure
your MIDI keyboard controller, sound modules, and control surfaces. This
section will guide you through setting up your MIDI keyboard controller
and sound modules. Please consult the Reference Manual located within
Studio One for complete setup instructions for other MIDI devices.
If you are using a third-party MIDI interface or USB MIDI-controller
keyboard, you must install any required drivers for these devices before
beginning this section. Please consult the documentation that came
with your MIDI hardware for complete installation instructions.
If you do not have any MIDI devices, please skip to Section 4.3.

14
4 Studio One Artist Quick Start
4.2 Setting Up Studio One
Studio 2|4
Owner’s Manual
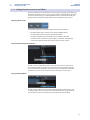
Setting up an External MIDI Keyboard Controller from the Start Page
A MIDI keyboard controller is a hardware device that is generally used for playing
and controlling other MIDI devices, virtual instruments, and software parameters.
In Studio One Artist, these devices are referred to as Keyboards, and they must be
configured before they are available for use. In some cases, your MIDI keyboard
controller is also used as a tone generator. Studio One Artist views the controller
and tone-generation functions as two different devices: a MIDI keyboard controller
and a sound module. The MIDI controls (keyboard, knobs, faders, etc.) will be
set up as a Keyboard. The sound modules will be set up as an Instrument.
You can set up your external MIDI devices from the Setup area
in the Start page. Before setting up a new Song for recording,
take a moment to configure external devices.
Make sure you have connected the MIDI Out of your external MIDI controller to
a MIDI In on your PreSonus audio interface (if available) or other MIDI interface. If
you are using a USB MIDI controller, connect it to your computer and power it on.
1. Click on the Configure External Devices link in the Setup area on
the Start page to launch the External Devices window.
2. Click the Add button. This will launch the Add Device window.

15
4 Studio One Artist Quick Start
4.2 Setting Up Studio One
Studio 2|4
Owner’s Manual
3. From the menu on the left, select your MIDI controller from the list of
manufacturers and models. If you do not see your MIDI controller listed,
select New Keyboard. At this point, you can customize the name of
your keyboard by entering the manufacturer and device names.
4. You must specify which MIDI channels will be used to communicate with
this keyboard. For most purposes, you should select all MIDI channels.
If you are unsure of which MIDI channels to choose, select all 16.
5. Studio One allows you to filter out specific control functions. If you would
like Studio One to ignore Aftertouch, Pitch Bend, Program Change, or
all CC messages, enable filtering for any or all of these messages.
6. In the Receive From drop-down menu, select the MIDI interface
input from which Studio One Artist will receive MIDI data (that
is, the MIDI port to which your keyboard is connected).
Power User Tip: In the Send To drop-down menu, select the MIDI interface output
from which your Studio One Artist will send MIDI data to your keyboard. If your
keyboard controller doesn’t need to receive MIDI data from Studio One, you can
leave this unselected.
7. If this is the only keyboard that you will use to control your external
synthesizers and virtual instruments, you should check the box
next to Default Instrument Input. This will automatically assign your
keyboard to control all MIDI devices in Studio One Artist.
8. Click “OK.”
If you have a sound module that you’d like to connect, leave the External
Devices window open and proceed to the next part of this section.
If not, you can close the window and skip to the next section.

16
4 Studio One Artist Quick Start
4.2 Setting Up Studio One
Studio 2|4
Owner’s Manual
Setting up an External MIDI Sound Module from the Start Page
MIDI instrument controllers (keyboards, MIDI guitars, etc.) send musical information,
in the form of MIDI data, to tone modules and virtual instruments, which respond
by generating sound as instructed. Tone modules can be standalone sound devices
or can be integrated into a MIDI instrument, such as a keyboard synthesizer. Studio
One Artist refers to all tone generators as Instruments. Once you have set up your
MIDI keyboard controller, take a moment to configure your sound module.
Make sure you have connected the MIDI In of your external
sound module to the MIDI Out of your MIDI interface.
1. In the External Devices window, click the Add button.
2. Select your device in the menu on the left. If your device is not listed,
select New Instrument. At this point you can customize the name of
your keyboard by entering the manufacturer and device names.
3. Specify which MIDI channels will be used to communicate with this sound
module. For most purposes, you should select all MIDI channels. If you are
unsure of which MIDI channels to select, we suggest you select all 16.

17
4 Studio One Artist Quick Start
4.3 Creating a New Song
Studio 2|4
Owner’s Manual
4. In the Send To menu, select the MIDI interface output from which Studio One
Artist will send MIDI data to your sound module. Click “OK” and close the External
Devices window. You are now ready to start recording in Studio One Artist.
The rest of this Quick Start Guide will go over how to set
up a Song and will discuss some general workflow tips for
navigating through the Studio One Artist environment.
4.3 Creating a New Song
Now that you’ve configured your audio and MIDI devices, let’s create
a new Song. We’ll start by setting up your default audio I/O.
1. From the Start page, select “Create a New Song.”
2. In the New Song window, name your Song and choose the directory in
which you’d like it saved. You’ll notice a list of templates on the left. These
templates provide quick setups for a variety of devices and recording
situations. The section will describe creating a Song from an empty session.
3. Select “Empty Song” from the Templates list. At this point, you should give
your Song a name and select your preferred sample rate and bit depth for
recording and playback. You can also set the length of your Song and the
type of time format you would like the timeline to follow (notation bars,
seconds, samples, or frames). Click the OK button when you are finished.
Power User Tip: If you plan to import loops into your Song, make sure that the Stretch
Audio Files to Song Tempo option is selected. This will automatically import loops at the
correct tempo.

18
4 Studio One Artist Quick Start
4.3 Creating a New Song
Studio 2|4
Owner’s Manual
4.3.1 Configuring Your I/O
1. Click on Song | Song Setup to set your sample rate and
resolution and configure your audio I/O.
2. Click on the Audio I/O Setup tab.
3. From the Inputs tab, you can enable any or all of the inputs on your
PreSonus Studio 2|4 that you’d like to have available. We recommend that
you create a mono input for each of the inputs on your interface. If you
plan on recording in stereo, you should also create a stereo input as well.
Page is loading ...
Page is loading ...
Page is loading ...
Page is loading ...
Page is loading ...
Page is loading ...
Page is loading ...
Page is loading ...
Page is loading ...
Page is loading ...
-
 1
1
-
 2
2
-
 3
3
-
 4
4
-
 5
5
-
 6
6
-
 7
7
-
 8
8
-
 9
9
-
 10
10
-
 11
11
-
 12
12
-
 13
13
-
 14
14
-
 15
15
-
 16
16
-
 17
17
-
 18
18
-
 19
19
-
 20
20
-
 21
21
-
 22
22
-
 23
23
-
 24
24
-
 25
25
-
 26
26
-
 27
27
-
 28
28
-
 29
29
-
 30
30


PRESONUS Studio 24 Owner's manual
- Category
- Operating systems
- Type
- Owner's manual
Ask a question and I''ll find the answer in the document
Finding information in a document is now easier with AI
Related papers
-
PRESONUS Studio 68 Owner's manual
-
-
-
-
PRESONUS StudioLive AR16c Owner's manual
-
-
PRESONUS AudioBox USB 96 Owner's manual
-
PRESONUS Quantum 2626 Owner's manual
-
-
Other documents
-
Sweex US156 Datasheet
-
-
-
Novation Launch Control User guide
-
Sitecom CN-216 Datasheet
-
Audio-Technica AT2040USB User manual
-
Midiplus Studio 2 Owner's manual
-
Rode NT1 5th GEN Studio Condenser Microphone User guide
-
Novation X-Station 25 User guide
-
Avid SESSION Owner's manual