6
6
6
6
Finish
Finish
Finish
Finish
Finish
Before you install
Make sure that your computer is ON and
you are logged on with Administrator
rights.
IMPORTANT
If there are any programs running, close
them.
The screens may differ depending on
your operating system.
•
•
Note
For Windows Vista
®
and Windows
®
7
users, when the User Account Control
screen appears, click Allow or Yes.
If you want to install the PS driver
(BR‑Script3 printer driver), choose
Custom Install and then follow the
on‑screen instructions.
Depending on your security settings, a
Windows Security or antivirus software
window may appear when using the
machine or its software. Please allow or
permit the window to continue.
XML Paper Specification Printer Driver
The XML Paper Specification Printer
Driver is the most suitable driver when
printing from the applications that use
the XML Paper Specification documents.
Please download the latest driver by
accessing the Brother Solutions Center at
http://solutions.brother.com/.
•
•
•
•
Before you install
Make sure your machine is connected
to the power and your Macintosh is ON.
You must be logged on with Administrator
rights.
IMPORTANT
For Mac OS X 10.4.10 users, upgrade
to Mac OS X 10.4.11 – 10.6.x. (For
the latest drivers and information
on the Mac OS X you are using, visit
http://solutions.brother.com/.)
Note
If you want to setup the PS driver
(BR‑Script3 printer driver), please
go to the Brother Solutions Center at
http://solutions.brother.com/ and click
Downloads on your model page to download
the driver and visit FAQ’s for installation
instructions.
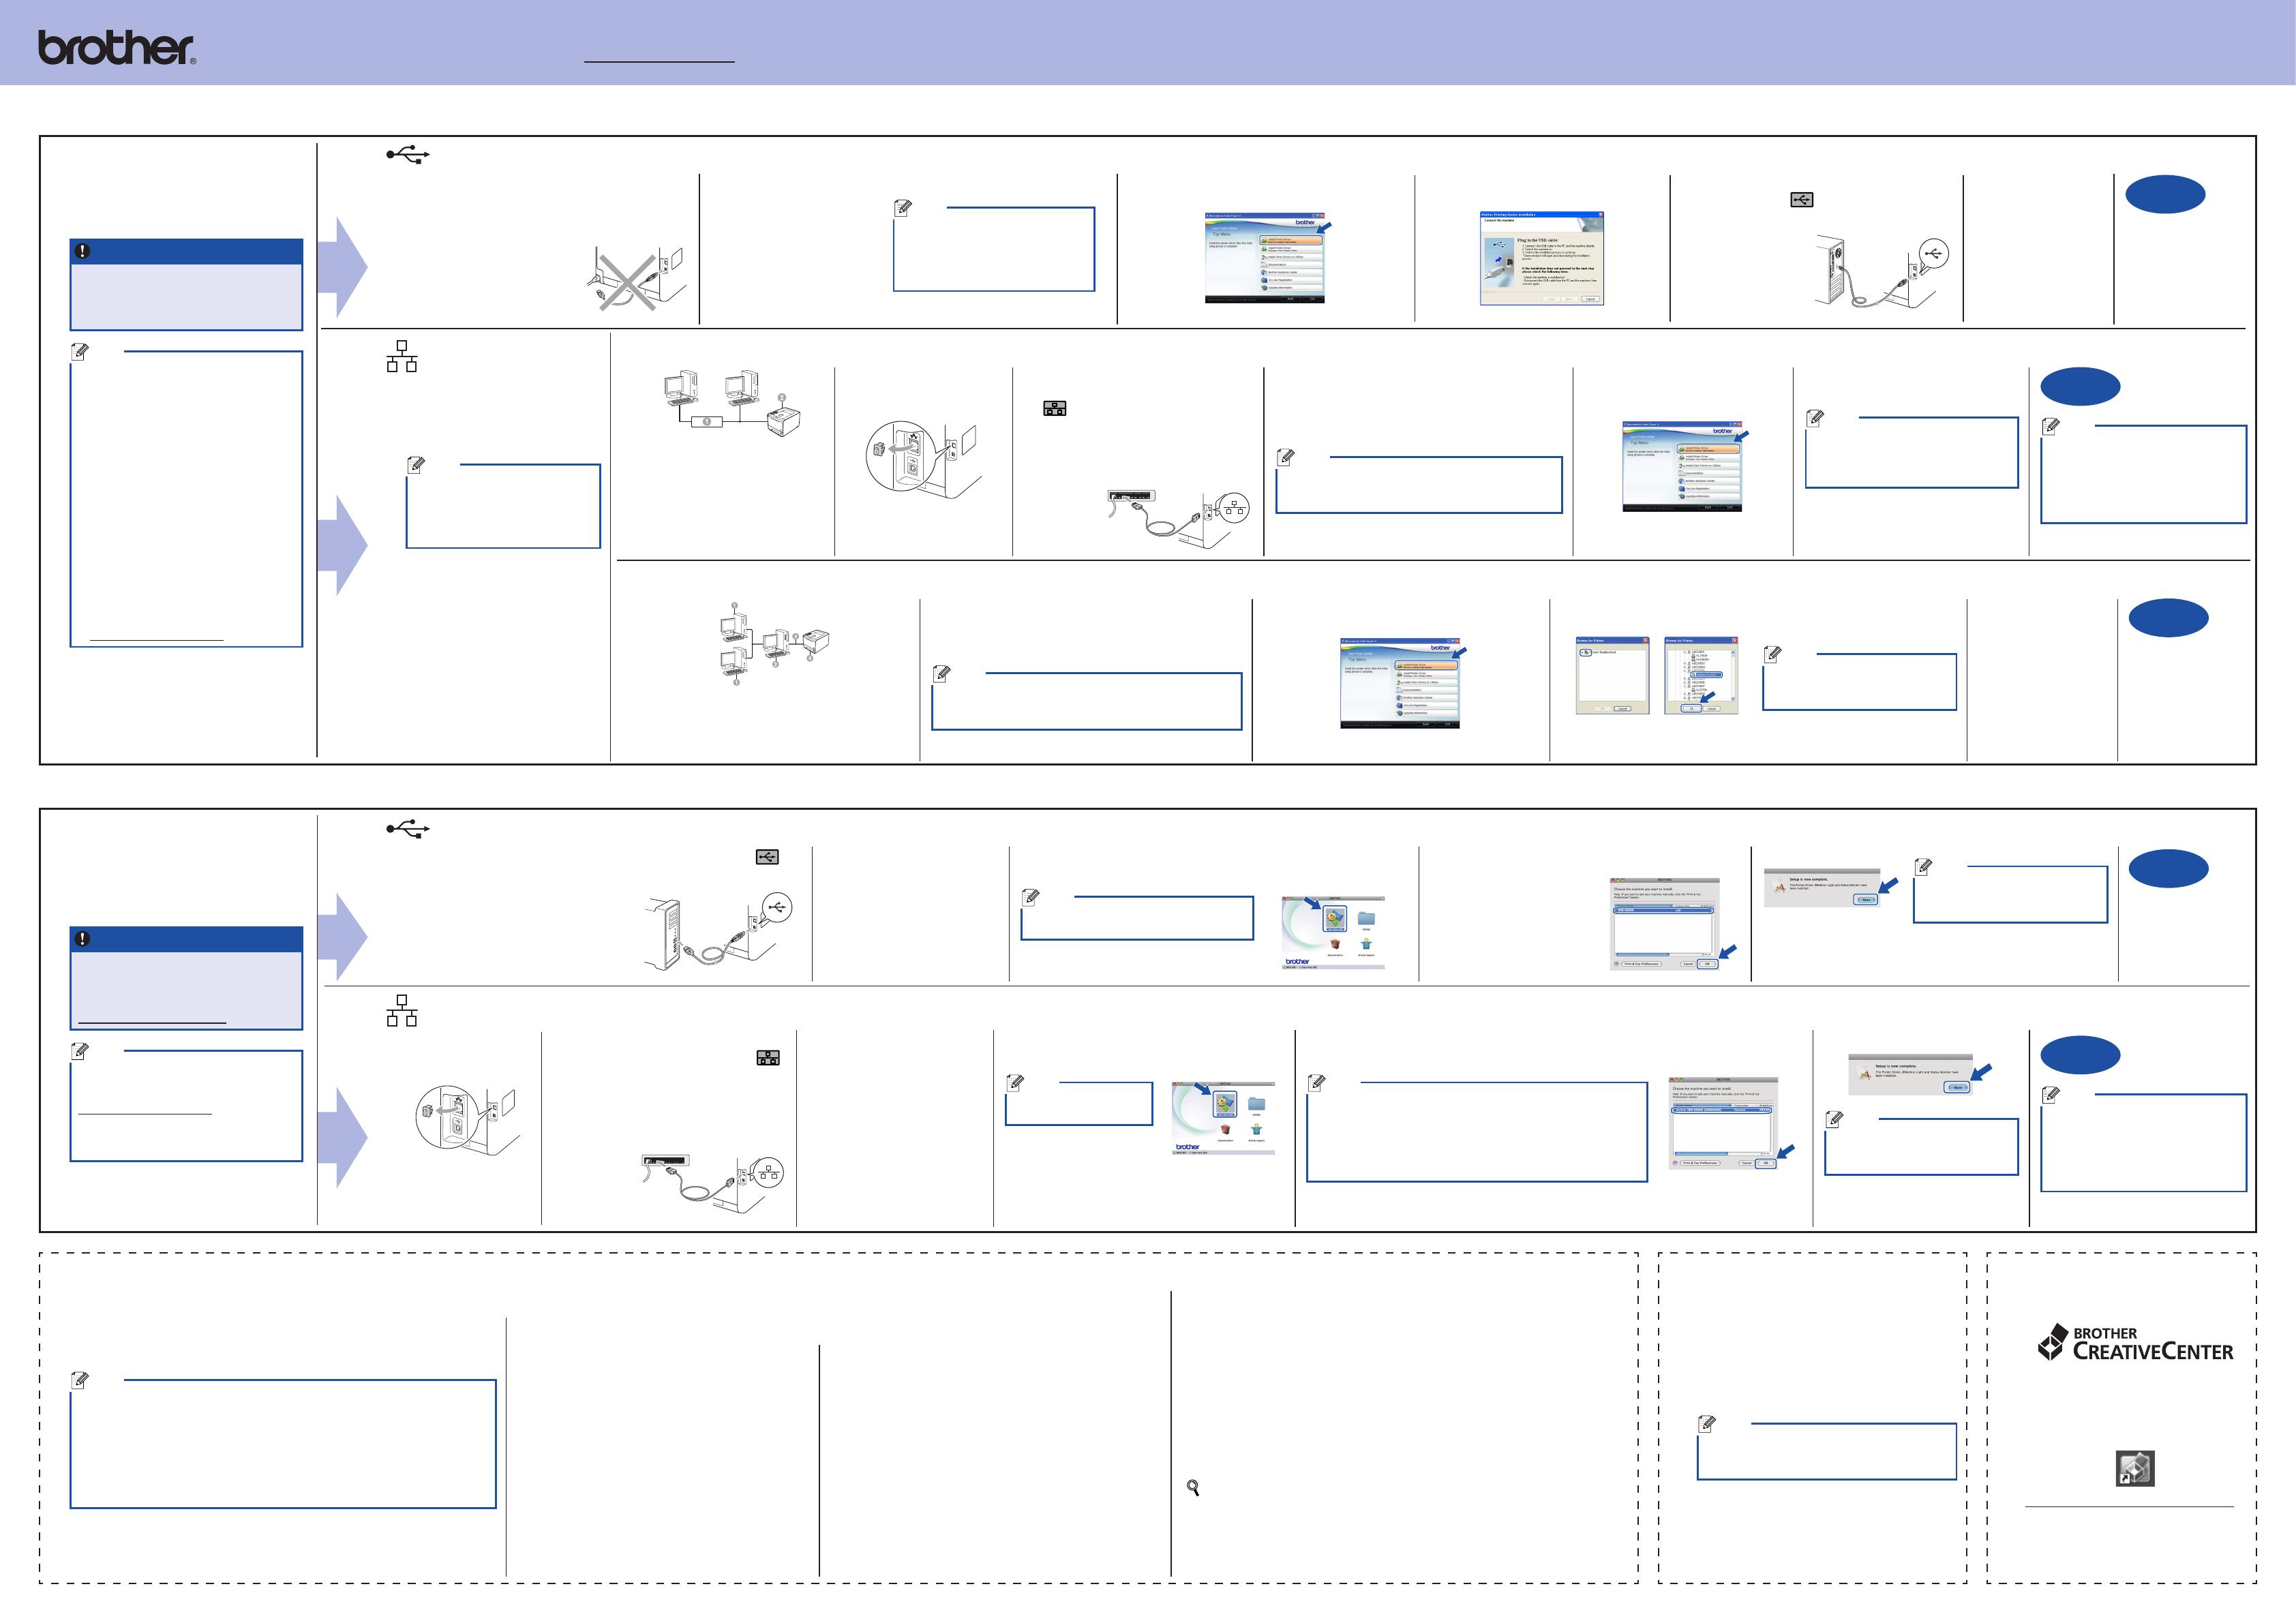
For USB Interface Cable Users
a. Turn off the machine and make sure the
USB interface cable is NOT connected to the
machine, and then begin installing the printer
driver. If you have already connected the cable,
disconnect it.
Install the printer driver
c. Click Install Printer Driver, and click Yes if
you accept the license agreement.
d. Follow the on‑screen instructions until
this screen appears.
e. Connect the USB cable to the USB connector
marked with the symbol, and then
connect the cable to the computer.
The installation is
now complete.
f. Turn the machine
on, and follow
the on‑screen
instructions to
complete setup.
For Wired
Network
Interface Cable
Users
Note
If you are going to connect the
machine to your network, we
recommend that you contact
your system administrator prior to
installation.
For Peer-to-Peer network users
a Router
b Machine
a. Remove the protective
cap from the LAN
connector.
b. Connect the network interface cable
to the LAN connector marked with a
symbol and then connect it to a
free port on your hub.
c. Make sure the machine power switch
is on.
Install the printer driver
d. Put the installation CD‑ROM into your CD‑ROM
drive. If prompted, select your model and
language.
Note
If the Brother screen does not appear automatically,
go to My Computer (Computer), double‑click the
CD‑ROM icon, and then double‑click start.exe.
e. Click Install Printer Driver,
and click Yes if you accept the
license agreement.
f. Follow the on‑screen instructions to
complete setup.
Note
You can find your machine’s IP Address
and the node name by printing out the
Printer Settings Page. See Print the
Printer Settings Page below.
The installation is
now complete.
For shared network users
a Client computer
b Also known as “Server” or “Print server”
c TCP/IP or USB
d Machine
Install the printer driver
a. Put the installation CD‑ROM into your CD‑ROM
drive. If prompted, select your model and language.
Note
If the Brother screen does not appear automatically, go to
My Computer (Computer), double‑click the CD‑ROM icon,
and then double‑click start.exe.
b. Click Install Printer Driver, and click Yes if
you accept the license agreement.
c. Follow the on‑screen instructions until this screen appears. Choose
your machine’s queue, and then click OK.
d. Follow the
on‑screen
instructions to
complete setup.
The installation is
now complete.
Note
If you use a specified IP Address for
the machine, you must set the Boot
Method to Static by using the control
panel. For more information, see
Network menu in the Network User’s
Guide.
For USB Interface Cable Users
a. Connect the USB cable to the USB connector marked with a
symbol, and then connect the cable to your Macintosh.
b. Make sure the machine power switch
is on.
d. Double‑click the Start Here OSX icon. Follow the on‑screen
instructions.
Note
It may take a few minutes for installation to
complete.
Install the printer driver
c. Put the installation CD‑ROM
into your CD‑ROM drive.
e. Follow the on‑screen instructions until this screen
appears. Choose your
machine from the list, and
then click OK.
f. Click Next.
Note
When the Brother Support screen
appears, make your selection and
follow the on‑screen instructions.
The installation is
now complete.
For Wired Network Interface Cable Users
a. Remove the
protective cap from
the LAN connector.
b. Connect the network interface cable to
the LAN connector marked with a
symbol and then connect it to a free
port on your hub.
c. Make sure the machine power switch
is on.
The installation is
now complete.
Note
If you use a specified IP Address for
the machine, you must set the Boot
Method to Static by using the control
panel. For more information, see
Network menu in the Network User’s
Guide.
e. Double‑click the Start Here OSX icon. Follow
the on‑screen instructions.
Note
It may take a few minutes
for installation to complete.
f. Follow the on‑screen instructions until this screen appears. Choose your machine from
the list, and then click OK.
Note
If there is more than one of the same model connected on your
network, the MAC Address (Ethernet Address) will be displayed
after the model name.
You can find your machine’s MAC Address (Ethernet Address)
and IP Address by printing out the Printer Settings Page. See
Print the Printer Settings Page below.
•
•
g. Click Next.
Note
When the Brother Support screen
appears, make your selection and
follow the on‑screen instructions.
Install the printer driver
d. Put the installation CD‑ROM
into your CD‑ROM drive.
Color Correction (if needed) Print the Printer Settings
Page
The Printer Settings Page lists all the current
printer settings, including network settings.
a. Press + or − to choose Machine Info..
Press OK.
b. Press OK to choose Print Settings.
Note
For Network Users
If the IP Address on the Printer Settings Page
shows 0.0.0.0, wait for one minute and try again.
Color Calibration
The output density for each color may vary depending on the environment
the machine is in, such as temperature and humidity. Calibration helps you to
improve the color density.
Note
If you print using the Direct Print feature or the BR‑Script printer driver, you need
to perform the calibration from the control panel. See Using the control panel.
If you print using the Windows
®
printer driver, the driver will get the calibration data
automatically if both Use Calibration Data and Get Device Data Automatically
are on. See Advanced tab in the User’s Guide.
If you print using the Macintosh printer driver, you need to perform the calibration
using Status Monitor. After turning Status Monitor on, choose Color Calibration
from Control menu. See Color Calibration in the User’s Guide.
•
•
•
Using the control panel
a. Press + or − to choose Color Correction.
Press OK.
b. Press + or − to choose ColorCalibration.
Press OK.
c. Press OK to choose Calibrate.
d. Press + to choose Yes.
Color Registration
Auto Registration
You can adjust the print position of each color automatically.
a. Press + or − to choose Color Correction.
Press OK.
b. Press + or − to choose Auto Regist..
Press OK.
c. Press OK to choose Registration.
d. Press + to choose Yes.
To adjust the print position of each color manually, see Manual Registration in the
User’s Guide.
You can reset the calibration parameters back to those set
at the factory.
a. Press + or − to choose Color Correction.
Press OK.
b. Press + or − to choose ColorCalibration.
Press OK.
c. Press + or − to choose Reset.
Press OK.
d. Press + to choose Reset.
For Windows
®
For Mac OS X
Note
Contact your administrator if you do
not know the location or the name of
the machine queue on the network.
Brother CreativeCenter
Icon
Get inspired. Double‑click the Brother
CreativeCenter icon on your desktop
to access a FREE web site with many
ideas and resources for personal and
professional use.
http://www.brother.com/creativecenter/
You can download the latest drivers and utilities for your machine from the
Brother Solutions Center at http://solutions.brother.com/.
Note
If the Brother screen does not appear
automatically, go to My Computer
(Computer), double‑click the
CD‑ROM icon, and then double‑click
start.exe.
b. Put the installation
CD‑ROM into your
CD‑ROM drive. If
prompted, select your
model and language.

