Operating and Servicing Instructions
PORTABLE AIR CONDITIONER & HEATER
ACH SERIES
IMPORTANT: READ CAREFULLY BEFORE ASSEMBLY AND USE
Read and follow all safety rules and instructions
before operating this equipment.
Please keep this manual for future reference.
Portable Air Conditioner
& Heater
ClimateRight
®
USA
Questions or concerns? For assistance, please call Customer Service
www.climaterightair.com
Ph: 800-725-4628
OWNER’S MANUAL
CR2500ACH • CR5000ACH • CR10000ACH
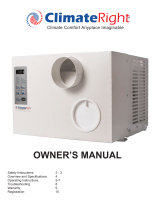
CR2500ACH
CR5000ACH CR10000ACH
*CR10000ACH varies slightly
from this picture
8 62752 00006 2

2 x ClimateRight Unit Connector Flange
2 x Flexible Air Hose
4 x Hose Flange
2 x Building Flange
4 x Flange Cap
PACKAGE CONTENTS
Models: CR2500ACH, CR5000ACH,
CR10000ACH
(1) ClimateRight
®
Air Conditioning and
Heating Unit
(1) Remote Control
(2) AAA batteries
(1) Owner’s Manual
Quick Connect Hose System
(2) ClimateRight® Unit Connector Flanges
(Pre-mounted to ClimateRight®)
(2) Flexible Air Hoses
(4) Hose Flanges (Pre-mounted to Hoses)
(2) Building Flanges
(4) Flange Caps
1 2
CLIMATERIGHT
®
CR2500ACH, CR5000ACH, CR10000ACH Portable
Air Conditioner and Heating Unit.
Thank you for choosing a ClimateRight
®
product. This owner’s manual will provide you
with valuable information necessary for the proper care and maintenance of your new
product. Please take a few moments to thoroughly read the instructions and familiarize
yourself with all the operational aspects of your new ClimateRight
®
Portable Air
Conditioning and Heating Unit.
For your own records, please attach a copy of your sales receipt to this manual. Also,
write the store name/location, date purchased, and serial number below:
Store Name: ______________________________________________________________
Location: _________________________________________________________________
Date Purchased: ___________________________________________________________
Serial Number (located on back of unit): ______________________________________
IMPORTANT INSTRUCTIONS
Before installing and using your portable air conditioner, please read this owner’s
manual carefully. Store this manual in a safe place for future reference.
1) Always place the unit on a level surface.
instructed by this manual.
4) The unit must be connected to a correctly grounded power supply.
5) Do not start or stop the unit by inserting or pulling out the power plug.
6) Do not use an adapter plug or extension cord.
7) Do not use the unit in the immediate surroundings of a bath, a shower or a
swimming pool.
8) Do not insert anything into the air outlet. Do not obstruct air inlet or outlet grills
unless instructed by this manual.
9) Do not let children play near this unit.
10) Always inspect the cord for signs of damage before use. If the power cord is
11) When cleaning the unit, always turn the unit off and unplug the power cord.
CR2500ACH and CR5000ACH
CR10000ACH UNIT FEATURES

SAFETY INSTRUCTIONS
CAREFULLY READ THESE INSTRUCTIONS BEFORE USING
General Information
• Never perform any maintenance procedures until the electrical power to the unit is
turned off and unplugged.
• Never remove any panel from the unit while it is operating.
• For safety purposes, the information in this manual must be followed to minimize
• Use this appliance only for its intended purpose as described in this Owner’s
Manual.
• This air conditioner must be properly installed in accordance with the Installation
Instructions before it is used.
e to
comply may void the warranty.
liquids in the vicinity of this or any other appliance.
• This product contains refrigerants. As required by federal law, refrigerants must
be removed prior to disposing of this product. To dispose of this product, contact
the local waste disposal service to ensure safe and proper disposal according to
federal, state and local laws.
• Save these instructions.
• For additional FAQ’s, please visit www.climaterightair.com for the most up to date
information.
SAFETY PRECAUTIONS
3 4
• Do not use the unit if the power cord is frayed, cracked or
otherwise damaged.
A damaged power cord must be replaced with a new power cord
obtained from the manufacturer and not repaired. Contact
ClimateRight
®
for repair and replacement details.
• Never unplug the unit by pulling on the power cord. Always grip
• Connect to a properly grounded 120V outlet. Do not remove the
ground prong. The power outlet must be easily accessible and
located within the length of the power cord supplied with the unit.
• This unit is designed for outdoor use. When plugging the unit
into an outdoor outlet, the outlet must be a GFCI outlet and have a
weatherproof while-in-use receptacle cover.
• The unit should be plugged into its own circuit. If other devices are
plugged into the same circuit, the fuse or breaker may trip due to
excessive amperage draw.
• Internal parts of the unit may get hot such as the condenser,
compressor and copper piping. Do not remove the outer cover and
touch these parts.
• There are moving parts inside the unit. Do not put any body part
inside of the unit.
Use of Extension Cords
Use of an extension cord is not recommended. Using an
extension cord could prevent the unit from operating normally and
unit is located near a 3-prong 120V GFCI outlet. If one is not near, a
STOP

SPECIFICATIONS
INSTALLATION
5
6
Please refer to www.climaterightair.com for the installation guide.
REMOTE CONTROL
INSTALLING BATTERIES
To Insert the Batteries in the Remote Control:
1. Remove the battery cover by sliding it according to the arrow direction.
2. Insert two new AAA alkaline batteries, matching the (+) and (–) of the battery
to the orientation in the battery compartment.
3. Reattach the cover by sliding it back into position.
Notes:
• Remove the batteries from the remote control if the system is not going to
be used for an extended period of time.
• This is an IR (Infrared) remote and requires line of sight to control the unit
Make sure there are no obstructions between the remote and signal
receiver located on the display panel of the unit.
* Remote may vary slightly from the image above

REMOTE CONTROL
7
8
I/O BUTTON (ON/OFF)
Starts or Stops the Unit
MODE BUTTON
Selects the functions of the unit for:
a. Auto Mode
b. Air Conditioning Mode
c. Dehumidifying Mode (Dry)
d. Fan Mode
e. Heating Mode
FAN BUTTON
a. High
b. Medium
c. Low
d. Auto
TEMPERATURE [+/-]
Select the desired temperature by pressing either + or – key when using the unit
in cooling, heating or Auto function. The LCD will display the desired temperature
during the setting. The LCD displays room temperature when it is not at tempera-
ture setting mode.
The LCD display either in Celsius or Fahrenheit. Press the temperature + and –
keys simultaneously to change the display from Celsius to Fahrenheit and vice
versa.
HOUR/MIN
Use the Hour and Min buttons to set the clock and timer.
To set clock: Press and hold either Hour or Min button until the time at the bottom
hour or min key until the current time has been set. The clock will display as a
now set.
Pressing down the reset button for a few seconds then releasing it can also reset
the clock. The display will then reset and the clock can be set.
T-ON AND T-OFF (TIMER)
The T-On and T-Off buttons set the unit to turn on and off at a pre-determined time.
RESET BUTTON
Pressing and holding the reset button will return the remote to its default settings.
The clock will also be reset.
MODE & FAN OPERATION
AUTO MODE
Turn the unit on by pressing the I/O button on the remote control.
Press the Mode Button until the “AUTO” appears on the LCD display.
Select the fan speed by using FAN button.
During the AUTO model, the unit operates at heating mode when the room
temperature is below 68°F (20°C). It operates at dehumidifying mode when
the room temperature is between 68°F (20°C) and 80°F (27°C). It operates
at cooling mode when the room temperature is above 80°F (27°C).
The timer may be used with the AUTO mode.
COOL MODE
Turn on the unit by pressing the I/O Button on the remote control.
Press Mode Button until “Cool” appears on the LCD display
Press the + / - Temperature button until the desired room temperature appears
on the LCD. The temperature ranges from 61°F - 88°F (16°C - 31°C).
Select the fan speed by pressing the FAN Button.
setting the temperature at the lowest and the fan speed at the highest.
Reducing the length of the exhaust duct and insulating the exhaust duct
and keeping direct sunlight to a minimum will also improve the cooling
NOTE: If the air conditioner is off and is then turned on while set to a
Cool setting or if turned from a fan setting to a Cool setting, it may take
approximately 3 minutes for the compressor to start and cooling to begin.

MODE & FAN OPERATION
9
10
DRY (DEHUMIDIFYING) MODE
Turn on the unit by pressing the I/O button on the remote control.
Press the Mode Button until the “DRY” appears on the LCD display.
NOTE: The unit operates at low fan speed during dehumidifying. The unit cools room
Keep the windows and the doors closed to aid the effectiveness of the unit in
removing the moisture from the room.
than 61°F or 16°C).
FAN MODE
Turn on the unit by pressing the I/O button on the remote control.
Press the Mode Button until “FAN” appears on the LCD display.
Select the fan speed by pressing the Fan Speed Button.
The HIGH, MED and LOW fan speeds can be chosen for the following modes:
AUTO, COOL, FAN and HEAT. Only the LOW fan speed is available for DRY mode.
HEAT MODE
Turn on the unit by pressing the I/O button on the remote control.
Press the Mode Button until “HEAT “appears on the LCD display.
Press the +/- Temperature button until the desired room temperature appears on the
LCD. The temperature ranges from 61°F to 88°F (16°C to 31°C).
Select the fan speed by pressing the Fan Speed Button. It is recommended to use
a low fan setting.
MODE & FAN OPERATION
SLEEP
Turn on the unit by pressing the I/O button on the remote control.
Press SLEEP to enter into sleep mode.
The fan motor of unit runs in low speed.
1°F per hour. Then temperature will stay at 2°F higher than the original temperature
for 8 hours. After 8 hours, the temperature will return to original temperature.
1°F per hour. Then temperature will stay at 2°F lower than the original temperature
for 8 hours. After 8 hours, the temperature will return to the original temperature.
When in dehumidify mode, the temperature will not be changed.
TIMER FUNCTION
To set the timer to turn the unit On or Off: Press the “T-On” key; the clock and the
word “ON
Hour and Min buttons until the desired on
and the timer will be set.
To set the timer to turn off, repeat the same steps with the “T-Off” key.
Note: Timer can only be set in 10-minute increments.
NOTE: You can set either T-ON or T-OFF; also can set both T-ON and T-OFF. If you
set both T-ON and T-OFF simultaneously, the timer will always cycle effectively
unless removed either T-ON or T-OFF
POWER OUTAGE RECOVERY FEATURE
In the case of a power outage or interruption, the unit will automatically re-start in
the settings last used after the power is restored. If the Delay 1–24hr feature was
set, it will resume countdown. If desired, a new time may be set.

11
12
MAINTENANCE
The ClimateRight® climate control unit is a low maintenance product and
does not require much attention if used in normal environments. However, two
components will require periodic cleaning to ensure maximum heating and
Failure to property care for the ClimateRight® unit as mentioned above will
result in a voided Warranty.
FILTERS
CONDENSER
The condenser is located on the side of the unit with the open grid. If the cooling
. Debris on
Use a garden hose with a spray nozzle set on a gentle setting to rinse away dirt and
debris.
EVAPORATOR
If the unit is installed in a location with lots of dirt, debris and pet fur
not screen all contaminants from the air. If the evaporator becomes heavily soiled
with debris, it may be necessary to clean the evaporator.
To clean the evaporator, carefully remove the sheet metal surrounding the top and
sides of the unit. Use a soft bristle brush, such as a paintbrush to gently brush away
TROUBLSHOOTING
PROBLEM POSSIBLE CAUSES WHAT TO DO
Air conditioner does
not start.
The air conditioner
is unplugged.
Check that the air
conditioner plug is
inserted completely into
the outlet.
The fuse is blown or
the circuit breaker
has been tripped.
Check the house fuse/
circuit breaker box and
replace the fuse or reset
the breaker.
Power failure. The unit will automatically
re-start in the settings last
used after the power is
restored.
There is a protective time
delay (approximately 3
minutes) to prevent
tripping of the
compressor overload. For
this reason, the unit may
not start normal cooling
for 3 minutes after it is
turned back on.
Water builds up in
unit.
Clogged drain hole Check the drain hole and
unclog if it is blocked.
Make sure the unit is on a
level surface.
NORMAL OPERATING SOUNDS
• The thermostat may click when the compressor cycles on and off.
• Fan
• Control Beep

13
14
WARRANTY
PROBLEM POSSIBLE CAUSES WHAT TO DO
Air conditioner
does not cool, as it
should.
The air conditioner
is unplugged.
Check that the air
conditioner plug is
inserted completely into
the outlet.
Make sure there are no
obstructions blocking the
supply or return air vents.
The temp control
may be set too high.
In the Cool mode, press
the Decrease (–) button.
at least every 30 days.
The condenser is
dirty.
Use a hose and nozzle
set to the gentle setting to
gently rinse debris out of
Space not cooling
quickly.
Allow up to 24 hours for
the unit to cool down the
space.
The remote control is
not working.
The batteries are
inserted incorrectly.
Check the position of the
batteries. They should be
inserted in the opposite
(+) and (-) direction.
The batteries may
be dead.
Replace the batteries.
TROUBLSHOOTING
To view the ClimateRight
®
Limited Warranty statement, please visit:
www.climaterightair.com
/