Page is loading ...

Prepare The Center Console Trash Bag
Center Console Trash Bag 100N10
www.rightlinegear.com/setup.html
Set Up
Video:
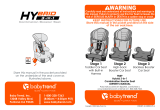
2-Route the straps around the center console’s armrest,
connect the quick release buckle, and tighten the strap
(Fig 4).
Attach The Center Console Trash Bag
1-Open the center console armrest (Fig 3).
NOTE: THE BAG IS LEAKPROOF; IT IS NOT
NECESSARY TO ADD A PLASTIC TRASH LINER.
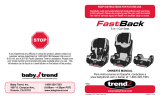
1-Open the Center Console Trash Bag and push outwards
on the bag to give it shape (Fig 1).
3-Adjust the elastic strap guide to hold the loose end of
the strap (Fig 5).
4-Close the center console armrest over the strap and
buckle.
1 Year Manufacturer’s Limited Warranty
www.rightlinegear.com/product-warranty.html
2-Pull the drawstring top of the bag over its sides (Fig 2).
Fig 1
Fig 2
Front Opening Center Console Armrests
Fig 3 Fig 4
Fig 5
Side Opening Center Console Armrests
1-Open the center console armrest (Fig 6).
2-Connect the ends of the strap with the quick release
buckle and adjust the buckle on the strap so that it is
centered across the width of the Trash Bag (Fig 7); use the
elastic strap guide to hold the loose end of the strap.
3-Place the quick release buckle inside the center console,
(Fig 8) and close the center console armrest over the strap
and buckle.
Fig 6 Fig 7
Fig 8
2-Pull the drawstring top over the trash and tighten the
draw string to contain the trash and smells (Fig 10).
Use The Center Console Trash Bag
1-Place drink cups, banana peels, napkins, food wrappers,
and any additional trash in the trash bag (Fig 9).
Fig 9 Fig 10
3-Remove and clean out the Center Console Trash Bag
with mild soap and water when necessary.
Elastic Strap Guide
Elastic Strap Guide
Quick
Release
Buckle
Quick Release
Buckle
/