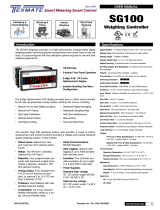
Nakamichi NDSR660A User manual

Category
Musical Equipment
Type
User manual

Nakamichi NDSR660A is a powerful 16-channel digital signal processor with a variety of features to enhance your car audio experience. Connect various audio sources such as AUX, Bluetooth, high-level inputs, optical, and coaxial inputs. Utilize the built-in 31-band equalizer to fine-tune the sound to your liking. Adjust the output channel type, delay, volume, and phase to create a cohesive and immersive soundscape. Additionally, the NDSR660A offers a 6-channel preamp output, making it ideal for expanding your car audio system.

Nakamichi NDSR660A is a powerful 16-channel digital signal processor with a variety of features to enhance your car audio experience. Connect various audio sources such as AUX, Bluetooth, high-level inputs, optical, and coaxial inputs. Utilize the built-in 31-band equalizer to fine-tune the sound to your liking. Adjust the output channel type, delay, volume, and phase to create a cohesive and immersive soundscape. Additionally, the NDSR660A offers a 6-channel preamp output, making it ideal for expanding your car audio system.

NDSR660A
1 EN
NDSR660A
Thank you for your purchase and welcome to the world of Nakamichi! Please keep your
original proof of purchase or invoice in a sate place in case of any warranty claims. Do
also mail or register your warranty With the ofcial Nakamichi service centers and/or
agents to ensure that you are provided with the relevant technical support if required.
1. To prevent short circuit, please keep the device away from water or damp places.
2. If water or any other liquid enters the device, cut off the power immediately, and inform
the nearest Nakamichi Service Center or Agent to inspect the product.
3. Users are not recommended to disassemble the device as there are no user serviceable
parts inside, please contact the nearest Nakamichi Service Center if necessary.
Ensure all cables and parts are securely connected before turning on the power.Shown
below is the basic troubleshooting procedure that you should follow.
Before sending the unit
for repair, please refer to
the table for common
troubleshooting solutions. Please return the unit to
factory settings
Please consult the
nearest service center or
authorized agent for
further aptions
Troubleshooting method:
Malfunction Reason and Solution
No Power Check the power connection and make sure it's secure.
Check the ACC connection and make sure it's secure.
Double check if the unit is in MUTE mode.
Check if you have choose the correct input channel.
Check the USB connection and make sure it's secure.
Check if the driver " HID-compliant device " has been
properly installed in your PC.
Unable to connect
through USB
No Sound
USB2.0 Cable(1.5m)
Mechanical at head screws(PM3x6mm)
User Manual
Self-Tapping Oval Head Screws(PA4x20mm)
Mounting brackets
Velcro(160x20mm)
2 EN
8P high level input signal line(18cm)
16p Speaker cable(18cm)/8p Speaker cable(18cm)
6p power cable(18cm)
1Chinese,1English
35A FUSE
1Pc 16p,1Pc 8p
24P high level input and speaker cable(18cm)
213(L)x177(W)x49(H)mm
Approx.1.78kg
Frequency Response
Input Impedance
Low Level Output Impedance
Signal Input Range
Signal Output Range
Working Temperature
Power
REM Output
REM Intput
Standby Power
Net Weight
Product Dimension
100dB
0.5
20Hz~20KHz
High Level: 51
51
RCA: 7.5Vpp; High Level: 26Vpp
RCA: 7.5Vpp;
Amplier Power: 16CHx25W
-20 ~ 70
DC 9V~15V
High Level Input Signal: H1+/H1- or ACC control cable
12V Start up Voltage Output(250mA)
0.1W
Dynamic Range(RCA Input)
S/N(RCA Input
THD
Input Type
Output Type
Output Gain
Output Signal EQ
Output Signal
Crossover
Output Phase and
Time Alignment
Presets
10 CH High Level, 2 CH Low Level, Built-in Bluetooth,
U disk music , Optical/Coaxial
16 Channels low Level, 16CHx25W Power
Gain Range: Mute,-59.9dB~6dB
31 Band Equalizer Engine:
1. Frequency range: 20Hz~40KHz, 1Hz Accuracy
2.Q value (slope): 0.404~28.852
3.Gain: -20.0dB~ +20.0dB, 0.1dB Accuracy
Each output is equipped with multi-order high and low pass
independent lters.
1. Filtering types: Link-Ril, Butter-W, Bessel
2. Filtering frequency division point: 20HZ~20KHz. Resolution 1Hz
3. Filter slope (slope) setting: 6dB/ Oct to 48dB /Oct and OFF
Each output channel can be adjusted for phase and delay, parameter
range:
Phase: in-phase or reverse-phase (0 /180 )
Delay: 0.000 to 20.000ms. 0 to 692 cm, 0 to 273 inch
6 Presets into the device
3 EN
98dB
The Velcro Is Attached To The Bottom Of The Fuselage
4 EN
177mm
213mm
49mm 49mm
OUTPUT
CH9
CH7
CH5
CH8
CH6
CH2 CH4
CH3
CH1
CH10
CH11 CH13 CH15
CH12 CH14 CH16
SP5 SP6 SP7 SP8
SP5 SP6 SP7 SP8
SPK OUT
SP9SP10 SP11SP12 SP13 SP14 SP15 SP16
SPK OUT
PWR /PRO
HOST ACC
OP T
COA X
AUX IN
R
L
REM USB
PC
H10 H 9 H 8 H 7
H10 H 9 H 8 H 7
HI.LEVEL INPUT
H 6 H 5 H 4 H 3 H 2 H 1
SP4
A C C
SP 3 SP 2SP 1
SP4 SP 3 SP 2SP 1
REM
OUT
HI.LEVEL INPUT SPK OUT
G N D G N D
G N D
12 V
12 V 12 V
POWER
5 EN
PWR /PRO
HOST ACC
OP T
COA X
AUX IN
R
L
REM USB
PC
H10 H 9 H 8 H 7
H10 H 9 H 8 H 7
HI.LEVEL INPUT
H 6 H 5 H 4 H 3 H 2 H 1
SP4
A C C
SP 3 SP 2SP 1
SP4 SP 3 SP 2SP 1
REM
OUT
HI.LEVEL INPUT SPK OUT
G N D G N D
G N D
12 V
12 V 12 V
POWER
4x25W 4
4x25W 4
OUTPUT
CH9
CH7
CH5
CH8
CH6
CH2 CH4
CH3
CH1
CH10
CH11 CH13 CH15
CH12 CH14 CH16
SP5 SP6 SP7 SP8
SP5 SP6 SP7 SP8
SPK OUT
SP9 SP10 SP11SP12 SP13 SP14 SP15 SP16
SPK OUT
8x25W 4
The controller port
Data call and total volume adjustment can be performed by the line controller.
6 EN
H1 H2 H3 H4
H1 H2 H3 H4
HOST ACC
PWR/PRO
REM
AC3 (Optional wiring controller)
PWR /PRO
HOST ACC
OP T
COA X
AUX IN
R
L
REM USB
PC
H10 H 9 H 8 H 7
H10 H 9 H 8 H 7
HI.LEVEL INPUT
H 6 H 5 H 4 H 3 H 2 H 1
SP4
A C C
SP 3 SP 2SP 1
SP4 SP 3 SP 2SP 1
REM
OUT
HI.LEVEL INPUT SPK OUT
G N D G N D
G N D
12 V
12 V 12 V
POWER
OUTPUT
CH9
CH7
CH5
CH8
CH6
CH2 CH4
CH3
CH1
CH10
CH11 CH13 CH15
CH12 CH14 CH16
SP5 SP6 SP7 SP8
SP5 SP6 SP7 SP8
SPK OUT
SP9 SP10 SP11SP12 SP13 SP14 SP15 SP16
SPK OUT
2 4 5 6 7 8 9 10 11
12 13 14
USB port
Insert the USB ash drive and play the song in the USB ash drive under the player audio source.
USB2.0 Port, Connect to the computer tuning software
No need to download the driver installation, connected to the computer sound software
installed automatically.
Low level input port
Connect up to 2 channels low level input.
Coaxial input port
When the coaxial input cable of in-car CD or DVD player is connected, the sound source of the
DSP is switched to digital input, and coaxial digital signals can be played.
Optical input port
When the optical input cable of in-car CD or DVD player is connected, the sound source of the
DSP is switched to digital input, and optical digital signals can be played.
7 EN
a. "+" is positive or positive;" - " is negative or inverted (ground).
b. Before connecting the power supply, you must conrm that the power supply meets the
designed power requirements and connect in strict accordance with the equipment
instructions. Otherwise, the equipment may be damaged and may cause accidents such as
re, electric shock, etc.
High level input port
H10 H 9 H 8 H 7
H10 H 9 H 8 H 7
HI.LEVEL INPUT
H 6 H 5 H 4 H 3 H 2 H 1
SP4
A C C
SP 3 SP 2SP 1
SP4 SP 3 SP 2SP 1
REM
OUT
HI.LEVEL INPUT SPK OUT
High level input port,High level output port
1~6 High level input, 1~4 power amplif ier output.
Machine start mode switch
When the switch is turned to the "ACC" terminal, the machine is started by ACC, and when it is
turned to the "HOST" terminal, the machine is started by the high level H1+/H1- input signal.
Power indicator light/Protection indicator light
Power port
G N D G N D
G N D
12 V
12 V 12 V
POWER
SP5 SP6 SP7 SP8
SP5 SP6 SP7 SP8
SPK OUT
High level output port
5~8 power amplif ier output.
Low level output port
Connect up to 16 channels low level output.
SP9 SP10 SP11SP12 SP13 SP14 SP15 SP16
SPK OUT
High level output port
9~16 power amplif ier output.
PC Software Operation Introduction
(PC can be downloaded from the ofcial website (http://www.nakamichicaraudio.com, CONTACT, downloads))
Computer Conguration Requirements: Screen resolution higher than1280 x 768, otherwise the
software Ul is incomplete, only suitable for windows operation system laptop, desktop and pads.
1. Menu editing area
Main functions: File, options operation.
a. Click the "File" pop-up window, and select to load the scene on you computer, save it as scene
on you computer, load the whole machine scene or save the whole machine scene.
b. Click on "Option" to select Chinese and English switching, Noise Gate, RESET, InPutVOL,default source
Input Attenuation-ratio and About(A)
8 EN
Note: If you need to share tuning parameters, please connect the machine, and "save machine
scene" to the personal computer to share this " machine scene".
2. Function editing area
Main functions: scene, master source, mixer source, channel type, link, mixer and mode settings.
a. Scene: 6 sets of scene data can be recalled or stored.
b. Master source: Click the input audio source drop-down list to select the input audio source.
AUX, BT, HI Level, OPT, COAX and USB.
Click the auxiliary audio source drop-down list to select the input audio source.AUX, BT,
HI Level, OPT, COAX, USB and OFF.
c. Reset: Click Reset to clear the channel type or restore the default channel type.
d. Link: Click the Link to set the Link synchronization mode: copy from left to right or copy from right
to left.
e. Click "Mixer" to enter the mixing interface, the interface is as shown below.
f. Click "Audio" to switch Sound mode.
3. Main volume and software connection editing area
9 EN
Main functions: master volume and computer software connection settings.
a. Main volume adjustment range: off, -59.9~6dB. Click the speaker button to mute the main
volume.
b. Click the "Not Connected" button to connect the host with a PC.
4. Output channel type editing area
Main function: congure the type of output channel.
5. Channel delay, volume, phase editing area
a. Push the fader left or right to adjust the sound size, or enter a value or roll the mouse wheel in the
volume input box to adjust the sound size. Click the speaker button to switch mute.
b. Positive phase adjustment: Click 0°]or 180°] to switch between positive phase and reverse
phase.
c. Delay: set the delay value by scrolling the mouse wheel in the delay input box, or enter the value
to set the delay value.
d. Delay Unit button: Click the drop-down list to select milliseconds, centimeters, and inches.
6. Channel divider editing area
Main Function Setup: Channel High & Low Pass Filter Setup.
Adjustable: Filter Type, Frequency point and Q Value (Gradient or Slope).
10 EN
7. Equalizer editing area
a. Reset EQ: It is used to restore the parameters of the all equalizer to the original pass-through
mode (the frequency of the equalizer, the Q value and the gain are restored to the initial value).
b. Restore EQ: Switch between the currently designed equalizer state parameters and the
pass-through mode (the gain of all equalization points is restored to 0 dB, the frequency and
value are unchanged).
c. Click PEQ Mode to switch GEQ Mode. The Q value and frequency cannot be adjusted in the
PEQ Mode interface.
8. Channel EQ editing area
Main function conguration: Equilibrium design of current output channel, 31-band equalization
adjustable: frequency, Q value (response bandwidth) and gain (increasing or decreasing the
frequency response amplitude near the frequency point).
11 EN
Smart-phone Software Operation Instruction
(APP can be downloaded from the ofcial website(http://www.nakamichicaraudio.com,CONTACT, Downloads))
1. Home interface
2. Delay interface
Home Delay Output
It can restore factory settings, share sound
effects, save sound effects, turn on local
sound effects, check the model and version
number of the unit, and exit the software
operation; volume, master source, storage
and recall of 6 sets of preset scenes.
A. Connection Status:
B. Menu:
C. Sound source:
Red means not connected, green means
connected.
You can restore factory settings, share
sound effects, save sound effects, turn on
local sound effects, view the model and
version number of the machine, and exit
the software operation.
Master source: AUX / Bluetooth / Hi.level /
OPT/Optical / USB to choose from.
Auxiliary source: AUX / Bluetooth / Hi.level /
OPT/Optical / USB /OFF to choose from.
Press and hold the volume scale clockwise
or counterclockwise to adjust the volume.
The main volume range is 0~66, The
subwoofer range is 0~60, The medium, high
D. Volume adjustment:
and low volume range is -12dB~ +12dB.
E. Scene preset:
There are 1~6 presets to choose from.
F. Advanced settings:
Click [Advanced Settings] to enter the
settings of the delay interface, channel
interface, EQ interface and mixing.
Sound eld positioning output delay
adjustment.
G. Unit switching:
Switch between milliseconds, centimeters,
and inches.
H. Delay setting:
Click setting window of the corresponding
channel. Slide the dots left and right to set
the delay value. Delay settings can be
made for CH1~ CH16 speakers.
Delay range: millisecond range: 0.000~
20.000; cm range: 0~692; inch range: 0~273.
3. Channel interface
Channel high-low-pass crossover setting
with high-low-pass independent ltering.
12 EN
EQ
Mixer
4. EQ interface
Adjustable: Filter type, frequency and Q
value (slope or slope).
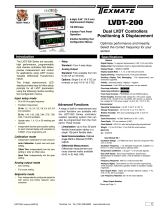
I. Output channel selection:
Sixteen channels are available.
J. Output channel volume setting:
You can adjust the volume by sliding left
and right. The volume range is 0~60. Click
the speaker button to mute. Congurable
output channel type, forward and reverse
switching.
K. Channel divider selection:
Channel type: Choose from Link-Rill,
Butter-W and Bessel.
Frequency Range: 20HZ~20KHz.
Slope selection:
6dB/Oct, 12dB/Oct, 18dB/Oct, 24dB/Oct,
30dB/Oct, 36dB/Oct, 42dB/Oct,48dB/Oct
and OFF can be selected.
L. Joint tuning and channel type settings:
Click [Reset] to reset the output channel
type so that the output type can be
customized.
Click [Stereo] to switch between stereo
mode and bridge mode.
Click[link] the joint debugging window
will pop up, and select the joint debugging
method.
Corresponding to the adjustment of the
output channel EQ curve (gain, Q value
and frequency); reset equalization,
pass-through equalization or parametric
equalization operation settings.
M. EQ display:
Edit the display area.
N. Output EQ gain, Q value and frequency
settings:
Output EQ gain setting: A total of 31 EQ. left
and right sliding screen can select EQ, you
can drag the slider up and down. Select
the rst line value, and drag the slider bar
left and right in the pop-up dialog box to
adjust the adjustment range: -20dB ~ +20dB.
Q value: Click the second line value, and
drag the slider bar left and right in the
pop-up dialog box to adjust, the
adjustment range is 0.404 ~ 28.852.
Frequency setting: Click the third line
value, and drag the slider bar left and
right in the pop-up dialog box to adjust it.
The adjustment range is 20Hz ~ 20KHz.
13 EN
5. Mixing interface
Click [Reset EQ] to restore the
parameters of the 31-band equalizer to
the original pass-through mode (the
equalizer frequency, Q value and gain
are restored to their initial values).
When there is channel adjustment,
display [straight-through equalization],
click [straight-through equalization], click
[OK], all values (frequency, Q value and
gain) will return to the initial value. At this
time, the [straight-through equalization]
button will become [recovery
O. Reset equalization, restore equalization,
pass-through equalization settings:
equalization]. Press the button and click
[Resume Equilibrium], all values
(frequency, Q value and gain) will be
restored to the value before the
pass-through.
Click [P.EQ Mode], click [OK] to switch to
Graphic Equalization, click [G.EQ Mode],
click [OK] to switch to Parametric
Equalization.
Six sound source modes can be selected.
It includes the mixing selection and
adjustment of 10 groups of high-level,
Bluetooth left and right channels, optical
ber left and right channels, coaxial
ber left and right channels and aux left
and right channels. The adjustment range
is 0-100.
14 EN
  • Page 1 1
  • Page 2 2
  • Page 3 3
  • Page 4 4
  • Page 5 5
  • Page 6 6
  • Page 7 7
  • Page 8 8
  • Page 9 9
  • Page 10 10
  • Page 11 11
  • Page 12 12
  • Page 13 13
  • Page 14 14
  • Page 15 15
  • Page 16 16

Nakamichi NDSR660A User manual

Category
Musical Equipment
Type
User manual

Nakamichi NDSR660A is a powerful 16-channel digital signal processor with a variety of features to enhance your car audio experience. Connect various audio sources such as AUX, Bluetooth, high-level inputs, optical, and coaxial inputs. Utilize the built-in 31-band equalizer to fine-tune the sound to your liking. Adjust the output channel type, delay, volume, and phase to create a cohesive and immersive soundscape. Additionally, the NDSR660A offers a 6-channel preamp output, making it ideal for expanding your car audio system.

Ask a question and I''ll find the answer in the document

Finding information in a document is now easier with AI