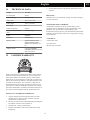
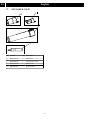
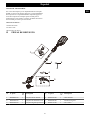
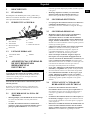
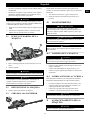
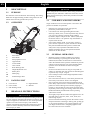
Greenworks CS60L03 60V Cordless 18 Inch Chainsaw User manual
- Category
- Lawnmowers
- Type
- User manual

CSC404
CS60L03
CS60L4R3
www.greenworkstools.com
EN OPERATOR MANUALCHAINSAW
ES MANUAL DEL OPERADORSIERRA DE CADENA


1 Description.........................................4
1.1 Purpose.............................................................. 4
1.2 Overview........................................................... 4
1.3 Packing list........................................................ 4
2 General power tool safety
warnings.............................................4
2.1 Work area safety................................................ 4
2.2 Electrical safety................................................. 4
2.3 Personal safety...................................................4
2.4 Power tool use and care.....................................5
2.5 Battery tool use and care................................... 5
2.6 Service............................................................... 5
3 Chainsaw safety warnings................ 5
4 Prevent operator kickback............... 6
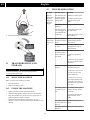
5 Symbols on the product.................... 6
6 Risk levels...........................................6
7 Environmentally safe battery
disposal...............................................7
8 Proposition 65....................................7
9 Installation......................................... 7
9.1 Unpack the machine.......................................... 7
9.2 Add bar and chain oil.........................................8
9.3 Install the battery pack.......................................8
9.4 Remove the battery pack................................... 8
10 Operation........................................... 8
10.1 Examine the chain oil........................................ 8
10.2 Hold the machine...............................................8
10.3 Start the machine............................................... 9
10.4 Stop the machine............................................... 9
10.5 Operate the chain brake..................................... 9
10.6 Fell a tree........................................................... 9
10.7 Limb a tree.......................................................10
10.8 Buck a log........................................................10
11 Maintenance.....................................11
11.1 Replace the guide bar and the chain................ 11
11.2 Adjust the chain tension...................................11
11.3 Sharpen the cutters...........................................12
11.4 Guide bar maintenance.................................... 13
12 Transportation and storage............13
13 Troubleshooting...............................13
14 Technical data..................................15
15 Limited warranty............................ 15
16 Exploded view..................................16
3
English EN

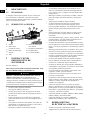
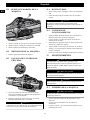
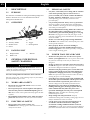
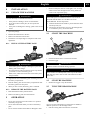
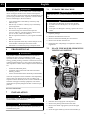
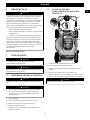
1 DESCRIPTION
1.1 PURPOSE
This chainsaw is designed for cutting branches, trunks, logs
and beams of a diameter determined by the cutting length of
the guide bar. It is only designed to cut wood.
It is only to be used in an outdoor, domestic application by
adults.
Do not use the chainsaw for any purpose not listed above.
This chainsaw is not to be used for professional tree services.
It is not to be used by children or by persons not wearing
adequate personal protective equipment and clothing.
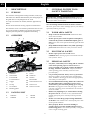
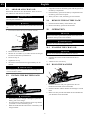
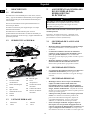
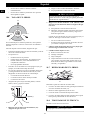
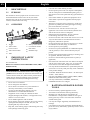
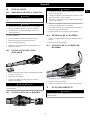
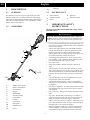
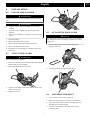
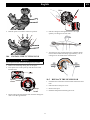
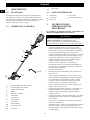
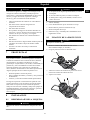
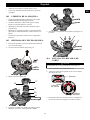
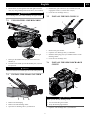
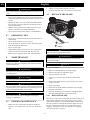
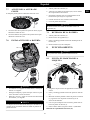
1.2 OVERVIEW
1Scabbard
2Chain brake
3Front handle
4Lock out button
5Trigger
6Oil cap
7Oil window
8Bucking spikes
9Chain
10 Guide bar
11 Wrench
12 Rear handle
13 Chain tension screw
14 Chain cover
15 Chain cover nuts
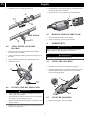
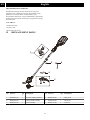
1.3 PACKING LIST
1Chainsaw
2Scabbard
3Manual
4Wrench
2 GENERAL POWER TOOL
SAFETY WARNINGS
WARNING
Read all safety warnings and all instructions. Failure to
follow the warnings and instructions may result in electric
shock, fire and/or serious injury.
Save all warnings and instructions for future reference.
The term “power tool” in the warnings refers to your battery-
operated (cordless) power tool.
2.1 WORK AREA SAFETY
•Keep work area clean and well lit. Cluttered or dark
areas invite accidents.
•Do not operate power tools in explosive atmospheres,
such as in the presence of flammable liquids, gases or
dust. Power tools create sparks which may ignite the dust
or fumes.
•Keep children and bystanders away while operating a
power tool. Distractions can cause you to lose control.
2.2 ELECTRICAL SAFETY
•Do not expose power tools to rain or wet
conditions.Water entering a power tool will increase the
risk of electric shock.
2.3 PERSONAL SAFETY
•Stay alert, watch what you are doing and use common
sense when operating a power tool. Do not use a
power tool while you are tired or under the influence
of drugs, alcohol or medication. A lapse of attention
while operating power tools may result in serious
personal injury.
•Use personal protection. Always wear eye protection.
Protective products such as dust mask, non-skid safety
shoes, hard hat or hearing protection used appropriately
will reduce personal injuries.
•Prevent unintentional starting. Ensure the switch is in
the off position before connecting to power source
and/or battery pack and when picking up or carrying
the tool. Carrying power tools with your finger on the
switch or energizing power tools that have the switch on
invites accidents.
•Remove any adjusting key or wrench before turning
the power tool on. A wrench or a key left attached to a
rotating part of the power tool may result in personal
injury.
•Do not over-reach. Keep proper footing and balance
at all times. This enables better control of the power tool
in unexpected situations.
•Dress properly. Do not wear loose clothing or
jewellery. Keep your hair, clothing and gloves away
from moving parts. Loose clothes, jewellery or long hair
can be caught in moving parts.
4
English
EN

•If devices are provided for the connection of dust
extraction and collection facilities, ensure these are
connected and properly used. Use of dust collection can
reduce dust related hazards.
•Do not let familiarity gained from frequent use of tools
allow you to become complacent and ignore tool safety
principles. A careless action can cause severe injury
within a fraction of a second.
2.4 POWER TOOL USE AND CARE
•Do not force the power tool. Use the correct power
tool for your application. The correct power tool will do
the job better and safer at the rate for which it was
designed.
•Do not use the power tool if the switch does not turn it
on and off. Any power tool that cannot be controlled with
the switch is dangerous and must be repaired.
•Disconnect the plug from the power source and/or the
battery pack from the power tool before making any
adjustments, changing accessories, or storing power
tools. Such preventive safety measures reduce the risk of
starting the power tool accidentally.
•Store idle power tools out of the reach of children and
do not allow persons unfamiliar with the power tool or
these instructions to operate the power tool. Power
tools are dangerous in the hands of untrained users.
•Maintain power tools. Check for misalignment or
binding of moving parts, breakage of parts and any
other condition that may affect the power tool’s
operation. If damaged, have the power tool repaired
before use. Many accidents are caused by poorly
maintained power tools.
•Keep cutting tools sharp and clean. Properly
maintained cutting tools with sharp cutting edges are less
likely to bind and are easier to control.
•Use the power tool, accessories and tool bits etc. in
accordance with these instructions, taking into
account the working conditions and the work to be
performed. Use of the power tool for operations different
from those intended could result in a hazardous situation.
2.5 BATTERY TOOL USE AND CARE
•Recharge only with the charger specified by the
manufacturer. A charger that is suitable for one type of
battery pack may create a risk of fire when used with
another battery pack.
•Use power tools only with specifically designated
battery packs. Use of any other battery packs may create
a risk of injury and fire.
•When battery pack is not in use, keep it away from
other metal objects like paper clips, coins, keys, nails,
screws, or other small metal objects that can make a
connection from one terminal to another. Shorting the
battery terminals together may cause burns or fire.
•Under abusive conditions, liquid may be ejected from
the battery; avoid contact. If contact accidentally
occurs, flush with plenty of soap and water. If liquid
contacts eyes, immediately seek medical help. Liquid
ejected from the battery may cause irritation or burns.
2.6 SERVICE
•Have your power tool serviced by a qualified repair
person using only identical replacement parts. This
will ensure that the safety of the power tool is maintained.
3 CHAINSAW SAFETY
WARNINGS
•Keep all parts of the body away from the saw chain
when the chainsaw is operating. Before you start the
chainsaw, make sure the saw chain is not in contact
with anything. A moment of inattention while operating
chainsaws may cause entanglement of your clothing or
body with the saw chain.
•Always hold the chainsaw with your right hand at the
rear handle and your left hand at the front handle.
Holding the chainsaw with a reversed hand configuration
increases the risk of personal injury and should never be
done.
•Hold the power tool by insulated gripping surfaces
only, because the saw chain may contact hidden
wiring or its own cord. Saw chains contacting a “live”
wire may make exposed metal parts of the power tool
“live” and could give the operator an electric shock.
•Wear safety glasses and hearing protection. Further
protective product for head, hands, legs and feet is
recommended. Adequate protective clothing will reduce
personal injury from flying debris or accidental contact
with the saw chain.
•Do not operate a chainsaw in a tree. Operation of a
chainsaw while up in a tree may result in personal injury.
•Always keep proper footing and operate the chainsaw
only when standing on fixed, secure and level surface.
Slippery or unstable surfaces such as ladders may cause
loss of balance or control of the chainsaw.
•When cutting a limb that is under tension, be alert of
spring back. When the tension in the wood is released,
the spring loaded limb may strike the operator and/or
throw the chainsaw out of control.
•Use extreme caution when cutting brush and saplings.
The slender material may catch the saw chain and be
whipped toward you or pull you off balance.
•Carry the chainsaw by the front handle with the
chainsaw switched off and away from your body.
When transporting or storing the chainsaw, always fit
the guide bar cover. Proper handling of the chainsaw
will reduce the likelihood of accidental contact with the
moving saw chain.
•Follow instructions for lubricating, chain tensioning
and changing accessories. Improperly tensioned or
lubricated chain may either break or increase the chance
for kickback.
•Keep handles dry, clean, and free from oil and grease.
Greasy, oily handles are slippery, causing loss of control.
5
English EN

•Cut wood only. Do not use chainsaw for purposes not
intended. For example: do not use chainsaw for
cutting plastic, masonry or non-wood building
materials. Use of the chainsaw for operations other than
intended could result in a hazardous situation.
4 PREVENT OPERATOR
KICKBACK
Kickback may occur when the nose or tip of the guide bar
touches an object, or when the wood closes in and pinches the
saw chain in the cut.
Tip contact in some cases may cause a sudden reverse
reaction, kicking the guide bar up and back towards the
operator.
Pinching the saw chain along the top of the guide bar may
push the guide bar rapidly back towards the operator.
Either of these reactions may cause you to lose control of the
saw which could result in serious personal injury. Do not rely
exclusively upon the safety devices built into your saw. As a
chainsaw user, you should take several steps to keep your
cutting jobs free from accident or injury.
Kickback is the result of tool misuse and/or incorrect
operating procedures or conditions and can be avoided by
taking proper precautions as given below:
•Maintain a firm grip, with thumbs and fingers
encircling the chainsaw handles, with both hands on
the saw and your body and arm positioned to allow
you to resist kickback forces.
Kickback forces can be controlled by the operator, if
proper precautions are taken. Do not let go of the
chainsaw.
•Do not overreach and do not cut above shoulder
height. This helps prevent unintended tip contact and
enables better control of the chainsaw in unexpected
situations.
•Only use replacement bars and chains specified by the
manufacturer. Incorrect replacement bars and chains
may cause chain breakage and/or kickback.
•Follow the manufacturer’s sharpening and
maintenance instructions for the saw chain.
Decreasing the depth gauge height can lead to increased
kickback.
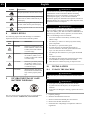
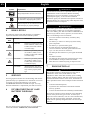
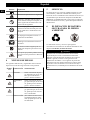
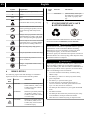
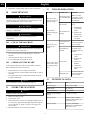
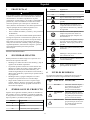
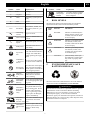
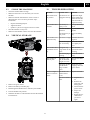
5 SYMBOLS ON THE PRODUCT
Some of the following symbols may be used on this product.
Please study them and learn their meaning. Proper
interpretation of these symbols will allow you to operate the
product better and safer.
Symbol Explanation
Direct current - Type or characteristic
of current.
Symbol Explanation
Precautions that involve your safety.
Read and understand all instructions
before operating the product, and fol-
low all warnings and safety instruc-
tions.
Wear eye and ear protection.
Do not expose the product to rain or
moist conditions.
Avoid bar nose contact.
Hold with both hands.
DANGER! Be careful with kickbacks.
Wear non-slip, heavy duty gloves.
Keep all bystanders at least 50 feet (15
m) away.
6 RISK LEVELS
The following signal words and meanings are intended to
explain the levels of risk associated with this product.
SYM-
BOL
SIGNAL MEANING
DANGER Indicates an imminently haz-
ardous situation,which, if not
avoided, will result in death
or serious injury.
WARNING Indicates a potentially hazard-
ous situation,which, if not
avoided, could result in death
or serious injury.
CAUTION Indicates a potentially hazard-
ous situation, which, if not
avoided, may result in minor
or moderate injury.
CAUTION (Without Safety Alert Sym-
bol) Indicates a situation that
may result in property dam-
age.
6
English
EN

7 ENVIRONMENTALLY SAFE
BATTERY DISPOSAL
The toxic and corrosive materials below are in the batteries
used in this machine: Lithium-Ion, a toxic material.
WARNING
Discard all toxic materials in a specified manner to prevent
contamination of the environment. Before discarding
damaged or worn out Li-ion battery, contact your local
waste disposal agency, or the local Environmental
Protection Agency for information and specific instructions.
Take the batteries to a local recycling and/or disposal center,
certified for lithium-ion disposal.
WARNING
If the battery pack cracks or breaks, with or without leaks,
do not recharge it and do not use. Discard it and replace
with a new battery pack. DO NOT TRY TO REPAIR IT! To
prevent injury and risk of fire, explosion, or electric shock,
and to avoid damage to the environment:
• Cover the terminals of the battery with heavy-duty
adhesive tape.
• DO NOT try to remove or destroy any of the battery
pack components.
• DO NOT try to open the battery pack.
• If a leak develops, the released electrolytes are
corrosive and toxic. DO NOT get the solution in the
eyes or on skin, and do not swallow it.
• DO NOT put these batteries in your regular household
trash.
• DO NOT incinerate.
• DO NOT put them where they will become part of any
waste landfill or municipal solid waste stream.
• Take them to a certified recycling or disposal center.
8 PROPOSITION 65
WARNING
This product contains a chemical known to the state of
California to cause cancer, birth defects or other
reproductive harm. Some dust created by power sanding,
sawing, grinding, drilling, and other construction activities
contains chemicals known to cause cancer, birth defects or
other reproductive harm. Some examples of these chemicals
are:
• Lead from lead-based paints;
• Crystalline silica from bricks and cement and other
masonry products;
• Arsenic and chromium from chemically treated lumber.
Your risk of exposure to these chemicals varies depending
on how often you do this type of work. To reduce your
exposure to these chemicals, work in a well-ventilated area,
and work with approved safety equipment, such as dust
masks that are specially designed to filter out microscopic
particles.
Save these instructions.
9 INSTALLATION
WARNING
Do not change or make accessories that are not
recommended by the manufacturer.
WARNING
Do not install battery pack until you assemble all the parts.
9.1 UNPACK THE MACHINE
WARNING
Make sure that you correctly assemble the machine before
use.
WARNING
• If the parts are damaged, do not use the machine.
• If you do not have all the parts, do not operate the
machine.
• If the parts are damaged or missing, speak to the service
center.
1. Open the package.
2. Read the documentation in the box.
3. Remove all the unassembled parts from the box.
4. Remove the machine from the box.
5. Discard the box and package in compliance with local
regulations.
7
English EN

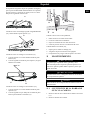
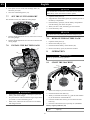
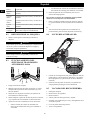
9.2 ADD BAR AND CHAIN OIL
Examine the amount of oil in the machine. If the oil level is
low, add the bar and chain oil as follows.
IMPORTANT
Use only bar and chain oil.
NOTE
The machine comes from the factory without bar and chain
oil.
1. Loosen and remove the cap (6) from the oil tank.
6
7
2. Put the oil into the oil tank.
3. Monitor the oil window (7) to make sure that no dirt gets
into the oil tank while you add the oil.
4. Put the oil cap on.
5. Tighten the oil cap.
6. The whole oil tank will last for approximately 20- 40
minutes.
IMPORTANT
Do not use dirty, used or contaminated oil. Damage can
occur to the bar or chain.
9.3 INSTALL THE BATTERY PACK
WARNING
• If the battery pack or charger is damaged, replace the
battery pack or the charger.
• Stop the machine and wait until the motor stops before
you install or remove the battery pack.
• Read and understand the instructions in the battery and
charger manual.
1. Align the lift ribs on the battery pack with the grooves in
the battery compartment.
2. Push the battery pack into the battery compartment until
the battery pack locks into place.
3. When you hear a click, the battery pack is installed.
9.4 REMOVE THE BATTERY PACK
1. Push and hold the battery release button (18).
2. Remove the battery pack from the machine.
10 OPERATION
NOTE
Remove the battery pack and keep hands clear of the lock
out button when you move the machine.
IMPORTANT
Examine the chain tension before each use.
10.1 EXAMINE THE CHAIN OIL
NOTE
Do not use the machine without sufficient chain oil.
1. Examine the oil level of the machine from the oil
indicator.
2. Add the oil if it is necessary.
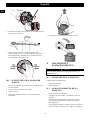
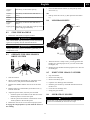
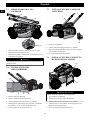
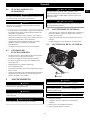
10.2 HOLD THE MACHINE
1. Hold the chainsaw with your right hand on the rear
handle and left hand on the front handle.
2. Hold the handles with the thumbs and the fingers around
them.
3. Make sure that your left hand holds the front handle and
your thumb is below the handle.
8
English
EN

10.3 START THE MACHINE
1. Press the lock-out button (4).
2. Press the trigger (5) while you hold the lock-out button.
3. Release the lock-out button.
IMPORTANT
The chain brake must be disengaged for the chain saw to
start. Activate the brake by moving the front hand guard
forwards.
10.4 STOP THE MACHINE
1. Release the trigger to stop the machine.
10.5 OPERATE THE CHAIN BRAKE
WARNING
Make sure that your hands are on the handles at all times.
1. Start the machine.
2. Push the guard forward to to engage the chain brake.
3. Pull the handle guard / chain brake backwards to
disengage the chain brake.
4. Call approved service center for repair before use if
• The chain brake does not stop the chain immediately.
• The chain brake does not stay in the disengaged
position without aid.
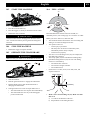
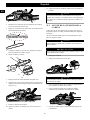
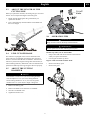
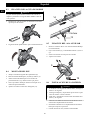
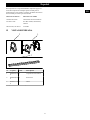
10.6 FELL A TREE
23
24
24
25
25
Recommendation that the first-time user should, as a
minimum practice, start cutting logs on a saw-horse or cradle.
Before you start to fell a tree, make sure that
• The minimum distance between the areas of bucking and
felling is two times the height of the tree.
• The operation does not
• Cause injury to personnel.
• Hit utility lines. If the tree touches utility lines,
immediately tell the utility company.
• Cause losses in property.
• The user is not in the danger area (24), for example, the
downhill side of the area.
• The escape paths (25) that extend back and diagonally
behind the felling direction (23) are clear. The felling
direction is controlled by
• The natural lean of the tree.
• The location of larger branches.
• The wind direction.
• Ensure there is no dirt, stones, loose bark, nails, and
staples on the tree.
27
28
29
2’’(50mm)
26
2’’(50mm)
1. Make a lower level notching cut (27). Make sure that
this cut is
a) 1/3 wide of the diameter of the tree.
b) Perpendicular to the felling direction.
9
English EN

CAUTION
The level notching cut helps prevent pinching of the
saw chain or the guide bar when you make the second
notch.
2. Make the felling cut no less than 2 in. (50 mm) and
higher than the level notching cut. Make sure that this
cut
a) Is parallel to the level notching cut.
b) Keeps sufficient wood to become a hinge (29) which
prevents the tree from twisting and felling in the
wrong direction.
When the felling cut (28) gets near the hinge (29), the tree
falls. Stop the felling cut if the tree
• Does not fall in the correct direction or
• Moves backwards, causing the cutting bar and chain
to become stuck in the cut.
3. Use felling wedge to open the cut and let the tree fall
in the correct direction.
4. When the tree starts to fall,
a) Remove the chainsaw from the cut.
b) Stop the machine.
c) Put the machine down.
d) Move away from the tree via the escape path (25).
Always keep watching the tree to see it's direction of
fall, be careful with overhead branches and your
footing.
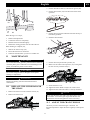
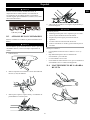
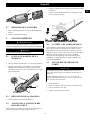
10.7 LIMB A TREE
30
31
Limbing is the removal of the branches from a fallen tree.
1. Keep the larger lower branches to hold the log off the
ground (31).
2. Remove the small limbs (30) in one cut.
3. Limb the branches with tension from the bottom to top.
4. Keep the larger lower branches as a support until the log
is limbed.
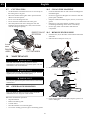
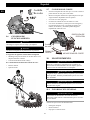
10.8 BUCK A LOG
To buck is to cut a log into lengths.
CAUTION
Do not let the chain saw touch the ground.
It is important to make sure your footing is secure and your
weight is evenly distributed. If possible, lift the log and hold
it with branches, logs or chock. Obey the instructions below:
33
32
When the log is held along the full length (32), cut it from the
top (33).
34
36
35
When the log is held on one end (34),
1. Cut the first time 1/3 of the diameter from the bottom
(35).
2. Cut the second time from the top (36) to complete the
bucking.
36
37 35
When the log is held on two ends (37),
1. Cut the first time 1/3 of the diameter from the top (36).
2. Cut the second time lower 2/3 from the bottom to
complete the bucking (35).
10
English
EN

38
39
When the log is on a slope,
1. Stand on the uphill side.
2. Control the chain saw completely.
3. Hold the chain saw handles tightly.
4. Release the cutting pressure near the end of the cut.
When bucking is complete (38),
1. Wait for the chain to stop (39).
2. Ensure the chainsaw is turned off.
3. Check for hazards before you move to another tree.
11 MAINTENANCE
CAUTION
Do not let brake fluids, gasoline, petroleum-based materials
touch the plastic parts. Chemicals can cause damage to the
plastic, and make the plastic unserviceable.
CAUTION
Do not use strong solvents or detergents on the plastic
housing or components.
WARNING
Remove the battery pack from the machine before
maintenance.
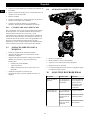
11.1 REPLACE THE GUIDE BAR AND
THE CHAIN
1. Remove the chain cover nuts with the wrench (11).
2. Remove the chain cover.
3. Put the chain drive links (21) into the bar groove (20).
4. Put the chain cutters (22) in the direction of the chain
operation.
5. Put the chain in position and make sure that the loop is
behind the guide bar.
6. Hold the chain and bar.
20
21
22
7. Put the chain loop around the sprocket (16).
8. Make sure the chain tension pin hole (19) on the guide
bar fits correctly with the bolt (17).
9. Install the chain cover.
10. Tighten the chain. Refer to Adjust the chain tension.
11. Tighten the nuts when the chain is correctly tensioned.
NOTE
If you start the chain saw with a new chain, have a test for
2-3 minutes. A new chain gets longer after the first use,
examine the tension and tighten the chain if necessary.
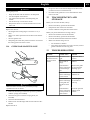
11.2 ADJUST THE CHAIN TENSION
The more you use a chain the longer it becomes. It is
therefore important to adjust the chain regularly to take up the
slack.
11
English EN

Tension the chain so that it can only just be pulled away from
the bar at its centre point.
WARNING
A slack chain may jump off and cause serious or even fatal
injury.
CAUTION
Wear protective gloves if you touch the chain, bar or areas
around the chain.
1. Stop the machine.
2. Loosen the lock nuts with the wrench.
NOTE
It is not necessary to remove the chain cover to adjust the
chain tension.
3. Turn the chain adjustment screw clockwise to increase
the chain tension.
4. Turn the chain adjustment screw counterclockwise to
decrease the chain tension.
5. When the chain is at the wanted tension, tighten the lock
nuts.
NOTE
During normal saw operation, the temperature of the chain
increases. The drive links of a correctly tensioned warm
chain will hang approximately 1/16 in. (1.58 mm) out of the
bar groove.
1/16 in. (1.58 mm)
11.3 SHARPEN THE CUTTERS
Sharpen the cutters if it is not easy for the chain to go into the
wood.
NOTE
We recommend that a service center, which has an electric
sharpener, perform important sharpening work.
1. Tensioning chain.
2. Sharpen the cutters corner with a 5/32 in. (4 mm)
diameter round file .
3. Sharpen the top plate, side plate and depth gauge with a
flat file.
4. File all the cutters to the specified angles and the same
length.
12
English
EN

NOTE
During the process,
• Keep the file flat with the surface to be sharpened.
• Use the midpoint of the file bar.
• Use light but firm pressure when sharpening the
surface.
• Lift the file away on each return stroke.
• Sharpen the cutters on one side and then move to the
other side.
Replace the chain if:
• The length of the cutting edges is less than 1/5 in. (5
mm).
• There is too much space between the drive links and the
rivets.
• The cut speed is slow
• Sharpening the chain many times but it does not increase
the cutting speed. The chain is worn.
11.4 GUIDE BAR MAINTENANCE
NOTE
Make sure that it is turned over periodically to keep
symmetrical wear on the bar.
1. Lubricate the bearings on the nose sprocket (if present)
with the syringe (not included).
2. Clean the bar groove with the scraping hook (not
included).
3. Clean the lubrication holes.
4. Remove burr from the edges and level the cutters with a
flat file.
Replace the bar if:
• the groove does not fit with the height of the drive links
(which must never touch the bottom).
• the inside of the guide bar is worn and makes the chain
lean to one side.
12 TRANSPORTATION AND
STORAGE
Before you move the machine, always
• Remove the battery pack from the machine.
• Keep hands clear of the lock-out button.
• Put the scabbard on the guide bar and the chain.
Before you put the machine into storage, always
• Remove all residual oil from the machine.
• Remove the battery pack from the machine.
• Clean all unwanted material from the machine.
• Make sure that the storage area is
• Not available to children.
• Away from agents which can cause corrosion, such as
garden chemicals and de-icing salts.
13 TROUBLESHOOTING
Problem Possible cause Solution
The guide bar and
the chain become
hot and release
smoke.
The chain is too
tight.
Adjust the chain
tension.
The oil tank is
empty.
Add oil.
Contamination
causes a blockage
of the discharge
port.
Remove the guide
bar and clean the
discharge port.
Contamination
causes a blockage
of the oil tank.
Clean the oil tank.
Add new oil.
Contamination
causes a blockage
of the guide bar
and the oil tank
cap.
Clean the guide
bar and the oil
tank cap.
Contamination
causes a blockage
of the sprocket or
guide wheels.
Clean the sprocket
and the guide
wheels.
13
English EN

Problem Possible cause Solution
The motor runs
but the chain does
not rotate.
The chain is too
tight.
Adjust the chain
tension.
The guide bar and
the chain are dam-
aged.
Replace the guide
bar and the chain
if it is necessary.
The motor is dam-
aged.
1. Remove the
battery pack
from the ma-
chine.
2. Remove the
guide bar cov-
er.
3. Remove the
bar and saw
chain.
4. Clean the ma-
chine.
5. Install battery
pack and oper-
ate the ma-
chine.
If the sprocket ro-
tates, it means the
motor works prop-
erly. If not, call
service center.
The motor runs
and the chain ro-
tates, but the chain
does not cut.
The chain is blunt. Sharpen or replace
the saw chain.
The chain is in the
incorrect direction.
Turn the chain
loop to the other
direction.
The chain is tight
or loose.
Adjust the chain
tension.
Problem Possible cause Solution
The machine does
not start. The chain brake is
engaged.
Pull the chain
brake in the direc-
tion of the user to
disengage it.
The machine and
battery are not
connected correct-
ly.
Make sure that the
battery release
button clicks when
you install the bat-
tery pack.
The battery level
is low.
Charge the battery
pack.
The lock out but-
ton and the trigger
are not pushed at
the same time.
1. Push the lock-
out button and
hold it.
2. Push the trig-
ger to start the
machine.
The battery is too
hot or too cold.
Refer to battery
and charger man-
ual.
The motor runs,
but the chain does
not cut correctly,
or the motor stops
after around 3 sec-
onds.
The machine is in
the protection
mode to protect
the PCB.
Release the trigger
and start the ma-
chine again. Do
not force the ma-
chine to cut.
The battery is not
charged.
Charge the battery.
Refer to the bat-
tery and charger
manual for correct
charging proce-
dures.
The chain is not
lubricated.
Lubricate the
chain to decrease
the friction. Do
not let the guide
bar and the chain
operate without
sufficient oil.
Incorrect battery
storage tempera-
ture
Cool the battery
pack until it de-
creases to the am-
bient temperature.
The machine has
stopped working
to protect internal
circuits.
Operating temper-
ature of the ma-
chine is too high.
Move the machine
to a cool, dry loca-
tion. Let rest for
5-10 minutes at
least. If the protec-
tion is frequent,
extend the cooling
time.
14
English
EN

14 TECHNICAL DATA
Voltage 60 V DC
No load speed 20 m/s
Guide bar length 18'' (457 mm)
Chain pitch 3/8" LP (9.5 mm)
Chain gauge .050" (1.27 mm)
Drive links 62
Chain oil capacity 230 ml
Weight (without battery
pack)
9.5 lbs (4.3 kg)
Chain 91P062X
Guide bar 180SDEA041
Battery model LB602/LB6025/LB603/
LB604/LB6041/LB605/
LB606 and other BAC ser-
ies
Charger model CAC801/CH60R00/
CH60DP01/60DPC10A and
other CAC series
15 LIMITED WARRANTY
Greenworks hereby warranties this product, to the original
purchaser with proof of purchase, for a period of four (4)
years against defects in materials, parts or workmanship.
Greenworks, at its own discretion will repair or replace any
and all parts found to be defective, through normal use, free
of charge to the customer. This warranty is valid only for
units which have been used for personal use that have not
been hired or rented for industrial/commercial use, and that
have been maintained in accordance with the instructions in
the owners’ manual supplied with the product from new.
ITEMS NOT COVERED BY WARRANTY:
1. Any part that has become inoperative due to misuse,
commercial use, abuse, neglect, accident, improper
maintenance, or alteration; or
2. The unit, if it has not been operated and/or maintained in
accordance with the owner's manual; or
3. Normal wear, except as noted below;
4. Routine maintenance items such as lubricants, blade
sharpening;
5. Normal deterioration of the exterior finish due to use or
exposure.
HELPLINE:
Warranty service is available by calling our toll-free helpline,
at 1-855-345-3934.
TRANSPORTATION CHARGES:
Transportation charges for the movement of any power
equipment unit or attachment are the responsibility of the
purchaser. It is the purchaser’s responsibility to pay
transportation charges for any part submitted for replacement
under this warranty unless such return is requested in writing
by Greenworks.
USA address:
Greenworks Tools
P.O. Box 1238
Mooresville, NC 28115
15
English EN

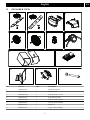
16 EXPLODED VIEW
1243
5 6 7 8
109 11
No
.
Part No. Qty Description No
.
Part No. Qty Description
1 R0201872-00 1 Bar 7 R0200896-00 1 Tensioner Kit
2 RB322041075 1 Chain 8 RB333001890 1 Wrench
3 R0200302-00 1 Sprocket Kit 9 R0200304-00 1 Sprocket Cover Assembly
4 R0200303-00 1 Oil Cap Assembly 10 R0200306-00 1 Auxiliary Handle Kit
5 R0201868-00 1 Chain Brake Kit 11 RB341182031B 1 Scabbard
6 R0200009-00 1 Chain Brake Handle
16
English
EN

1 Descripción.......................................18
1.1 Finalidad.......................................................... 18
1.2 Perspectiva general..........................................18
1.3 Lista de embalaje.............................................18
2 Advertencias generales de
seguridad para herramientas
eléctricas...........................................18
2.1 Seguridad de la zona de trabajo.......................18
2.2 Seguridad eléctrica.......................................... 18
2.3 Seguridad personal.......................................... 18
2.4 Utilización y cuidado de herramientas
eléctricas.......................................................... 19
2.5 Utilización y cuidado de herramientas a
batería.............................................................. 19
2.6 Servicio............................................................19
3 Advertencias de seguridad para
motosierras.......................................19
4 Prevención del retroceso del
operario............................................ 20
5 Símbolos en el producto..................20
6 Niveles de riesgo.............................. 21
7 Eliminación de batería segura
para el medio ambiente...................21
8 Propuesta 65.....................................22
9 Instalación........................................22
9.1 Desembalaje de la máquina............................. 22
9.2 Adición de aceite para barras y cadenas..........22
9.3 Instalación de la batería................................... 22
9.4 Retirada de la batería....................................... 23
10 Funcionamiento...............................23
10.1 Examen del aceite de la cadena....................... 23
10.2 Sujeción de la máquina....................................23
10.3 Puesta en marcha de la máquina......................23
10.4 Detención de la máquina................................. 23
10.5 Accionamiento del freno de la cadena.............23
10.6 Tala de un árbol............................................... 24
10.7 Desramado de un árbol....................................24
10.8 Tronzado de un tronco..................................... 24
11 Mantenimiento.................................25
11.1 Sustitución de la barra de guía y la cadena......25
11.2 Ajuste de la tensión de la cadena.....................26
11.3 Afilado de los cortadores.................................27
11.4 Mantenimiento de la barra de guía.................. 27
12 Transporte y almacenamiento........28
13 Solución de problemas.................... 28
14 Datos técnicos.................................. 30
15 Garantía limitada............................30
16 Vista despiezada.............................. 31
17
Español
ES

1 DESCRIPCIÓN
1.1 FINALIDAD
Esta motosierra se ha diseñado para cortar ramas, troncos,
leños y vigas de un diámetro determinado por la longitud de
corte de la barra de guía. Se ha diseñado únicamente para
cortar madera.
Para su uso únicamente en una aplicación doméstica en
exteriores por adultos.
No utilice la motosierra para ningún fin que no se haya
indicado anteriormente.
Esta motosierra no debe utilizarse para servicios
profesionales de tala de árboles. No debe ser utilizada por
niños o personas que no lleven ropa y equipos adecuados de
protección personal.
1.2 PERSPECTIVA GENERAL
1Vaina
2Freno de cadena
3Asa delantera
4Botón de desbloqueo
5Gatillo
6Tapa de aceite
7Ventanilla del aceite
8Dientes
9Cadena
10 Barra de guía
11 Llave
12 Asa posterior
13 Tornillo de tensado
de cadena
14 Cubierta de cadena
15 Tuercas de cubierta
de cadena
1.3 LISTA DE EMBALAJE
1Motosierra
2Vaina
3Manual
4Llave
2 ADVERTENCIAS GENERALES
DE SEGURIDAD PARA
HERRAMIENTAS
ELÉCTRICAS
AVISO
Lea todas las advertencias de seguridad y todas las
instrucciones. El incumplimiento de las advertencias e
instrucciones puede provocar descargas eléctricas,
incendios o lesiones graves.
Guarde todas las advertencias e instrucciones para su
consulta posterior.
El término “herramienta eléctrica” empleado en las
advertencias se refiere a su herramienta eléctrica con
funcionamiento a batería (inalámbrica).
2.1 SEGURIDAD DE LA ZONA DE
TRABAJO
•Mantenga limpia y bien iluminada la zona de trabajo.
Las zonas desordenadas u oscuras fomentan los
accidentes.
•No utilice herramientas eléctricas en atmósferas
explosivas, como en la presencia de líquidos, gases o
polvo que puedan inflamarse. Las herramientas
eléctricas generan chispas que pueden encender el polvo
o los gases.
•Mantenga alejados a los niños y los transeúntes
mientras utilice una herramienta eléctrica. Las
distracciones pueden hacer que pierda el control.
2.2 SEGURIDAD ELÉCTRICA
•No exponga las herramientas eléctricas a la lluvia ni a
condiciones de humedad.Si penetra agua en una
herramienta eléctrica, aumentará el riesgo de descarga
eléctrica.
2.3 SEGURIDAD PERSONAL
•Manténgase alerta, observe lo que está haciendo y
emplee el sentido común cuando utilice una
herramienta eléctrica. No utilice una herramienta
eléctrica mientras esté cansado o bajo la influencia de
drogas, alcohol o medicamentos. Una falta de atención
durante el uso de herramientas eléctricas puede provocar
lesiones personales graves.
•Utilice protección personal. Lleve siempre protección
ocular. Si se utilizan correctamente productos de
protección como máscaras antipolvo, zapatos de
seguridad antideslizantes, cascos o protecciones
auditivas, se reducirán las lesiones personales.
•Evite el arranque accidental. Asegúrese de que el
interruptor esté en la posición de apagado antes de
conectar a la fuente de alimentación o a la batería y al
coger o transportar la herramienta. El transporte de
herramientas eléctricas con el dedo en el interruptor o la
18
Español
ES

conexión de herramientas eléctricas que tienen el
interruptor activado fomenta los accidentes.
•Retire cualquier llave de ajuste antes de encender la
herramienta eléctrica. Una llave que se quede fijada a
una pieza giratoria de la herramienta eléctrica puede
provocar lesiones personales.
•No se estire. Mantenga en todo momento una postura
adecuada y el equilibrio. Esto permite un mejor control
de la herramienta eléctrica en situaciones inesperadas.
•Lleve indumentaria adecuada. No lleve ropa o joyas
sueltas. Mantenga el cabello, la ropa y los guantes
lejos de las piezas móviles. La ropa suelta, las joyas o el
cabello largo pueden quedar atrapados en las piezas
móviles.
•Si se utilizan dispositivos para la conexión de sistemas
de extracción y recogida de polvo, asegúrese de que
estén conectados y se utilicen correctamente. La
utilización de sistemas de recogida de polvo puede
reducir los riesgos relacionados con el polvo.
•No permita que la familiaridad adquirida con el uso
frecuente de las herramientas le permita ser confiado
e ignorar los principios de seguridad de las
herramientas. Una acción descuidada puede provocar
lesiones graves en una fracción de segundo.
2.4 UTILIZACIÓN Y CUIDADO DE
HERRAMIENTAS ELÉCTRICAS
•No fuerce la herramienta eléctrica. Utilice la
herramienta eléctrica correcta para su aplicación. La
herramienta eléctrica correcta hará el trabajo mejor y
con mayor seguridad a la velocidad para la que se
diseñó.
•No utilice la herramienta eléctrica si el interruptor no
la enciende y la apaga. Cualquier herramienta eléctrica
que no pueda controlarse con el interruptor es peligrosa
y debe repararse.
•Desconecte el enchufe de la fuente de alimentación o la
batería de la herramienta eléctrica antes de realizar
ajustes, cambiar accesorios o almacenar herramientas
eléctricas. Estas medidas de seguridad preventivas
reducen el riesgo de que la herramienta eléctrica se
arranque accidentalmente.
•Almacene las herramientas eléctricas inactivas fuera
del alcance de los niños y no permita que personas que
no estén familiarizadas con la herramienta eléctrica o
estas instrucciones puedan utilizarla. Las herramientas
eléctricas son peligrosas en manos de usuarios
inexpertos.
•Realice el mantenimiento de las herramientas
eléctricas. Compruebe si hay desalineación o unión de
las piezas móviles, rotura de piezas y cualquier otra
condición que pueda afectar al funcionamiento de la
herramienta eléctrica. Si ha sufrido daños, lleve a
reparar la herramienta eléctrica antes del uso.
Numerosos accidentes se deben a herramientas eléctricas
mal mantenidas.
•Mantenga limpias y afiladas las herramientas de
corte. Las herramientas de corte mantenidas
correctamente con filos cortantes tienen menos
probabilidades de atascarse y son más fáciles de
controlar.
•Utilice la herramienta eléctrica, los accesorios, las
brocas, etc. de acuerdo con estas instrucciones,
teniendo en cuenta las condiciones de trabajo y el
trabajo a realizar. El uso de la herramienta eléctrica
para operaciones distintas de las previstas podría dar
lugar a una situación peligrosa.
2.5 UTILIZACIÓN Y CUIDADO DE
HERRAMIENTAS A BATERÍA
•Recargue solo con el cargador especificado por el
fabricante. Un cargador adecuado para un tipo de
batería puede dar lugar a un riesgo de incendio cuando
se usa con otra batería.
•Utilice las herramientas eléctricas únicamente con las
baterías designadas específicamente. El uso de
cualquier otra batería puede dar lugar a un riesgo de
lesiones e incendio.
•Cuando la batería no esté en uso, manténgala alejada
de otros objetos metálicos como clips, monedas, llaves,
clavos, tornillos u otros objetos metálicos pequeños
que puedan hacer una conexión entre los terminales.
El cortocircuito de los terminales de la batería puede
provocar quemaduras o incendios.
•Bajo condiciones abusivas, es posible que salga líquido
despedido de la batería; evite el contacto. Si se
produce un contacto accidental, aclare con abundante
agua y jabón. Si el líquido entra en contacto con los
ojos, acuda al médico inmediatamente. El líquido
despedido de la batería puede provocar irritación o
quemaduras.
2.6 SERVICIO
•Solicite a un técnico de reparación cualificado que
realice las tareas de servicio de su herramienta
eléctrica utilizando únicamente piezas de repuesto
idénticas. Esto garantizará el mantenimiento de la
seguridad de la herramienta eléctrica.
3 ADVERTENCIAS DE
SEGURIDAD PARA
MOTOSIERRAS
•Mantenga todas las partes del cuerpo alejadas de la
cadena de la sierra cuando la motosierra esté
funcionando. Antes de arrancar la motosierra,
asegúrese de que la cadena de la sierra no esté en
contacto con nada. Un momento de falta de atención
mientras utiliza la motosierra puede hacer que su ropa o
su cuerpo se enreden con la cadena de la sierra.
•Sujete siempre la motosierra con la mano derecha en
el asa posterior y la mano izquierda en el asa
delantera. Si invierte las posiciones de las manos para
19
Español
ES

sujetar la motosierra, aumenta el riesgo de lesiones
personales. Esto no debe hacerse nunca.
•Sujete la herramienta eléctrica solo por las superficies
de agarre aisladas, ya que la cadena de la sierra puede
entrar en contacto con cableado oculto o con su propio
cable. Si la cadena de la sierra entra en contacto con un
cable "con corriente", esto puede hacer que las piezas
metálicas expuestas de la herramienta eléctrica "tengan
corriente" y podrían producir una descarga eléctrica al
operario.
•Lleve gafas de seguridad y protección auditiva. Se
recomienda el uso de productos adicionales de
protección para la cabeza, las manos, las piernas y los
pies. Una indumentaria protectora adecuada reducirá las
lesiones personales debidas a residuos que salen
despedidos o al contacto accidental con la cadena de la
sierra.
•No utilice una motosierra subido a un árbol. La
utilización de una motosierra mientras está subido a un
árbol puede producir lesiones personales.
•Mantenga siempre una postura adecuada y utilice la
motosierra solo cuando se encuentre sobre una
superficie fija, segura y nivelada. Las superficies
resbaladizas o inestables, como las escaleras, pueden
provocar la pérdida del equilibrio o el control de la
motosierra.
•Cuando corte una rama que esté bajo tensión, esté
alerta a la retracción. Cuando se libera la tensión en la
madera, la rama bajo tensión puede golpear al operario
o hacer que pierda el control de la motosierra.
•Tenga mucho cuidado al cortar maleza y árboles
jóvenes. El material delgado puede quedar atrapado en
la cadena de la sierra y ser azotado hacia usted o hacerle
perder el equilibrio.
•Transporte la motosierra por el asa delantera con la
motosierra apagada y alejada de su cuerpo. Cuando
transporte o almacene la motosierra, coloque siempre
la cubierta de la barra de guía. El manejo adecuado de
la motosierra reducirá la posibilidad de contacto
accidental con la cadena de la sierra en movimiento.
•Siga las instrucciones para lubricar, tensar la cadena y
cambiar accesorios. Una cadena lubricada o tensada
incorrectamente puede romperse o aumentar la
posibilidad de retroceso.
•Mantenga las asas secas, limpias y sin restos de aceite
y grasa. Las asas grasientas son resbaladizas y pueden
hacer que pierda el control.
•Corte únicamente madera. No utilice la motosierra
para fines distintos al previsto. Por ejemplo: no utilice
la motosierra para cortar plástico, mampostería o
materiales de construcción que no sean madera. El uso
de la motosierra para operaciones distintas de las
previstas podría dar lugar a una situación peligrosa.
4 PREVENCIÓN DEL
RETROCESO DEL OPERARIO
Puede producirse retroceso cuando el extremo o la punta de la
barra de guía toca un objeto, o cuando la madera se cierra y
pellizca la cadena de la sierra en el corte.
El contacto con la punta en algunos casos puede provocar una
reacción inversa repentina, que levanta la barra de guía y la
empuja atrás hacia el operario.
Si se pellizca la cadena de la sierra a lo largo de la parte
superior de la barra de guía, la barra de guía puede ser
empujada rápidamente atrás hacia el operario.
Cualquiera de estas reacciones puede hacer que pierda el
control de la sierra, lo que podría provocar lesiones
personales graves. No confíe exclusivamente en los
dispositivos de seguridad incorporados en su sierra. Como
usuario de la motosierra, debe tomar diversas medidas para
realizar sus trabajos de corte sin accidentes ni lesiones.
El retroceso es el resultado de un uso incorrecto de la
herramienta o de procedimientos o condiciones de
funcionamiento incorrectos y puede evitarse tomando las
precauciones adecuadas que se indican a continuación:
•Mantenga un agarre firme, con los pulgares y los
dedos rodeando las asas de la motosierra, con ambas
manos en la sierra y el cuerpo y el brazo colocados
para permitirle resistir las fuerzas de retroceso.
Las fuerzas de retroceso pueden ser controladas por el
operario, si se toman las precauciones adecuadas. No
suelte la motosierra.
•No se estire y no corte por encima de la altura del
hombro. Esto ayuda a evitar el contacto accidental con la
punta y permite un mejor control de la motosierra en
situaciones inesperadas.
•Utilice únicamente barras y cadenas de repuesto
especificadas por el fabricante. Las barras y cadenas de
repuesto incorrectas pueden provocar la rotura de la
cadena o retroceso.
•Siga las instrucciones de afilado y mantenimiento del
fabricante para la cadena de la sierra. Si disminuye la
altura del calibrador de profundidad, puede aumentar el
retroceso.
5 SÍMBOLOS EN EL PRODUCTO
En el producto pueden utilizarse algunos de los siguientes
símbolos. Le rogamos que los estudie y aprenda su
significado. La interpretación correcta de estos símbolos le
permitirá manejar el producto mejor y de manera más segura.
Símbolo Explicación
Tipo de corriente directa o caracterís-
tica de corriente.
Precauciones que afectan a su seguri-
dad.
20
Español
ES
Page is loading ...
Page is loading ...
Page is loading ...
Page is loading ...
Page is loading ...
Page is loading ...
Page is loading ...
Page is loading ...
Page is loading ...
Page is loading ...
Page is loading ...
Page is loading ...
Page is loading ...
Page is loading ...
Page is loading ...
Page is loading ...
Page is loading ...
Page is loading ...
Page is loading ...
Page is loading ...
Page is loading ...
Page is loading ...
Page is loading ...
Page is loading ...
Page is loading ...
Page is loading ...
Page is loading ...
Page is loading ...
Page is loading ...
Page is loading ...
Page is loading ...
Page is loading ...
Page is loading ...
Page is loading ...
Page is loading ...
Page is loading ...
Page is loading ...
Page is loading ...
Page is loading ...
Page is loading ...
Page is loading ...
Page is loading ...
Page is loading ...
Page is loading ...
Page is loading ...
Page is loading ...
Page is loading ...
Page is loading ...
Page is loading ...
Page is loading ...
Page is loading ...
Page is loading ...
Page is loading ...
Page is loading ...
Page is loading ...
Page is loading ...
Page is loading ...
Page is loading ...
Page is loading ...
Page is loading ...
Page is loading ...
Page is loading ...
Page is loading ...
Page is loading ...
Page is loading ...
Page is loading ...
Page is loading ...
Page is loading ...
Page is loading ...
Page is loading ...
Page is loading ...
Page is loading ...
Page is loading ...
Page is loading ...
Page is loading ...
Page is loading ...
Page is loading ...
Page is loading ...
Page is loading ...
Page is loading ...
Page is loading ...
Page is loading ...
Page is loading ...
Page is loading ...
Page is loading ...
Page is loading ...
Page is loading ...
Page is loading ...
Page is loading ...
Page is loading ...
Page is loading ...
Page is loading ...
Page is loading ...
Page is loading ...
Page is loading ...
Page is loading ...
Page is loading ...
Page is loading ...
Page is loading ...
Page is loading ...
Page is loading ...
Page is loading ...
Page is loading ...
Page is loading ...
Page is loading ...
Page is loading ...
Page is loading ...
Page is loading ...
Page is loading ...
Page is loading ...
Page is loading ...
Page is loading ...
-
 1
1
-
 2
2
-
 3
3
-
 4
4
-
 5
5
-
 6
6
-
 7
7
-
 8
8
-
 9
9
-
 10
10
-
 11
11
-
 12
12
-
 13
13
-
 14
14
-
 15
15
-
 16
16
-
 17
17
-
 18
18
-
 19
19
-
 20
20
-
 21
21
-
 22
22
-
 23
23
-
 24
24
-
 25
25
-
 26
26
-
 27
27
-
 28
28
-
 29
29
-
 30
30
-
 31
31
-
 32
32
-
 33
33
-
 34
34
-
 35
35
-
 36
36
-
 37
37
-
 38
38
-
 39
39
-
 40
40
-
 41
41
-
 42
42
-
 43
43
-
 44
44
-
 45
45
-
 46
46
-
 47
47
-
 48
48
-
 49
49
-
 50
50
-
 51
51
-
 52
52
-
 53
53
-
 54
54
-
 55
55
-
 56
56
-
 57
57
-
 58
58
-
 59
59
-
 60
60
-
 61
61
-
 62
62
-
 63
63
-
 64
64
-
 65
65
-
 66
66
-
 67
67
-
 68
68
-
 69
69
-
 70
70
-
 71
71
-
 72
72
-
 73
73
-
 74
74
-
 75
75
-
 76
76
-
 77
77
-
 78
78
-
 79
79
-
 80
80
-
 81
81
-
 82
82
-
 83
83
-
 84
84
-
 85
85
-
 86
86
-
 87
87
-
 88
88
-
 89
89
-
 90
90
-
 91
91
-
 92
92
-
 93
93
-
 94
94
-
 95
95
-
 96
96
-
 97
97
-
 98
98
-
 99
99
-
 100
100
-
 101
101
-
 102
102
-
 103
103
-
 104
104
-
 105
105
-
 106
106
-
 107
107
-
 108
108
-
 109
109
-
 110
110
-
 111
111
-
 112
112
-
 113
113
-
 114
114
-
 115
115
-
 116
116
-
 117
117
-
 118
118
-
 119
119
-
 120
120
-
 121
121
-
 122
122
-
 123
123
-
 124
124
-
 125
125
-
 126
126
-
 127
127
-
 128
128
-
 129
129
-
 130
130
-
 131
131
-
 132
132


Greenworks CS60L03 60V Cordless 18 Inch Chainsaw User manual
- Category
- Lawnmowers
- Type
- User manual
Ask a question and I''ll find the answer in the document
Finding information in a document is now easier with AI